Many designers encounter a common question when they first try GPT-Image-2: When I upload a photo and ask it to "change the person's clothes to blue," is the AI precisely modifying pixels like Photoshop, or is it secretly redrawing the entire image? The answer to this question directly affects how we use AI image editing tools and how we interpret the predictability of the output.
In fact, this is a widely misunderstood technical detail. This article starts with the AI image editing principles, dives deep into the working mechanisms of next-generation autoregressive image models like GPT-Image-2 and Nano Banana, answers the core question of "local modification vs. full redrawing," and reveals how they maintain stunning visual consistency while redrawing the entire image.
| Core Question | Intuitive Answer | Real Answer |
|---|---|---|
| Editing Method | PS-style local overlay | Full-image token redrawing |
| Consistency Source | Retaining unmodified pixels | Self-attention anchoring original image features |
| Mainstream Architecture | Diffusion denoising | Autoregressive Transformer |
| Multi-round Editing | Prone to cumulative artifacts | GPT-Image-2 has no obvious drift |
Once you understand this principle, you'll find that your approach to writing prompts, using masks, and strategies for passing reference images will have a new theoretical basis. We recommend that readers test this out while reading by using the GPT-Image-2 API on the APIYI (apiyi.com) platform to see how the theory translates into actual results.
AI Image Editing Principles: Not PS Local Modification, but Intelligent Redrawing
Many users, based on their experience with the ChatGPT web interface, naturally assume that AI image editing is like Photoshop's "local modification": the system identifies the area you want to change, overlays a few pixels on the original image, and leaves the rest untouched. This mental model is intuitive, but completely wrong.
All mainstream AI image editing models are essentially based on a "redrawing" logic. Whether it's GPT-Image-2, Nano Banana, or the Stable Diffusion series, they all need to first encode the original image into some internal representation (tokens or latent space), then have the model "imagine" the complete internal representation of the new image, and finally decode it back into pixels. There is no step that involves "drawing on the original image."
This is why sometimes you might ask the AI to change the color of just one eye, only to find that the hair strands and background textures have also changed slightly. The model isn't being lazy; it really is "redrawing" the entire image, it's just that it draws most areas to be extremely close to the original.
So the question arises: since it's a redraw, why do images edited by GPT-Image-2 look so consistent with the original, even allowing for multiple rounds of editing without "drifting"? The answer lies in its architecture. If you want to verify this behavior firsthand, you can call the /v1/images/edits endpoint for gpt-image-2 on APIYI (apiyi.com), repeatedly edit the same image with the same prompt, and observe the changes in detail.
The Essential Difference Between PS Local Modification and AI Redrawing
| Comparison Dimension | Photoshop Local Modification | GPT-Image-2 Intelligent Redrawing |
|---|---|---|
| Operation Unit | Pixels | Visual tokens (8×8 or 16×16 pixel blocks) |
| Unedited Areas | Physically unchanged | Theoretically undergo minor reconstruction via encoding-decoding |
| Consistency Guarantee | 100% (direct copy of original pixels) | Guaranteed by the model's attention mechanism |
| Semantic Understanding | None, only pixel values | Understands semantics like "clothes," "background," "lighting" |
| Boundary Transition | Requires manual feathering | Automatically transitions naturally based on semantics |
PS is a "mechanical modification" based on pixels, while AI is an "understanding-then-drawing" process based on semantics. This is why AI can accomplish overall edits that PS never could, such as "changing daytime to dusk"—it modifies the semantic representation of the image, not just the RGB values of the pixels.
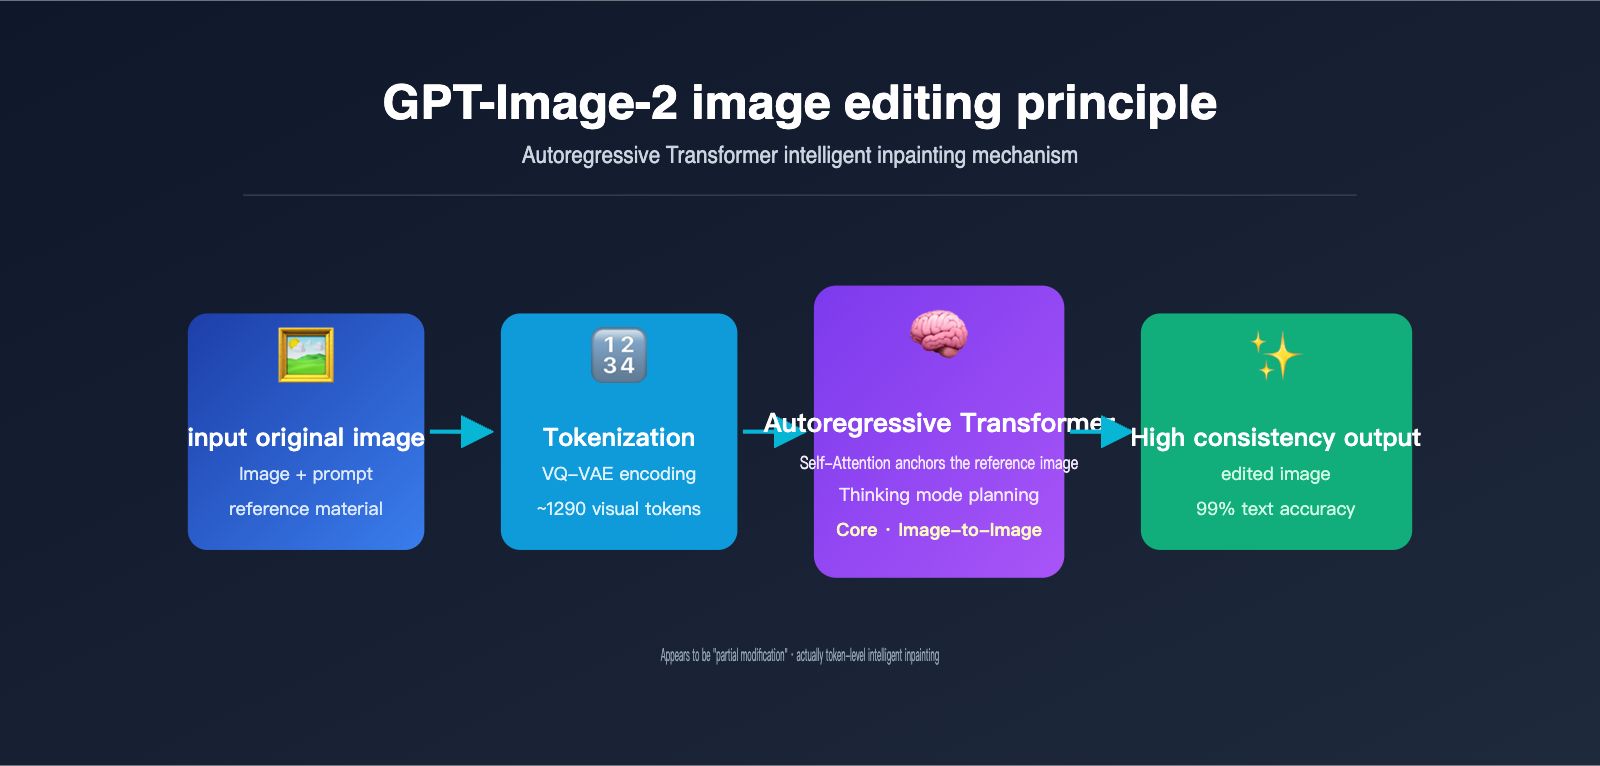
The Editing Principle of gpt-image-2: How Autoregressive Transformers "Understand" the Original Image
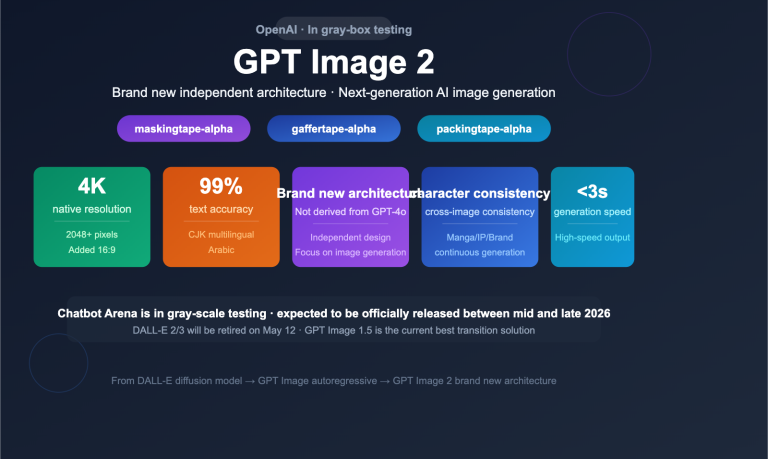
To truly understand the gpt-image-2 editing principle, you can't ignore a key architectural choice OpenAI made when releasing this model on April 21, 2026: abandoning the diffusion models used in the DALL-E series in favor of an autoregressive Transformer. This decision was directly inspired by the multimodal architecture of GPT-4o.
Autoregressive generation is essentially the same mechanism ChatGPT uses to write articles—predicting the next token. The difference is that the "tokens" here aren't words, but visual tokens. The model performs the following steps:
- Image Tokenization: Using a discretization mechanism similar to VQ-VAE, the image is broken down into approximately 1024–1290 visual tokens, with each token roughly corresponding to an 8×8 or 16×16 pixel block of the original image.
- Sequence Concatenation: The user's text prompt tokens and the original image's visual tokens are concatenated into a long sequence and fed into a unified Transformer.
- Token-by-Token Generation: The model predicts each visual token of the output image one by one from left to right (or in raster scan order). Every time a new token is generated, it can "see" all previous inputs and already generated content.
- Decoding to Pixels: Once all visual tokens are generated, they are passed through a decoder to reconstruct the final pixel-based image.
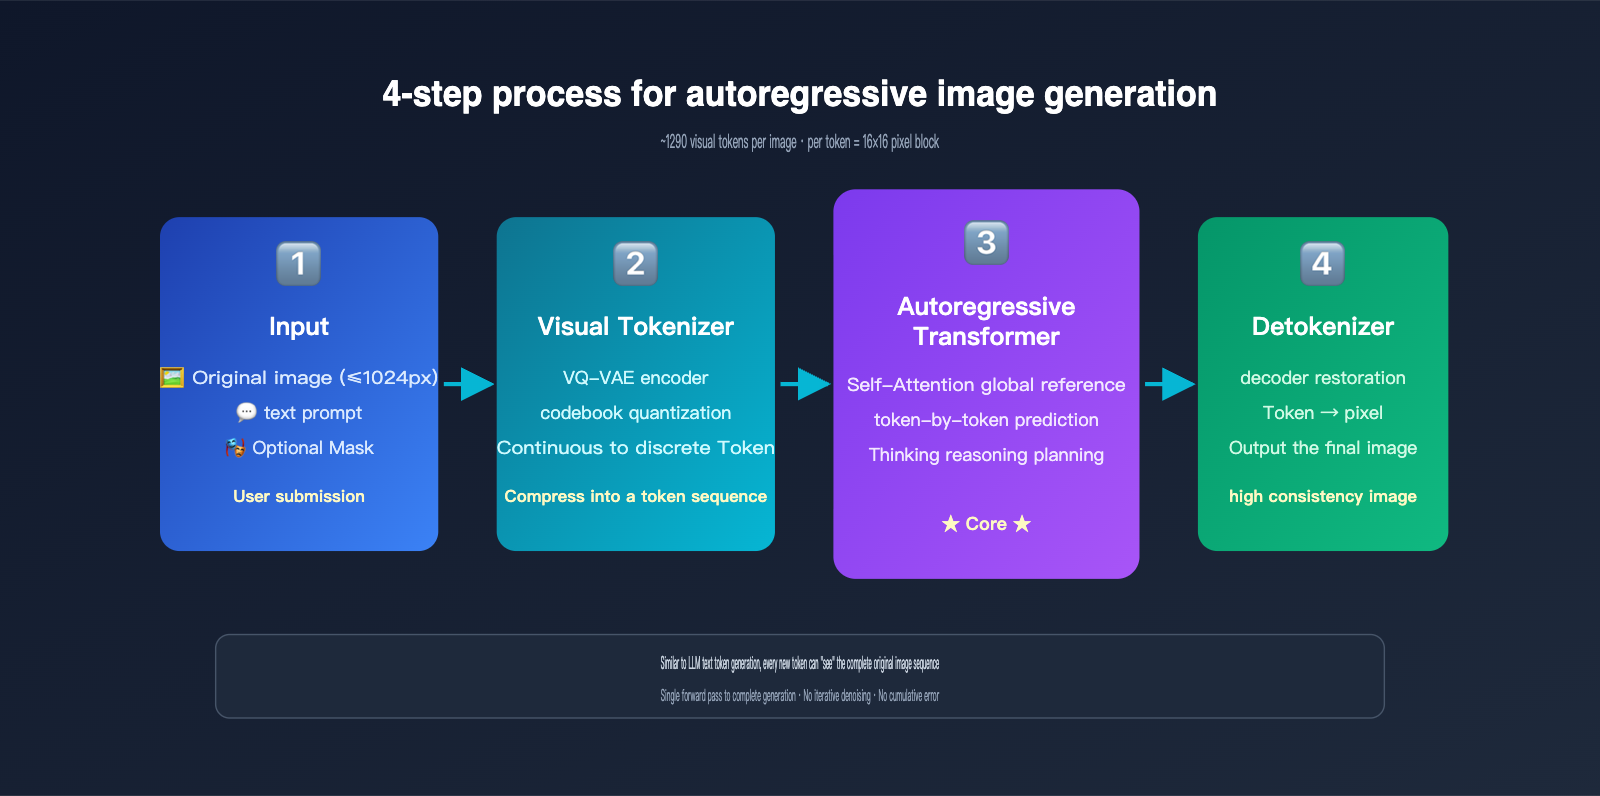
The key insight here is: When GPT-Image-2 generates a new image, all tokens from the original image are within its "field of view." This is exactly the same principle as when you chat with ChatGPT, and it can see all previous messages. The Self-Attention mechanism allows every newly generated token to "reference" features from any position in the original image.
OpenAI has also introduced a "Thinking mode" in GPT-Image-2, allowing the model to perform internal reasoning before it starts generating visual tokens—figuring out what the user wants to change, which parts to keep, and how to arrange the spatial layout. This further improves the execution accuracy of complex editing instructions, achieving 99% text accuracy and precise multi-object layout. If you need to test these capabilities in a production environment, you can access gpt-image-2 via APIYI (apiyi.com), which provides consistent official interface specifications and easy model switching.
Visual Tokenizer: Balancing Compression and Information Retention
The visual tokenizer is the key bottleneck of the entire autoregressive image generation system. It needs to balance two goals:
- High Compression Rate: The fewer the tokens, the faster the Transformer processes, and the lower the cost.
- High Reconstruction Quality: The decoded pixels should restore the original image as much as possible without losing detail.
The mainstream approach is VQ-VAE (Vector Quantized Variational Autoencoder): an encoder compresses image regions into a continuous vector, which is then mapped to the closest codebook index; this index is the token. A 1024×1024 image is typically compressed into about 1024 tokens, resulting in extremely high information density.
Because this compression is inherently lossy, no AI editing tool can "100% preserve the pixel values of unmodified areas." This leads to the next critical issue—consistency.
The Core Mechanism of AI Image Consistency: Visual Tokenization and Attention Anchoring
Since GPT-Image-2 redraws the entire image, how is AI image consistency achieved? Why don't your facial features, skin tone, or hairstyle change into someone else's when you edit a portrait? There are four layers to the answer.
Layer 1: The high abstraction of visual tokens. Once a face passes through the tokenizer, the resulting token sequence has already encoded the core features of "that person"—face shape, facial proportions, skin tone, etc. As long as these "identity tokens" are largely preserved when generating the new image, the person won't change.
Layer 2: Global reference via Self-Attention. When generating each new token, the autoregressive Transformer calculates its attention weights against all input tokens (including the original image tokens). If the user hasn't specified a change for a region corresponding to a new token, the model assigns high weight to the corresponding token from the original image, effectively "copying" it.
Layer 3: Inductive bias from training data. OpenAI trained GPT-Image-2 using a massive amount of "original image-edited image" pairs. The model learned an implicit rule during training: unless the prompt explicitly requests a change, try to keep other areas unchanged. This bias is solidified in the weights and naturally takes effect during inference.
Layer 4: Explicit planning via Thinking mode. GPT-Image-2 uses internal reasoning to figure out "which areas need to be changed and which should be kept" before generating, essentially creating a "retention list" for itself before it starts.

Comparison of the Four Layers of Consistency Protection
| Mechanism Layer | Scope | Failure Scenario |
|---|---|---|
| Token Abstraction | Global identity features | Face too far away, leading to insufficient tokens |
| Self-Attention | Local detail anchoring | Semantic conflict between prompt and original image |
| Training Bias | Default retention of unmentioned areas | Prompt is too aggressive |
| Thinking Planning | Complex editing instructions | Requires multiple trial-and-error iterations |
Understanding these four layers of protection will help you write more precise prompts to avoid "drift." For example, instead of saying "redraw this person's clothes," try "keep the person's identity unchanged, only change the color of the clothes from white to blue." When we tested GPT-Image-2 on APIYI (apiyi.com), we found that adding explicit constraints like "keep other elements unchanged" allows the Thinking mode to be more effective.
Mask Mode: Making Redrawing "Pretend" to be a Local Edit
If you want a more deterministic "local modification" experience, GPT-Image-2 provides a mask parameter for the /v1/images/edits endpoint. You can pass a binarized mask image: white areas allow AI generation, while black areas must retain the original image.
However, it's important to emphasize that mask mode does not change the essence of redrawing. Its role is to add a hard constraint when generating tokens: tokens corresponding to the black areas must be exactly equal to the original image tokens. This is a form of "constrained generation" within the autoregressive framework, rather than a Photoshop-style pixel overlay.
Diffusion Models vs. Autoregressive Image Generation: A Comparison of Implementation Principles
To fully grasp the advantages of GPT-Image-2, we need to systematically compare it with the previous generation of diffusion models (Stable Diffusion, DALL-E 3, Midjourney). These two systems differ fundamentally in their AI image editing principles.
The workflow of a diffusion model starts with a pure noise image, which undergoes dozens of iterative denoising steps to gradually reveal the final image. When editing, it compresses the original image into a latent space, adds partial noise to the latents, and then uses a prompt to guide the denoising process, finally decoding it back into pixels. In inpainting mode, it resets the latents outside the mask to the original image's latents at every denoising step, effectively "locking" the unedited areas.
The workflow of an autoregressive model is completely different: it encodes the image into tokens and then predicts the output token-by-token, much like writing an article. There is no iterative denoising, no latent noise, and the generation is completed in a single pass.
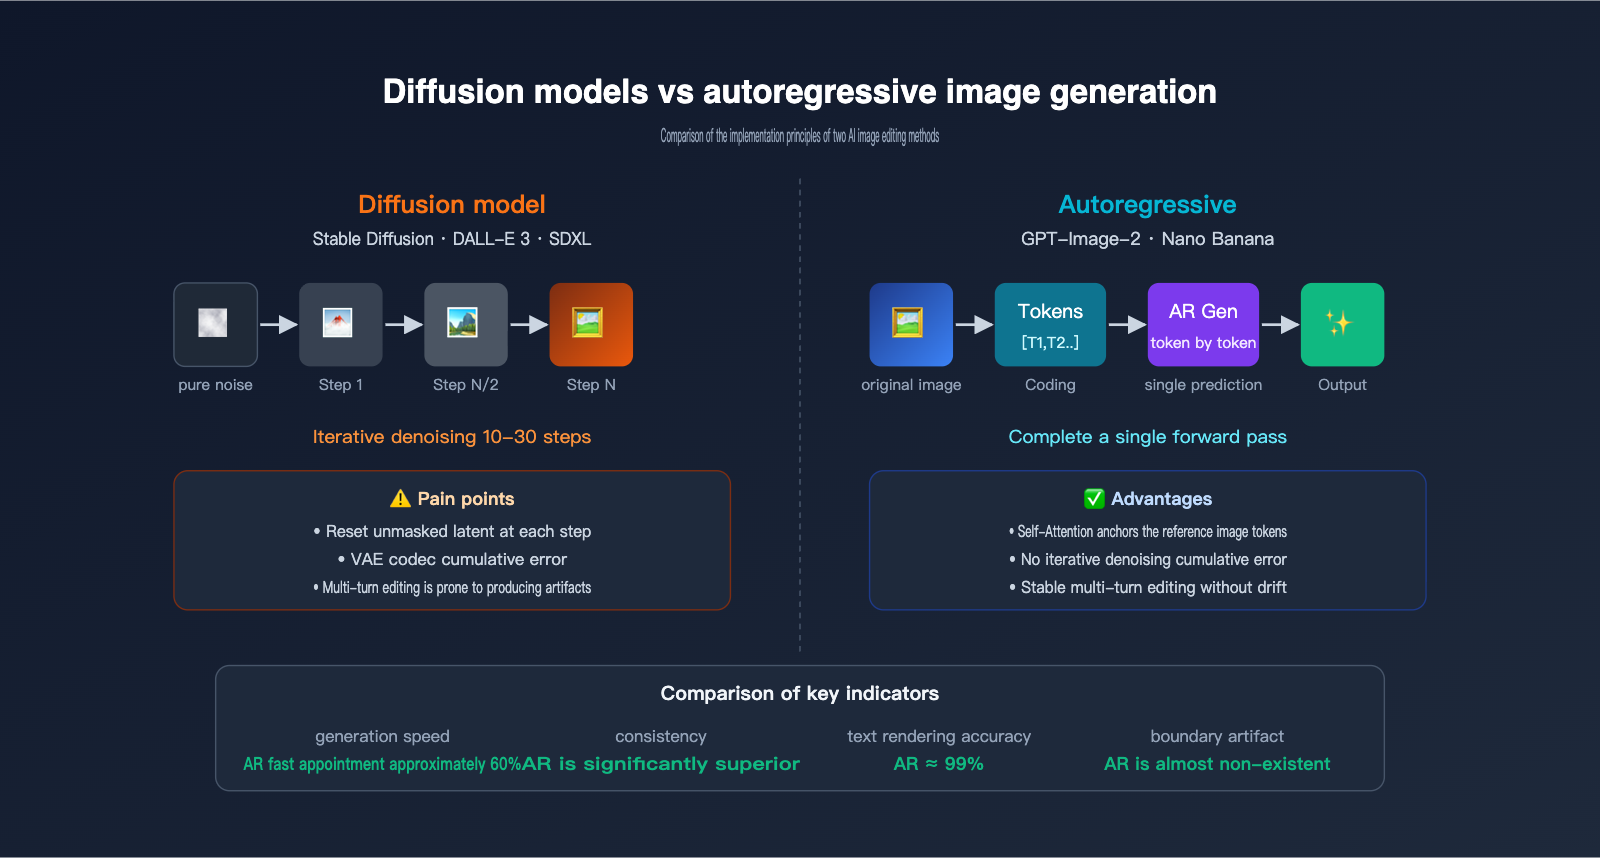
The performance differences between these two paradigms in image editing scenarios are significant, as shown in the table below:
| Comparison Item | Diffusion Models (SD/DALL-E 3) | Autoregressive Models (GPT-Image-2/Nano Banana) |
|---|---|---|
| Generation Method | Multi-step denoising iteration | Single-pass token sequence prediction |
| Mask Implementation | Reset unmasked latents at each step | Token-level hard constraints |
| Boundary Handling | Prone to latent stitching artifacts | Natural transition (semantic level) |
| Text Rendering | Frequently fails | ~99% accuracy |
| Multi-round Editing | Cumulative re-encoding loss | Almost no drift |
| Complex Instructions | Difficult to layout precisely | Supports 100+ object layouts |
| Speed | Usually 10-30 seconds | ~60% faster than diffusion |
| Long Text Rendering | Difficult | Any language/script |
The core pain point of diffusion models lies in the re-encoding loss of VAE codec—even if the unmasked area is theoretically "locked," the back-and-forth conversion between latents and pixels introduces subtle color shifts. After multiple edits, these losses accumulate into visible artifacts. GPT-Image-2 bypasses this issue using an autoregressive architecture, where token decoding occurs only once.
However, autoregressive models aren't without their costs. Their generation cost is higher, primarily because the number of tokens is large and each token requires a full Transformer forward pass. We recommend using GPT-Image-2 (accessible via APIYI at apiyi.com) for scenarios that demand extreme consistency and high-quality text rendering, while keeping the Stable Diffusion series as a supplement for cost-sensitive, high-concurrency scenarios.
Practical Guide to GPT-Image-2 Editing: API Invocation and Consistency Optimization
Now that we've covered the GPT-Image-2 editing principles, let's look at how to put this mechanism to work. Below is a minimal, runnable example showing how to call the GPT-Image-2 editing interface using an APIYI-compatible endpoint:
from openai import OpenAI

client = OpenAI(
    api_key="your-apiyi-key",
    base_url="https://vip.apiyi.com/v1"
)

with open("portrait.png", "rb") as image_file:
    response = client.images.edit(
        model="gpt-image-2",
        image=image_file,
        prompt="Keep the character's identity and background unchanged, only change the shirt color from white to dark blue",
        size="1024x1024",
        quality="high"
    )

print(response.data[0].url)
Note the prompt structure: explicitly state what to keep and what to modify. This directly triggers GPT-Image-2's Thinking mode to plan the generation as you expect. If you need precise regional editing, you can add the mask parameter:
response = client.images.edit(
    model="gpt-image-2",
    image=open("portrait.png", "rb"),
    mask=open("mask.png", "rb"),
    prompt="Change the white shirt to a dark blue suit",
    size="1024x1024"
)
The mask is a PNG of the same dimensions; the white area is the allowed modification range, while the black area forces the model to retain the original tokens.
5 Practical Tips for Consistency Optimization
For real-world debugging of AI image consistency, we've summarized five tips based on actual testing:
- Explicitly state "what to keep" in the prompt: Don't just say "change X"; say "keep Y unchanged, and change X."
- Use moderate reference image resolution: OpenAI recommends that the long side of the reference image should not exceed 1024px; larger sizes can actually dilute token attention.
- Use the same base image for multi-round editing: Don't use the result of the previous edit as the input for the next; instead, perform different dimensions of editing based on the original image and combine the prompts at the end.
- Break down instructions for complex scenes: Split "change the character to a Japanese style with a sunset background" into two steps, changing only one variable per step.
- Select 'high' for the quality parameter: Low quality reduces the number of tokens, which directly weakens consistency.
The Trade-off Between GPT-Image-2 Price and Consistency
| Parameter Combination | Cost per Image | Applicable Scenario |
|---|---|---|
| 1024×1024 low | $0.006 | Creative sketches/quick previews |
| 1024×1024 medium | $0.053 | Social media images |
| 1024×1024 high | $0.211 | Commercial-grade editing/iterative work |
| 4K high | $0.50+ | Printing/high-resolution display |
Cost and consistency are positively correlated—high-quality mode allocates more tokens to the model, naturally allowing it to retain more features from the original image. We recommend prioritizing the 'high' mode in production environments, and you can further reduce costs by 50% using the Batch API via APIYI (apiyi.com).
AI Image Editing FAQ and Future Trends
Q1: Is GPT-Image-2 performing local Photoshop-style edits or a full redraw?
A: It's a full redraw. All autoregressive image models need to encode the original image into tokens, generate a complete output token sequence, and finally decode it into a new image. Even when a mask is enabled, it only adds constraints during the redrawing process; it doesn't truly overwrite pixels locally.
Q2: Since it's a redraw, why does the edited image look almost identical?
A: It relies on a four-layer consistency mechanism: feature abstraction of visual tokens, global reference of the original image via Self-Attention, inductive bias from training data, and explicit planning in Thinking mode. These mechanisms allow the AI to "actively choose" to preserve areas not mentioned in the prompt.
Q3: Does the inpainting of diffusion models count as a true local modification?
A: Not really. Stable Diffusion's inpainting also passes the unmasked area through VAE encoding/decoding, which introduces minor re-encoding loss. Multi-round editing can accumulate visible artifacts, which is one of the core motivations for GPT-Image-2 switching to an autoregressive approach. You can use APIYI (apiyi.com) to call both models simultaneously for comparative verification.
Q4: Why can GPT-Image-2 perform multi-round editing without drifting?
A: Because the autoregressive architecture references the complete original image token sequence during each generation, avoiding the cumulative errors found in iterative denoising. Combined with the explicit preservation planning of Thinking mode, the stability of multi-round editing far exceeds that of diffusion models.
Q5: Should I use a mask or just prompt-based editing?
A: Prioritize prompt + explicit preservation instructions; this leverages the automatic planning of Thinking mode. Only add a mask for hard constraints when the boundaries of the area to be modified are clear and must be precise (such as specific parts of a face).
Q6: How will AI image editing develop in the future?
A: Three trends: (1) Tokenizer information density will continue to improve, reducing token counts and costs; (2) Multimodal unification, where text, images, and video share the same Transformer; (3) Enhanced Thinking reasoning capabilities, supporting longer multi-step editing chains. We recommend keeping an eye on new model releases on APIYI (apiyi.com) to evaluate upgrade paths as soon as possible.
Summary: Understand the Principles to Master the Tools
Autoregressive image models like GPT-Image-2 have overturned our intuitive understanding of "AI image editing." They aren't Photoshop-style local modifications; they are intelligent redrawing based on autoregressive image generation. Consistency is achieved through the collaboration of four mechanisms: tokenized semantic abstraction, global anchoring via Self-Attention, training bias, and Thinking mode.
By understanding these principles, you can write prompts that effectively trigger Thinking-based planning, avoid the pitfalls of multi-round editing, and find the right balance between cost and quality. We recommend conducting practical tests and comparisons via the APIYI (apiyi.com) platform, which supports a unified interface for various mainstream models like GPT-Image-2, Nano Banana, and Stable Diffusion, making it easy to verify all the principles and optimization techniques mentioned in this article.
This article was written by the APIYI Team, based on official materials from OpenAI, Google DeepMind, and first-hand testing. If you need to call GPT-Image-2 in a production environment, visit the APIYI official website: apiyi.com to access the documentation.