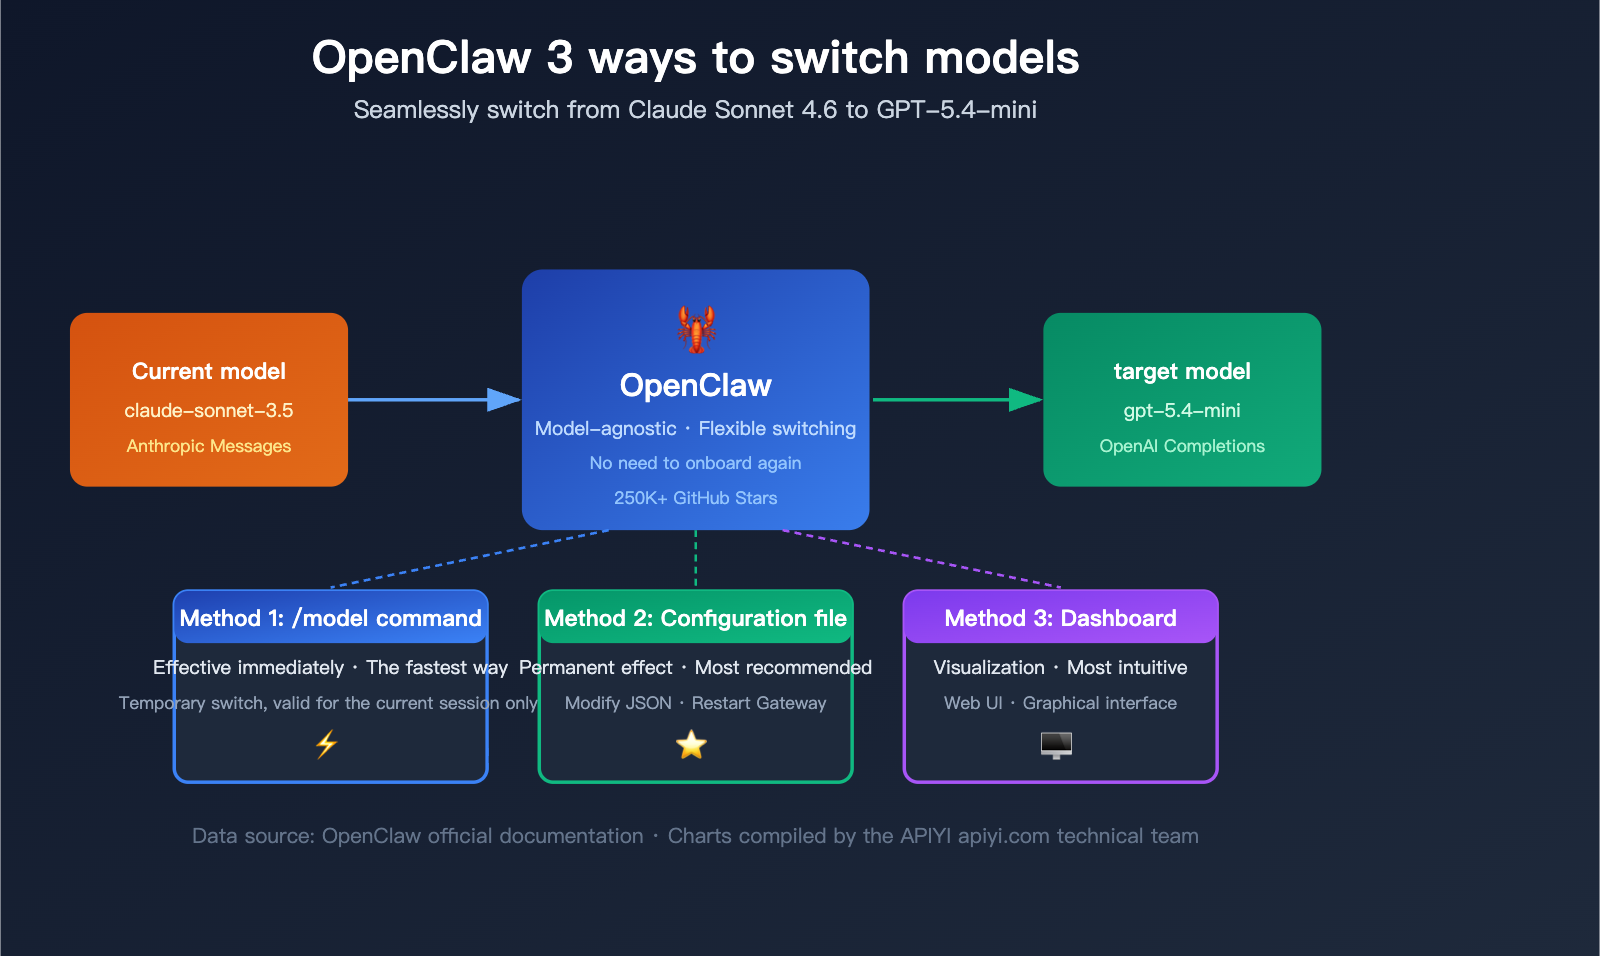
When using OpenClaw, many users run into a common question: "The current model is too expensive or just not the right fit—how do I switch to another one?" For example, if you're currently using the claude-sonnet-4-6 via Anthropic Messages mode and burning through tokens, you might want to switch to the more budget-friendly gpt-5.4-mini. Do you need to run openclaw onboard all over again?
The answer is: Absolutely not. OpenClaw provides 3 flexible ways to switch models, and you can get it done in as little as 10 seconds.
Key Takeaway: By the end of this article, you'll master every method for switching models in OpenClaw, know how to choose the best approach for your specific scenario, and learn how to add custom Providers for unified multi-model management.
Core Points for Switching Models in OpenClaw
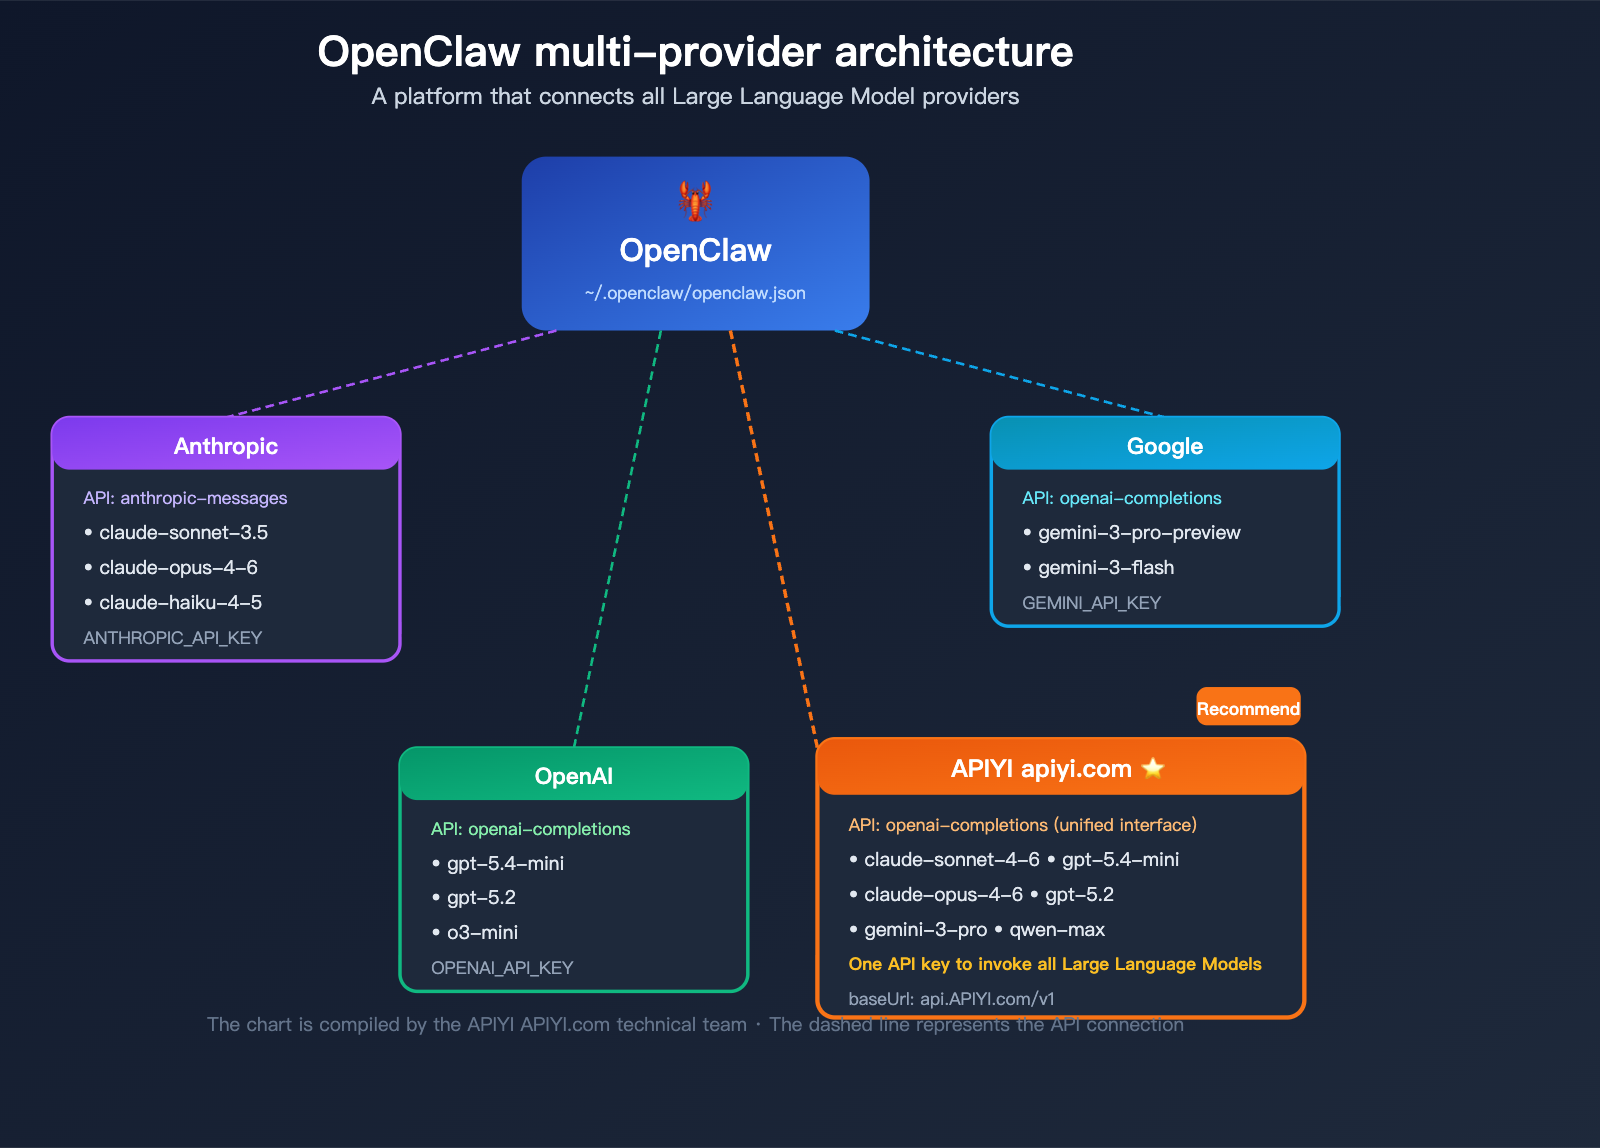
Before diving into the steps, let's look at the core mechanism behind OpenClaw's model switching. OpenClaw is a model-agnostic platform that connects to various AI providers via Provider configurations.
| Point | Description | Value |
|---|---|---|
| No re-onboarding needed | openclaw onboard is just an initial setup wizard |
Saves time, avoids redundant config |
| 3 switching methods | CLI, config file, Dashboard | Choose what fits your workflow |
| Real-time hot-swapping | /model command takes effect instantly |
Switch models mid-conversation |
| Independent Provider management | Each provider has its own API key | Manage multiple models in parallel |
| Persistent config | JSON config changes are permanent | Auto-loads after restart |
Prerequisites for Switching Models
Before you switch, make sure you've met these requirements:
- OpenClaw is installed and onboarded: You must have run
openclaw onboardduring initial setup. - Target model API key is configured: For example, if you're switching to GPT-5.4-mini, you need an OpenAI API key.
- Gateway service is running: Confirm the service status with
openclaw status.
# Check OpenClaw status
openclaw status

# If the gateway isn't running, start it
openclaw gateway start
🎯 Pro Tip: If you need to use API keys for multiple models simultaneously, you can use the APIYI (apiyi.com) platform to get a unified API interface. A single key allows you to invoke mainstream models like Claude, GPT, and Gemini, saving you the hassle of registering and managing multiple API keys separately.
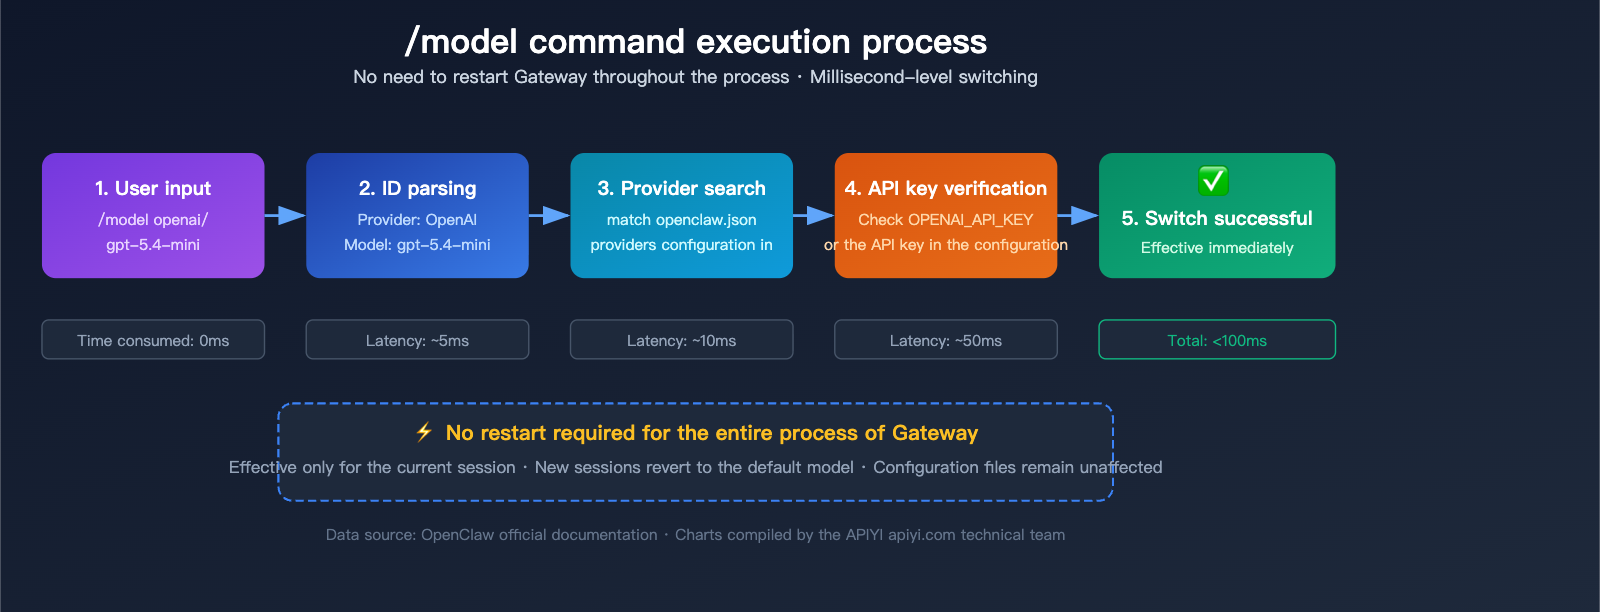
OpenClaw Model Switching Method 1: Real-time Switching via /model Command
This is the fastest and easiest way to switch models, perfect for quick tests or swapping models on the fly during a conversation.
Basic Syntax
In any OpenClaw chat interface, simply type:
/model openai/gpt-5.4-mini
It’s that simple—the command takes effect immediately, and your current conversation will start using GPT-5.4-mini.
Complete Command Examples for OpenClaw
| Target Model | Command | API Type |
|---|---|---|
| GPT-5.4-mini | /model openai/gpt-5.4-mini |
openai-completions |
| Claude Sonnet 4.6 | /model anthropic/claude-sonnet-4-6 |
anthropic-messages |
| Claude Opus 4.6 | /model anthropic/claude-opus-4-6 |
anthropic-messages |
| Gemini 3 Pro | /model google/gemini-3-pro-preview |
openai-completions |
| GPT-5.2 | /model openai/gpt-5.2 |
openai-completions |
| Custom Model | /model custom/model-name |
Depends on Provider config |
Features of the /model Command
Pros:
- Takes effect instantly, no need to restart any services.
- Switch anytime during a chat, great for A/B testing different models.
- Doesn't affect the default model settings in your configuration file.
Cons:
- Only valid for the current session; new conversations will revert to the default model.
- Does not modify the configuration file, so changes are lost after a restart.
Practical Demonstration
Suppose you're currently using claude-sonnet-4-6 and want to switch to gpt-5.4-mini:
Step 1: Confirm the current model
# Type in OpenClaw chat
/model

# Output example:
# Current model: anthropic/claude-sonnet-4-6
# Provider: anthropic
# API type: anthropic-messages
Step 2: Execute the switch
/model openai/gpt-5.4-mini

# Output example:
# ✅ Model switched to: openai/gpt-5.4-mini
# Provider: openai
# API type: openai-completions
Step 3: Verify the switch
Send a message directly and observe if the response comes from the new model. You can ask "What model are you?" to confirm.
💡 Pro Tip: If you get a prompt saying the API key is not configured, it means you haven't set up the key for that target provider yet. Refer to the "Method 2: Edit Configuration File" section below to add it.
OpenClaw Model Switching Method 2: Persistent Configuration
If you want your model switch to be permanent (so it's used every time you start OpenClaw), you need to modify the configuration file. This is the recommended approach for daily use.
Configuration File Location
The main configuration file for OpenClaw is located at:
~/.openclaw/openclaw.json
You can open it with any text editor, or use the built-in OpenClaw command:
# Use the built-in config editor
openclaw configure

# Or open directly with your editor
code ~/.openclaw/openclaw.json    # VS Code
vim ~/.openclaw/openclaw.json     # Vim
nano ~/.openclaw/openclaw.json    # Nano
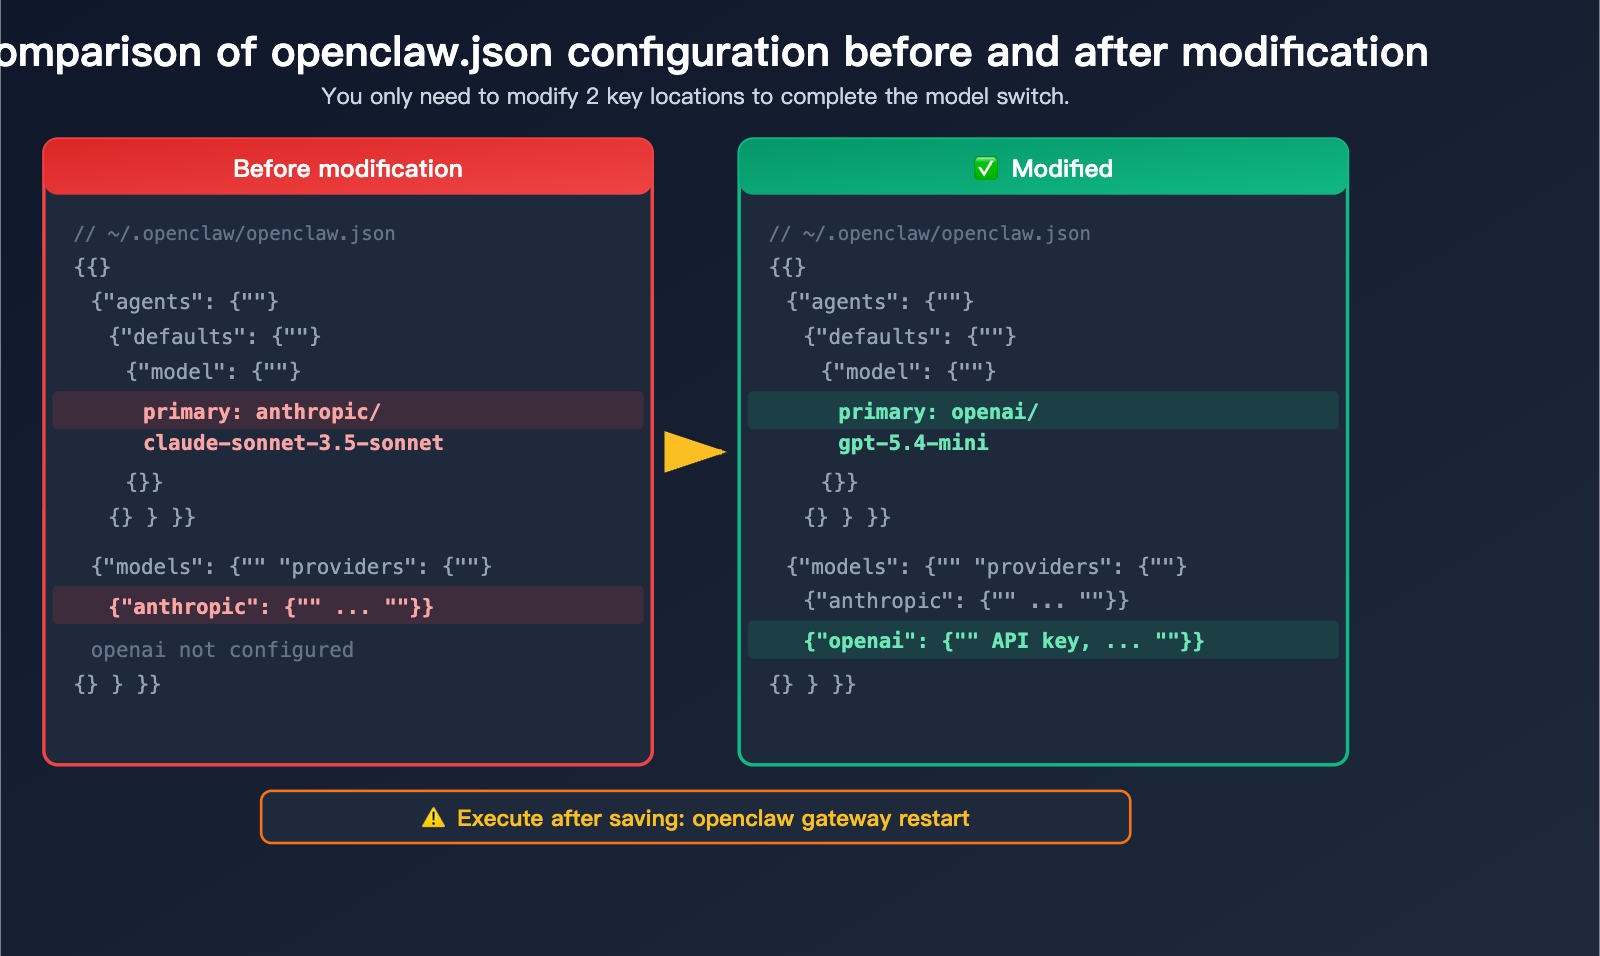
Understanding the OpenClaw Configuration Structure
The config file is in standard JSON format. Here are the core fields related to model switching:
{
  "agents": {
    "defaults": {
      "model": {
        "primary": "anthropic/claude-sonnet-4-6"
      }
    }
  },
  "models": {
    "providers": {
      "anthropic": {
        "apiKey": "sk-ant-xxxxx",
        "api": "anthropic-messages",
        "models": ["claude-sonnet-4-6", "claude-opus-4-6", "claude-haiku-4-5"]
      },
      "openai": {
        "apiKey": "sk-xxxxx",
        "api": "openai-completions",
        "models": ["gpt-5.4-mini", "gpt-5.2", "o3-mini"]
      }
    }
  }
}
Step-by-Step: Switching from Claude Sonnet to GPT-5.4-mini
Step 1: Open the configuration file
openclaw configure
Step 2: Ensure the OpenAI Provider is configured
Check if openai exists under models.providers. If not, add the following:
"openai": {
  "apiKey": "sk-your-openai-key",
  "api": "openai-completions",
  "models": ["gpt-5.4-mini", "gpt-5.2"]
}
Step 3: Change the default model
Update the value of agents.defaults.model.primary from anthropic/claude-sonnet-4-6 to openai/gpt-5.4-mini:
{
  "agents": {
    "defaults": {
      "model": {
        "primary": "openai/gpt-5.4-mini"
      }
    }
  }
}
Step 4: Save the file and restart the Gateway
# Restart the gateway to apply changes
openclaw gateway restart

# Verify status
openclaw status
Step 5: Verify the configuration
# Use the doctor command to check if the config is correct
openclaw doctor --fix
🚀 Quick Start: If you don't want to manage multiple API keys for OpenAI, Anthropic, Google, etc., we recommend using the APIYI (apiyi.com) platform. You can access all mainstream models through a single OpenAI-compatible interface with just one API key, making configuration much simpler.
Understanding API Types in the OpenClaw Config
This is a common point of confusion. OpenClaw supports two API protocol types:
| API Type | Protocol | Applicable Models | Request Format |
|---|---|---|---|
openai-completions |
OpenAI Chat Completions | GPT series, Gemini, Qwen, custom compatible interfaces | messages[] + model |
anthropic-messages |
Anthropic Messages | Claude series | messages[] + model + max_tokens |
Key Point: When switching models, the API type will automatically follow the provider configuration. You don't need to specify the API type manually; just ensure the api field for the provider is configured correctly.
OpenClaw Model Switching Method 3: Dashboard Visual Interface
For users who prefer not to use the command line, OpenClaw provides a Web Dashboard, allowing you to manage model configurations through a graphical interface.
Launching the Dashboard
openclaw dashboard
Once executed, it will automatically open http://127.0.0.1:18789/ in your browser, which is the local Web management interface for OpenClaw.
Steps to Switch Models in the Dashboard
Step 1: After opening the Dashboard, locate the Settings option in the left navigation bar.
Step 2: Navigate to the Models or Agents configuration page.
Step 3: In the model list, find the Default Model option.
Step 4: Select your target model from the dropdown menu (e.g., openai/gpt-5.4-mini).
Step 5: Click Save to apply your configuration.
Step 6: The Dashboard will prompt you to restart the Gateway; confirm to proceed.
Advantages of the Dashboard
| Feature | Description |
|---|---|
| Visual Interface | No need to memorize command syntax |
| Real-time Preview | See configuration effects immediately after changes |
| Configuration Validation | Automatically checks the validity of API keys and model names |
| One-click Restart | Restart the Gateway directly after saving |
| Multi-Provider Management | Add and edit providers graphically |
💰 Cost Optimization: The Dashboard also lets you intuitively view the usage volume and token consumption for each model. If you find that Claude Sonnet 4.6 is getting expensive, you can check the pricing comparison for different models on APIYI (apiyi.com) to find a more cost-effective alternative.
Advanced OpenClaw Model Switching: Adding Custom Providers
If you want to use a third-party platform like APIYI to manage multiple models centrally, you'll need to add a custom provider in your configuration file.
Why Use a Custom Provider?
| Scenario | Direct Official API Connection | Via Unified Platform |
|---|---|---|
| API Key Management | Requires multiple keys | Only 1 key needed |
| Model Switching | Requires switching providers | Switch under the same provider |
| Billing | Scattered across platforms | Unified settlement |
| Network Stability | Some have access restrictions | Platform provides stable access |
| Supported Models | Single service provider | Aggregates models from many vendors |
Example: Configuring a Custom Provider
Add the following to models.providers in your ~/.openclaw/openclaw.json:
{
  "models": {
    "providers": {
      "apiyi": {
        "baseUrl": "https://api.apiyi.com/v1",
        "apiKey": "sk-your-APIYI-key",
        "api": "openai-completions",
        "models": [
          "claude-sonnet-4-6",
          "claude-opus-4-6",
          "gpt-5.4-mini",
          "gpt-5.2",
          "gemini-3-pro-preview"
        ]
      }
    }
  }
}
Once configured, switching models is as simple as:
/model apiyi/gpt-5.4-mini
/model apiyi/claude-sonnet-4-6
/model apiyi/gemini-3-pro-preview
All models are invoked through the same provider, so there's no need to switch API keys or reconfigure providers.
View full configuration file example (including multiple providers)
{
  "agents": {
    "defaults": {
      "model": {
        "primary": "apiyi/gpt-5.4-mini"
      },
      "sandbox": {
        "enabled": true
      }
    }
  },
  "models": {
    "providers": {
      "anthropic": {
        "apiKey": "sk-ant-xxxxx",
        "api": "anthropic-messages",
        "models": ["claude-sonnet-4-6", "claude-opus-4-6"]
      },
      "openai": {
        "apiKey": "sk-xxxxx",
        "api": "openai-completions",
        "models": ["gpt-5.4-mini", "gpt-5.2"]
      },
      "apiyi": {
        "baseUrl": "https://api.apiyi.com/v1",
        "apiKey": "sk-your-APIYI-key",
        "api": "openai-completions",
        "models": [
          "claude-sonnet-4-6",
          "claude-opus-4-6",
          "gpt-5.4-mini",
          "gpt-5.2",
          "gemini-3-pro-preview",
          "qwen-max"
        ]
      },
      "google": {
        "apiKey": "AIza-xxxxx",
        "api": "openai-completions",
        "models": ["gemini-3-pro-preview"]
      }
    }
  },
  "channels": {
    "telegram": { "enabled": true },
    "discord": { "enabled": false }
  }
}
Setting a Custom Provider as the Default Model
{
  "agents": {
    "defaults": {
      "model": {
        "primary": "apiyi/gpt-5.4-mini"
      }
    }
  }
}
After saving, run:
openclaw gateway restart
🎯 Technical Tip: The benefit of using a custom provider is that model switching becomes much more flexible. Through an aggregation platform like APIYI (apiyi.com), you can switch between models from different vendors like Claude, GPT, and Gemini in OpenClaw with a single command, without having to modify your provider configuration every time.
Comparing the 3 Ways to Switch Models in OpenClaw
The best method depends on your specific needs:
| Comparison Dimension | /model Command |
Edit Config File | Dashboard |
|---|---|---|---|
| Difficulty | Easiest | Moderate | Simple |
| Speed | Instant | Requires Gateway restart | Requires Gateway restart |
| Persistence | Current session only | Permanent | Permanent |
| Best for | Quick testing | Daily default model | Visual setup for beginners |
| Restart Required | No | Yes | Yes |
| Learning Curve | Remember one command | Understand JSON format | None |
Recommended Strategy:
- Daily Development: Set your default model in the config file, and use
/modelfor occasional quick switches. - Model Comparison: Use
/modelwithin your chat to quickly toggle and compare results. - Team Collaboration: Use the Dashboard to manage configurations centrally.
OpenClaw Model Switching FAQ
Q1: Do I need to run `openclaw onboard` again after switching models?
Nope. openclaw onboard is just the initial setup wizard, and you only need to run it once during the first installation. Afterward, you can switch models using the /model command, the config file, or the Dashboard. Even if you want to add a brand-new provider, you just need to update your config file—no need to onboard again.
Q2: Will my chat history be lost if I switch models?
Not at all. OpenClaw stores chat history independently of the model. Your previous records remain intact. Just keep in mind that different models interpret context differently, so the new model might not perfectly pick up the exact conversational nuance of the previous one.
Q3: What if the `/model` command fails with “Provider not found”?
This means the provider you specified hasn't been configured yet. Here’s how to fix it:
- Open your config file:
openclaw configure - Add the provider under
models.providers. - Enter your API key and API type.
- Restart the Gateway:
openclaw gateway restart - Run the
/modelcommand again.
If you don't want to configure multiple providers individually, you can get a unified API key from APIYI (apiyi.com). This lets you access all models by configuring just one provider.
Q4: Do I need to manually change the API type when switching from an Anthropic model to an OpenAI model?
No manual changes are needed. OpenClaw automatically selects the correct API protocol based on your provider configuration. The anthropic provider automatically uses the anthropic-messages protocol, and the openai provider uses openai-completions. Just make sure the api field in your provider configuration is set correctly.
Q5: Can I configure multiple providers at once? How do I manage multiple API keys?
Yes, you can. OpenClaw allows you to configure multiple providers in the config file, each managing its own API key. You can have Anthropic, OpenAI, Google, and others configured simultaneously and switch between them using the /model provider/model-name format.
Additionally, using an aggregation platform like APIYI (apiyi.com) allows you to consolidate multiple models under a single provider, which really simplifies key management.
Q6: How do I see all the models currently supported by OpenClaw?
There are two ways to check the list of available models:
- Type
/model(without arguments) in your chat; it will display the current model and a list of available ones. - Check the
modelsarray for each provider in your configuration file.
If you want to use a model that isn't in your config, just add the model name to the models array for the corresponding provider.
Q7: What if I mess up the config file and OpenClaw won’t start?
Use the built-in diagnostic tool to fix it:
# Automatically diagnose and fix configuration issues
openclaw doctor --fix

# View real-time logs to pinpoint the problem
openclaw logs --follow
If the issue is severe, you can back up your current config and re-run openclaw onboard to generate a default configuration, then manually restore your custom settings.
OpenClaw Model Switching Quick Reference Guide
Finally, here’s a quick reference table to keep handy while you're working:
| Action | Command |
|---|---|
| View current model | /model |
| Switch model temporarily | /model openai/gpt-5.4-mini |
| Open configuration editor | openclaw configure |
| Restart Gateway | openclaw gateway restart |
| Open Dashboard | openclaw dashboard |
| Check configuration status | openclaw doctor --fix |
| View running status | openclaw status |
| View real-time logs | openclaw logs --follow |
Summary
Switching models in OpenClaw is super flexible. There are three core ways to do it:
/modelcommand: The fastest way, perfect for quick switches and A/B testing.- Editing the config file: The most stable method, best for setting your default model.
- Dashboard interface: The most intuitive way, great for beginners.
The most important thing to remember: You don't need to re-onboard when switching models. As long as the API key for your target provider is configured correctly, you can jump between different models freely.
For users who frequently switch between models from different vendors, we recommend setting up a custom provider via APIYI (apiyi.com). It lets you manage all your models through a single interface, making model invocation in OpenClaw even more efficient.
Author: APIYI Technical Team
Technical Support: Visit APIYI at apiyi.com for more AI model configuration tutorials and support.
Last Updated: April 2026
Applicable Version: OpenClaw 2026.3.x+
References:
- OpenClaw Official Documentation: docs.openclaw.ai
- OpenClaw GitHub Repository: github.com/openclaw/openclaw
- OpenClaw Official Website: openclaw.ai