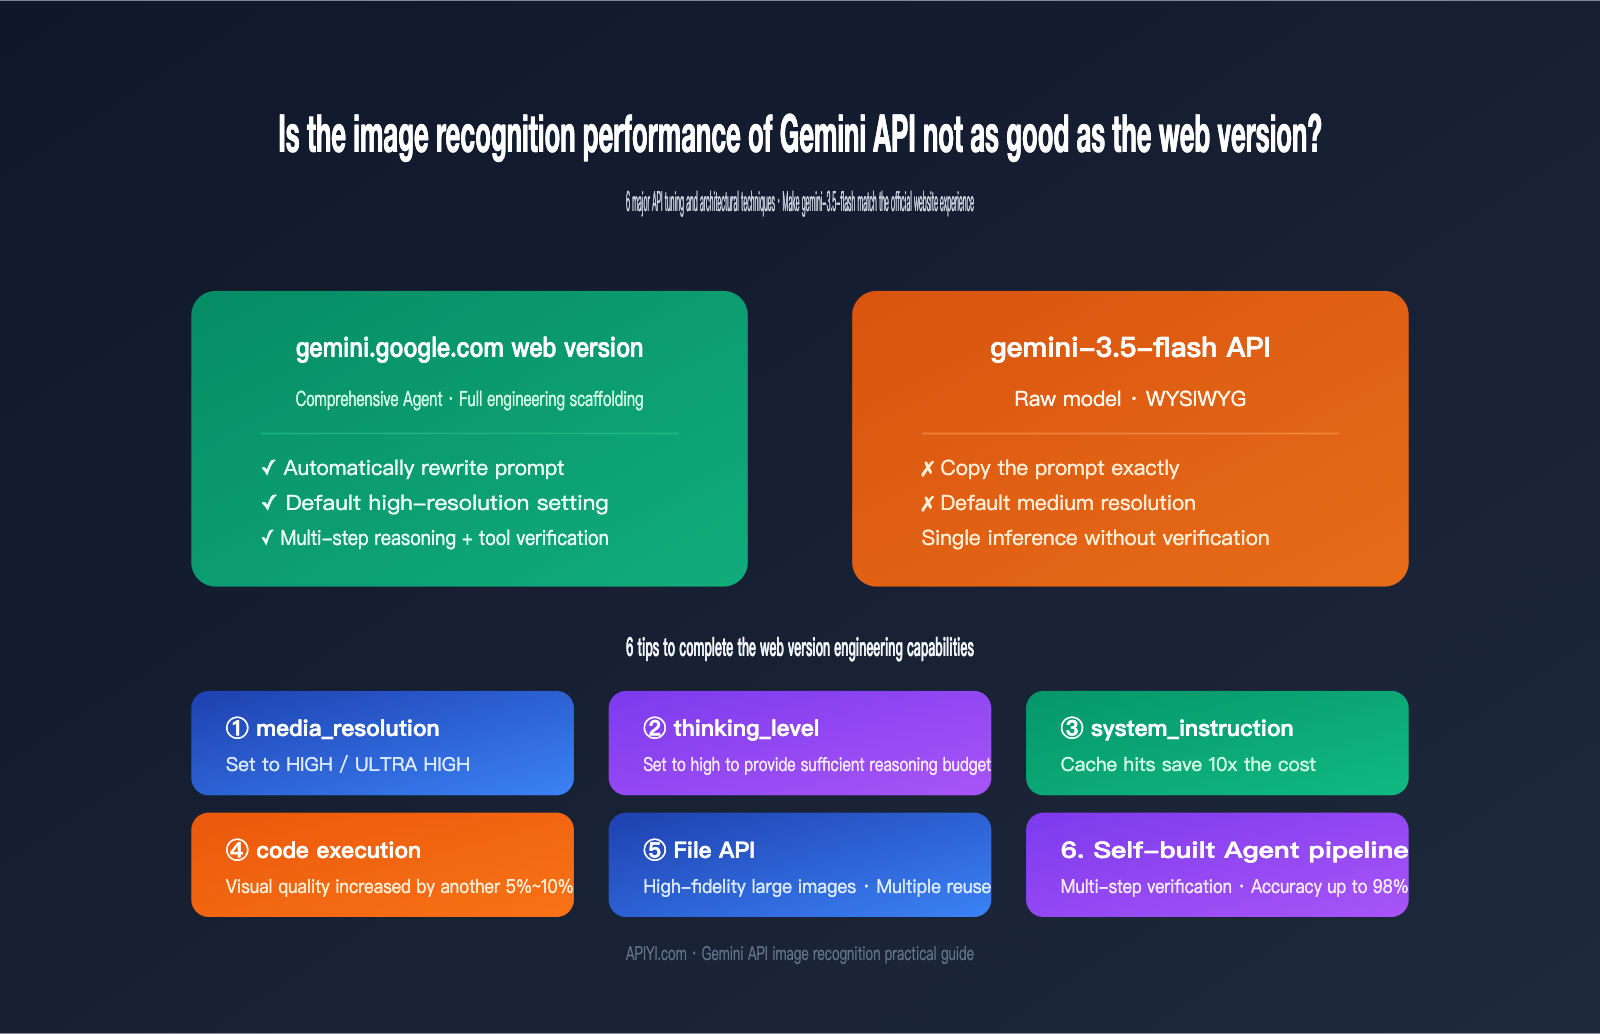
Many teams integrating Gemini API for image recognition tasks have encountered the same confusion: when you upload an image and use the same prompt on gemini.google.com, the model identifies details precisely and provides structured answers. However, when you switch to the gemini-3.5-flash API for the same task, the results are noticeably rougher, sometimes even missing key information. This "web is strong, API is weak" perception isn't because the model itself has been downgraded; it's because the engineering gap between the web version and the API is now visible to you.
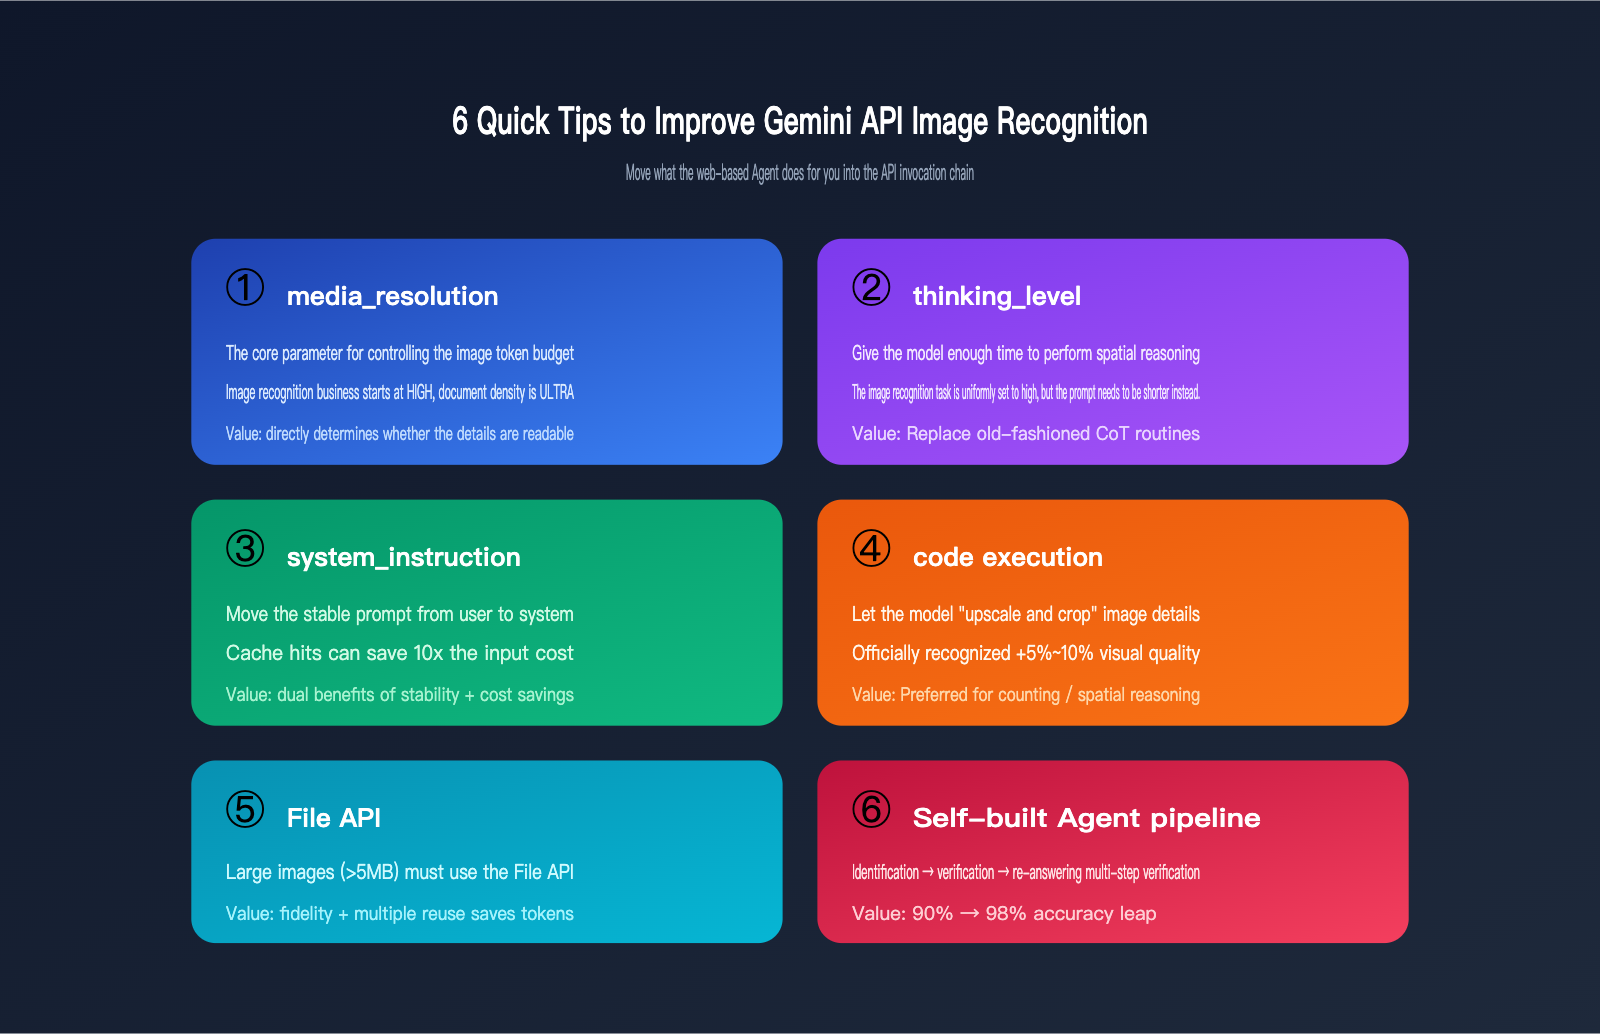
This article centers on one core conclusion: the web version of Gemini is a comprehensive Agent that automatically performs prompt optimization, multi-step reasoning, tool invocation, and result verification. API calls, on the other hand, use the "raw" model—what you send is exactly what you get. Once you understand this gap, these 6 API optimization techniques (which go beyond just "tweaking prompts") will help your image recognition performance consistently catch up to the web experience.
Why Gemini API Image Recognition Lags Behind the Web Version: The Gap Between Agents and Raw Models
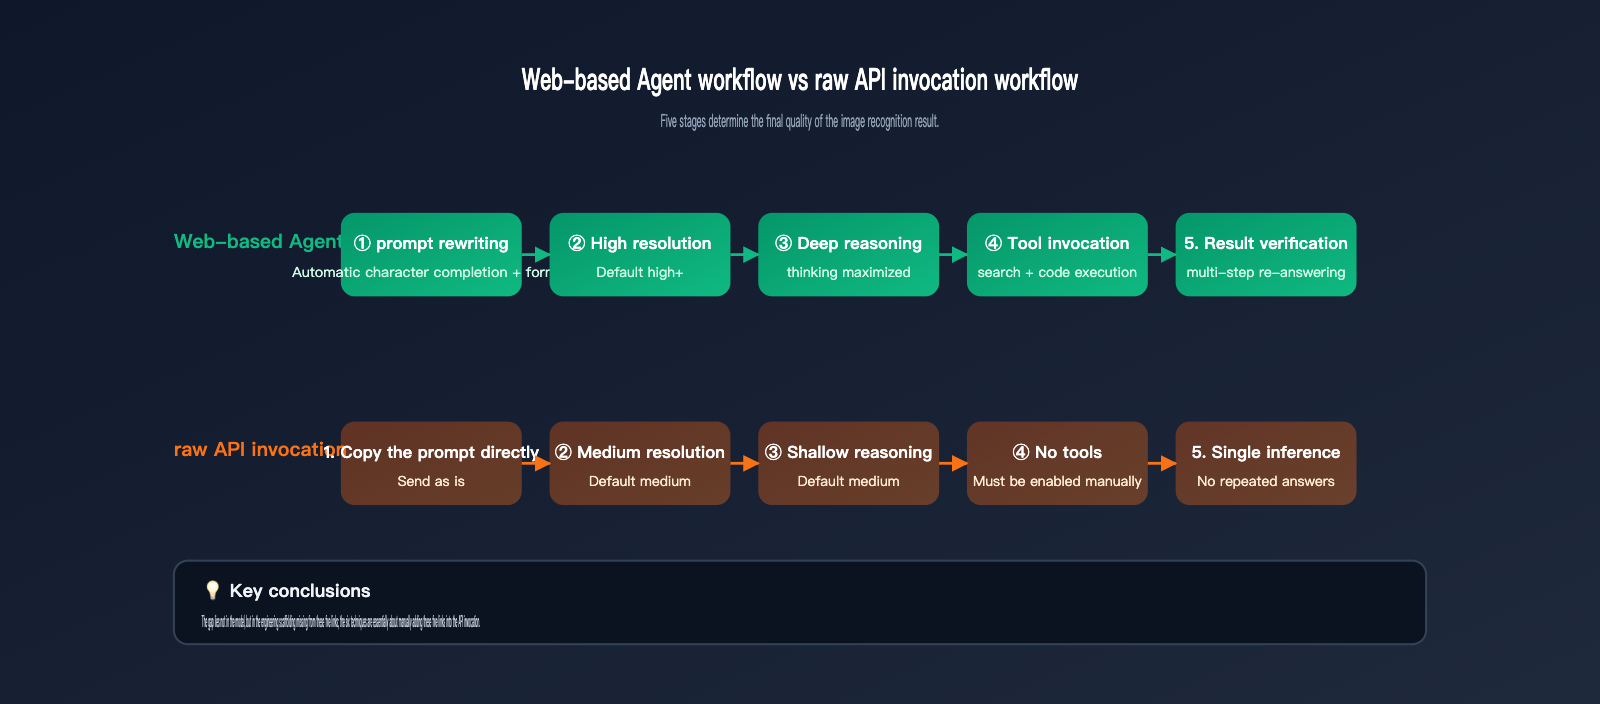
To clarify this gap, we must first understand how much work gemini.google.com does for you between the moment you submit an image and the moment you receive a final answer. Based on Google's public Agentic Vision documentation and the differences we've observed at APIYI (apiyi.com) between the official website and the API, the web version is essentially a product-level Agent built around a base model. It performs at least 5 tasks you didn't explicitly request:
- Automatic prompt rewriting: It supplements "identify this image" into a complete instruction set including roles, tasks, and output formats.
- High-resolution processing: It internally handles images at higher resolution tiers to ensure details aren't compressed into blurry pixels.
- High-intensity reasoning: It defaults to a high reasoning budget (similar to
thinking_level=high), giving the model time to "think." - Tool invocation: It calls built-in tools like code execution or web search when necessary to cross-verify details and ensure accuracy.
- Result validation: It formats output and makes "re-answer" judgments, asking the model again if it encounters a vague response.
When you call the API directly, none of these 5 things happen automatically. In other words, you're calling a fully capable "model," but you've lost the "engineering scaffolding." The table below clearly outlines the differences in key links between the two usage methods:
| Comparison Dimension | gemini.google.com Web Version | gemini-3.5-flash API |
|---|---|---|
| Prompt Processing | Automatic rewriting, role/format completion | Uses user input exactly as is |
| Image Resolution | Default high tier | Default medium tier, requires manual adjustment |
| Reasoning Budget | High intensity, no explicit limit | Default medium, can set thinking_level manually |
| Tool Invocation | Default access to search, code execution | Disabled by default, requires explicit enablement |
| Result Validation | Agent multi-step verification | Single-pass inference, no verification |
| Billing Transparency | Covered by monthly subscription | Pay-per-token |
We recommend using an aggregation gateway like APIYI (apiyi.com) to run the same image and prompt simultaneously, comparing the image recognition results of gemini-3.5-flash API, Claude Opus, and GPT-5.5. This allows you to quickly determine whether your current task is being bottlenecked by the model's capabilities or by the engineering pipeline.
Gemini API Vision Tip 1: Boost the media_resolution Parameter
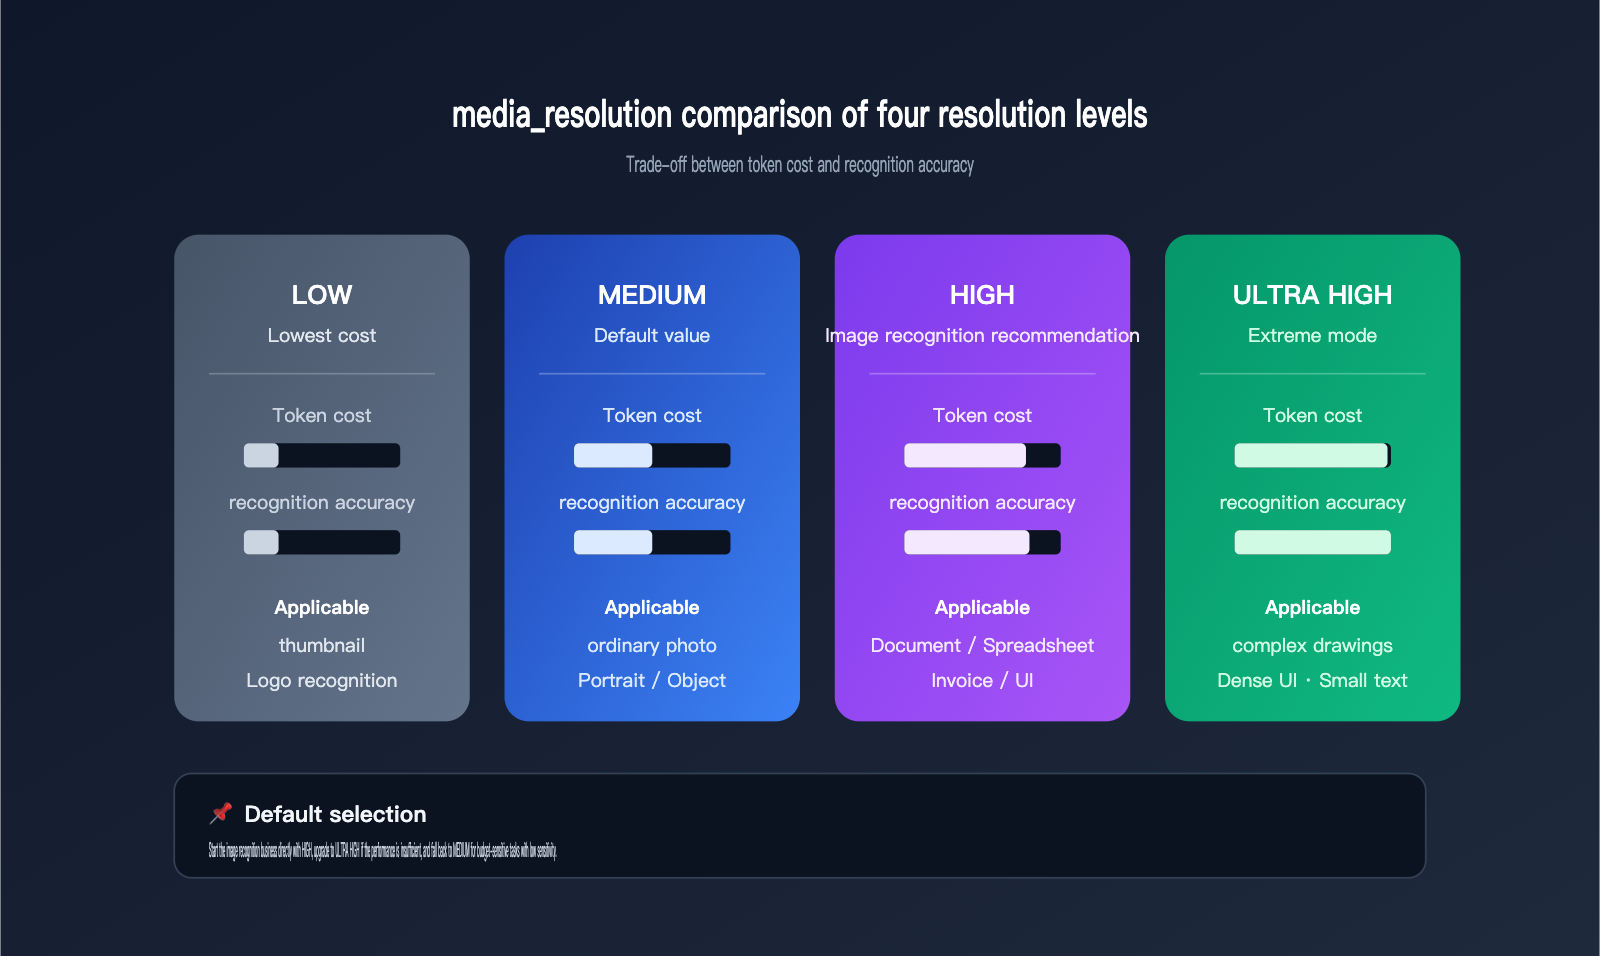
Starting with the Gemini 3 series, Google introduced the media_resolution parameter. It directly controls how many tokens the API allocates to "look" at an image. This parameter has four settings: low, medium, high, and ultra high, with medium typically being the default. For tasks involving small text, receipts, circuit diagrams, or dense UI screenshots, medium often falls short. The model compresses the image into a rough feature map, causing fine details to get lost.
The table below breaks down the actual differences between these four tiers, helping you choose the right one for your task:
| Resolution Tier | Token Cost | Best For | Typical Issues |
|---|---|---|---|
low |
Lowest | Thumbnails, Logo recognition | Small text is mostly lost |
medium (default) |
Medium | Standard photos, portraits | Details appear blurry |
high |
Higher | Documents, tables, receipts | Information is mostly readable |
ultra high |
Highest | Complex diagrams, dense UI | Near-website performance |
For vision-heavy tasks, bumping this parameter from medium to high can often immediately improve your recognition accuracy by a full tier. If your budget allows and your task involves small text or dense tables, opting for ultra high is a solid choice.
# Call gemini-3.5-flash via APIYI, explicitly setting high media resolution
from google import genai
from google.genai import types

client = genai.Client(
    api_key="YOUR_APIYI_KEY",
    http_options={"base_url": "https://api.apiyi.com"}
)

resp = client.models.generate_content(
    model="gemini-3.5-flash",
    contents=[image_part, "Extract all visible text from the image and output it as a table"],
    config=types.GenerateContentConfig(
        media_resolution="MEDIA_RESOLUTION_HIGH"
    )
)
print(resp.text)
When calling through APIYI (apiyi.com), parameters are passed directly to the underlying service without being re-wrapped by the gateway, so you can safely use the values specified in the official documentation.
Gemini API Vision Tip 2: Explicitly Enable thinking_level=high
Gemini 3.5 Flash introduced the thinking_level parameter, which controls the depth of the model's internal reasoning before it produces an answer. In vision tasks, the difference between "thinking long enough" and "thinking carefully enough" is often the difference between seeing the details correctly and missing them entirely. The API's default setting prioritizes speed over quality; for vision tasks, we recommend setting this to high so the model has enough time to perform spatial reasoning and counting, just like it does in the web interface.
thinking_level |
Recommended Scenario | Perceived Difference |
|---|---|---|
low |
Simple chat, style judgment | Fast, but recognition is rough |
medium |
General Q&A | Average performance |
high (Recommended) |
Documents, receipts, counting, spatial reasoning | Near-website experience |
The official documentation also highlights a counter-intuitive point: after using thinking_level=high, you should actually write your prompts more directly and concisely. Avoid old-school chain-of-thought patterns like "please reason step-by-step" or "please consider various situations." These patterns were meant to compensate for older models; for the Gemini 3 series, they can cause the model to "over-analyze."
🎯 Parameter Selection Advice: Use
media_resolution=HIGHandthinking_level=highas your default combination for vision tasks and save them in your APIYI (apiyi.com) call templates. Fine-tune towardultra highorlowlater based on your specific business needs to avoid constantly testing parameters for every request.
Gemini API Vision Tip #3: Put instructions in system_instruction instead of the user prompt
A common mistake when using the API is stuffing everything into the user prompt: role definitions, task descriptions, output formats, and user questions all jumbled into one block of text. This forces the model to re-read the entire context every single time, whereas the "System Instructions" found in the web interface are cached and reused.
The right way to handle this is to place your "stable instructions" into the system_instruction field:
config = types.GenerateContentConfig(
    media_resolution="MEDIA_RESOLUTION_HIGH",
    thinking_level="high",
    system_instruction=(
        "You are a rigorous image analysis assistant."
        "Only reference details clearly visible in the image; do not make assumptions."
        "Output structured JSON with fixed fields: entities/attributes/text."
    )
)
This approach offers two key benefits: the model follows consistent rules for every response, leading to more stable results, and once System Prompt Caching is enabled, input costs can drop by up to 10x—which is incredibly valuable for long-running batch image analysis tasks. In the APIYI (apiyi.com) dashboard, you can track cache hit rates per model ID, making it easy to monitor your optimization progress.
Gemini API Vision Tip #4: Enable code execution to let the model "zoom in"
In Google's announcement regarding Agentic Vision for Gemini 1.5 Flash, they provided a clear metric: enabling code execution tools on top of the native model yields an average quality improvement of 5%–10% for vision-based tasks. The principle here is that the model can internally generate Python code to crop, zoom, rotate, or read pixels from an image, and then feed those processed sub-images back to itself for analysis. This is exactly what the web version does by default.
The API doesn't enable code execution by default, so you need to explicitly declare it:
config = types.GenerateContentConfig(
    media_resolution="MEDIA_RESOLUTION_HIGH",
    thinking_level="high",
    tools=[types.Tool(code_execution=types.ToolCodeExecution())]
)

resp = client.models.generate_content(
    model="gemini-1.5-flash",
    contents=[image_part, "Count all the red buttons in the image and list their positions"],
    config=config
)
For tasks officially recognized as benefiting from code execution—such as counting, spatial reasoning, and dense UI parsing—this is the most cost-effective optimization you can implement. At APIYI (apiyi.com), we've observed that enabling code execution does increase overall latency, so we recommend enabling it by default for asynchronous workflows and using it selectively for synchronous ones.
Gemini API Vision Tip #5: Use File API for Large Images Instead of Base64 Inline
For images larger than a few MBs, many teams simply embed the image into the request body using base64. While this works fine for smaller files, once the total request size exceeds 20MB, you'll hit Gemini's limits. This often leads to silent compression of your images, which naturally degrades the recognition quality.
The official guidelines for choosing the right approach are quite clear:
| Image Size | Recommended Transfer Method | Reason |
|---|---|---|
| Under 5MB | base64 inline | Lightweight request, simple invocation |
| 5~20MB | File API upload | Prevents request size bloat |
| Over 20MB | File API required | base64 encoding will corrupt the request |
| Reused across calls | File API recommended | Upload once, reference multiple times to save tokens |
Another major benefit of the File API is that the same image can be reused across multiple requests, saving you the cost of repeated uploads. When using the APIYI (apiyi.com) gateway, the File API endpoint uses the same set of credentials, so you don't need to set up a separate Google Cloud account just for image uploads.
Gemini API Image Recognition Tip 6: Build Your Own Agent Chain for Multi-Step Verification
After mastering the first five tips, your single API calls should feel nearly as good as the official web interface. However, the web version has one "killer" feature: multi-step verification. After generating an answer, it performs a second round of reasoning to verify key facts, and if it encounters uncertainty, it triggers a "re-answer." This capability isn't a ready-made switch in the API; you need to build a simple Agent chain yourself.
A minimal viable two-step chain looks like this:
- First call: Have
gemini-3.5-flashgenerate structured recognition results (JSON output). - Second call: Feed the first result back along with the original image and ask the model, "Based on this image, are each of the following conclusions accurate?"
If the second call flags any "inaccurate" fields, you then trigger a third "re-answer" step. You can chain this entire process using the same base_url and API key on APIYI (apiyi.com) without needing any extra services. For tasks requiring high accuracy—such as contract extraction, medical imaging assistance, or security compliance reviews—multi-step verification is the crucial step to push accuracy from 90% to 98%.
| Task Type | Recommended Chain | Single-Step Parameters |
|---|---|---|
| General Image Q&A | Single-step | high + thinking_high |
| Document Extraction | Single-step + JSON validation | ultra high + thinking_high |
| Complex Counting | Two-step + code execution | high + thinking_high + tools |
| High-Accuracy Business | Three-step chain (Identify → Verify → Re-answer) | ultra high + thinking_high + tools |
Practical Parameter Template: Chaining 6 Tips into One Reusable Call
To make it easy for you to get started, here is a "default template for image recognition tasks" that integrates the previous 6 tips. It's a great starting point for most business use cases:
from google import genai
from google.genai import types

client = genai.Client(
    api_key="YOUR_APIYI_KEY",
    http_options={"base_url": "https://api.apiyi.com"}
)

SYSTEM = (
    "You are a rigorous image analysis assistant. Only cite content clearly visible in the image; "
    "do not infer without evidence. Output strict JSON with fields: entities/attributes/text."
)

config = types.GenerateContentConfig(
    media_resolution="MEDIA_RESOLUTION_HIGH",
    thinking_level="high",
    system_instruction=SYSTEM,
    tools=[types.Tool(code_execution=types.ToolCodeExecution())],
    response_mime_type="application/json"
)

resp = client.models.generate_content(
    model="gemini-3.5-flash",
    contents=[image_part, "Identify this image according to the SYSTEM requirements"],
    config=config
)
print(resp.text)
For actual deployment, I recommend abstracting this template into a unified SDK call layer on APIYI (apiyi.com). This way, your business units only need to pass the image and the question, while the parameters are injected by the gateway, saving everyone from having to learn these lessons the hard way.
FAQ: Addressing the Gap Between Gemini API and the Web Version
Q1: If I enable all these parameters, will the API still perform worse than the web version?
For the vast majority of use cases, you'll be able to match the web version's performance. However, for a small number of high-difficulty tasks (such as tiny text, low-light images, or unique artistic styles), the API might still lag slightly behind because the web version utilizes undisclosed internal enhancement pipelines. For these scenarios, you can use APIYI (apiyi.com) to perform side-by-side comparisons with visual models from other providers to find the best model for your specific workflow.
Q2: Does thinking_level=high double the cost?
It does increase the internal reasoning token usage, but it only impacts the output stage. Furthermore, in image recognition tasks, image tokens usually account for the bulk of the total cost. The accuracy gains from setting thinking to high far outweigh the additional costs, especially in workflows where you're replacing manual review processes.
Q3: How do I change the base_url? I'm using the official Google SDK.
The google-genai SDK supports routing requests to the APIYI (apiyi.com) gateway via http_options={"base_url": "https://api.apiyi.com"}. You can use the API key generated in the APIYI dashboard; there's no need to set up a separate Google Cloud project.
Q4: Can I solve these issues just by optimizing the prompt?
The ceiling for prompt-only optimization is quite low. It cannot cover "model-external" capabilities like resolution, reasoning depth, or tool invocation. Out of the six tips in this article, only the third one is related to prompts; the other five are engineering-level levers.
Q5: What should I do if the API keeps missing "Chinese watermarks" that the web version can easily identify?
Watermark details often rely on a combination of high resolution and code execution for cropping. Setting media_resolution to ultra high, enabling code execution, and using a two-step verification chain will usually lead to stable recognition.
Summary: Bringing Web-Level Engineering to Your API Calls
Returning to the original question: Why does Gemini API image recognition perform worse than the web version? The answer isn't that the model is weaker; it's that the web version comes with a heavy "engineering scaffold." When you call the gemini-3.5-flash API directly, you have to explicitly handle prompt rewriting, resolution tiers, reasoning budgets, tool invocation, and result verification yourself. Once you understand this, the essence of these six tips is simply "moving the tasks the web version does for you into your own API call chain."
The practical path is clear: start by maxing out media_resolution and thinking_level, move your instructions into system_instruction and enable caching, turn on code execution for complex recognition tasks, use the File API for large images, and finally, use a two-to-three-step agent chain to ensure high accuracy for critical business tasks. Once you've implemented this combination, go back to the APIYI (apiyi.com) dashboard to compare hit rates and latency—most teams find they can shrink the "web vs. API" gap to the point where it's almost imperceptible.
📌 Author: This article was compiled by the APIYI (apiyi.com) technical team. For more practical guides on integrating Gemini, Claude, and GPT series models, please visit the APIYI Help Center.