I’ve recently been getting a lot of questions from developer clients: "Why does it take over 200 seconds to generate a 1024×1024 image with gpt-image-2? Is my account being rate-limited?" After taking a look at their code, I found they were using the default quality="high" and size="1536x1024". At that point, a 235-second generation time is actually standard performance.
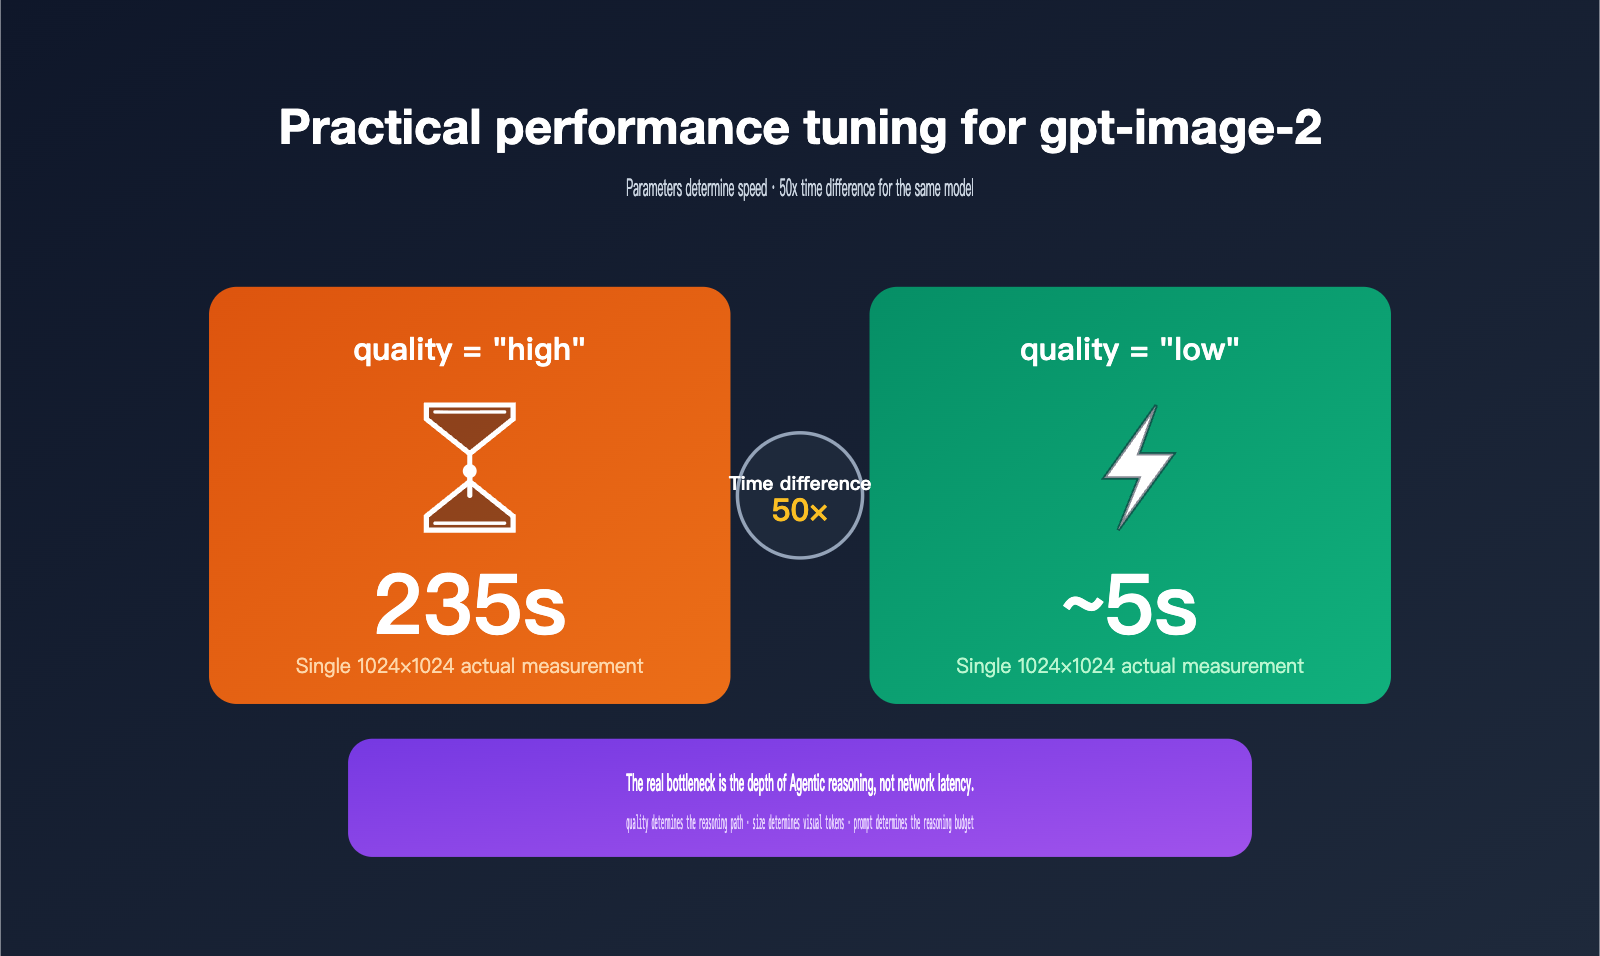
gpt-image-2 is the new-generation image model officially released by OpenAI on April 21, 2026. It’s the first to bring O-series reasoning capabilities (Agentic thinking) into the image generation workflow. This means that requests with quality="high" go through a full four-stage process: "Understand—Plan—Generate—Review," which takes 30–50 times longer than quality="low". Based on real-world production experience, this article breaks down the three most critical parameters so you can find the sweet spot between image quality and speed.
Quick Reference: Core Parameters for gpt-image-2
Let's get straight to the point. The table below covers all the important parameters for gpt-image-2 in the OpenAI Python SDK, along with their impact on latency and cost. I recommend using this as your go-to guide when tuning your requests.
| Parameter | Options | Default | Latency Impact | Cost Impact |
|---|---|---|---|---|
quality |
low / medium / high / auto |
auto |
Extreme | Extreme |
size |
1024x1024 / 1536x1024 / 1024x1536 / Any ≤ 2K |
1024x1024 |
High | Medium |
output_format |
png / jpeg / webp |
png |
Low | None |
output_compression |
0–100 (only for jpeg/webp) | 100 | Very Low | None |
n |
1–10 | 1 | Proportional | Proportional |
background |
transparent / opaque / auto |
auto |
Low | None |
prompt |
string | Required | Complexity affects inference time | Affects input tokens |
The core logic to understand here is that quality and size are the deal-breakers—they directly determine which inference path the model takes, how many tokens are generated, and how much visual compute is consumed. output_format and output_compression are just serialization tasks; tweaking them won't speed up your generation.
🎯 Top Recommendation: If your business use case allows it, change
quality="auto"to an explicitlowormedium. This single step can usually drop your latency from minutes to seconds. When callinggpt-image-2via APIYI (apiyi.com), all these parameters are passed through natively, behaving exactly as they do on the official OpenAI endpoints.
Two Key Parameters Affecting gpt-image-2 Latency: quality and size
To understand why there's a multi-fold difference between "high" and "low" settings, you first need to understand the execution path of gpt-image-2. This is the most fundamental difference between it and the previous generation, gpt-image-1.
How the quality parameter works
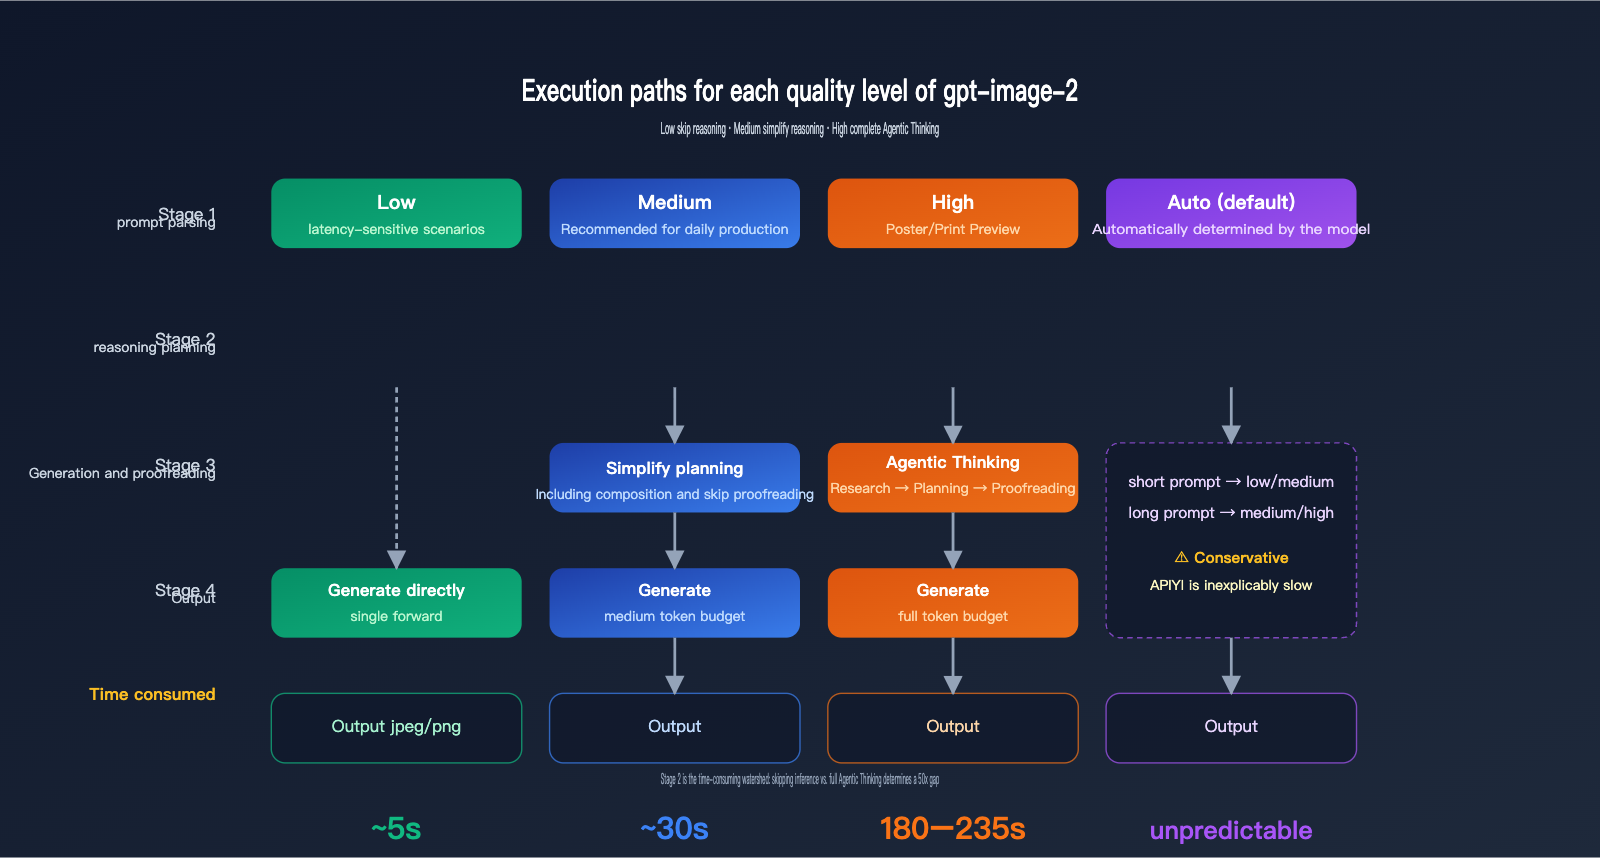
The official gpt-image-2 documentation clearly states that quality="low" is designed for latency-sensitive scenarios, providing sub-second responses while maintaining acceptable visual quality. Conversely, quality="high" enables a full Agentic chain-of-thought—the model internally plans the composition, text layout, and lighting logic before it even starts drawing. This reasoning phase is invisible to the user but accounts for roughly 70–80% of the total latency.
quality="medium" is the middle ground; it retains a simplified planning phase but skips fine-grained verification. When quality="auto" is used without a specific setting, the model automatically chooses based on prompt complexity. However, in practice, it tends to lean conservatively toward "medium" or "high," which is why many developers mistakenly believe the "default is just slow."
How the size parameter works
gpt-image-2 natively supports three standard sizes: 1024x1024, 1536x1024, and 1024x1536, plus an auto detection mode. It also supports arbitrary dimensions, provided the total pixel count doesn't exceed 2K (2560×1440 ≈ 3.69 million pixels). Exceeding this threshold moves into experimental territory, where result stability decreases.
The number of pixels directly determines the number of visual tokens. 1024×1024 is roughly 1024 visual tokens, 1536×1024 increases to about 1536 tokens, and so on. Doubling the token count means doubling the inference and generation time, as well as doubling the output cost.
| Standard Size | Total Pixels | Visual Tokens (Est.) | Relative Latency | Use Case |
|---|---|---|---|---|
1024x1024 |
1.05M | ~1024 | 1.0× | General, Social Media, Thumbnails |
1536x1024 |
1.57M | ~1536 | 1.5× | Banners, Article Covers |
1024x1536 |
1.57M | ~1536 | 1.5× | Posters, Vertical Content |
| Custom ≤ 2K | Up to 3.69M | Up to ~3686 | 2–3× | High-res Print Previews |
🎯 Size Recommendation: In production, I recommend using
1024x1024for 95% of your requests, only switching to the 1536 series when you specifically need banners, posters, or other unique aspect ratios. When calling via APIYI (apiyi.com), you can use any custom size, but remember to keep it under 2K to ensure stability.
The coupling effect of both parameters
quality and size have a multiplicative relationship, not an additive one. A high + 1536x1024 request isn't just a few times slower than low + 1024x1024; it's dozens of times slower. This is particularly fatal in concurrent scenarios—you might think running 10 concurrent requests will get you images in 1 second, but you might end up waiting 200 seconds for those 10 images, by which time your HTTP client will have long since timed out.
Even more subtle is the implicit coupling between quality and prompt complexity. Even at the high setting, a simple prompt (e.g., "a red apple") might take 100 seconds, while a complex prompt (e.g., "cyberpunk city on a rainy night, neon signs, cinematic aspect ratio, 6 characters interacting") can easily exceed 230 seconds or more. The model's reasoning phase dynamically expands its token budget based on the number of elements in the scene. Therefore, the more complex the prompt, the slower the high setting becomes, and the higher the cost.
🎯 Prompt Writing Recommendation: When using the
highsetting, I suggest keeping your prompt under 200 words and placing the core elements within the first 50 words. Verbose descriptions don't necessarily improve quality; they often just inflate the inference time. This rule also applies when calling via APIYI (apiyi.com), as the proxy layer fully passes through the prompt, ensuring model behavior remains consistent with the official API.
Performance and Pricing Comparison of gpt-image-2 Quality Tiers
The table below is based on real-world data we collected on the APIYI (apiyi.com) platform across various time slots and prompt complexities. While data may fluctuate slightly due to network conditions, time of day, or prompt specifics, the overall scale is reliable.
Real-world Data for 1024×1024 Images
| quality | Average Latency | Price (USD/Image) | Visual Accuracy | Text Accuracy | Use Case |
|---|---|---|---|---|---|
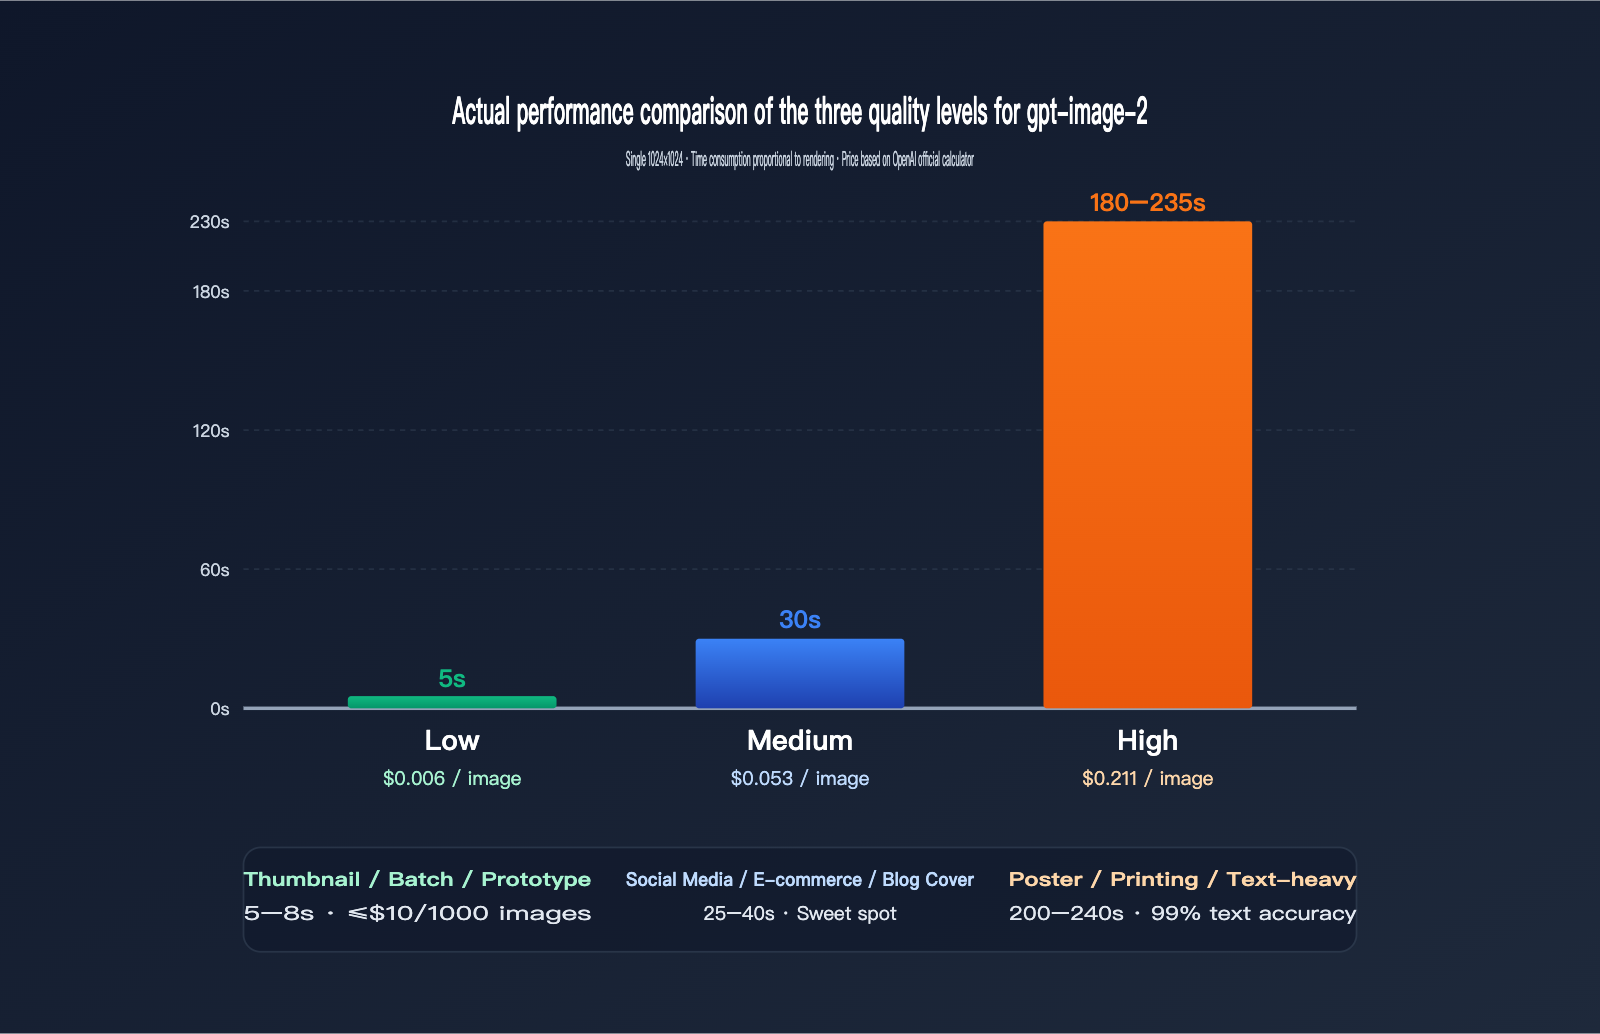
low |
3–8s | $0.006 | Medium | Average | Thumbnails, batch, prototyping |
medium |
20–40s | $0.053 | High | Good | Social media, e-commerce, blog covers |
high |
150–235s | $0.211 | Very High | Excellent (99%+) | Posters, printing, text-heavy |
You can see a clear non-linear relationship: moving from low to medium increases the price by 9x but only increases latency by 5x; moving from medium to high increases the price by 4x, but latency jumps by 6–7x. In other words, you're paying for the high tier with your "waiting time."
If your business doesn't strictly require 99% text accuracy (e.g., pure illustrations, abstract designs, concept art), medium is more than enough—it saves both money and time. Only scenarios with hard requirements for text and fine details, like posters, IP design, or print previews, justify the 200-second wait for high.
🎯 Cost Estimation Tip: Before going live in production, we recommend running 100 images each for
low/medium/highvia APIYI (apiyi.com). Create an internal A/B report covering latency distribution, pricing, and image quality to decide which tier should handle your main traffic. Running a week's worth of traffic won't cost more than $30, but it can prevent your entire SLA from being dragged down by slow requests after launch.
Latency Differences: 1024×1024 vs 1536×1024
For the medium tier, 1024×1024 averages 25 seconds, while 1536×1024 averages 38 seconds (1024×1536 is also around 38s). This difference aligns with the 1.5x ratio of visual tokens. However, this gap widens in the high tier—high + 1024×1024 takes about 180 seconds, while high + 1536×1024 can easily exceed 240 seconds, or even longer during peak hours.
The Fluctuation of the high Tier
It's worth noting that the latency for the high tier isn't constant; it's a wide distribution. We sampled 200 requests for high + 1024×1024: the fastest was 145s, the slowest 280s, with a median around 195s. This fluctuation stems from two factors: the inference budget triggered by prompt complexity, and OpenAI's backend load at different times. Therefore, you should never use synchronous blocking calls for the high tier—implement it as an asynchronous task where the frontend receives a task ID, and the backend polls or uses a callback to notify the user.
A Common Misconception: Higher Resolution Equals Better Quality
Many developers assume higher resolution automatically means better quality, so they default to the 1536 series. This is a misconception. gpt-image-2's quality at 1024×1024 is already excellent, with optimal pixel utilization. Switching to the 1536 series just changes the aspect ratio; the actual details displayed on the screen do not increase. Unless you specifically need landscape or portrait compositions, sticking with 1024×1024 is the most cost-effective choice.
Complete Python SDK Example for gpt-image-2
Below are three code snippets ranging from basic calls to production-ready implementations. All examples use the official OpenAI Python SDK, with base_url pointed to APIYI (apiyi.com), ensuring behavior identical to the official endpoint.
Basic Example: Single Text-to-Image Generation
from openai import OpenAI
import base64

client = OpenAI(
    api_key="sk-xxx",
    base_url="https://api.apiyi.com/v1"
)

resp = client.images.generate(
    model="gpt-image-2",
    prompt="Cyberpunk city in the rain, neon signs, cinematic aspect ratio",
    size="1024x1024",
    quality="high",
    output_format="jpeg",
    output_compression=85
)

with open("out.jpg", "wb") as f:
    f.write(base64.b64decode(resp.data[0].b64_json))
This code works, but there's a catch: quality="high" + the default timeout will almost certainly crash. The OpenAI Python SDK's default HTTP timeout is 600 seconds, which sounds sufficient, but many users wrap it in requests/httpx with a custom 60s timeout, leading to frequent ReadTimeout errors during bulk high tier requests.
Production Example: Explicit Timeouts and Retries
from openai import OpenAI
import base64

client = OpenAI(
    api_key="sk-xxx",
    base_url="https://api.apiyi.com/v1",
    timeout=300.0,
    max_retries=2,
)

def generate_image(prompt: str, quality: str = "medium",
                   size: str = "1024x1024", fmt: str = "jpeg"):
    resp = client.images.generate(
        model="gpt-image-2",
        prompt=prompt,
        size=size,
        quality=quality,
        output_format=fmt,
        output_compression=85 if fmt in ("jpeg", "webp") else None,
    )
    return base64.b64decode(resp.data[0].b64_json)
Pro tips:
timeout=300is a safe value for thehightier, covering 99% of requests. If you're usinglow/medium, you can tighten this to 60s.max_retries=2leverages the SDK's built-in exponential backoff, which is more stable than custom retry logic.output_format="jpeg"+output_compression=85typically results in files 60–70% smaller than PNG, with negligible visual difference—highly recommended for web thumbnails.
🎯 Timeout Advice: When calling via APIYI (apiyi.com), the platform handles connection keep-alives for long-running requests, but you must set the client SDK timeout manually; don't rely on defaults. For the
hightier, we suggest at least 240 seconds, whilelowcan be tightened to 30 seconds to prevent slow requests from clogging your connection pool.
Batch Example: Asynchronous Concurrent Generation
import asyncio
from openai import AsyncOpenAI
import base64

aclient = AsyncOpenAI(
    api_key="sk-xxx",
    base_url="https://api.apiyi.com/v1",
    timeout=120.0,
)

async def gen(prompt: str, idx: int):
    resp = await aclient.images.generate(
        model="gpt-image-2",
        prompt=prompt,
        size="1024x1024",
        quality="low",
        output_format="jpeg",
    )
    img = base64.b64decode(resp.data[0].b64_json)
    with open(f"out_{idx}.jpg", "wb") as f:
        f.write(img)

async def main(prompts):
    sem = asyncio.Semaphore(5)
    async def task(p, i):
        async with sem:
            await gen(p, i)
    await asyncio.gather(*[task(p, i) for i, p in enumerate(prompts)])

asyncio.run(main(["cat", "dog", "bird", "fish", "rabbit"] * 4))
Concurrency is the most important technique for bulk image generation. A low tier request takes 5 seconds; 20 images in serial take 100 seconds, but 5-way concurrency cuts that to 20 seconds. Just be sure to lock the quality to low or medium—concurrent high tier requests will only lead to timeout avalanches.
Recommended gpt-image-2 Parameters for Different Business Scenarios
Now that we've covered the theory, let's look at how to apply it to real-world scenarios. Here is a breakdown of the optimal parameter combinations for high-frequency business use cases.
| Business Scenario | quality | size | output_format | Expected Latency | Unit Price |
|---|---|---|---|---|---|
| E-commerce Main Image, Banner | medium | 1024×1024 | jpeg+85 | 25–35s | $0.053 |
| Social Media Posts (e.g., Xiaohongshu) | medium | 1024×1536 | jpeg+85 | 30–40s | ~$0.06 |
| Article/Blog Cover Image | medium | 1536×1024 | webp+90 | 30–40s | ~$0.06 |
| Posters, Print Previews | high | 1024×1536 | png | 200–240s | ~$0.21 |
| Subtitles/PPT Covers | high | 1536×1024 | png | 200–240s | ~$0.21 |
| Thumbnails, Prototype Testing | low | 1024×1024 | jpeg+75 | 3–8s | $0.006 |
| Batch Sketches, Mood Boards | low | 1024×1024 | jpeg+75 | 3–8s × N | $0.006 × N |
| AI Assistant Real-time Generation | low | 1024×1024 | webp+85 | 5–10s | $0.006 |
Scenario 1: E-commerce and Social Media — "Medium" is the Sweet Spot
E-commerce main images and social media posts are latency-sensitive (users won't wait 4 minutes after uploading a product), but they still need to look sharp and professional. The medium setting is your best bet. It generates images in about 30 seconds for just 5 cents—running 1,000 images a day will only cost you $53.
Scenario 2: Posters and Print Previews — Pay for "High" with Time
Posters and covers often require complex layouts, specific text, and consistent IP character representation, which demands the deep Agentic reasoning of the high setting. Don't try to rush this; instead, design your frontend to handle these as "tasks"—tell the user to check back in 3–5 minutes.
Scenario 3: Batch Processing and Prototyping — Stick to "Low"
If you need to "run 10,000 sketches overnight," you must use the low setting—there's no room for negotiation. By combining this with asynchronous concurrency and jpeg+75 compression, a single GPU node can achieve impressive throughput.
Scenario 4: Real-time User Interaction — Must be "Low" or "Medium"
For scenarios where the user is actively waiting—like chatbots, AI-embedded image generation, or automated customer service replies—never use high. Making a user wait 4 minutes means at least 50% of them will refresh or leave, which is a disaster for user experience. Stick to low and use a "Loading…" animation to deliver results within 5–8 seconds. If the quality isn't quite enough, offer an "HD Optimize" button that triggers a medium regeneration.
Scenario 5: Content Moderation and Compliance
If an image is blocked by OpenAI's content policy, use the low setting to test if your new prompt passes moderation before upgrading to medium or high for the final output. This two-stage "test-then-confirm" strategy minimizes costs, preventing you from wasting 200 seconds on a high request only to have it blocked.
🎯 Hybrid Strategy: Many production systems use a "dual-tier generation" approach—first, generate a low-res preview for the user to select, then use the
highsetting to generate the final high-quality version once they've made their choice. This is incredibly smooth to implement on APIYI (apiyi.com) because the same API key covers all quality tiers, so there's no need to switch accounts.
FAQ
Q1: Why do my high tier requests always time out?
The OpenAI Python SDK defaults to a 600-second timeout, which is theoretically enough, but many frameworks (FastAPI, Flask, Celery) add their own timeout layers. Check the timeout settings across your entire call chain; for high tier requests, I recommend allowing at least 300 seconds. If you're using httpx, remember to explicitly set httpx.Timeout(300.0).
Q2: What is the best output_compression value?
For JPEG, 85 is the sweet spot—the difference from 100 is almost invisible to the naked eye, but the file size is 30–40% smaller. For WebP, 90 is a common choice. Anything below 70 will introduce noticeable artifacts, especially in areas with gradient backgrounds. This parameter doesn't affect generation time; it only affects the final serialized output.
Q3: Is there any difference between calling gpt-image-2 via APIYI (apiyi.com) versus the official endpoint?
Parameters and behavior are passed through exactly as-is, including all fields like quality, size, output_format, output_compression, n, and background. The advantage of APIYI (apiyi.com) is that it provides high-speed nodes accessible from within China, unified billing, and pay-as-you-go pricing with no minimum spend, making it much more developer-friendly.
Q4: Can the n parameter return multiple images at once?
Yes, gpt-image-2 supports n=1 to n=10. Note that the total latency for multiple images is roughly 0.7–0.9 times the single-image latency multiplied by n (it's not perfectly parallel), and the total price is calculated as n times the cost. If you need a "consistent set of characters," using n=4 in a single inference is more stable than calling the API four times, as gpt-image-2 maintains better character consistency within a single inference pass.
Q5: What does quality="auto" actually do?
In practice, auto tends to default to medium or high, depending on the length and complexity of your prompt. Short prompts (e.g., "a cat") will likely result in low or medium, while long prompts (including characters, scenes, text, and style) will likely trigger high. For production environments, I recommend specifying the quality explicitly rather than relying on auto.
Q6: Which has better quality: 1024×1536 or 1536×1024?
Both have the same total pixel count (about 1.57 million), so the inherent quality is identical. The only difference is the aspect ratio—portrait (1024×1536) is better for posters, full-body character shots, and mobile content; landscape (1536×1024) is better for banners, landscapes, and PC covers. Choose based on your composition needs; it won't affect speed or price.
Q7: Can I skip the inference and access the underlying model directly?
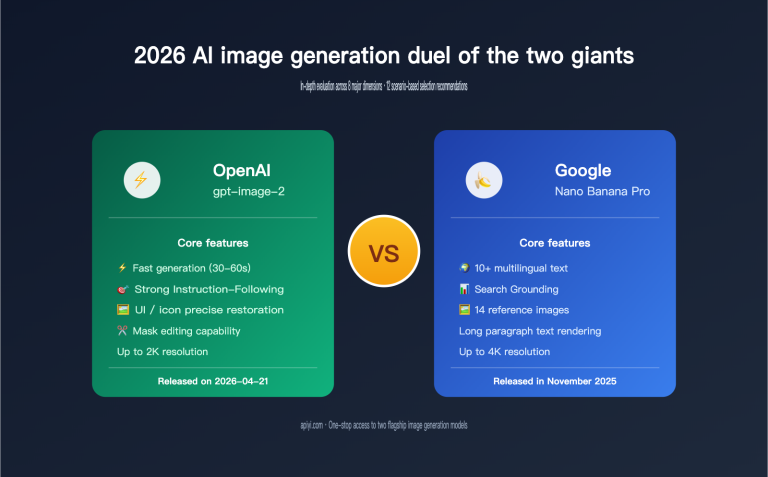
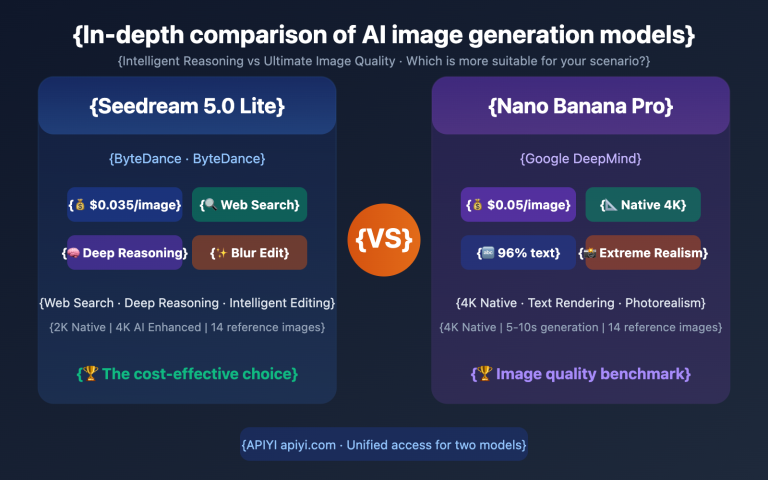
No, the Agentic reasoning of gpt-image-2 is part of the model architecture and cannot be disabled. If you only need fast, traditional SD-style image generation without text rendering or reasoning, use the low tier, which skips the full reasoning chain. Alternatively, consider Google's nano-banana-pro; its fast tier is even quicker than gpt-image-2's low setting, and it is also available on APIYI (apiyi.com).
🎯 Multi-Model Collaboration Tip: Mature image generation systems rarely rely on just one model. I recommend using
nano-banana-profor quick previews (5-second response),gpt-image-2 mediumfor standard traffic, andgpt-image-2 highfor premium content. All three models share the same API key on APIYI (apiyi.com) with pay-as-you-go billing, making it the most cost-effective combination for image API integration in 2026.
Summary: Treat parameters as performance switches, not just decorations
The design philosophy of gpt-image-2 is fundamentally different from the previous generation of image models—it turns inference into the core step of image generation. Therefore, quality is no longer a simple "image quality" toggle, but a switch that determines "how deep the inference path goes." Once you grasp this, you'll understand why the same API can span a 50x time difference, ranging from 5 seconds to 235 seconds.
In practice, we recommend making "parameter selection" the first step of your business design: clearly define the latency tolerance, required image quality, and unit price cap for your specific scenario, then consult the table to select the appropriate quality and size. Setting these parameters upfront is much less of a headache than trying to optimize them after you've already gone live.
🎯 Final Recommendation: When you start integrating gpt-image-2, we suggest running a round of comparative tests across the low, medium, and high tiers via APIYI (apiyi.com). Score the actual latency and image quality before deciding on the parameters for your main traffic. Using a single token to cover all three tiers, with pay-as-you-go billing and no minimum consumption, is the most efficient way to integrate image APIs in 2026.
— APIYI Technical Team | Continuously tracking the latest in image generation models. For more in-depth tutorials, visit the APIYI (apiyi.com) Help Center.