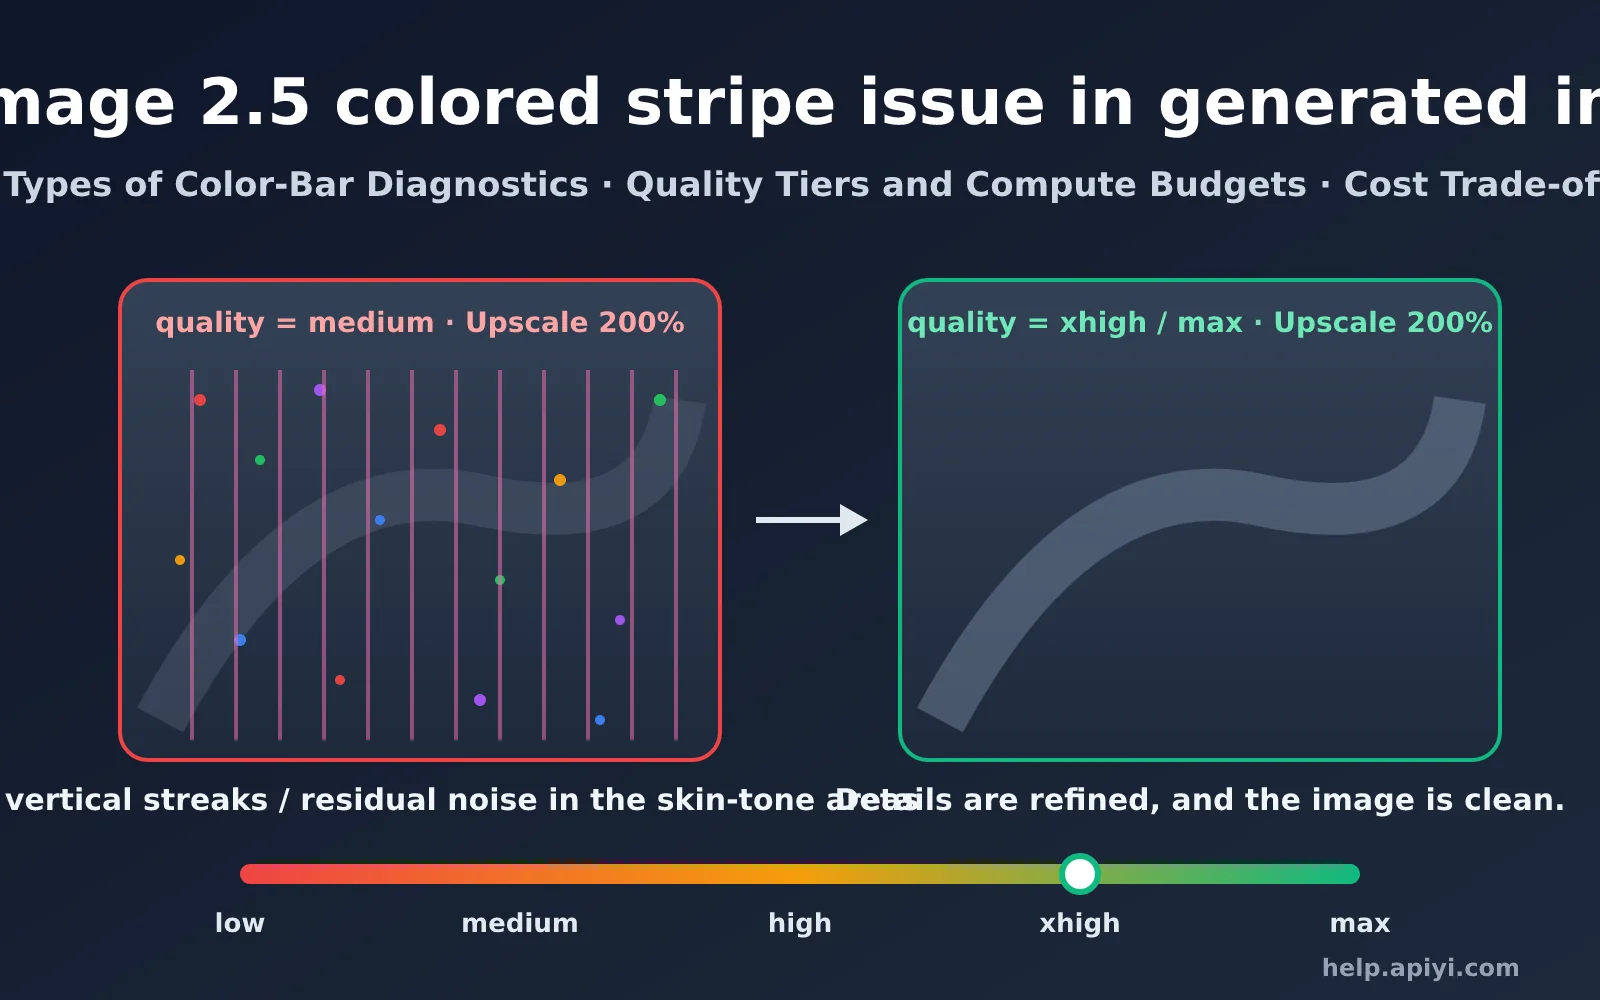
Recently, quite a few customers have reported the same issue when generating images in batches with gpt image 2.5: after enlarging the images, they can see fine color bands. The most typical example is faint pink vertical lines that appear and disappear in smooth skin-tone areas such as the forehead, bridge of the nose, and cheeks. One customer put it this way: “This one also has color bands, but they’re not as obvious as with image 2.” After changing the quality setting to ultra-high, the color bands disappeared—but the price increased several times over.
This issue follows a pattern. In most cases, the color bands in gpt-image-2.5 images are directly related to the quality parameter. The quality level determines how many output tokens—and therefore how much “compute budget”—the model allocates to an image. When the budget isn’t sufficient, high-frequency details may not fully converge, leaving residual errors in the form of faint pink vertical lines or colored speckles.
This article will first help you identify which type of color banding you’re dealing with. Then, we’ll explain why the quality level affects color bands, and provide a quality conversion table, cost comparison, and a cost-conscious image-generation strategy.
1. Five Types of Color Banding in gpt image 2.5
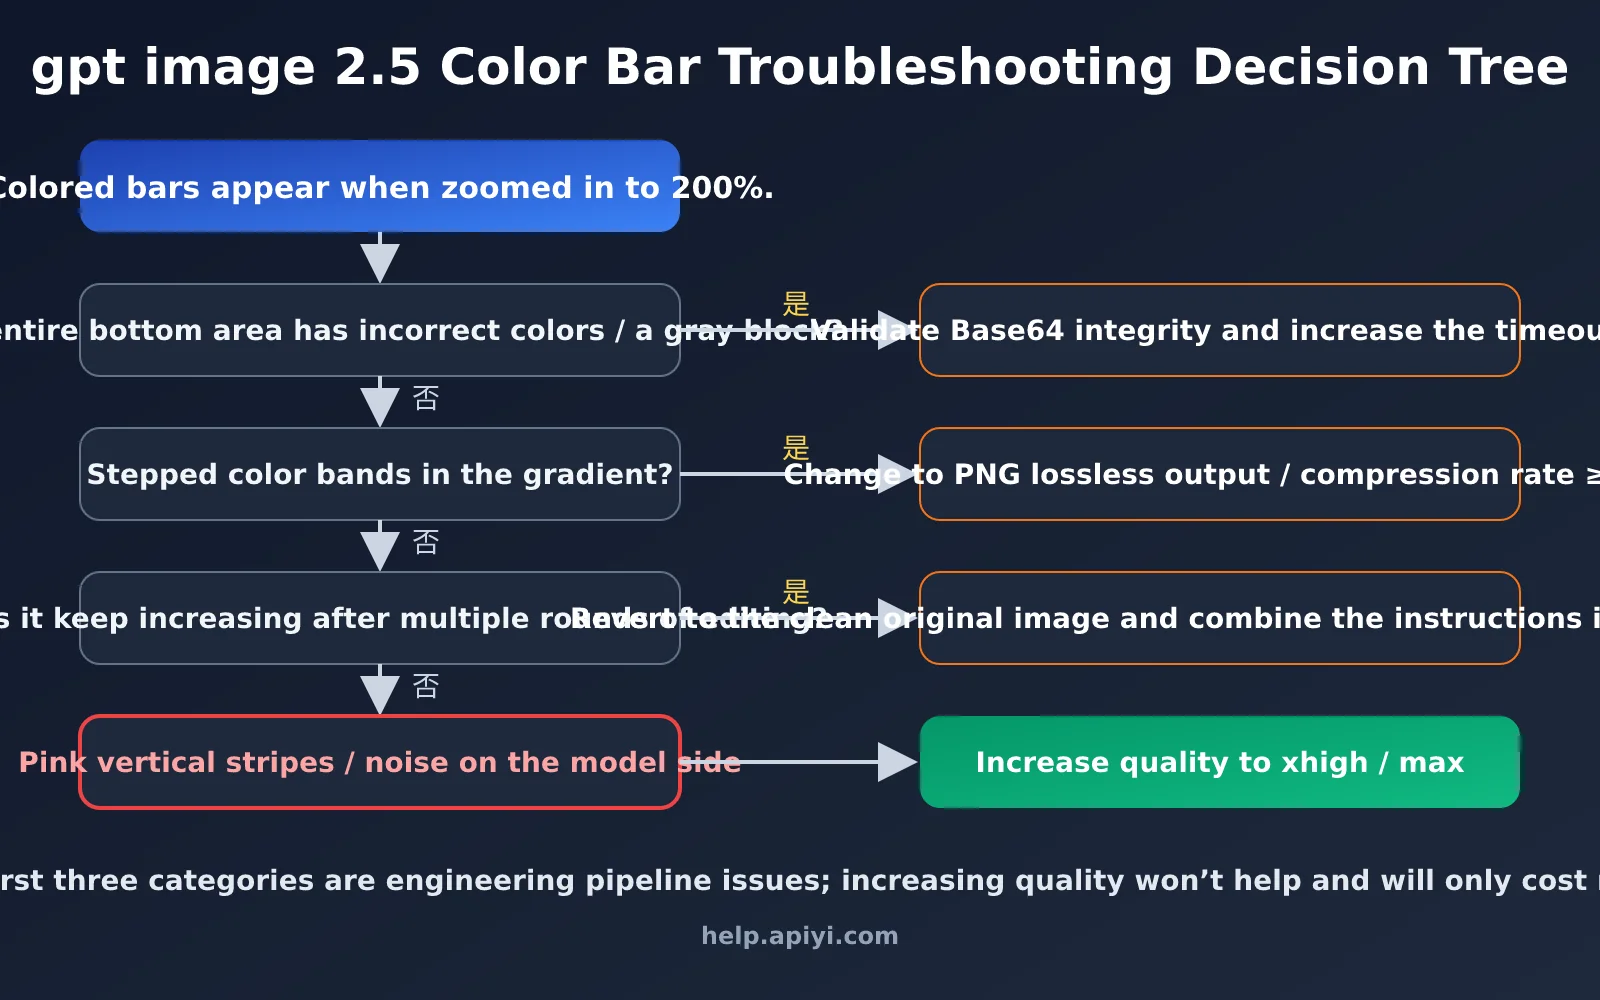
“Color bands” is a broad term users often use to describe several different issues. Technically, there are at least five possible sources. Identifying the type before troubleshooting can save you a lot of time: some types can be fixed by adjusting quality, while others have nothing to do with the model and are caused by transmission or compression.
1.1 Use the Table to Identify Your Type of Color Banding in gpt image 2.5
| Type of color banding | Visual appearance | Common locations | Root cause | Does adjusting quality help? |
|---|---|---|---|---|
| Colored vertical lines / speckles | Faint pink or magenta vertical lines, or small red and green speckles that are barely visible at normal size | Smooth skin-tone areas such as the forehead, cheeks, and bridge of the nose; dark areas and night scenes | Details haven’t fully converged during image generation | ✅ Significantly effective |
| Grid / checkerboard texture | Regular small squares, honeycomb patterns, or ripples | Clouds, fabric, stone, and water | Structural artifacts during image generation | ✅ Partially effective |
| Gradient color banding | Stepped rings or bands appearing in the sky or on walls | Large, smooth gradients | Lossy compression or 8-bit quantization | ❌ Change the output format |
| Horizontal corrupted bands | Large areas of incorrect colors or gray blocks across the lower half of the image | Bottom of the image | Truncated Base64 transmission or incomplete decoding | ❌ Check the transmission process |
| Noise accumulated through multiple edits | More noise appears after each edit | The entire image | Artifacts accumulating through repeated edits | ⚠️ Start over from the original image |
The first two types are model-side issues and were also the artifacts most frequently discussed in the community after the release of gpt-image-2. Users in the OpenAI Developer Community have described how these artifacts vary from image to image: some look like pointillist paintings, some resemble JPEG compression artifacts, and others look like colored stars scattered across the entire image. With gpt-image-2.5, the most common form in our customer feedback is the “vertical line” variant of the first type. The last three types are engineering pipeline issues, and no quality setting will fix them.
1.2 Customer Case: Pink Vertical Lines That Only Appear After Enlarging the Image
Let’s return to the customer feedback mentioned at the beginning. At first glance, the realistic portrait by the window on a rainy night looked quite clean, so we asked the customer to mark the color bands. The marked areas were concentrated on the forehead, bridge of the nose, and both cheeks—all large, smooth skin-tone regions, rather than the hair and night-scene highlights we had initially suspected. Only after enlarging the image several times did we notice faint pink vertical lines running down the skin.
Interestingly, we had to enlarge the image several times to see them, while several people on the customer’s side noticed them immediately. This shows that the visibility of color bands in gpt image 2.5 depends heavily on viewing conditions. Screen pixel density, brightness, color temperature—including automatic warm-color adjustments such as True Tone and Night Shift—and the image’s zoom method can all make a difference. A high-PPI Retina display using “fit to window” scaling may average out a one-pixel-wide, lightly colored line. On a standard monitor at 100% zoom, with increased brightness, or when zooming in on a phone, the same lines may be much easier to see. So when checking for color bands, don’t rely only on your own screen. Use the devices your end users are most likely to use as the reference.
We recommend the following three-step check. It’s more reliable than looking for the issue with the naked eye:
- Use the original PNG: Don’t use an image forwarded through a messaging app. Compression may erase faint vertical lines or create new color blocks.
- Check smooth areas: Zoom in to 200%–400%, focusing on the forehead, cheeks, bridge of the nose, solid-color walls, and sky. Because these areas lack real texture to mask the issue, vertical lines are easier to spot.
- Enlarge the chroma channels: Use a script to flatten brightness and amplify only color deviations. Pink vertical lines will become immediately visible.
Expand: Inspection script for enlarging the chroma channels and revealing pink vertical lines
import numpy as np
from PIL import Image

img = Image.open("portrait.png").convert("YCbCr")
y, cb, cr = [np.asarray(c, dtype=float) for c in img.split()]

# Flatten brightness and amplify only chroma deviations by 6x; faint pink vertical lines will become obvious magenta bands
gain = 6
cb2 = np.clip(128 + (cb - 128) * gain, 0, 255)
cr2 = np.clip(128 + (cr - 128) * gain, 0, 255)
flat = np.full_like(y, 128)
check = np.stack([flat, cb2, cr2], axis=-1).astype("uint8")
Image.fromarray(check, "YCbCr").convert("RGB").save("chroma_check.png")

# Roughly quantify vertical lines: calculate the mean red chroma by column, remove slow variations, and measure the fluctuation
col = cr.mean(axis=0)
detrended = col - np.convolve(col, np.ones(25) / 25, mode="same")
print("Vertical-line intensity:", round(detrended[25:-25].std(), 3))
In the generated chroma_check.png, regularly spaced vertical magenta bands appearing in skin-tone areas indicate typical model-side vertical banding. The Vertical-line intensity value can be used to compare different quality levels with the same prompt. In general, the higher the quality level, the lower this value will be.
💡 Troubleshooting tip: When you encounter color bands, save the original PNG before enlarging it for inspection. Don’t rely only on a compressed image forwarded through a messaging app. We recommend using APIYI at apiyi.com to run the same prompt at the
medium,high, andxhighlevels, then compare the results side by side. This will quickly tell you whether the color bands are the type that can be fixed by adjustingquality.
2. The Relationship Between gpt image 2.5 Color Bands and the quality Parameter
To understand why increasing quality can eliminate color bands, you first need to look at the tier design of gpt image 2.5. gpt-image-2.5 comes in two versions: Flare and Sunburst. Flare prioritizes speed, while Sunburst is the heavier, quality-first version. Its snapshot, gpt-image-2.5-sunburst-2026-09-08, was released on September 8, 2026. According to OpenAI’s official model documentation, it supports six quality settings: low, medium, high, xhigh, max, and auto. That’s two more tiers—xhigh and max—than gpt-image-2 offers.
2.1 Quality Tiers Are Essentially Compute Budgets
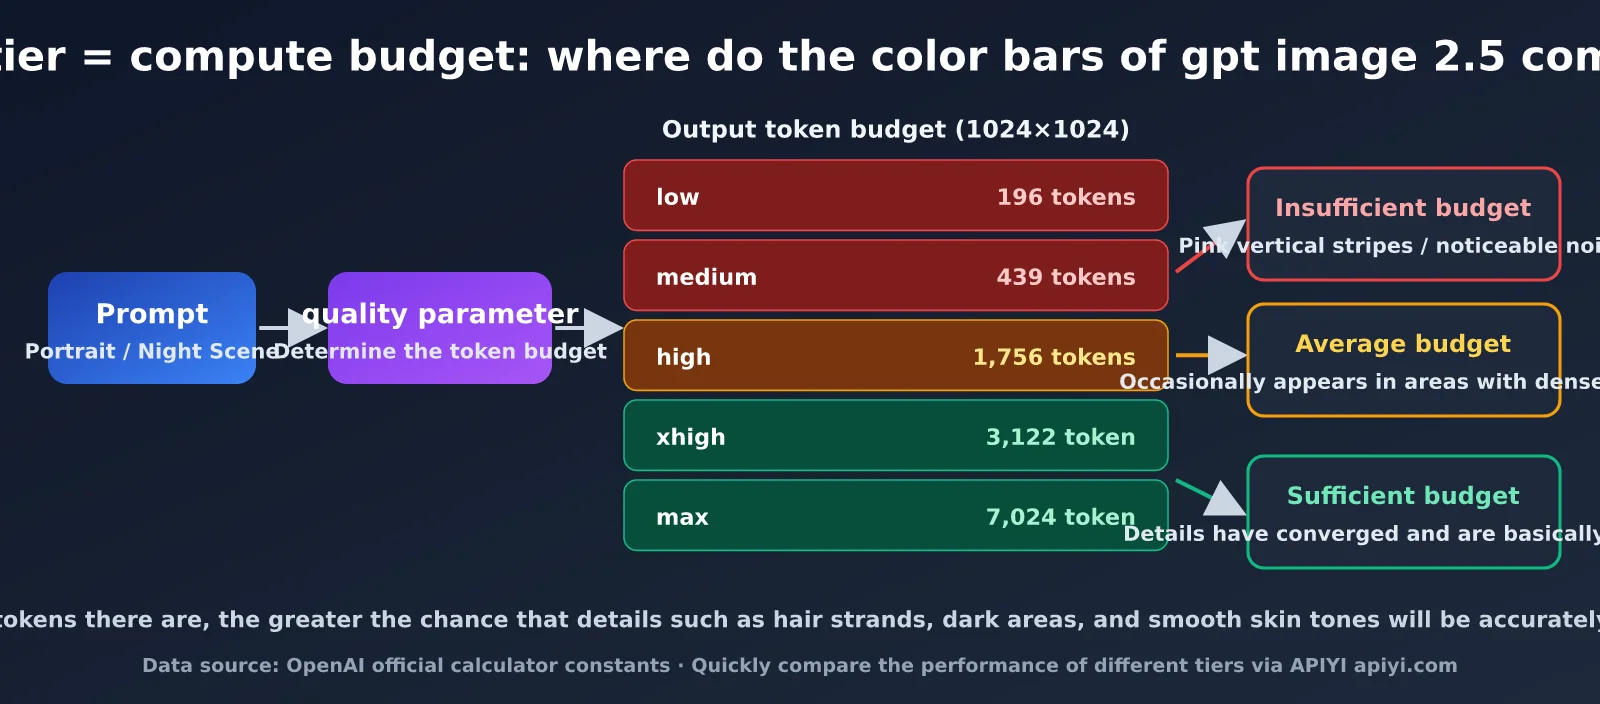
In the gpt image family, quality isn’t a post-processing filter. It directly determines the number of output tokens used for each image. The more tokens available, the more “brushstrokes” the model has to describe visual details. This gives it more opportunities to accurately reproduce high-frequency information—such as strands of hair, light spots, and textures—as well as subtle color transitions in smooth areas. When the token budget is tight, the model can only prioritize the composition and main subject. Residual errors that haven’t fully converged may remain in detailed areas, appearing as colored vertical lines or noise.
This explanation matches what testing shows: color bands are most severe at lower quality tiers and are easiest to spot in realistic portraits. Once the tier is raised to xhigh or max, the problem largely disappears. As for why residual artifacts often appear in areas such as skin tones, hair and background light spots are naturally rich in texture, which can conceal the residuals. The forehead and cheeks, by contrast, have almost no real texture, so any patterned color shift is immediately visible to the human eye. It’s worth noting that OpenAI hasn’t publicly confirmed the precise cause of these artifacts. The community has proposed several other possibilities, including invisible watermarks, denoiser clustering, and frequency interference. From an engineering perspective, however, an insufficient compute budget currently provides the best explanation for the correlation with quality.
2.2 The Tier Names Have Changed: 2.5’s high Is Roughly Equivalent to 2’s medium
This is where many users run into trouble. When migrating from gpt-image-2 to gpt-image-2.5, if you leave quality="high" unchanged in your code, you may think you’re still using the highest tier. In reality, the compute budget has been reduced by three-quarters.
Based on data compiled from OpenAI’s official calculator constants for a 1024×1024 image, the high tier on gpt-image-2.5 consumes 1,756 output tokens—the same as gpt-image-2’s medium tier. Meanwhile, gpt-image-2.5’s max tier consumes 7,024 tokens, which is equivalent to gpt-image-2’s high tier. The output-token price remains unchanged at $30 per million tokens.
| gpt-image-2.5 Tier | Output Tokens (1024×1024) | Official Price per Image | Roughly Equivalent gpt-image-2 Tier | Color-Band Risk |
|---|---|---|---|---|
| low | 196 | Approx. $0.006 | Below gpt-image-2’s low level |
🔴 High |
| medium | 439 | Approx. $0.013 | New intermediate tier | 🔴 High |
| high | 1,756 | Approx. $0.053 | gpt-image-2’s medium |
🟡 Medium |
| xhigh | 3,122 | Approx. $0.094 | Between gpt-image-2’s medium and high |
🟢 Low |
| max | 7,024 | Approx. $0.211 | gpt-image-2’s high |
🟢 Extremely low |
This table also explains why customers say the issue is “not as noticeable as with image2.” gpt-image-2.5 includes model-level improvements to noise handling, and third-party evaluations have also found that the noise patterns are “reduced but not completely eliminated.” As a result, color bands are less pronounced than with gpt-image-2 at the same token budget. However, detailed portraits can still show residual artifacts whenever the budget is set to high or below.
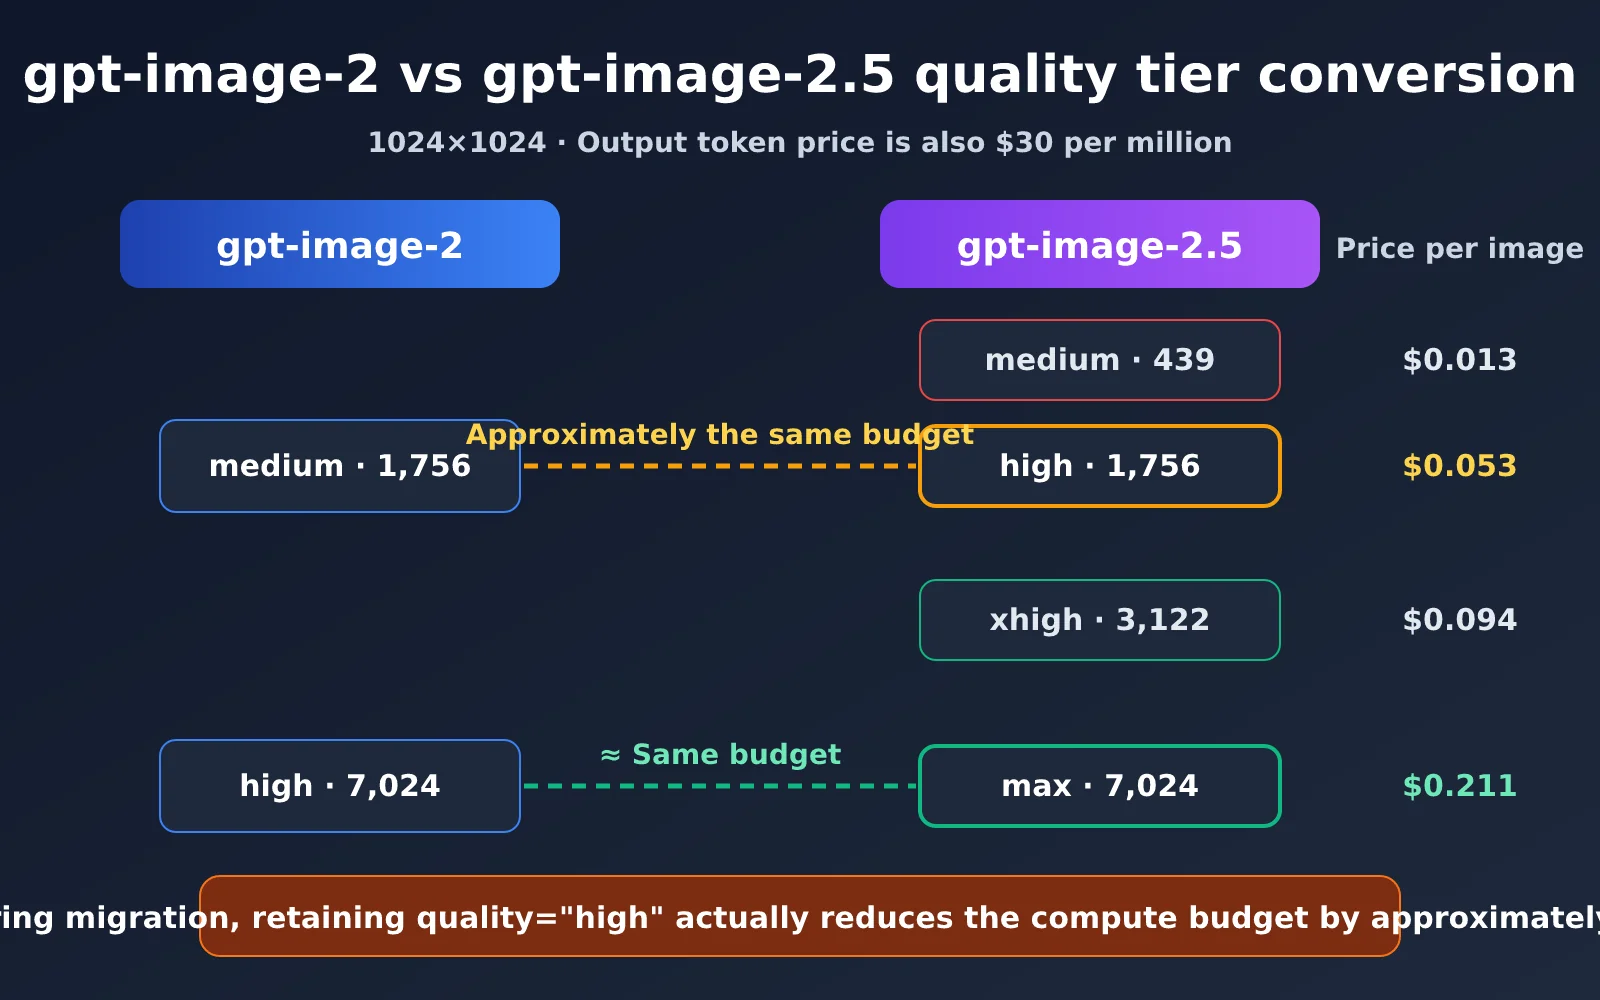
🎯 Migration advice: When switching from gpt-image-2 to gpt-image-2.5, make sure to reassess the
qualityparameter instead of carrying over the old value. With APIYI at apiyi.com, you can switch between gpt-image-2 and gpt-image-2.5-sunburst through the same interface and run an A/B comparison by changing only themodelfield.
3. Solutions for Color Banding in GPT Image 2.5
Now that we know what causes the issue, there are two ways to address it: on the model side, allocate the compute budget appropriately; on the engineering side, correct the output and transmission pipeline. First, here’s the minimal working example.
3.1 Getting Started: Call GPT Image 2.5 with the Right quality Setting
The following is a minimal example of calling gpt-image-2.5-sunburst through an OpenAI-compatible API. For detail-heavy scenes such as portraits and night scenes, it’s best to start with xhigh:
import base64
from openai import OpenAI

client = OpenAI(api_key="YOUR_API_KEY", base_url="https://api.apiyi.com/v1")

result = client.images.generate(
    model="gpt-image-2.5-sunburst",
    prompt="夜景窗边的女性肖像,雨夜城市灯光虚化,电影感布光",
    size="1024x1536",
    quality="xhigh",        # 细节密集画面建议 xhigh 起步
    output_format="png",    # 无损输出,避免压缩色带
)

with open("portrait.png", "wb") as f:
    f.write(base64.b64decode(result.data[0].b64_json))
Expand: A tiered image generation script using low-quality drafts and high-quality finals
import base64
from openai import OpenAI

client = OpenAI(api_key="YOUR_API_KEY", base_url="https://api.apiyi.com/v1")
MODEL = "gpt-image-2.5-sunburst"

def gen(prompt: str, quality: str, n: int = 1, size: str = "1024x1024"):
    resp = client.images.generate(
        model=MODEL, prompt=prompt, size=size,
        quality=quality, n=n, output_format="png",
    )
    return [base64.b64decode(d.b64_json) for d in resp.data]

def draft_then_final(prompt: str, drafts: int = 4):
    # 第一步:用 medium 低成本出多张草稿,只看构图和创意
    for i, img in enumerate(gen(prompt, "medium", n=drafts)):
        open(f"draft_{i}.png", "wb").write(img)
    # 第二步:人工选定方向后,只对最终稿使用高档位
    revised = input("输入修改后的 prompt(直接回车沿用原 prompt): ").strip()
    final = gen(revised or prompt, "xhigh")[0]
    open("final.png", "wb").write(final)
    print("定稿已保存为 final.png")

if __name__ == "__main__":
    draft_then_final("夜景窗边的女性肖像,雨夜城市灯光虚化,电影感布光")
The idea behind tiered image generation is to spend money where it matters: use medium for quick trial and error during the draft stage, then switch to xhigh or max once the composition is finalized. This helps avoid color banding in the final image without charging the highest rate for every experimental draft.
🚀 Get Started Quickly: We recommend using the APIYI apiyi.com platform to quickly test image generation results at different
qualitylevels. The platform provides an OpenAI-compatible API, so you can run the script above with existinggpt-image-2code by changing onlybase_urlandmodel.
3.2 Choosing a GPT Image 2.5 quality Level by Scenario
Not every image needs max. Whether color banding is visible depends heavily on the image content and its final display size. Low-frequency images such as flat illustrations and icons show almost no visible noise even at medium.
| Use case | Image characteristics | Recommended level | Reason |
|---|---|---|---|
| Creative drafts and composition exploration | Only the overall direction matters | medium | Lowest cost; color banding doesn’t affect evaluation |
| Flat illustrations, icons, and UI assets | Large color blocks with few details | high | Noise is less noticeable in low-frequency images |
| E-commerce product images and posters | Rich material textures | xhigh | Fabric and metal textures can easily reveal artifacts |
| Photorealistic portraits and night scenes | Large areas of smooth skin tones and dark regions | xhigh or max | The scenarios most prone to pink vertical stripes |
| Print and large-screen displays | Will be viewed enlarged | max | Any residual artifacts become obvious when enlarged |
3.3 Engineering Fixes for Color Banding
If, based on the table above, the color banding falls into one of the last three categories, increasing quality will only waste money. Instead, troubleshoot each item below:
| Symptom | What to check | Fix |
|---|---|---|
| Stepped color bands appear in the sky or on walls | Check output_format and output_compression |
Use png, or set the JPEG/WebP compression quality to 90 or above |
| A large gray block or incorrect colors appear at the bottom of the image | Compare the file size after Base64 decoding | Increase the timeout and verify that the PNG file is complete before saving it |
| Noise becomes increasingly noticeable after several editing rounds | Review the output from each round | Always use the original clean image as the editing input |
| The issue appears only when displayed through a CDN or frontend | Compare it with the downloaded original | Disable secondary lossy compression in the image service |
Noise accumulation during multi-round editing deserves special attention. Community testing has found that when the third through fifth images are generated through continuous iteration in the same session, noise can become significantly amplified. For workflows that require multiple revisions, always return to the original clean image and combine the requested changes into a single instruction, rather than continuing to stack edits on the previous output.
3.4 Prompt-Based Supporting Techniques
In addition to parameter settings, prompts can also help reduce the issue to some extent. Adding descriptions such as clean, noise-free, smooth skin gradients, no grain to the end of the prompt can encourage the model to reduce grain. However, the effect is limited and won’t fundamentally solve the lack of budget at lower quality levels.
A more effective approach is to reduce the high-frequency load in the image. For example, in a night portrait, replace “dense city neon bokeh” with “soft, blurred city lights.” Once the detail density is reduced, the same quality level is much less likely to produce color banding.
IV. Cost Trade-Offs of Color Banding in gpt image 2.5
Let’s return to the customer’s comment: “The ultra-high quality is gone, but the price has multiplied several times.” This is indeed a trade-off we have to deal with today. Increasing the quality from high to xhigh makes each image cost about 1.8 times more, while upgrading to max costs 4 times more. If you switch everything to max, your monthly budget will rise significantly.
| Image Generation Strategy | Output Cost for 100 Final Images (1024×1024, Official Pricing) | Color Banding Risk | Best For |
|---|---|---|---|
| All high | Approximately $5.3 | Relatively high for portrait scenes | Illustration and asset-based businesses |
| All xhigh | Approximately $9.4 | Low | Most commercial image generation |
| All max | Approximately $21.1 | Extremely low | Print materials and large brand visuals |
| 4 medium drafts + 1 xhigh final image per image | Approximately $14.7 | Low for final images | Creative teams that need extensive exploration |
We recommend choosing quality tiers based on the use case rather than applying a single setting across the board. Keep illustrations at high, use xhigh for portraits and product images, and reserve max for print and large-screen materials. After making this adjustment, most teams can keep the overall cost increase within 50% while virtually eliminating color banding that users can see.
💰 Cost Optimization: For high-volume image generation, we recommend connecting to gpt-image-2.5-sunburst through APIYI at apiyi.com. The platform charges based on usage, supports flexible switching between quality tiers, and provides detailed usage records, making it easier to calculate the actual cost of each tier for different use cases. Refer to the pricing shown in the console for the latest details.
V. Frequently Asked Questions
Q1: Why does gpt image 2.5 still show color banding at the high setting? Is the model broken?
No. The high setting for gpt-image-2.5 is roughly equivalent to the medium setting for gpt-image-2, so its compute budget is limited. In realistic portraits, faint pink vertical lines or small amounts of colored noise in skin-tone areas are known issues. First, use the table in Chapter 1 to identify the type of color banding. If it’s model-related vertical banding or noise, switching to xhigh will usually resolve the problem. You can use APIYI at apiyi.com to compare the results from high and xhigh with the same prompt, then decide whether the additional cost is worthwhile.
Q2: Why is the color banding in gpt-image-2.5 less noticeable than in gpt-image-2?
gpt-image-2.5 optimizes noise at the model level. Third-party evaluations also indicate that the noise patterns have been reduced, but not completely eliminated. As a result, color banding is less noticeable in 2.5 with the same token budget. That doesn’t mean lower quality tiers are completely safe to use.
Q3: Can setting quality to auto prevent color banding?
auto lets the model choose the quality tier, so the result isn’t predictable—it may select medium or high. For production scenarios that are sensitive to color banding, we recommend explicitly specifying xhigh or max so that both image quality and cost remain predictable.
Q4: Is the color banding in the Flare version worse than in Sunburst?
Flare is a lightweight version optimized for speed. Its official positioning is to trade some detail for faster generation, so it’s more likely to reveal noise in detail-heavy scenes. For quality-sensitive businesses, we recommend Sunburst. Both versions can be accessed through APIYI’s unified interface at apiyi.com; simply change the model parameter to switch between them for comparison.
Q5: Can images with color banding be fixed after they’ve already been generated?
They can be improved to some extent. For example, you can apply light denoising to the chroma channels with a noise-reduction tool, or process the color bands separately in image-editing software using frequency separation. However, post-processing will reduce some detail, and in most cases it’s more cost-effective to regenerate the image at a higher quality tier.
Q6: Why can some people see the color banding in the same image while others can’t?
The visibility of color banding depends on screen pixel density, brightness, color temperature, and scaling. On a high-PPI display set to “fit to window,” a faint pink vertical line that’s only one pixel wide may be averaged out. Displays with True Tone or Night Shift enabled can also make faint pink tones harder to distinguish from skin tones. For commercial delivery, you should evaluate the image based on the devices used by customers and end users. Use the chroma inspection script from Section 1.2 for an objective assessment instead of relying solely on how the image looks on your own screen.
6. Summary
Color banding in gpt image 2.5 outputs isn’t mysterious. The key is to identify the type first, then apply the right fix:
- Model-side color banding (pink vertical streaks in skin tones, colored noise, and grid-like textures) is strongly tied to the quality setting. At its core, it happens when the output token budget is too low for the details to fully converge.
- Quality tier names have changed:
highin gpt-image-2.5 is roughly equivalent tomediumin gpt-image-2, whilemaxis roughly equivalent tohighin gpt-image-2. When migrating, you need to reconfigure the quality setting. - Engineering-side color banding (color strips, corrupted patterns at the bottom, and artifacts accumulated across multiple edits) is unrelated to quality. You’ll need to change the output format, verify transmission integrity, or edit from the original image again.
- Cost control comes from choosing quality tiers based on the scenario and using a layered workflow—“low-quality drafts + high-quality final output”—rather than using
maxfor everything.
We recommend using APIYI apiyi.com to integrate gpt-image-2.5-sunburst, gpt-image-2, and other image models through a unified interface. You can configure quality tiers by scenario within the same codebase, keeping color-banding issues within acceptable limits while ensuring every unit of compute budget is spent where image detail really matters.
About the author: The APIYI technical team has long tracked production issues involving OpenAI image models, including visual artifacts, content moderation blocks, and multi-model routing. Visit the APIYI website at apiyi.com for integration solutions and technical support for mainstream image models such as gpt-image-2.5 and gpt-image-2.
References:
– OpenAI GPT-Image-2.5 Sunburst model documentation: developers.openai.com/api/docs/models/gpt-image-2.5-sunburst
– OpenAI Developer Community GPT Image 2 issue collection: community.openai.com
– GPT Image 2.5 quality tiers and pricing analysis: tokencost.app