
Author’s note: Starting with the f(t) rendering principle and the SenseNova 6.8 Code2Video case, this article uses four questions to help you choose between code-based and pixel-based video generation.
If you create science explainers, formula walkthroughs, or data animations, you’ve probably run into the same problem: the visuals look good, but the text is wrong or the formulas are distorted. Generate the video again, and new problems appear. This article explains how to choose between code-based and pixel-based video generation, so you can decide when to have AI write code for a video—and when not to.
This isn’t a sales pitch for replacing everything with code. Using SenseNova 6.8 Code2Video, introduced in an open-source model practice post on November 3, 2026, as a case study, we’ll break down the principles and workflow and point out what the available information hasn’t confirmed.
What you’ll learn: By the end of this article, you’ll understand how code-generated video goes from a time function f(t) to an MP4, and you’ll be able to use four questions to decide which approach fits your video.
Code-Generated Video vs. Pixel-Generated Video: Key Differences
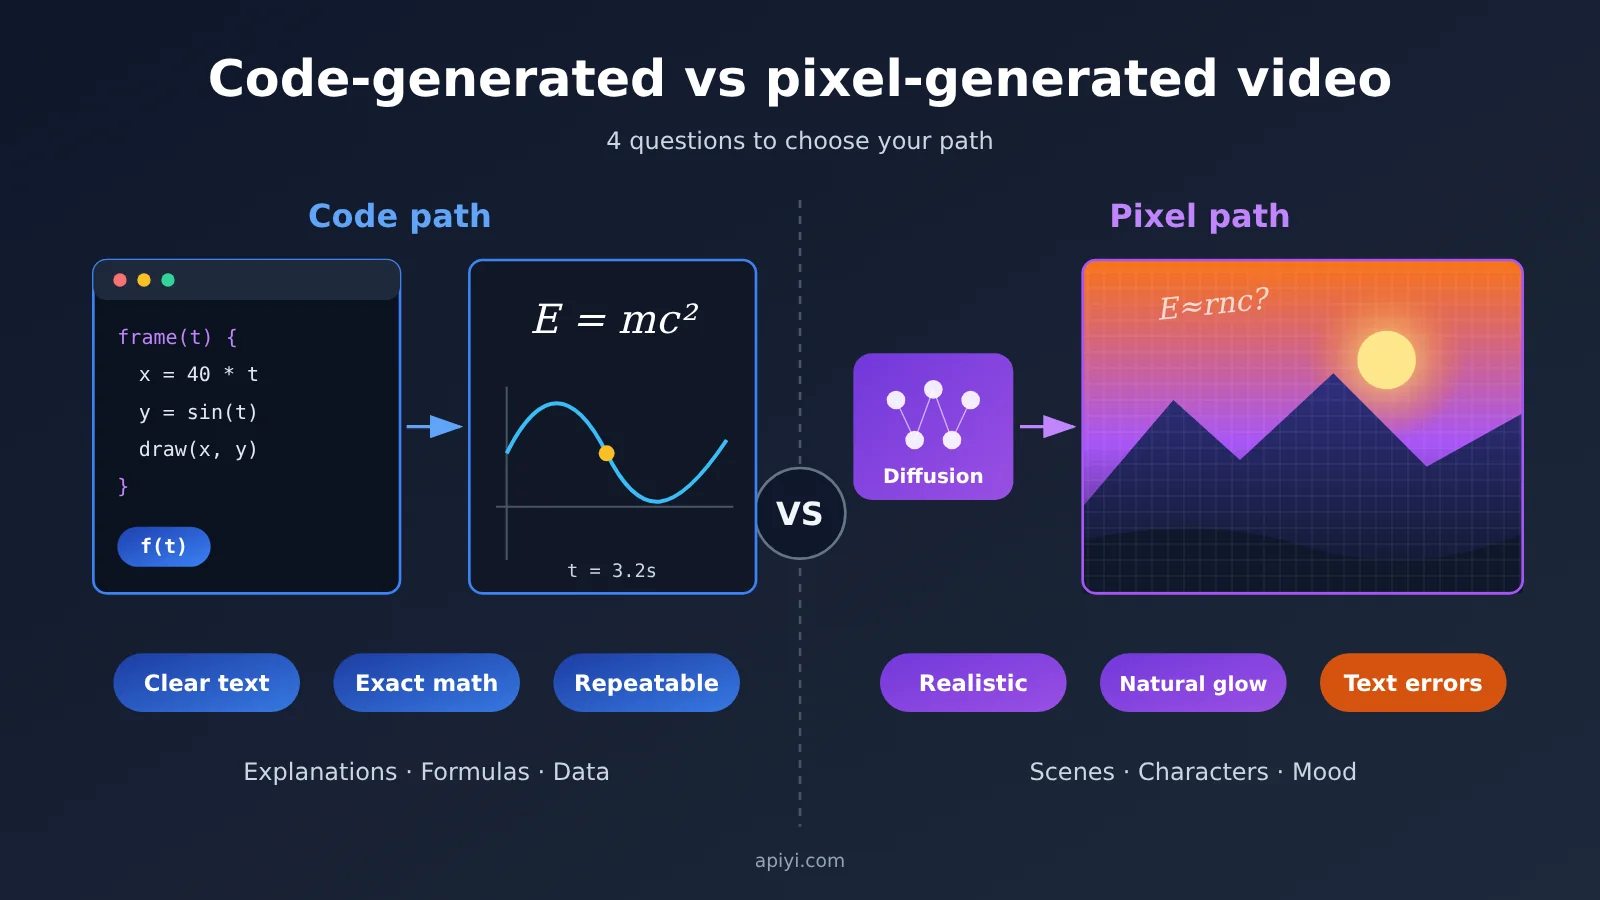
The fundamental difference between the two approaches isn’t model size—it’s what the model produces. The pixel approach generates images directly, while the code approach generates a program that renders them.
| Dimension | Code-Generated Video | Pixel-Generated Video |
|---|---|---|
| Model output | Executable code such as HTML/CSS, Canvas, SVG, Three.js, Manim, or p5.js | Pixels generated directly for each frame |
| Text and formulas | Rendered from characters and input data | Generated as part of the image; the original post’s author says garbled text and distorted formulas are common |
| How to make changes | Modify the specifications or source code, then render again | Usually requires adjusting the prompt and regenerating |
| Reproducibility | The same pure-function code can be rendered repeatedly | Depends on the model and tool |
| Main risks | May lack photorealism and requires a rendering environment | Precise information can be hard to guarantee, requiring repeated screening |
It’s worth noting that the claim that “pixel diffusion models often produce garbled text, distorted formulas, and objects passing through each other” is the original post author’s generalization; it wasn’t accompanied by a comparative test. Treat it as a potential risk when choosing an approach, and try both with your own material before making a final decision.
How Code-Generated Video Works: Each Frame Is a Pure Function of Time
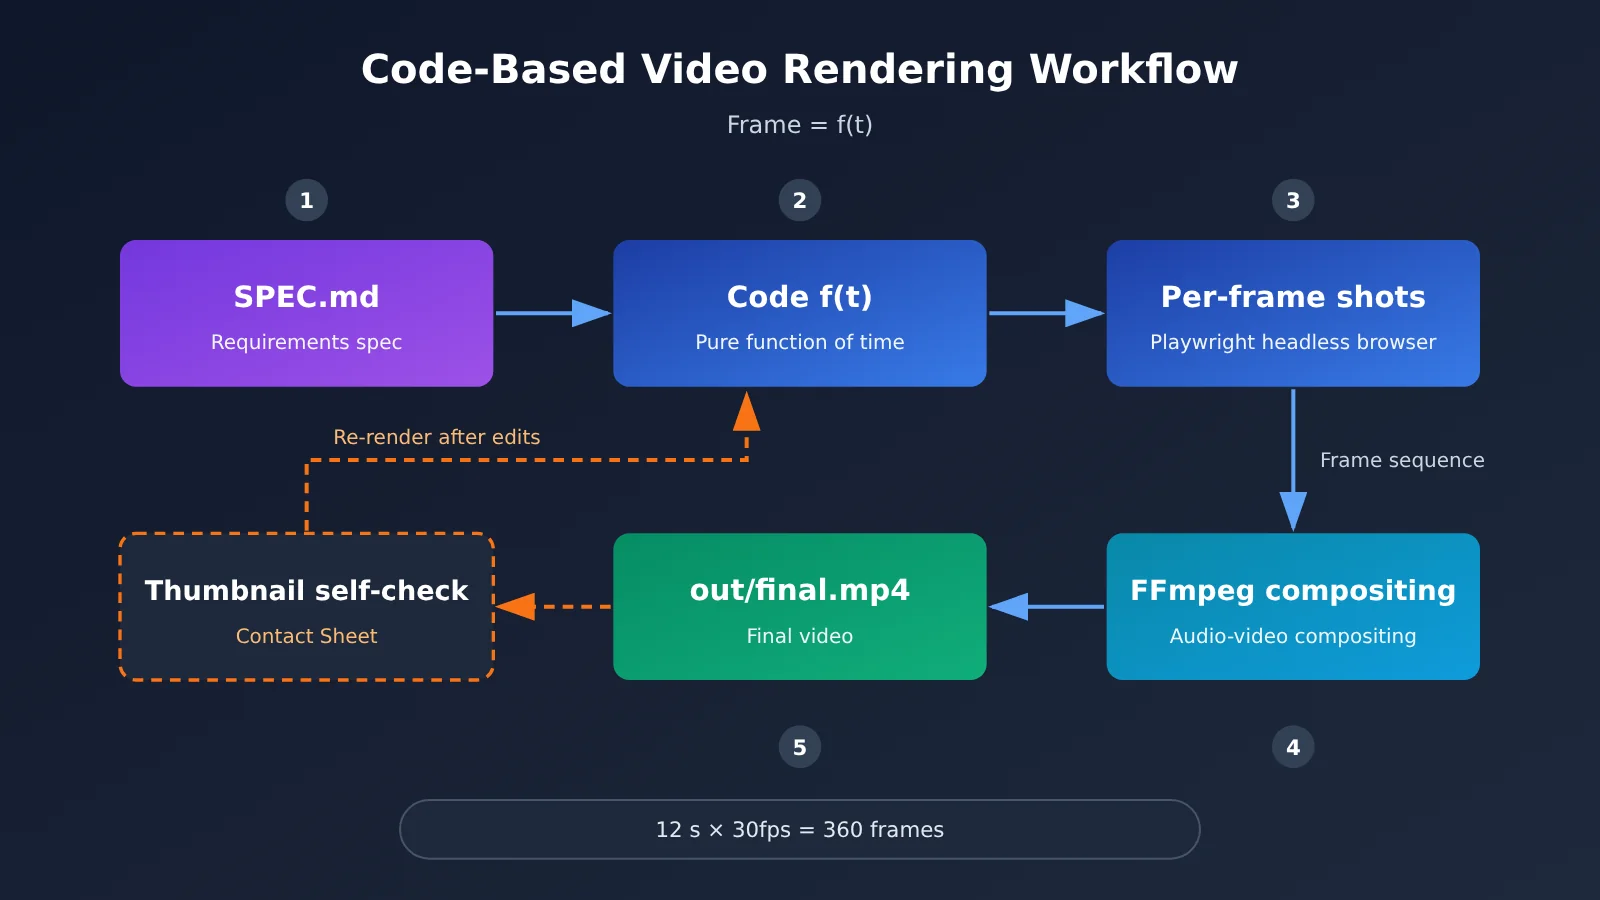
At its core, Code2Video defines each frame as a pure function of the time parameter t. Given any point in time, the program can calculate every element’s position, shape, and color. Because the visuals don’t depend on the system clock, rendering the same code repeatedly should produce consistent results.
The full rendering pipeline has four steps:
- Write the time function: The model expresses composition, motion, and pacing as code that varies with t.
- Step through frames: Playwright launches headless Chromium and sets each time point according to the frame rate. For a 12-second video at 30fps, that’s 360 frames.
- Capture the frame sequence: A high-resolution screenshot is taken at each time point.
- Combine with FFmpeg: The frame sequence and audio track are combined into the final MP4.
This is fundamentally different from screen recording. Screen recording depends on the device’s real-time performance, while frame-by-frame rendering keeps each frame in its correct position on the timeline, even if it takes longer to calculate. In practice, unseeded random numbers or font differences across machines can still break that determinism.
Deterministic Code-Generated Video Starts With the Spec, Not Just the Code
According to the post, code animations generated by a typical model from a single prompt can look rough. The key difference is the workflow: Code2Video, paired with the code-video Skill, first turns requirements into a verifiable SPEC.md that defines the composition, color palette, easing curves, and storyboard timeline. Natural-language revisions are also applied mainly to this spec, making it easier to keep the style and logic consistent across multiple rounds of changes.
After the initial render, the model extracts keyframes into contact sheets and checks for overlapping text, elements moving out of frame, and pacing issues. It then updates the code and renders again. According to the post, a single task can run for more than 10 hours and support over 2,000 tool calls, producing VERIFY.md and out/final.mp4 as final outputs. These figures are project claims; refer to the official repository and model card for model parameters and capabilities.
💡 Technical tip: If you don’t want to deploy a Large Language Model yet, you can use APIYI’s unified interface at apiyi.com to have different text models generate
SPEC.mdfrom the same requirements. Compare how clearly each one defines the storyboard and constraints. This step doesn’t involve rendering, but it’s a quick way to check whether your requirements are clear enough.
Code-Generated vs. Pixel-Generated Video: 4 Questions to Guide Your Choice
You don’t need to start by debating which model is more powerful. Instead, identify the elements your video can’t afford to get wrong. Answer these four questions in order:
- Is there content that must be reproduced exactly? For example, terminology, formulas, prices, or chart values.
- Are there values you need to control precisely? For example, coordinates, duration, camera paths, or music synchronization.
- Will you need to make repeated, localized edits? For example, changing only the color palette or adding one annotation while keeping everything else unchanged.
- Does the video’s value depend on a realistic look and feel? For example, real people, live-action environments, or natural lighting.
If you answer “yes” to at least two of the first three questions and “no” to the fourth, consider the code-based approach first. If you answer “yes” to the fourth, code is unlikely to be your first choice. That said, this is an inference based on how the approaches work. The reference material doesn’t provide comparative evidence for photorealistic styles, so it’s worth testing for yourself.
| Video element | Required capability | Recommended approach | Why |
|---|---|---|---|
| Subtitles and typography | Accurate characters and stable layouts | Code first | Text is laid out as characters |
| Formulas and charts | Accurate data and structure | Code first | Content can come directly from the input |
| Camera movement and beats | Precise timing and paths | Code first | Duration, beats, and paths are all numerical |
| Physics and particle simulations | Equation-driven motion | Code first | Motion can be calculated using mathematical and physical formulas |
| Real people and live-action realism | Realism and detail | Pixels or live action first | Evidence for the code-based approach is still lacking; test it yourself |
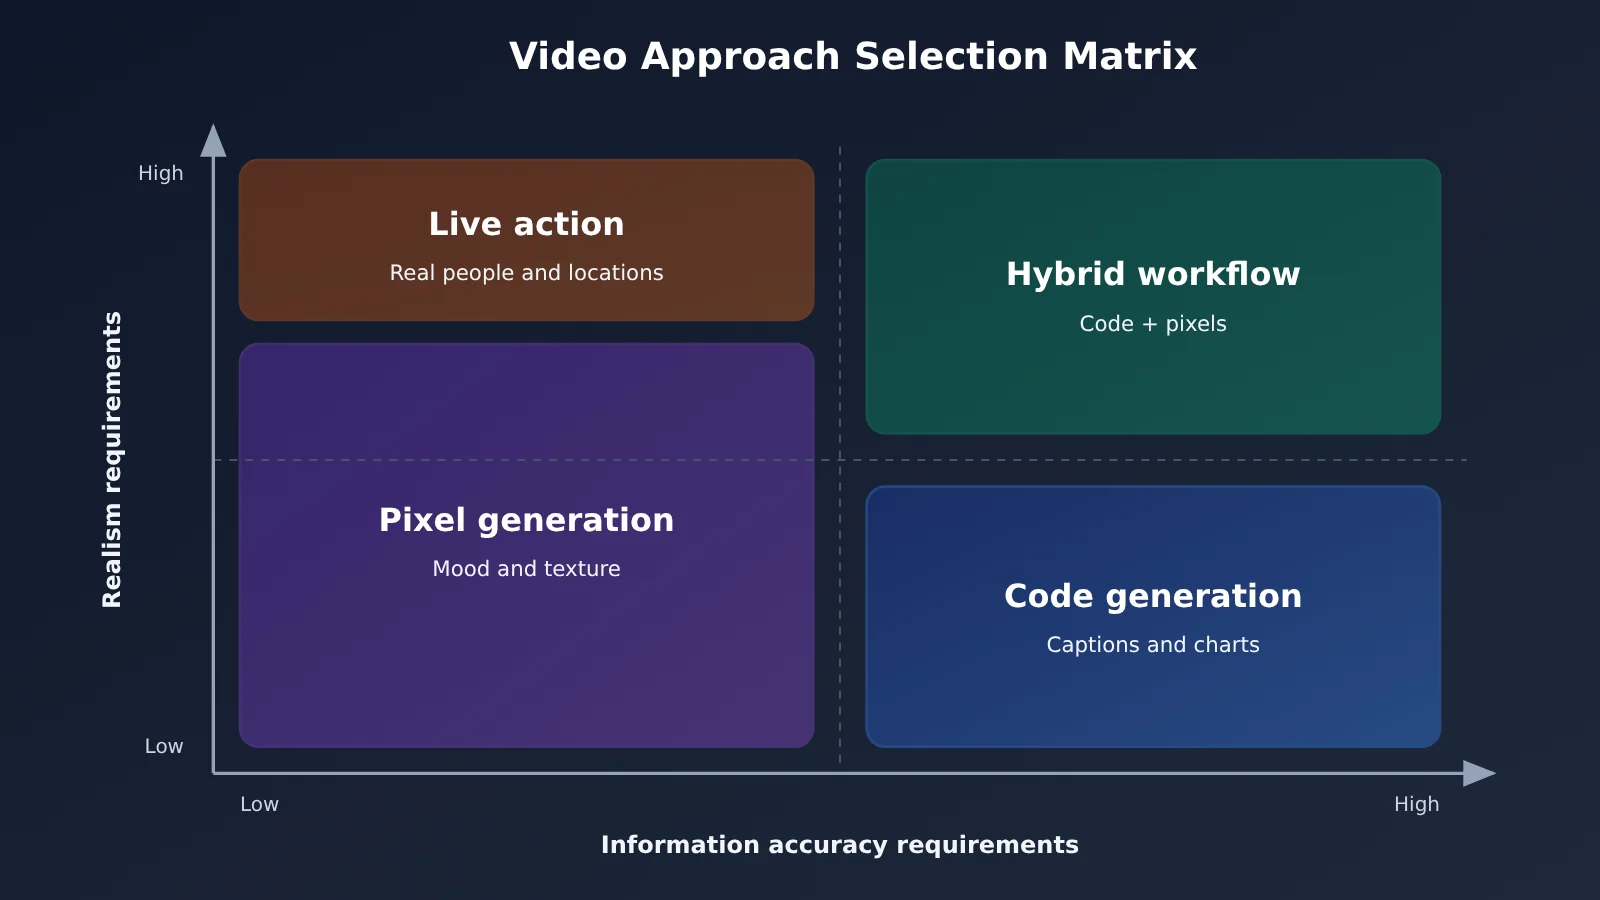
To add your own evidence to the matrix above, you can use the same script to create sample clips with available text and video models through APIYI at apiyi.com. Check the platform’s current list to see which models are available.
6 Scenarios Well Suited to Code-Generated Video
The code-video Skill provides practical guides across eight domains. From those, we can identify the following scenarios as good places to start. The “Suitability” ratings are this article’s judgments based on how the approach works, not official ratings.
| Video type | Corresponding guide | Suitability | Things to watch |
|---|---|---|---|
| Educational content and data visualization | explainer-diagrams.md |
High | Verify input data first |
| Motion typography and UI animation | motion-graphics-and-promos.md |
High | Prepare the required fonts in advance |
| Short videos synced to music | music-and-beat-sync.md |
High | Define the beats and cut points |
| Particle and physics simulations | simulations-and-generative.md |
High | Set constraints on parameters and seeds |
| 3D product showcases | threejs-scenes-and-cameras.md |
Medium | Judge the look and feel from a sample |
| Stylized character animation | character-and-creature-motion.md |
Medium | Not the same as realistic human performance |
One important caveat: the code-based approach ensures that content is rendered precisely as provided, not that the content itself is correct. If a script contains an incorrect formula, it’ll render that incorrect formula clearly. A person still needs to check the facts.
Getting Started with Code-Generated Video: Code2Video
This workflow is adapted from a community post and is intended for people building workflows in an existing GPU environment. Deployment settings may change between versions, so check the official README before you begin.
Step 1: Prepare the Environment
Install the dependencies in advance so the agent doesn’t spend a lot of time configuring the environment on its first run.
| Component | Requirement | Purpose |
|---|---|---|
| Coding agent | Codex, Claude Code, or similar | Runs the code-writing, rendering, and fixing loop |
| Node.js | Version 18 or later | Runs the frontend rendering project |
| Python 3 | Install dependencies from the repository’s requirements.txt |
Handles audio and helper scripts |
| FFmpeg / FFprobe | Available on the system | Assembles video and validates media streams |
| Playwright | Includes Chromium and fonts for the relevant language | Captures frames in a headless browser |
Step 2: Deploy the Model and Install the Skill
- Download the weights:
huggingface-cli download sensenova/SenseNova-6.8-Code2Video --local-dir /path/to/SenseNova-6.8-Code2Video - Start the service: The post uses a vLLM container to provide an OpenAI-compatible interface, with four-GPU tensor parallelism as an example. Key parameters include
--tensor-parallel-size 4and--max-model-len 524288. - Clone the repository:
git clone https://github.com/OpenSenseNova/SenseNova-6.8-Code2Video.git - Create an isolated directory:
mkdir -p ~/video_tasks/methane_explainer/.claude/skills. The agent will run shell commands automatically, so don’t run it in an important project directory. - Copy the Skill:
cp -r SenseNova-6.8-Code2Video/skills/code-video ~/video_tasks/methane_explainer/.claude/skills/code-video - Configure the context: The post specifies the environment variables
CODEX_MAX_CONTEXT_TOKENS=524288,CODEX_AUTOCOMPACT_PCT=80, andCODEX_MAX_OUTPUT_TOKENS=64000.
The post mentions both .claude/skills and .codex/skills. Check the correct directory for your agent against its official documentation.
If your team is still evaluating the approach, you don’t need to invest in a multi-GPU setup right away. You can first use APIYI at apiyi.com to access an existing coding model and test the workflow for specifications and simple Canvas animations. Then decide whether to deploy a dedicated model. This lets you validate your requirements and workflow, but the resulting video won’t directly represent Code2Video’s capabilities.
Step 3: Expand a One-Line Request into a Code-Generated Video Brief
The post’s example is a 12-second educational video about methane combustion. A one-line request is expanded into a structured brief. You can also use the Enhance Prompt template in the repository’s prompts/ directory to generate dense_prompt.md. A good brief should cover at least the following:
- Basic specs: 1920×1080 resolution, 30fps, 12-second duration, and programmatically generated sound effects.
- Learning objective: Explain that a chemical reaction only rearranges atoms—it neither creates nor destroys them.
- Timeline: Show the reactants from 0–3 seconds, break the bonds from 3–7 seconds, recombine the atoms from 7–10 seconds, and display the balanced equation from 10–12 seconds.
- Hard constraint: Keep the counter in the upper-right corner locked to
C: 1 | H: 4 | O: 4throughout.
That last point shows the advantage of the code-based approach. The model doesn’t need to “remember” what the counter looks like; the program can render those values consistently throughout.
Step 4: Refine the Code-Generated Video with Natural Language
The first render is usually just a starting point. The post recommends using --continue in the same task directory to make further changes, and suggests three prompting techniques:
- Lock down what shouldn’t change first: Start with
Keep the molecular coordinates, bond-breaking timing...to prevent the timeline from being rewritten when you change the style. - Give precise timestamps: For example,
At 3.5s when bonds break...helps the model find the relevant section. - Ask for in-place edits: End with
Edit the existing source in place and overwrite out/final.mp4.to avoid creating a separate project.
If you don’t have the source code, you can also put a reference video in the project directory and ask the model to analyze its layout, transitions, and motion paths, then reconstruct it as an editable project. This is useful for learning about structure and pacing, but before publishing, make sure you understand the copyright and licensing terms for the reference material.
🚀 Workflow tip: Before starting a long-running task, you can use APIYI apiyi.com to invoke a text model and check the script’s formulas, terminology, and narration. Then put the final content in
SPEC.md. Fixing factual errors before rendering is usually easier than reworking the finished video.
Code-Generated Video vs. Pixel-Generated Video FAQ
Q1: What is code-generated video?
Code-generated video is made by having AI write executable graphics or front-end code, then rendering that code frame by frame. Instead of generating pixels directly, the model defines the rules for what appears at each point in time.
Q2: What’s the biggest difference between code-generated and pixel-generated video?
The difference lies in the output and how you edit it. The code-based approach leaves you with an editable project, making it well suited for controlling text, formulas, and timing. The pixel-based approach outputs visuals directly. There isn’t enough information yet to compare realism or overall cost, so you’ll need to test those on a project-by-project basis.
Q3: Can code-generated video completely replace tools like Sora and Runway?
It’s too early to draw that conclusion. The available material mainly showcases educational, motion graphics, and stylized examples; it doesn’t establish that the code-based approach can produce a live-action look. A safer approach is to choose based on what matters most in your video and consider a hybrid workflow when needed.
Q4: Is code-generated video always cheaper than pixel-generated video?
Not necessarily. The high cost mentioned at the start of the original post wasn’t sourced, so this article doesn’t rely on it. The cost of the code-based approach depends on model invocations, hardware, and the number of iterations. Long-running tasks can also consume substantial resources, so it’s worth making a short sample before estimating costs.
Q5: How can I test a code-generated video workflow without multiple GPUs?
Start with an SVG or Canvas animation of around 10 seconds, focusing on the specification, rendering script, and revision process. Once you’ve connected to a compatible interface through APIYI at apiyi.com, you can compare code quality across models simply by switching the model name. Check docs.apiyi.com for interface configuration and available models.
Q6: What limitations of Code2Video should I know about?
The post only provides an example using four GPUs in parallel and doesn’t specify minimum hardware requirements. INT4 and INT8 quantized weights are also awaiting a future release. In addition, the available material doesn’t include rendering times or finished-video samples for objective evaluation, and its ability to produce realistic visuals remains unverified. The agent executes commands automatically, so be sure to run it in an isolated directory.
Q7: Can the two approaches be combined?
You can try combining them in a workflow—for example, by using live-action footage or a pixel-based model for backgrounds, then overlaying titles, formulas, and charts with code. The reference material hasn’t validated this approach, so first test whether embedded assets stay in sync with frame-by-frame rendering. When comparing models for creating assets, you can also check APIYI at apiyi.com for currently available options.
Code-Generated Video vs. Pixel-Generated Video: Key Takeaways
- Core difference: The code-based approach generates a renderable program; the pixel-based approach generates images directly.
- Source of determinism: Each frame is a pure function of time, f(t), rendered frame by frame by a headless browser.
- Best use cases: Consider the code-based approach when text, formulas, data, coordinates, or timing need to be precise.
- Workflow essentials:
SPEC.md, thumbnail self-checks, and in-place edits work together to maintain consistency across revisions. - Main limitation: There isn’t enough evidence to assume the code-based approach is equally good at photorealism or live-action aesthetics.
- Getting started: Test your requirements with a short prototype and APIYI’s unified interface before investing in a dedicated deployment.
Summary: When Should You Have AI Write Code for Video?
When choosing between code-generated and pixel-generated video, remember three things:
- Consider the elements: The less room for error in text, formulas, data, and timing, the better suited the video is to the code-based approach.
- Consider the revisions: An editable project has an advantage when you need multiple localized changes while keeping everything else intact.
- Consider the look: If realistic people and a live-action feel are central to the video, don’t assume the code-based approach can deliver.
As a next step, choose an existing 10–15 second video, break it down using four questions, and create prototypes with each approach. Compare their accuracy, number of revisions, and actual time spent. If you need to evaluate multiple models, you can use APIYI at apiyi.com to test script expansion and code generation through a unified interface, then use the results to decide whether to deploy Code2Video.
📚 References
- Discussion post – Introduction to SenseNova 6.8 Code2Video in Practice: The source for this article’s concepts, workflow, and examples
- Link:
v2ex.com/t/1254274 -
Note: Published on November 3, 2026. Some comparisons and cost claims haven’t been independently verified.
-
GitHub – SenseNova 6.8 Code2Video: Official repository and code-video Skill
- Link:
github.com/OpenSenseNova/SenseNova-6.8-Code2Video -
Note: Refer to the repository for deployment instructions, directory structure, and feature updates.
-
Hugging Face – SenseNova 6.8 Code2Video: Model weights release page
- Link:
huggingface.co/sensenova/SenseNova-6.8-Code2Video - Note: Use this page to verify model specifications, weights versions, and quantization progress.
Author: APIYI Technical Team
Technical discussion: To learn more about unified access to multiple models, visit APIYI at apiyi.com or the documentation center at docs.apiyi.com