Many designers and developers ask the same question when using gpt-image-2: "Can it generate layered PSD files directly?" The answer has two sides—the ChatGPT web version can handle layered editing thanks to its Adobe Photoshop integration, but the gpt-image-2 API itself can only output standard PNG, JPEG, or WEBP formats.
This article will clarify the actual boundaries of gpt-image-2's PSD output capabilities and provide three practical workflow solutions to help you choose the right path for your specific needs. Whether you're an individual creator or a team developer, you'll find the solution you need here.
Core Understanding of gpt-image-2 PSD Output
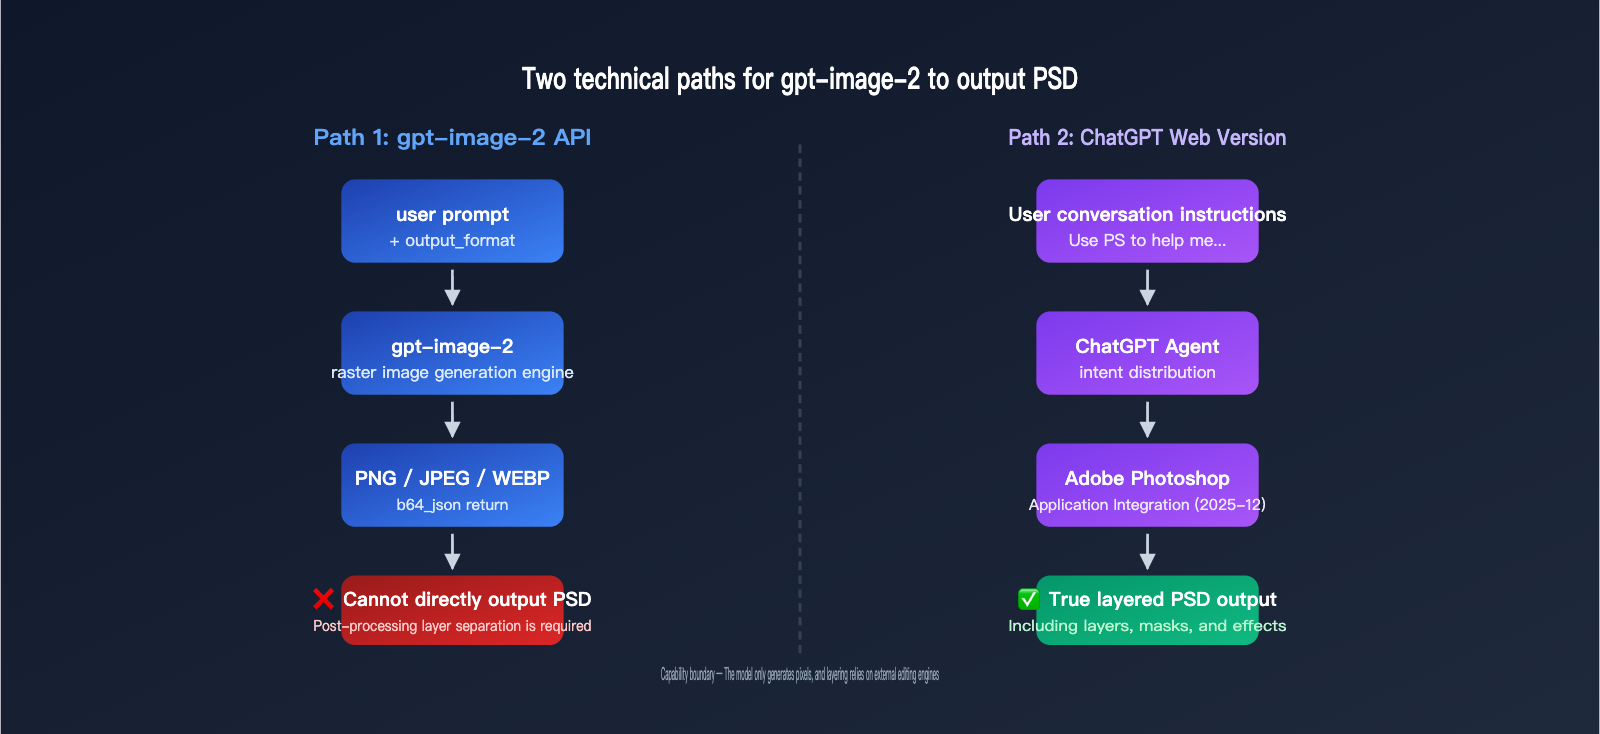
Before you get started, you must grasp one key fact: gpt-image-2 is an image generation model, not image editing software. It doesn't have the capability to generate "layered files" on its own; any PSD output requires the assistance of external tools.
Fundamental Differences in Output Capabilities
OpenAI's official definition for the gpt-image series output formats is very clear: the model only supports three types of rasterized image formats:
| Output Format | File Extension | Layered? | Transparency | Typical Use Case |
|---|---|---|---|---|
| PNG | .png |
❌ Single Layer | ✅ Supported | Default format, great for assets needing transparent backgrounds |
| JPEG | .jpg |
❌ Single Layer | ❌ Not Supported | Small file size, ideal for photography |
| WEBP | .webp |
❌ Single Layer | ✅ Supported | Modern web format, excellent balance of size/quality |
| PSD | .psd |
✅ Multi-layer | ✅ Supported | Not supported by API, requires post-processing |
🎯 Core Conclusion: The gpt-image-2 API only accepts
png,jpeg, andwebpvia theoutput_formatparameter. There are no parameters that allow it to output a PSD file directly. If you need to integrate gpt-image-2 into enterprise projects, you can use the APIYI (apiyi.com) API proxy service for unified access. The platform is compatible with official OpenAI interface specifications and supports all parameters for these three output formats.
Why the API Cannot Output PSD Directly
PSD is Adobe Photoshop's proprietary layered format, containing complex structures like layers, masks, blending modes, and adjustment layers. To generate a true PSD, you don't need an image generation model; you need an image editing engine. This is why:
- gpt-image-2 API: Produces a single, flattened raster image and doesn't understand the concept of "layers."
- ChatGPT Web Version: Uses Adobe Photoshop integration, where Photoshop actually handles the layering.
These are two completely different systems, which we'll explore in detail below.
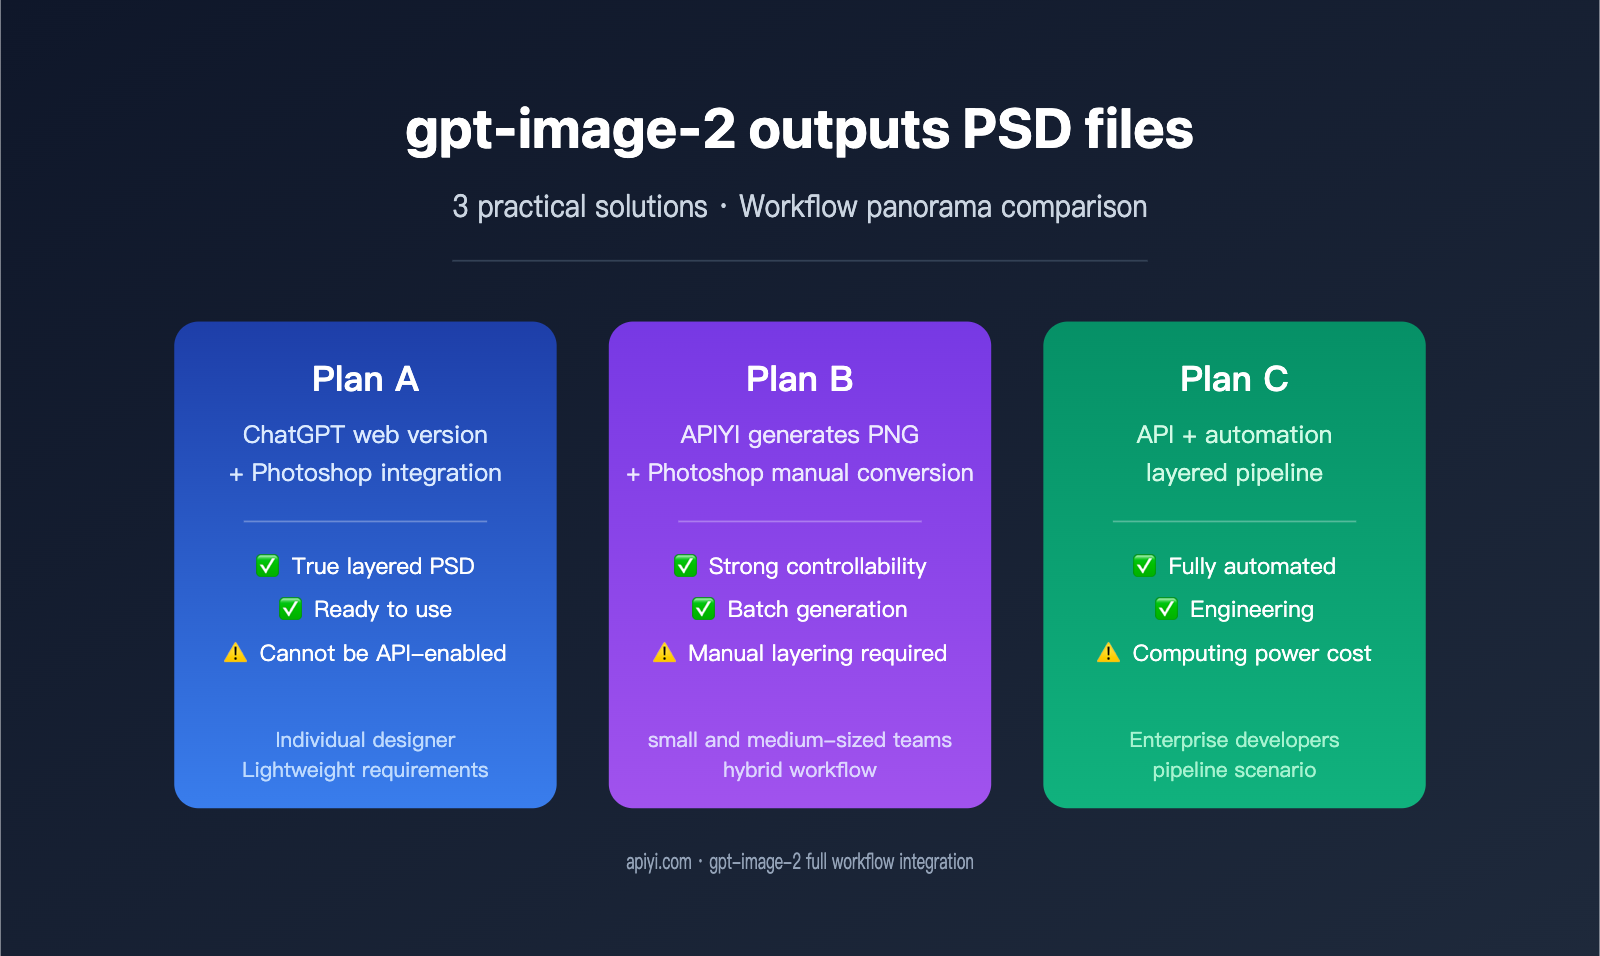
3 Approaches for Exporting PSDs from gpt-image-2
If your goal is to get a PSD file, there are currently three viable paths, each suited for different scenarios. The table below compares their core features:
| Approach | Implementation | True PSD Layering | Automation Level | Target Audience |
|---|---|---|---|---|
| Approach A: ChatGPT + Photoshop Integration | Web-based Adobe plugin | ✅ Yes | Semi-automated | Individual designers, light tasks |
| Approach B: API Generation + Manual PS | API for PNG, manual PS import | ⚠️ Pseudo-layering (single layer) | Fully manual | Developers needing batch generation |
| Approach C: API Generation + 3rd-party Tool | API image + script/AI layer splitting | ✅ Yes (algorithmic estimate) | Fully automated | Engineering workflows, pipelines |
🎯 Recommendation: If you only need a layered image occasionally, Approach A is the simplest. If you need to embed image generation capabilities into your product, using the gpt-image-2 API via APIYI (apiyi.com) with backend integration (Approach B or C) is a much more controllable choice.
Approach A: ChatGPT Web + Photoshop Integration for PSD Output
This capability was officially launched by OpenAI in December 2025. Adobe and OpenAI partnered to bring Adobe Photoshop, Adobe Express, and Adobe Acrobat into ChatGPT, allowing 800 million users to access professional image editing tools directly within their conversations.
Steps to Enable Photoshop for ChatGPT
The key to this workflow is that ChatGPT acts as an "integrated Agent," distributing the user's natural language intent to gpt-image-2 for image generation, and then passing the result to the Adobe Photoshop app for layer processing.
User Input → ChatGPT parses intent
        ├─ Calls gpt-image-2 to generate base image
        └─ Calls Photoshop app for layer processing
                ↓
            Outputs downloadable PSD file
Workflow:
- Log in to the ChatGPT web version (chatgpt.com) and ensure your account is upgraded to a version that includes image features.
- Click "+" in the input box → "More" → select the "Adobe Photoshop" app.
- Enter a prompt, for example: "Use Adobe Photoshop to help me generate a night city illustration, and separate the foreground characters, mid-ground buildings, and background sky into different layers."
- ChatGPT will automatically call gpt-image-2 to generate the base image.
- It will then immediately call the Photoshop app to perform layering, adjustments, and blending.
- Once finished, click the download button in the chat to get the layered PSD file.
Capabilities of Photoshop for ChatGPT
The official Adobe helpx documentation lists the core operations supported by this integrated version:
| Operation Type | Supported | Notes |
|---|---|---|
| Localized adjustments | ✅ | Can adjust brightness/contrast for specific parts |
| Creative effects | ✅ | Built-in filters like Glitch, Glow, etc. |
| Background blur/replace | ✅ | Powered by Adobe Firefly |
| Layer separation | ✅ | Splits subjects, foreground, and background |
| Masks and selections | ⚠️ Partial | Complex selections are better handled on desktop |
| Smart objects | ❌ | Cannot create editable smart objects |
| Advanced blending | ❌ | Only basic blending supported |
🎯 Pro Tip: Photoshop for ChatGPT is great for lightweight editing, but the full feature set remains in the desktop version of Photoshop. If you need high-frequency, batch PSD generation, it's more efficient to use APIYI (apiyi.com) to connect directly to the gpt-image-2 API, output PNGs, and then deliver them to the desktop version of Photoshop.
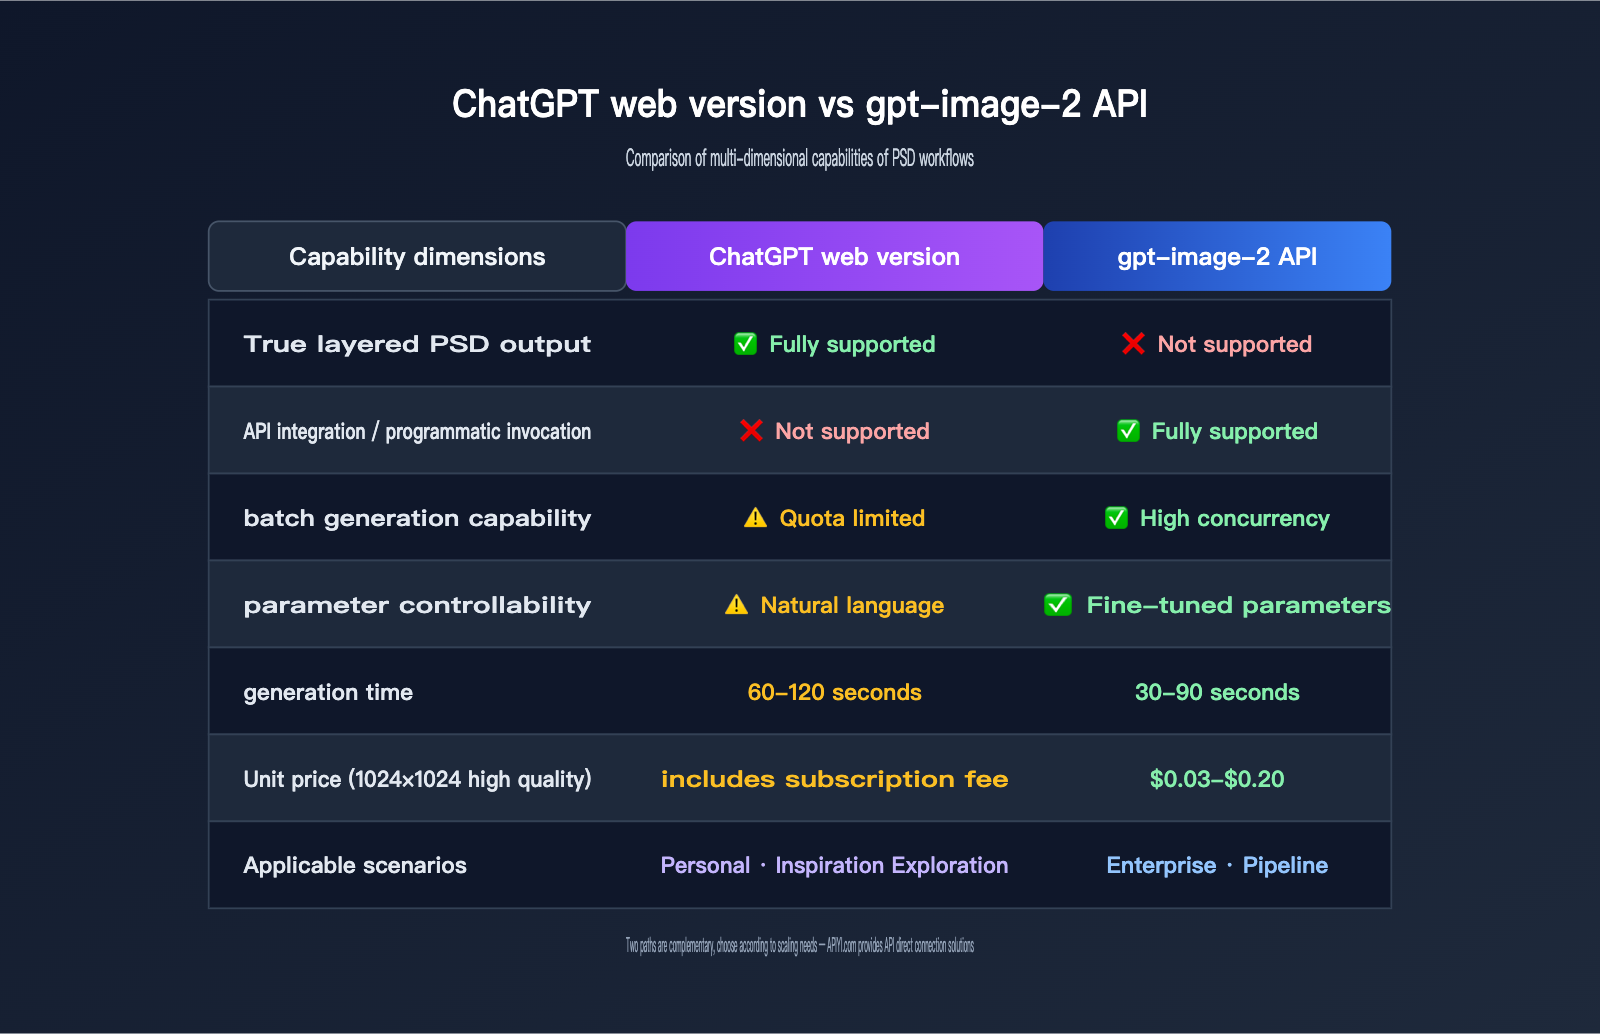
Limitations of Approach A
While the ChatGPT + Photoshop integration is smooth, there are several hard limitations you should be aware of:
- No API access: This is a web-only capability; there is no public API to replicate this workflow in your own applications.
- Slow generation speed: A single generation + layer processing usually takes 60-120 seconds.
- Low controllability: The number of layers, naming, and order are determined by ChatGPT and cannot be strictly constrained by prompts.
- Quota limits: Free users have limited daily calls, and Plus users also have caps.
These limitations make Approach A suitable for "inspiration exploration" and "one-off creations," but not for stable production environments.
Option B: gpt-image-2 API + Manual Photoshop to PSD Conversion
If your requirement is to "batch generate images programmatically and then manually curate them into PSD files," Option B is the most straightforward path. This approach completely decouples AI generation from layer processing.
A Minimal Example of gpt-image-2 API Invocation
Below is the minimum runnable code to generate an image via the API, using an OpenAI-compatible interface:
import requests
import base64

response = requests.post(
    "https://api.apiyi.com/v1/images/generations",
    headers={"Authorization": "Bearer YOUR_API_KEY"},
    json={
        "model": "gpt-image-2",
        "prompt": "Cyberpunk city at night, neon lights, rainy street",
        "size": "1024x1024",
        "quality": "high",
        "output_format": "png"
    }
)

data = response.json()["data"][0]
image_bytes = base64.b64decode(data["b64_json"])
with open("output.png", "wb") as f:
    f.write(image_bytes)
📦 Complete Python Example (includes error handling and parameter descriptions)
import os
import base64
import requests
from typing import Optional

def generate_image(
    prompt: str,
    output_path: str,
    size: str = "1024x1024",
    quality: str = "high",
    output_format: str = "png",
    background: Optional[str] = None
) -> dict:
    """
    Call gpt-image-2 to generate an image

    Args:
        prompt: Image description
        output_path: Output file path
        size: 1024x1024 / 1024x1536 / 1536x1024
        quality: low / medium / high
        output_format: png / jpeg / webp
        background: transparent / opaque (only for png/webp)
    """
    api_key = os.getenv("APIYI_API_KEY")
    if not api_key:
        raise ValueError("Please set the APIYI_API_KEY environment variable")

    payload = {
        "model": "gpt-image-2",
        "prompt": prompt,
        "size": size,
        "quality": quality,
        "output_format": output_format,
    }
    if background:
        payload["background"] = background

    response = requests.post(
        "https://api.apiyi.com/v1/images/generations",
        headers={
            "Authorization": f"Bearer {api_key}",
            "Content-Type": "application/json"
        },
        json=payload,
        timeout=180
    )
    response.raise_for_status()

    result = response.json()
    image_data = result["data"][0]["b64_json"]

    with open(output_path, "wb") as f:
        f.write(base64.b64decode(image_data))

    return {
        "path": output_path,
        "usage": result.get("usage", {}),
        "size": size
    }


if __name__ == "__main__":
    info = generate_image(
        prompt="A futuristic city illustration, ready for a product promotional poster",
        output_path="hero.png",
        size="1536x1024",
        quality="high",
        background="transparent"
    )
    print(f"Generation successful: {info}")
🎯 Integration Tip: When using APIYI (apiyi.com) to call gpt-image-2, simply replace the official OpenAI
api.openai.comURL withapi.apiyi.com. All other parameters are fully compatible, and it supportsoutput_formatsettings for png, jpeg, or webp.
Importing PNG into Photoshop and Converting to PSD
Once you have the PNG returned by the API, here is the standard workflow for converting it to a PSD in Photoshop:
- Open the PNG file in the Photoshop desktop app (
File → Open) - The image will appear as a single layer, usually labeled "Background"
- Double-click the layer to unlock it and make it editable
- Separate the subject as needed:
- Use the Object Selection Tool to automatically identify the subject
- Use Generative Expand to redraw the background
- Use Alpha Channels to extract transparent areas
- Save as PSD:
File → Save As → Photoshop (.PSD)
Real Layering Capabilities of Option B
Note that converting directly from PNG to PSD results in only 1 layer by default. To obtain a true multi-layered PSD, you must perform additional layer separation. Common methods include:
| Separation Method | Complexity | Layer Quality |
|---|---|---|
| Manual selection + Duplicate layer | High | Very High |
| AI background removal tools (Remove.bg) | Low | Medium |
| Photoshop Object Selection + Generative Fill | Medium | High |
| Photoshop Neural Filters depth estimation | Low | Medium (Pseudo 3D layering) |
Prompt Engineering Tips for gpt-image-2 PSD Output
To maximize the efficiency of layer separation in Option B, you should consider the potential for layering during the prompt stage. Below is a field-tested prompt template:
[Subject]: A product promotional poster, the subject is a futuristic sneaker
[Composition Requirements]:
  - Subject centered, occupying 60% of the frame
  - Background uses a solid color or simple gradient for easy background removal
  - Clear color contrast and depth-of-field separation between subject and background
  - Do not include elements in the background similar to the subject
[Output Parameters]:
  - Resolution: 1536x1024
  - Background: transparent (if supported)
  - Style: Commercial photography texture
This prompt style makes the generated PNG more "friendly" for subsequent layering, significantly improving the accuracy of background removal tools.
| Prompt Keyword | Impact on Layering |
|---|---|
pure background / solid color background |
Cleaner edges for removal |
clear subject separation |
Clear boundaries between subject and background |
centered composition |
Easier to automatically detect subject position |
studio lighting |
Reduces shadow casting, lowering misidentification |
no overlapping elements |
Prevents layers from obscuring each other |
🎯 Efficiency Boost: When connecting to APIYI (apiyi.com) for gpt-image-2, you can use system-level prompt templates to preset these constraints, ensuring that all images generated by your team are friendly to the downstream PSD workflow.
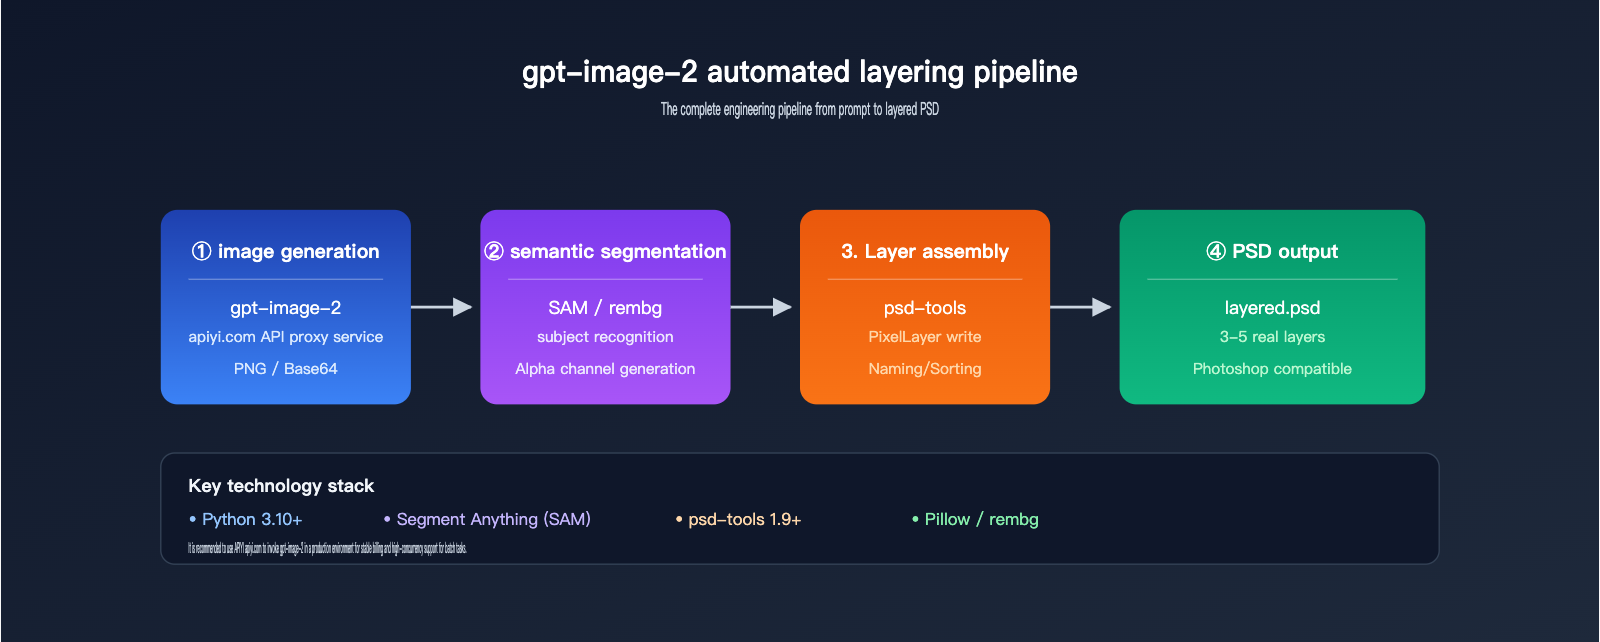
Option C: API + Third-Party Layering Tools for Automated PSD Output
For production scenarios (e.g., automated e-commerce asset generation or advertising pipelines), manual Photoshop operation is impractical. This is where you need to introduce automated layering tools.
Automated Workflow Architecture
[User Input Prompt]
       ↓
[gpt-image-2 API generates raw image]
       ↓
[Semantic segmentation model identifies regions]   (e.g., SAM, Florence)
       ↓
[Alpha channel generates individual layers]
       ↓
[psd-tools / photoshop-python-api writes to PSD]
       ↓
[Output multi-layer PSD file]
The entire pipeline can be implemented entirely in code, without needing to open the Photoshop client.
Key Tool Combinations
| Tool | Function | Recommendation |
|---|---|---|
| psd-tools (Python) | Read/Write PSD file structure | ⭐⭐⭐⭐⭐ |
| Pillow | Basic image processing | ⭐⭐⭐⭐⭐ |
| SAM (Segment Anything) | Meta's semantic segmentation | ⭐⭐⭐⭐⭐ |
| rembg | One-click background removal | ⭐⭐⭐⭐ |
| MiDaS | Depth estimation, foreground/background separation | ⭐⭐⭐⭐ |
| Photopea API | Online PSD editing | ⭐⭐⭐ |
Automated Layering Example Code
from psd_tools import PSDImage
from psd_tools.api.layers import PixelLayer
from PIL import Image
from rembg import remove

original = Image.open("gpt_image_2_output.png")
foreground = remove(original)
background = Image.new("RGBA", original.size, (255, 255, 255, 0))

psd = PSDImage.new(mode="RGBA", size=original.size)
psd.append(PixelLayer.frompil(background, psd, "Background"))
psd.append(PixelLayer.frompil(foreground, psd, "Foreground"))
psd.save("layered_output.psd")
🎯 Engineering Advice: In production environments, it is recommended to encapsulate the "Call gpt-image-2 → Remove background → Write to PSD" process into a microservice. Calling the gpt-image-2 API via APIYI (apiyi.com) supports high concurrency and stable billing, making it suitable as an upstream capability for image pipelines.
Considerations for Option C
- Layer quality depends on the segmentation model: SAM is more accurate than rembg but has higher inference costs.
- PSD Compatibility: PSDs generated by psd-tools perform well in mainstream Photoshop versions, though metadata may be lost in very rare older versions.
- Compute costs for batch scenarios: Running a segmentation model on every image significantly increases GPU costs.
- Hybrid solutions are more realistic: A common trade-off is API generation + simple background separation + minor manual refinement.
Advanced: Practical Code for Multi-Character Layering
When you need to place multiple semantic objects like people, products, and text into independent layers, you can combine SAM (Segment Anything Model) for more precise segmentation:
📦 SAM + psd-tools Multi-Semantic Object Layering Complete Example
import torch
import numpy as np
from PIL import Image
from segment_anything import SamPredictor, sam_model_registry
from psd_tools import PSDImage
from psd_tools.api.layers import PixelLayer

def gpt_image_to_layered_psd(image_path: str, output_psd: str, points: list):
    """
    Split a PNG output from gpt-image-2 into a PSD with multiple semantic object layers

    Args:
        image_path: Path to PNG generated by gpt-image-2
        output_psd: Path to output PSD file
        points: List of center points for objects to segment [(x, y, label), ...]
    """
    image = Image.open(image_path).convert("RGBA")
    image_np = np.array(image)

    sam = sam_model_registry["vit_h"](checkpoint="sam_vit_h.pth")
    sam.to("cuda" if torch.cuda.is_available() else "cpu")
    predictor = SamPredictor(sam)
    predictor.set_image(image_np[:, :, :3])

    psd = PSDImage.new(mode="RGBA", size=image.size)

    for idx, (x, y, label) in enumerate(points):
        masks, scores, _ = predictor.predict(
            point_coords=np.array([[x, y]]),
            point_labels=np.array([1]),
            multimask_output=False
        )
        mask = masks[0]
        layer_array = image_np.copy()
        layer_array[~mask] = [0, 0, 0, 0]
        layer_image = Image.fromarray(layer_array, "RGBA")
        psd.append(PixelLayer.frompil(layer_image, psd, label))

    background_array = image_np.copy()
    background_image = Image.fromarray(background_array, "RGBA")
    background_layer = PixelLayer.frompil(background_image, psd, "Background")
    psd.insert(0, background_layer)

    psd.save(output_psd)
    print(f"✅ Multi-layer PSD generated: {output_psd}")


if __name__ == "__main__":
    gpt_image_to_layered_psd(
        image_path="gpt_image_2_poster.png",
        output_psd="layered_poster.psd",
        points=[
            (512, 400, "Subject"),
            (200, 600, "ProductLeft"),
            (800, 600, "ProductRight"),
        ]
    )
Through this process, a poster generated by gpt-image-2 can be split into 3-5 true layers in a PSD, with each layer independently editable in Photoshop.
Error Handling and Troubleshooting
In production scenarios, both gpt-image-2 calls and subsequent layering can fail. The table below summarizes frequent issues and solutions:
| Issue | Root Cause | Solution |
|---|---|---|
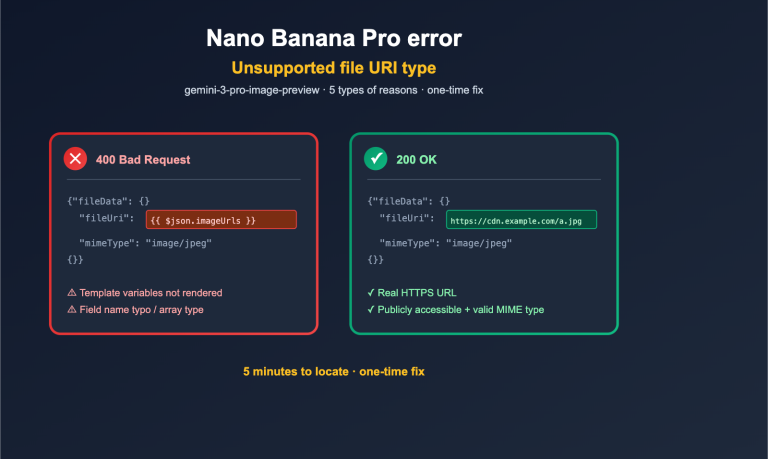
API returns invalid output_format |
Unsupported value like psd was passed |
Only use png/jpeg/webp |
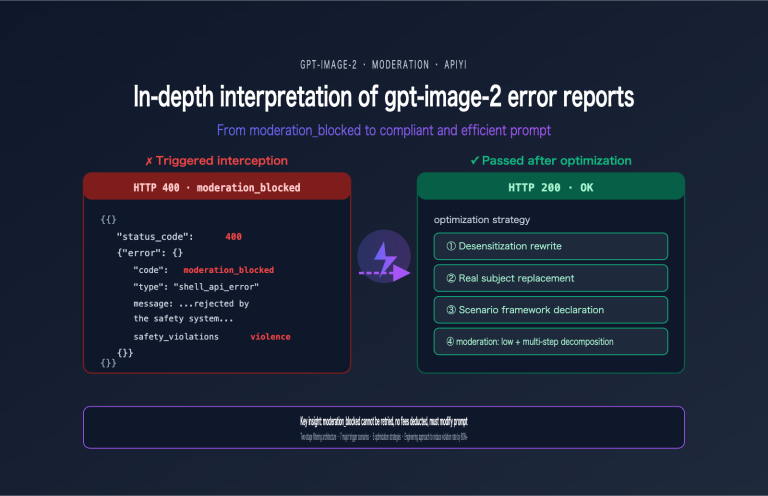
b64_json field is empty |
Content moderation block | Optimize prompt, avoid sensitive descriptions |
| Jagged edges after background removal | Insufficient segmentation model precision | Use SAM + edge feathering post-processing |
| PSD won't open in Photoshop | psd-tools wrote incomplete metadata | Upgrade psd-tools to version 1.9+ |
| Layers misaligned after separation | RGBA channels not aligned | Standardize canvas size before writing |
| Slow call speed | Rate limited due to high concurrency | Use APIYI (apiyi.com) multi-channel routing to distribute load |
🎯 Stability Tip: In production environments, it is recommended to add retry and fallback logic at the API call layer. Requests proxied through APIYI (apiyi.com) automatically recognize OpenAI rate-limit responses and support intelligent switching, reducing the failure rate of batch tasks.
FAQ: GPT-image-2 and PSD Output
Here are the answers to the most frequently asked questions regarding real-world usage.
Q1: Can the GPT-image-2 API really not output PSD files directly?
Confirmed, it cannot. The official OpenAI documentation explicitly limits the output_format parameter to png, jpeg, and webp. Any service claiming to "output PSD directly via API" is essentially running a layer-splitting process (like the one described in Solution C) on their own servers and packaging the result into a PSD file—this is not a native capability of the GPT-image-2 model itself.
🎯 Clarification: If you want to reliably access the official, native GPT-image-2, you can use an API proxy service like APIYI (apiyi.com) that is compatible with official OpenAI interfaces. This ensures your parameter behavior remains identical to OpenAI's and prevents "hidden modifications" by middleman layers.
Q2: Is the PSD output from the ChatGPT web interface truly layered?
Yes, it is. Because it’s backed by an actual Adobe Photoshop application performing the editing, the generated PSD contains real layers, masks, and effects. However, you cannot precisely control the number or naming of layers. In most cases, you'll get 3-5 layers (background, subject, foreground, adjustment layers, etc.).
Q3: Is there a difference in output format between GPT-image-2 and GPT-image-2-all?
There are subtle differences. gpt-image-2-all uses the reverse channel equivalent to the ChatGPT web interface, and the returned b64_json field includes the data:image/png;base64, prefix. Conversely, gpt-image-2 connects directly to the OpenAI Images API and returns a raw base64 string without a prefix. Neither supports PSD output, but your underlying string processing code will need to handle them differently.
Q4: If I only need a PNG with a transparent background, do I still need a PSD?
For many scenarios, you don't. The GPT-image-2 API supports the background: "transparent" parameter, which generates a transparent PNG directly. This is perfect for:
- E-commerce product background removal
- Logos, icons, and sticker assets
- UI elements
You only need to move to a PSD workflow if you need to perform layered adjustments on non-subject parts during post-processing.
Q5: How can I control the costs of batch-generating PSDs?
Costs are primarily composed of three parts:
| Cost Item | GPT-image-2 API | Post-processing |
|---|---|---|
| Unit Cost | ~$0.03 – $0.20/image | Background removal GPU ~$0.001 |
| Time Cost | 60-120 seconds | 5-30 seconds |
| Stability | Subject to OpenAI rate limits | Own compute is controllable |
🎯 Cost-Saving Strategy: For large-scale scenarios, it's recommended to perform layering only on high-quality candidate images. First, use GPT-image-2 with low-quality parameters (
quality=low) to quickly generate previews, check consumption via the unified billing on APIYI (apiyi.com), and once satisfied, regenerate withhighquality before entering the layering pipeline.
Q6: Can I use GPT-image-2 to directly edit an existing PSD file?
No. The GPT-image-2 image edit interface only accepts PNG/JPEG/WEBP inputs and cannot recognize the internal layer structure of a PSD. If you want to "AI-repaint a specific layer of a PSD," the standard approach is:
- Export that layer as a PNG (with Alpha) in Photoshop.
- Use the GPT-image-2 edit interface with a mask to repaint it.
- Import the result back into the original PSD as a new layer.
Industry Case Studies: GPT-image-2 and PSD Output
Different industries have vastly different requirements for PSD output. Choosing the right approach depends on your specific business scenario. Here are three typical workflow references.
Case 1: Batch Production of E-commerce Posters
A cross-border e-commerce team needs to generate 300+ product posters daily. The requirement: one layer for the product subject, one for the background, and one for text, allowing operations staff to quickly swap out copy for different markets.
Workflow Design:
- After uploading the product, operations staff fill in keywords for selling points in the backend.
- Call the GPT-image-2 API to generate the main image (
output_format=png,background=transparent). - Use
rembgto refine the edges of the cutout. - Use
psd-toolsto generate a 3-layer structure:- Layer 1: Product subject (transparent background)
- Layer 2: AI-generated scene background
- Layer 3: Placeholder text layer
- Designers only need to modify the text layer in the PSD before publishing.
Efficiency Gains: Production time per poster dropped from 30 minutes to 2 minutes; designers only perform final reviews.
🎯 Scenario Selection: For high-volume, repetitive tasks, using the GPT-image-2 interface via APIYI (apiyi.com) combined with enterprise-grade billing allows for predictable costs and scalable capacity.
Case 2: Rapid Prototyping of Game UI Assets
Game art teams need a large number of "placeholder" UI assets—buttons, icons, banners, etc.—during the prototyping phase, requiring PSD format for later refinement.
Workflow Design:
GPT-image-2 generates base visuals
       ↓
SAM automatically segments subject shapes
       ↓
Export multiple PNGs (frame, icon, glow, etc.)
       ↓
psd-tools integrates them into a layered PSD
       ↓
Artists refine the final version in PS
| Asset Type | GPT-image-2 Output | Post-processing Action | Final Layer Count |
|---|---|---|---|
| Button | Transparent PNG | State slicing (default/hover/pressed) | 3 |
| Icon | Transparent PNG | Highlight/shadow separation | 2-4 |
| Banner | RGB PNG | Subject/background/lighting separation | 3-5 |
| Card | RGB PNG | Border/base/badge separation | 3-4 |
Case 3: Multilingual Marketing Content
An ad-buying team needs to adapt a main visual into 10 different languages. The core requirement is that the text layer must be independent while the image layer remains fixed.
Key Steps:
- Use GPT-image-2 to generate a "text-free" main visual (explicitly include
no text,no lettersin the prompt). - Create text layer placeholders via
psd-tools. - Simply modify the text layer to output 10 language versions.
The benefit of this workflow: The main visual is generated only once, and the text layer is fully controllable, avoiding the spelling errors common when AI generates multilingual text.
🎯 Multilingual Tip: GPT-image-2 is relatively reliable for English text, but prone to typos when generating Chinese, Japanese, or Korean. When calling GPT-image-2 via APIYI (apiyi.com), it's recommended to explicitly exclude text in the prompt and manage it separately via PSD text layers.
Case 4: Comic and Storyboard Assistance
Illustrators often use GPT-image-2 to generate sketch inspiration before refining it in Photoshop. This "AI inspiration + manual refinement" hybrid process requires a structured layer setup.
Typical Layering Scheme:
- Sketch Layer: GPT-image-2 output, kept as a reference base.
- Line Art Layer: Lines drawn based on the sketch.
- Base Color Layer: Block color fills.
- Shadow Layer: Dark area detailing.
- Highlight Layer: Bright area accents.
- Effect Layer: Decorative elements.
Operational Tips:
1. GPT-image-2 outputs a 1024x1536 vertical composition.
2. Set this image as Layer 0 in Photoshop (locked, non-editable).
3. Create 5-6 new empty layers above it for drawing.
4. Save as PSD for archiving once finished.
This workflow turns AI sketches into assets that can be continuously developed, rather than disposable images.
Comparing gpt-image-2 with Other Image Formats
To better understand where PSD fits into your workflow, let's compare it side-by-side with other common output formats.
| Format | File Size | Editability | Cross-Software Compatibility | Suitable for gpt-image-2 Post-processing |
|---|---|---|---|---|
| PNG | Medium | Low (Flattened) | ✅ Excellent | ⭐⭐⭐⭐⭐ Default choice |
| JPEG | Small | Very Low | ✅ Excellent | ⭐⭐⭐ Preview only |
| WEBP | Small | Low | ⚠️ Web-focused | ⭐⭐⭐ Good for Web scenarios |
| PSD | Large | ✅ Very High | ⚠️ Adobe Ecosystem | ⭐⭐⭐⭐ Requires post-processing |
| TIFF | Very Large | Medium | ✅ Print-focused | ⭐⭐ Print scenarios |
| SVG | Small | ✅ Very High (Vector) | ✅ Web/Print | ❌ Not supported by gpt-image-2 |
As you can see from the table, the core value of PSD is its "editability," which is hard to replicate with other formats. If you don't need post-editing, PNG is usually the better choice.
Best Practices for gpt-image-2 PSD Output
Returning to our original question: How do you get gpt-image-2 to output PSD files? After a thorough review, the core conclusions can be summarized in three points:
- The API path cannot output PSD directly: The gpt-image-2 API only supports PNG, JPEG, and WEBP raster formats; this is a limitation of the model itself.
- The ChatGPT web version can output true layered PSDs via Photoshop: By letting the Adobe Photoshop app handle layer processing, it's perfect for the light-duty needs of individual designers.
- Engineering scenarios require an "API generation + post-processing" combination: Use tools like SAM/rembg for automatic layer segmentation and
psd-toolsto write the files, enabling batch automation.
| User Role | Recommended Approach | Tool Combination |
|---|---|---|
| Individual Designer | Approach A | ChatGPT + Photoshop Integration |
| Small/Medium Team | Approach B | gpt-image-2 API + Manual Layering in Desktop Photoshop |
| Enterprise Developer | Approach C | gpt-image-2 API + Automated Layering Pipeline |
🎯 Final Recommendation: Start by experiencing the Photoshop integration via the ChatGPT web version to understand the layering process before deciding whether to build an API pipeline. If you decide to proceed with engineering integration, you can access gpt-image-2 through APIYI (apiyi.com). This platform provides OpenAI-compatible interfaces accessible within China, offering enterprise-grade stability and transparent billing.
We hope this comprehensive guide on gpt-image-2 PSD output helps you avoid unnecessary hurdles. The real challenge of gpt-image-2 outputting PSD files isn't the API itself, but choosing the right workflow. By selecting Approach A, B, or C based on your scale, budget, and automation needs, you should be able to get the full process running within a week.
Author: APIYI Technical Team | apiyi.com — Enterprise-grade Large Language Model API proxy service platform