
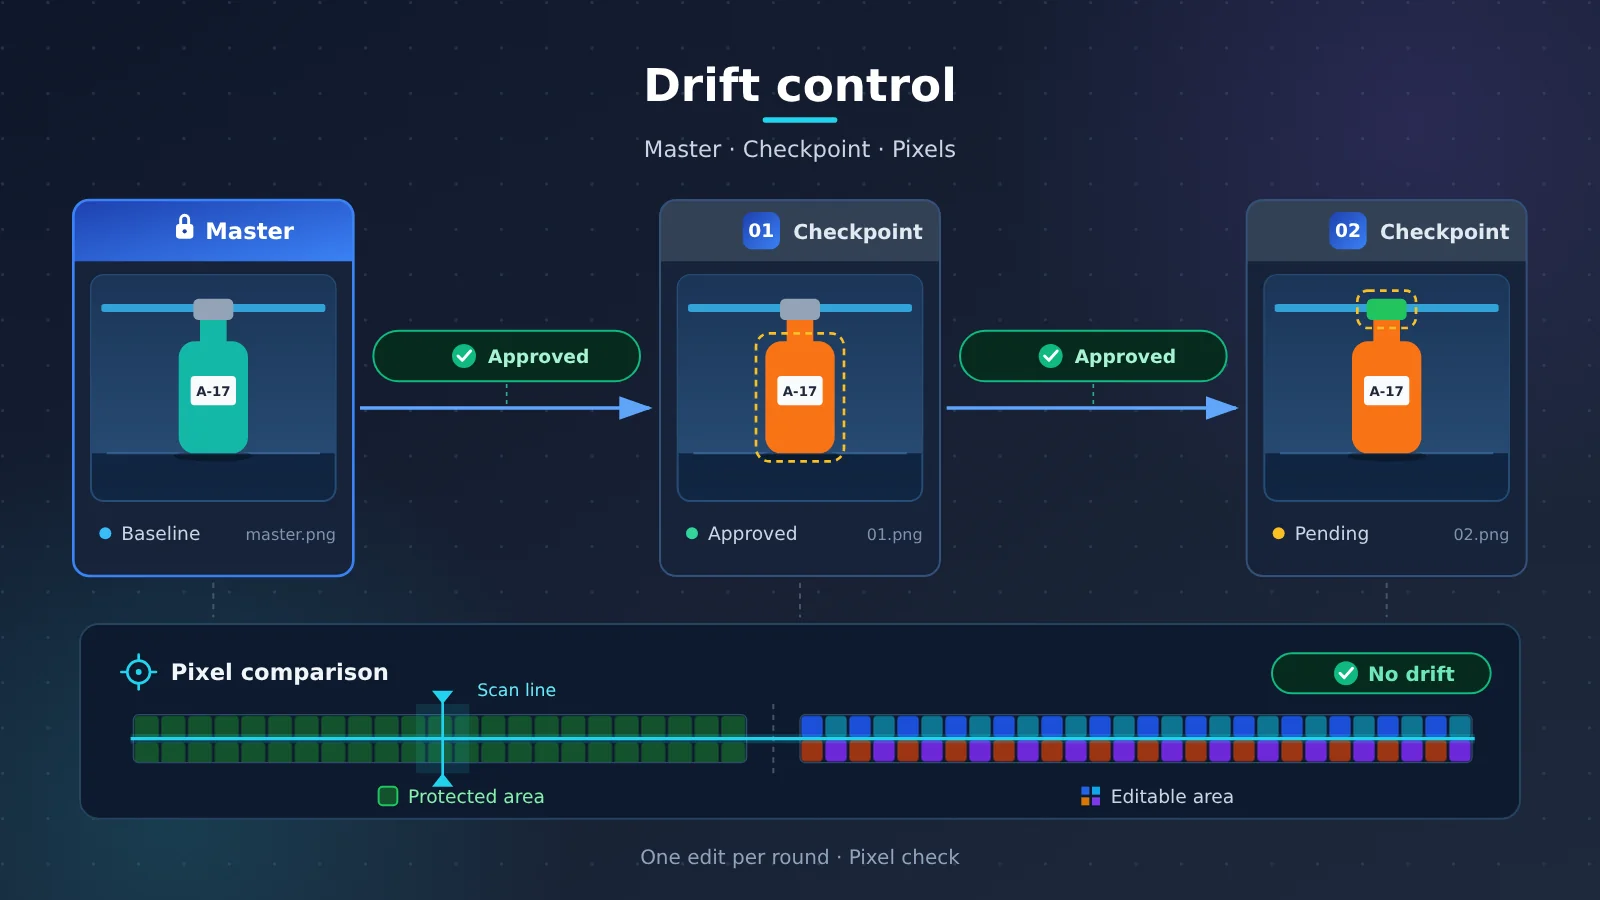
Abstract: This article lays out an acceptance workflow for multi-turn AI image editing that isn’t tied to any particular model. Using a master copy, checkpoints, an edit log, and local pixel comparison, it confirms that each round changed only the parts you asked to change.
There are four basic practices for keeping drift under control in multi-turn AI image editing. First, keep an untouched master copy. Second, request only one change per round. Third, only an approved version may become the input for the next round. Fourth, validate against the original file downloaded locally — not the preview image. The phrase “keep everything else unchanged” has to be broken down into constraints you can check one at a time: dimensions and composition, key text, and background pixels each get their own verification method. For elements that must match exactly — logos, legal disclaimers, product numbers — compositing them back from the original image is more reliable than asking the model to redraw them over and over.
Below, we start with terminology, then work through the actual order of operations: how to turn vague requirements into acceptance criteria, how to set up the master and checkpoint directories, how to tell apart the editing mask used by the generation API from the verification mask used locally, and how to compare protected pixels with a small local Python script. The last section maps recovery steps to failure types and explains when to retry versus when to switch to compositing from the original image. These steps don’t depend on a specific model version — swap in a different editing API and they still apply.
To Know: Terminology for Drift in Multi-Round Image Editing
| Term | Explanation |
|---|---|
| Drift | In multi-round editing, parts that weren’t asked to change get quietly altered by the model—for example, background color shifts or text warps. |
| Master | The original source file. It stays read-only throughout and serves as the baseline for all comparisons. |
| Checkpoint | A revision that has passed review and been saved under its own name. It can become the parent file for the next editing round. |
| Parent | The input image actually used for a given editing round. |
| Branch | Independent edit variations derived from the same parent file. |
| edit-log | A table that records the parent file, prompt, output, check results, and rationale for each round. |
| Edit mask (generation API) | A mask sent to the image editing API to tell the model where it may repaint. Format conventions follow each API’s documentation. |
| Validation mask (local) | A black-and-white image used only by local scripts. Black marks areas that must remain unchanged. |
| Protected pixels | Pixels marked black in the validation mask that must match exactly before and after editing. |
| RGBA | The red, green, blue, and alpha channels of an image. Each channel typically ranges from 0–255. |
| Lossless format | A format that preserves pixel information when saved, such as PNG. JPEG is a lossy format. |
| Original-image compositing | Pasting a region from the master back into the generated result as-is, to preserve elements that must stay exactly identical. |
1 The Root Cause of Multi-Round Image Editing Drift: Turning Vague Requirements into Acceptance Criteria
1.1 Why “keep everything else unchanged” can’t be verified
Writing just “keep everything else unchanged” gives you nothing to check against at acceptance time. Teams also have different tolerances for different purposes: slight lighting changes are fine in concept art, while official brand assets may require the logo to be pixel-identical. So before you start editing, decide which standard applies this time.
Take a fictional product image as an example: a travel bottle sits on a table, with a small label reading A-17 on the body, and a thin blue stripe in the background. The request is completed in two rounds—first change the bottle body color, then the cap color, while preserving the label, framing, and background stripe. This request actually contains several types of constraints with different natures, and each type needs its own checking method.
1.2 Constraint breakdown table for multi-round image editing
| Constraint | Checking method | Failure symptom |
|---|---|---|
| Bottle body changed to orange | Inspect the region allowed to change | Color applied to the wrong object |
| Label keeps A-17 | Read character by character against the approved text | Characters altered or missing |
| Framing unchanged | Compare dimensions and object positions | Cropping, scaling, or perspective shift |
| Background unchanged | Compare protected pixels | Blue stripe shifts, background color drifts |
| Final usable | View at delivery size and original resolution | New edge artifacts, small details blurry |
Each checking method in this table covers a different class of problem. Pixel comparison catches background drift but can’t detect a swapped digit; character-by-character reading confirms label content but can’t judge subtle background color shifts. The methods need to be used together.
1.3 Identify elements that must be perfectly identical up front
Elements like logos, legal disclaimers, and product numbers require pixel-perfect consistency. For these, keeping a separate editable layer—or compositing the original region back onto the final image—works better than having the generation model redraw them. Flag these elements during the requirements stage, and you won’t have to retry repeatedly later.
2 Setting Up the Master File and Checkpoint Directory for Multi-Round Image Editing
2.1 Preparing the master file
Use an image you have the rights to or permission to process, record its dimensions, and keep the original downloaded file. If you have the original, don’t use a screenshot as the master — scaling and compression will make later pixel comparisons hard to interpret. Once the master is archived, it’s never modified again.
2.2 Directory structure and requirements file
It’s best to give each editing task its own directory:
master.png
requirements.txt
01-body-color.txt
02-cap-color.txt
edit-log.csv
outputs/
Write the fixed, unchanging details in plain language in requirements.txt, like this:
Keep the original canvas size and camera angle.
Keep the bottle's outline, position, and proportions.
The front label must still read A-17, with its position unchanged.
The blue stripes and all other background content stay unchanged.
Round one changes only the bottle body color.
Round two changes only the cap color.
Any revision that alters a protected requirement is an automatic reject.
Save each round’s prompt in its own text file so you can reproduce and compare it later.
2.3 Using edit-log to record parent files and the reasoning behind each decision
The edit-log records each round’s parent file, prompt, output file, protected-region check results, text check results, and the accept/reject decision. Filenames have to reflect the real parent-child relationship — something like final-new-final.png tells you nothing about its own history.
revision,parent,prompt_file,output,protected_changed,text_check,decision,reason
01a,master.png,01-body-color.txt,outputs/01a.png,1532,A-17 OK,reject,background stripes shifted
01b,master.png,01-body-color.txt,outputs/01b.png,0,A-17 OK,accept,
02a,01b.png,02-cap-color.txt,outputs/02a.png,0,A-17 OK,accept,
The numbers in this table are just there to show the format and don’t correspond to any real run. Rejected versions should be recorded too — the reason for rejection is exactly what informs the next round’s prompt revision.
3 Running multi-round edits: change only one thing per round
3.1 Round one: change only the part you were asked to change
In your prompt, describe what to preserve as specifically as you describe what to change:
Edit the attached image. Change only the body color of the travel bottle to orange.
Keep the cap, label, bottle silhouette, position, scale, and camera angle.
The label text must stay A-17, with its position and size unchanged.
Do not touch the desk, the blue background stripes, or any other background detail.
If the API supports it, keep the original framing and output dimensions.
Do not add objects, shadows, captions, or decorative text.
Download the raw result and save it as 01.png. Before moving on to the next round, compare it against master.png: read the A-17 text once, check the cap and the background stripes, then look at the whole image for any unexpected changes. The orange body is only one item out of several requirements.
3.2 If you reject a version, go back to the master
If you reject this version, write down the reason first, and start the next attempt from the master again. Don’t stack fixes for several unrelated problems on top of a rejected version — otherwise your comparison baseline keeps shifting with every round, and it gets hard to say which step introduced the drift.
3.3 Round two: start from an accepted parent file
Once round one passes, save a clearly named checkpoint copy, and only then start round two:
Edit the attached image (the approved revision). Change only the cap to light blue.
Keep the orange body from this input.
Keep the label at A-17, with the same size and position.
Preserve the bottle silhouette, position, scale, camera angle, and framing.
Do not change the desk, the blue background stripes, or anything else.
Do not introduce extra text or objects.
Round two needs two comparisons. Compare 02.png against 01.png to see what the latest instruction actually changed. Then compare 02.png against the master and against requirements.txt, because a sequence can carry earlier mistakes forward even when the most recent round itself was clean.
3.4 Choose the parent file deliberately
If the second edit depends on the first one, use the accepted first version as the parent. If it’s just an independent alternative, branch off from the master instead. Keep the branches recorded separately in the edit-log, so the final output can be reproduced end to end.
4 Distinguishing Between the Two Kinds of Masks in Multi-Turn Image Editing
4.1 The Generation API’s Edit Mask vs. the Local Validation Mask
Many editing APIs let you upload a mask to limit the region that gets repainted, while local pixel comparison also needs a mask. The two serve different purposes and follow different rules — mixing them up is an easy way to break things.
| Dimension | Generation API’s Edit Mask | Local Validation Mask |
|---|---|---|
| Purpose | Tells the model where it’s allowed to repaint | Tells the script which pixels must stay identical |
| Who uses it | The remote editing API | The local validation script |
| Format convention | Defined by each API’s docs (e.g., transparent areas editable, or white areas editable) | Defined by the local script: black is protected, any non-zero value is allowed to change |
| Precision requirements | Can be expanded outward a bit to leave the model some transition room | Should hug the boundary tightly, so you don’t drag protected labels into the allowed region |
| What it can prove | Only expresses editing intent | Can prove whether the protected pixels were altered |
You still need local validation on top of the edit mask, for a simple reason: the edit mask only expresses intent. The API might re-encode the entire image, or blend outside the mask boundary, so the final result still has to be verified at the pixel level.
4.2 Creating a Local Validation Mask
In an image editor, create a new image with exactly the same dimensions as the master. Paint black over everywhere that must remain unchanged, paint white over the areas that are allowed to change, and save it as a lossless grayscale PNG. The script in this article treats any non-zero value as “allowed to change,” so protected areas must be pure black (0) — gray edges left by anti-aliasing will be counted as part of the allowed region.
If you want to generate both kinds of masks from the same source image, draw the “allowed to change” region first, then convert it into the corresponding format per each API’s docs. After converting, use the example in the API docs to confirm you haven’t flipped the meaning of black/white or transparent.
5 Using a local script to compare protected pixels across multiple editing rounds
5.1 Verification script
The script below was written for this article. It depends only on Python 3 and Pillow, makes no network requests, and doesn’t modify the input files. It decodes all three images to RGBA and compares protected pixels one by one. If the dimensions don’t match, it exits immediately rather than auto-scaling to make the comparison “pass.”
# check_edit.py — compare whether protected pixels have been modified
import sys
from PIL import Image

def main(before_path, after_path, mask_path, diff_out=None):
    before = Image.open(before_path).convert("RGBA")
    after = Image.open(after_path).convert("RGBA")
    mask = Image.open(mask_path).convert("L")

    if not (before.size == after.size == mask.size):
        sys.exit(f"Dimension mismatch: before={before.size} "
                 f"after={after.size} mask={mask.size}")

    b, a, m = before.load(), after.load(), mask.load()
    w, h = before.size
    protected = changed = total_diff = max_diff = 0
    diff_img = Image.new("RGB", (w, h), (0, 0, 0)) if diff_out else None

    for y in range(h):
        for x in range(w):
            if m[x, y] != 0:          # non-zero = modification allowed
                continue
            protected += 1
            diffs = [abs(b[x, y][i] - a[x, y][i]) for i in range(4)]
            d = max(diffs)
            total_diff += sum(diffs)
            max_diff = max(max_diff, d)
            if d:
                changed += 1
                if diff_img:
                    diff_img.putpixel((x, y), (255, 0, 0))

    if protected == 0:
        sys.exit("No protected pixels in the mask (no pure black region)")

    print(f"Protected pixels: {protected}")
    print(f"Modified protected pixels: {changed}")
    print(f"Change ratio: {changed / protected:.4%}")
    print(f"Average absolute channel difference: {total_diff / (protected * 4):.4f}")
    print(f"Maximum channel difference: {max_diff}")
    if diff_img:
        diff_img.save(diff_out)
        print(f"Difference image saved: {diff_out} (red = modified protected pixels)")

if __name__ == "__main__":
    if len(sys.argv) not in (4, 5):
        sys.exit("Usage: python3 check_edit.py before.png after.png mask.png [diff.png]")
    main(*sys.argv[1:])
How to run it (macOS/Linux syntax; Windows users should swap in the virtual environment activation command for their shell):
python3 -m venv .venv
source .venv/bin/activate
python3 -m pip install Pillow
python3 check_edit.py master.png 01.png 01-mask.png 01-diff.png
5.2 Validate the Script with Positive and Negative Controls First
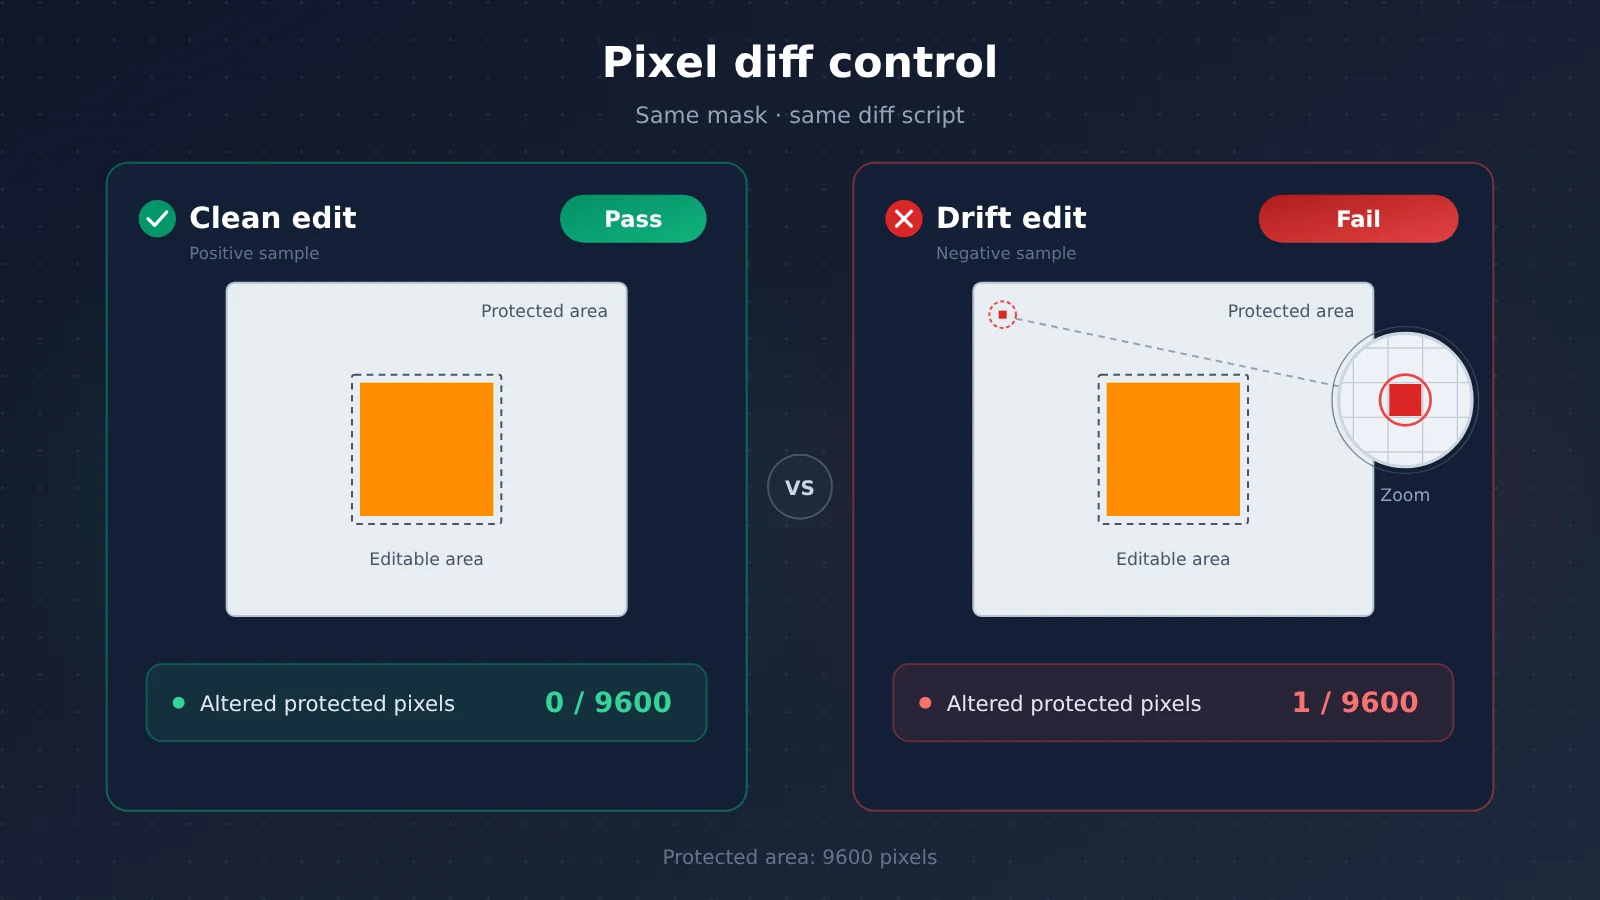
Before you trust any verification script, validate it against synthetic images with known answers. The script below generates a 100 × 100 image where the editable region is the central 20 × 20, leaving 9,600 protected pixels. The “clean edit” changes only the allowed region; the “drift edit” changes one extra protected pixel.
# make_fixtures.py — generate positive and negative control samples
from PIL import Image

before = Image.new("RGBA", (100, 100), (200, 220, 255, 255))
mask = Image.new("L", (100, 100), 0)
for y in range(40, 60):
    for x in range(40, 60):
        mask.putpixel((x, y), 255)

clean = before.copy()
for y in range(40, 60):
    for x in range(40, 60):
        clean.putpixel((x, y), (255, 140, 0, 255))

drift = clean.copy()
drift.putpixel((5, 5), (201, 220, 255, 255))

before.save("before.png"); mask.save("allowed-mask.png")
clean.save("clean-edit.png"); drift.save("drift-edit.png")
python3 make_fixtures.py
python3 check_edit.py before.png clean-edit.png allowed-mask.png
python3 check_edit.py before.png drift-edit.png allowed-mask.png
By design, the first command should report 0 modified protected pixels, and the second should report 1. Only when both numbers match is the script’s decision logic usable. This control pair only validates the script itself — it doesn’t say anything about any model’s editing capability.
5.3 Reading the comparison numbers from multi-round image edits
The script compares decoded channel values directly and doesn’t normalize color profiles. So the two images must be geometrically consistent and interpret color the same way. JPEG recompression, color profile changes, or changes in RGB values beneath fully transparent pixels that aren’t visible can all produce numeric differences — and those differences don’t necessarily correspond to visible generation changes.
So keep the workflow as lossless as possible, and look at the numbers alongside the actual image. When the numbers are very low, a single digit on a label can still have been swapped; when the numbers are very high, the cause may just be a change in the export pipeline. No universal pixel threshold can substitute for the task’s own requirements — set thresholds according to each project’s acceptance criteria.
5.4 Applying the same acceptance process to different editing APIs
This process only cares about “what goes in and what comes back,” so it can be applied to any API that supports image editing. When switching APIs, confirm the following one by one:
- Input path: Can the API directly select an earlier version as input? If not, download the accepted version and resubmit it using the upload method described in the docs.
- Output size: Does it preserve the original resolution? If the size changes, the script stops — check the export settings first, and don’t mask the problem with resizing.
- Mask fields: The field names, the meaning of black/white or transparency, and the size requirements should all follow that API’s official documentation. Don’t copy parameter names from another model.
- Download method: Download the original file, not a preview or screenshot.
- Request failures: If no image comes back at all, check the actual error message returned by the API — don’t tweak the visual prompt.
6 Recovering from Multi-Round Edit Drift and Compositing with the Original Image
6.1 Pick a recovery path based on the failure type
Once you spot a problem, first figure out what kind of failure it is, then decide whether to call the model again.
| Failure type | Recovery approach |
|---|---|
| Wrong object edited | Switch to a clearer description or the selection control the API supports, and restart from the accepted parent file |
| Unrequested change in the background | Reject that version, tighten the instruction, and compare again |
| Key logo or label altered | Keep it as an original layer or composite it back from the original image — don’t keep re-generating |
| Framing or size changed | Check export settings, restart from the correct parent file, keep the evidence, and don’t paper over it with scaling |
| A later round wiped out an edit already approved in an earlier round | Feed in the accepted checkpoint and explicitly require that edit to be preserved in the instruction |
| Request failed before returning an image | Check the actual API error — it has nothing to do with the prompt |
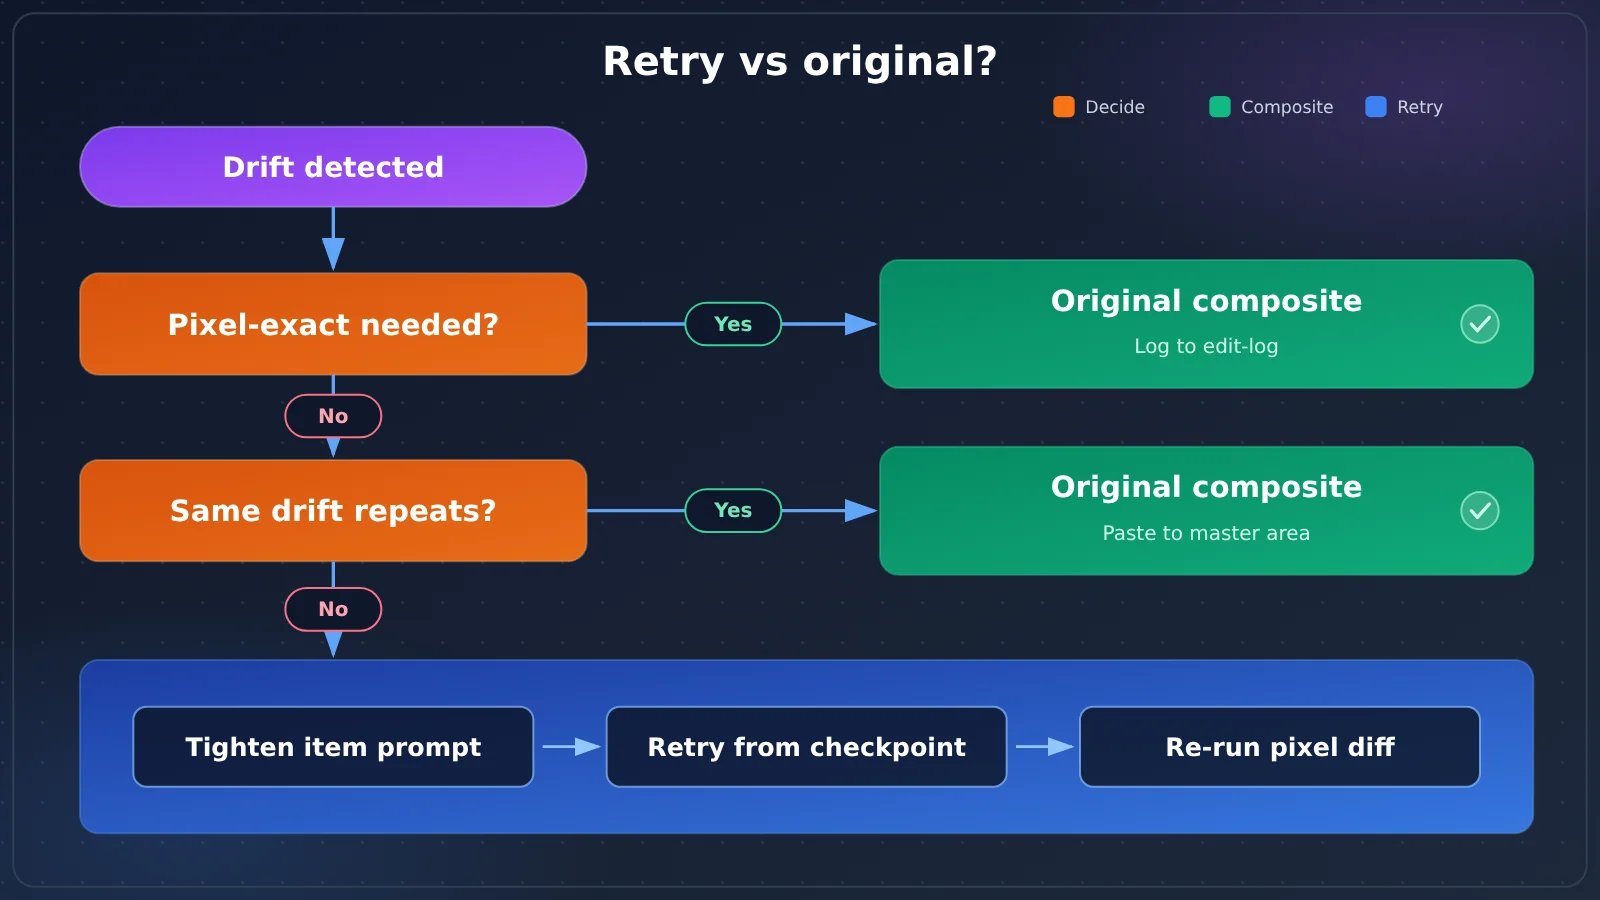
6.2 When to retry, when to composite from the original image
Retrying makes sense when the problem is an ambiguous instruction or an imprecise selection, and the affected region can be fixed by re-describing it — say, the wrong object got edited or the background shifted slightly. Adjust just one instruction per retry, then compare against the same verification mask, so you can tell whether that single change actually did anything.
Compositing from the original image makes sense in three cases: what’s affected must be pixel-identical (logo, serial number, legal notice); the same kind of drift keeps recurring across retries; or you’d have to pile more and more protective conditions into the prompt just to change one spot. In those cases, pasting the corresponding region from the master back onto the result is more reliable than gambling on the model’s output.
Any image fixed by compositing should be logged as an edit step in the edit-log. It’s a legitimate production method, but the final image can no longer be described as an untouched model output. After compositing, check the seams, lighting, and edges — a patch that’s numerically perfect can still leave a visible join.
6.3 Sign off on the final version, not just the latest one
Reopen the final exported file and confirm each item one by one: bottle body and cap colors are correct, re-read the label, and compare the protected background against the master one more time. Archive the master, every accepted parent file, the prompts, and the final file together. With the change log in hand, other people can tell which edits came from the model and which were manual fixes, and they can understand why a given version was accepted.
If the finished asset also needs a transparent background, do a final transparency-channel and edge check. If the image contains a title, date, or price, proofread that text separately. Pixel preservation, transparent delivery, and correct text are three distinct problems, and each needs its own acceptance check.
Frequently Asked Questions (FAQ)
Q1: What does drift mean in multi-round image editing?
Drift means that during continuous editing, areas you didn’t ask to change get altered by the model—for example, a background color shifts, label characters change, or framing gets cropped. The more rounds you do, the more easily errors accumulate, so you need to check every round against the master file and requirements document.
Q2: I’ve already uploaded an edit mask through the API—do I still need local pixel comparison?
Yes. An edit mask expresses “you want the model to change only this area”; local verification checks “whether the final pixels were actually changed.” The API may re-encode the whole image or blend outside the boundaries, and only local comparison can provide reviewable evidence.
Q3: The comparison shows a small number of changes in protected pixels—do I have to reject it?
It depends on the acceptance criteria you set in advance. Concept drafts can tolerate slight lighting changes, while final brand assets require zero changes in key areas. First rule out non-generation causes such as JPEG compression or color profile changes, then use the diff image to see where the changes landed.
Q4: The image size returned by the model has changed—can I scale it back before comparing?
Not recommended. Scaling makes every pixel differ, which wipes out the original drift information. You should first check the API’s size parameters and export settings, re-edit from the correct parent file, and record this size change in the edit-log.
Q5: Which image editing APIs does this workflow apply to?
As long as an API can accept image input and return a downloadable original file, you can use it. When you switch APIs, verify the meaning of the mask field, output resolution, and upload method against the official documentation; the acceptance steps themselves don’t change.
Q6: What are the limitations of this method?
Pixel comparison only answers “did the protected pixels change?” It doesn’t judge composition quality, and it can’t tell you whether the text is correct. It requires lossless formats and consistent color interpretation. The script in this article iterates pixel by pixel and is slow with large images; you can switch to a NumPy implementation as needed.
Key Takeaways for Drift Control in Multi-Round Image Editing
- Master copy is read-only: the original file stays untouched and serves as the baseline for all comparisons.
- One edit per round: request only one change each round; it becomes the next round’s parent file only after it passes review.
- Constraints must be checkable: break “keep unchanged” into separately verifiable items such as dimensions, text, and background pixels.
- Keep the two masks separate: the edit mask is for the API, the verification mask is for local scripts, and each has its own format.
- Self-test scripts first: use positive and negative control samples to confirm the verification script makes correct judgments before putting it into use.
- Restore by failure type: retry if the wrong object was changed; composite from the original image if a critical label was altered.
- Keep a log trail: edit-log records the parent file, check results, and reasons for choices; compositing fixes should also be logged.
Summary
Controlling drift in multi-round AI image editing comes down to a process you can audit:
- Structure: the master copy, checkpoints, and branches form a traceable version chain.
- Acceptance checks: close reading, dimension comparison, and local pixel comparison each cover a different type of constraint.
- Recovery: choose retry or original-image compositing based on the failure type; prioritize original-image compositing for critical elements.
Start by getting the verification script working with the composite sample in this article, then take a real asset through the full “master copy → 01 → 02” flow. Once you’ve confirmed the process and thresholds meet your team’s standards, move on to batch production.
References
- Seedream 5.5 multi-turn editing: protect details and check drift: a checkpoint-based workflow for multi-turn editing plus protected-pixel verification
- Link:
ofox.ai/blog/seedream-5-5-multi-turn-editing-guide -
Note: This is the main basis for the workflow structure and failure-recovery categories in this article
-
Seedream 5.5 transparent PNGs: prompts and alpha checks: prompts for transparent assets and alpha-channel checks
- Link:
ofox.ai/blog/seedream-5-5-transparent-png-guide - Note: Good for running transparency and edge acceptance checks once you’ve finished editing an image
Author: APIYI Technical Team