Author’s note: A breakdown of GPT Image 2.6’s saved references, complexity dial, image markup, and SVG export, including the distinction between ChatGPT features and API capabilities, a multi-round image-editing workflow, and an export checklist.
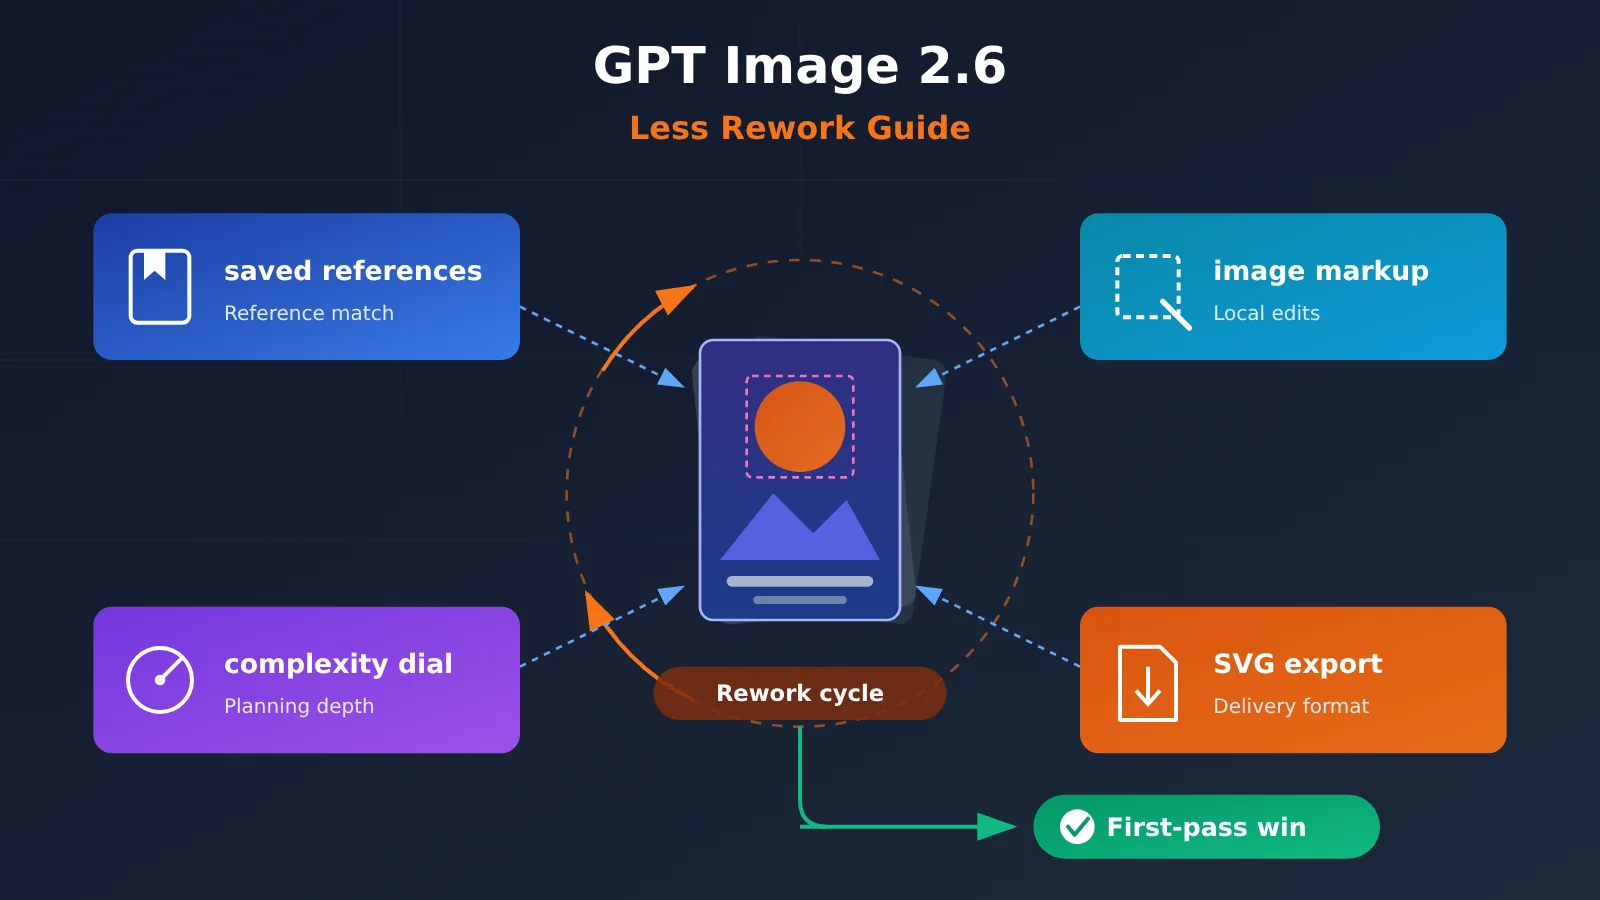
The bottom line: The most interesting thing about GPT Image 2.6 isn’t that it’s “50% faster”—it’s that it can noticeably reduce rework across multiple rounds of image editing. Saved references help maintain consistency, the complexity dial controls planning depth, image markup supports local edits, and SVG export handles the delivery format. All four address the same familiar problem: “I’ve revised it three times, and it still doesn’t look the way I want.”
The second takeaway is just as important: distinguish between features available in ChatGPT and capabilities you can call directly through the API. Saved references and the complexity dial are currently more closely tied to the ChatGPT experience; you’ll need to check the official documentation to see whether the API exposes corresponding fields. This isn’t a recap of release notes. Instead, it looks at three pain points—reference consistency, rework, and export formats—to help creators and developers decide how and where to use each feature.
What you’ll get: By the end of this article, you’ll understand where each new GPT Image 2.6 feature fits and where its limits are. You’ll also have a practical multi-round image-editing workflow, an SVG export checklist, and a list of things to verify before integrating the API.
GPT Image 2.6 Update Overview: Which Features Actually Reduce Rework
According to the November 4, 2026 update, Images 2.6 generates images 50% faster than before and adds GIF output, saved references, image markup, SVG export, and a complexity dial. OpenAI also says its platform generates 4 billion images per week, which helps explain why this update focuses on control rather than image quality alone.
On the API side, there are two models: GPT-Image-2.6 Flare and GPT-Image-2.6 Sunburst. Flare prioritizes speed, with OpenAI claiming it can generate an image in about 6 seconds at the low-quality setting. Sunburst prioritizes image quality and is better suited to final deliverables. That distinction determines which model belongs in the draft stage of your workflow and which belongs in the final stage.
| Feature | Pain Point | Typical Use Cases | Primary Interface |
|---|---|---|---|
| saved references | Characters, products, and styles drift across iterations | Character design, product series, brand visuals | Primarily ChatGPT; API support needs verification |
| complexity dial | Insufficient planning for complex compositions or long waits for simple edits | Multi-object posters, text layouts, minor edits | Check official documentation for interface availability |
| image markup | Editing A unintentionally changes B | Localized color changes, object replacement, text fixes, blemish removal | Primarily interactive use in ChatGPT |
| SVG export | Bitmap images become blurry when enlarged or printed | Icons, vector illustrations, print materials | Check official documentation for specific fields |
| GIF output | Static images can’t convey simple motion | GIFs, loading animations, short demonstrations | Check official documentation for specific fields |
| Flare / Sunburst | Speed and image quality are hard to balance | Fast draft iterations / high-quality final output | API models |
As the table shows, the first four features are the ones most directly tied to reducing rework. A 50% speed boost can shorten the wait for each iteration, but if you’re spending every round correcting unwanted changes from the previous one, your total time may not drop by much.
🎯 Technical tip: If you’re planning to integrate Flare or Sunburst into your business, first check the model list on APIYI apiyi.com for currently available GPT-Image versions. The platform currently offers the GPT-Image 2.5 / 2 series, with Flare and Sunburst options. Check the console to confirm whether 2.6 is supported.
GPT Image 2.6 saved references and image markup: How to stay consistent and make precise local edits
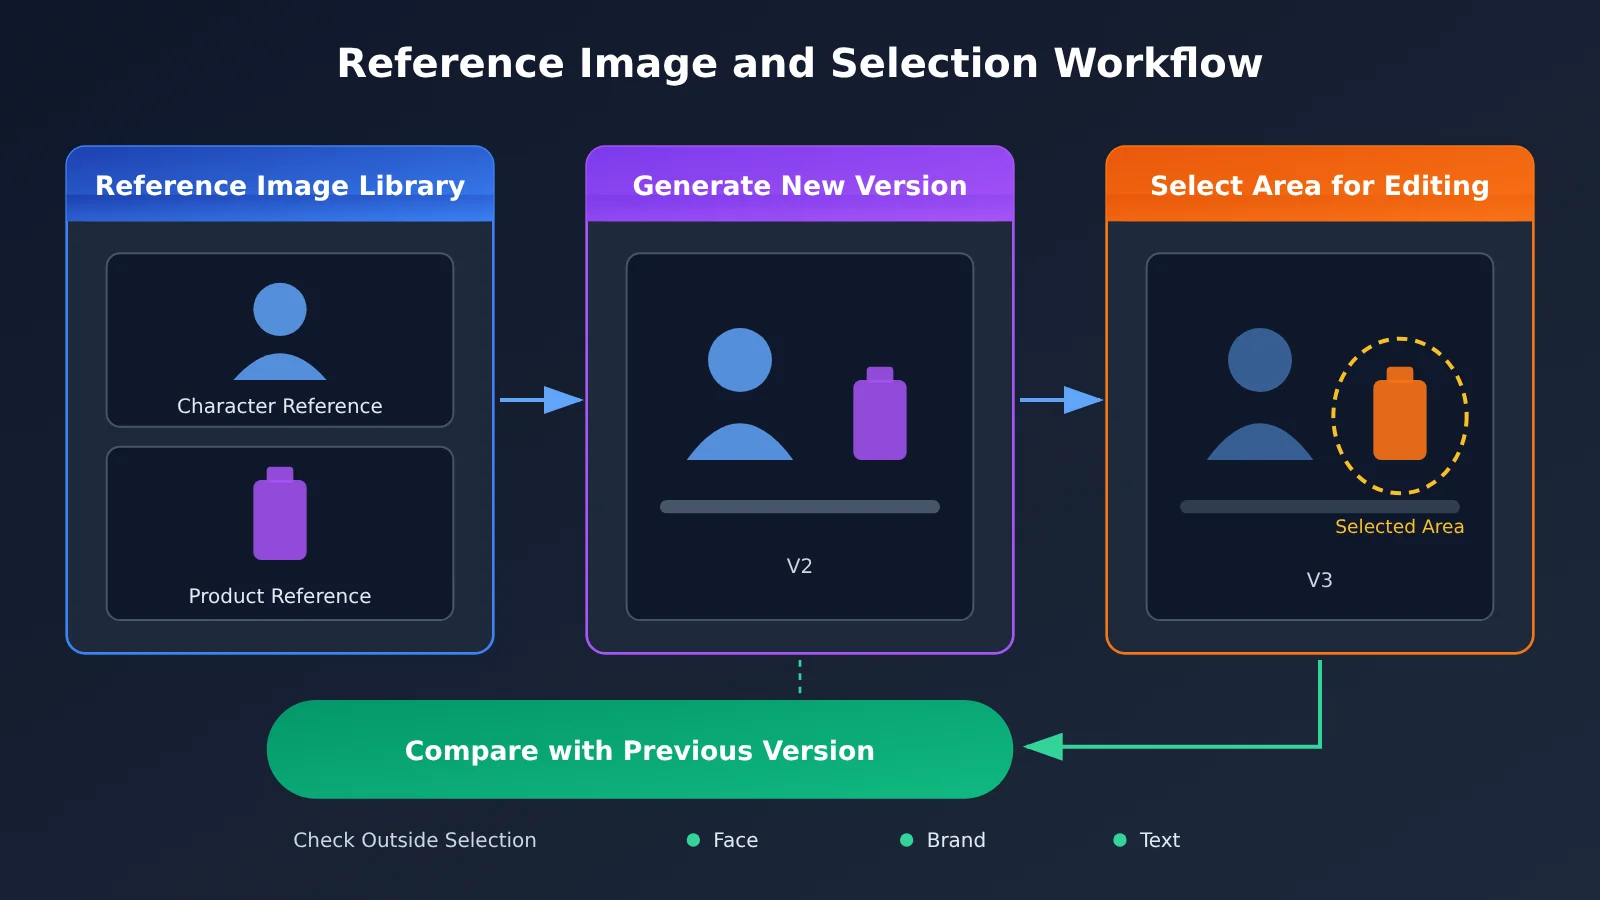
These two features often work best together: saved references keep the overall look consistent, while image markup helps you change only what needs changing. Combining them in one workflow is a straightforward way to reduce rework across multiple revisions.
How saved references keep characters and products consistent
The main purpose of saved references is to save an approved reference image so you can reuse it in later generations or edits. When developing a character, a common problem is that by the third round, the hair color gets lighter or the proportions of the facial features shift. In product images, logos may move or packaging textures may disappear. With a saved reference image, the model has the same visual baseline to anchor each round, reducing the chance of drift.
It’s especially useful in four scenarios: extending a character design into multiple poses, creating a series of scene images for the same product, maintaining a consistent brand aesthetic, and working on long-term projects that need repeated revisions. If you’re creating a one-off poster, saving a reference image may not offer much benefit and could add unnecessary management overhead.
One important caveat: saved references are primarily designed for continuous creative work in ChatGPT. Check the official documentation to confirm whether the API supports saving reference images. In API workflows, a safer approach is to maintain a reference image library in your own system and explicitly include the reference image with each request, rather than assuming the server will remember it.
How image markup reduces unintended changes
Image markup lets you circle or annotate the area you want to change directly on the image, then provide editing instructions. It addresses a classic problem: you only want to replace a cup in the background with a vase, but the person’s gesture, lighting, or even clothing color changes too. Marking the area makes the intended scope of the edit clearer to the model.
Markup is useful for tasks like changing a specific color, replacing an object, correcting text in an image, and removing imperfections. But it doesn’t completely isolate the selected area. Small changes can still occur outside it, so compare each edit with the previous version, paying particular attention to things that shouldn’t change, such as faces, brand elements, and text.
GPT Image 2.6 complexity dial: When to let the model plan more
Think of the complexity dial as a control for how much planning the model does. Turn it up, and the model spends more effort working out the composition, object relationships, and text layout before generating an image. Turn it down, and the model does less planning and generates images faster—ideal for simple edits that don’t require rethinking the layout.
This setting directly affects how much rework you’ll need. When a multi-object poster doesn’t come out right on the first try, the problem often isn’t that the model lacks capability. It may simply need more planning to prevent overlapping elements or misplaced text. On the other hand, using high complexity for a simple color change only adds unnecessary waiting time.
| Task type | Recommended complexity | Why | Typical examples |
|---|---|---|---|
| Complex compositions | High | Multiple objects need their positions planned in relation to one another | Multi-person scene posters, infographics |
| Text layout | High | Text placement and hierarchy need advance planning | Product hero images with headlines and selling points |
| Style exploration | Medium | Balances variety and speed | Multiple drafts of the same theme |
| Small local edits | Low | The layout is already set, so there’s no need to replan | Color changes, swapping small objects, removing blemishes |
| Batch drafts | Low | Iteration speed is the priority | Quickly generating images to screen creative directions |
A good rule of thumb is to start high, then go low. Use high complexity early in the project to get the composition and layout right. Once you’re making detailed edits, lower it and use image markup for local adjustments. This helps you establish a solid foundation without wasting time on small changes later.
One important caveat: the official documentation still needs to be checked to confirm whether the complexity dial is exclusive to ChatGPT and whether the API exposes a corresponding parameter. In an API workflow, if there’s no corresponding field, you can approximate this approach through model selection: use the speed-focused Flare for drafts, then switch to the image-quality-focused Sunburst for the final version.
GPT Image 2.6 SVG Export: Use Cases and Quality Checks
SVG export is one of the updates with the biggest impact on design deliverables. SVG is a vector format that can scale without losing quality, and its paths, colors, and layers can be edited in design software. For icons, vector illustrations, and print materials, that means AI-generated results can finally enter a production design workflow without being manually traced first.
But not every image is a good fit for SVG. Converting photographic textures, complex lighting, or subtle gradients to vectors can produce an enormous number of paths, making files larger and harder to edit.
| Image type | Recommended format | Notes |
|---|---|---|
| Icons, logos | SVG |
Ideal for reuse at multiple sizes, where vectors offer the clearest advantage |
| Flat vector illustrations | SVG |
Distinct color blocks and simple paths make editing easier |
| Line art for print | SVG |
Vectors can be enlarged without quality loss for high-resolution printing |
| Photographic product images | PNG / JPEG / WebP |
Realistic detail makes vectorization more trouble than it’s worth |
| Simple animations | GIF |
Version 2.6 supports GIF output for lightweight animations |
After exporting an SVG, check these four areas rather than relying on the preview alone:
- Paths: Look for excessive fragmented paths, overlapping paths, or open paths, which can cause problems during editing and printing.
- Text outlines: Check whether text remains editable or has been converted to outlines. Print delivery typically requires outlines, while future copy changes require editable text.
- Colors: Verify that color values match brand guidelines and check for unintended near-matches. For print, also pay attention to color mode conversion.
- Layers: Make sure the layer or group structure is sensible. Ideally, the background, main subject, and text should be separate so a designer can easily take over.
If your workflow involves handing AI-generated images to a designer for refinement, these checks can help avoid the awkward discovery that the file can’t be edited and has to be rebuilt.
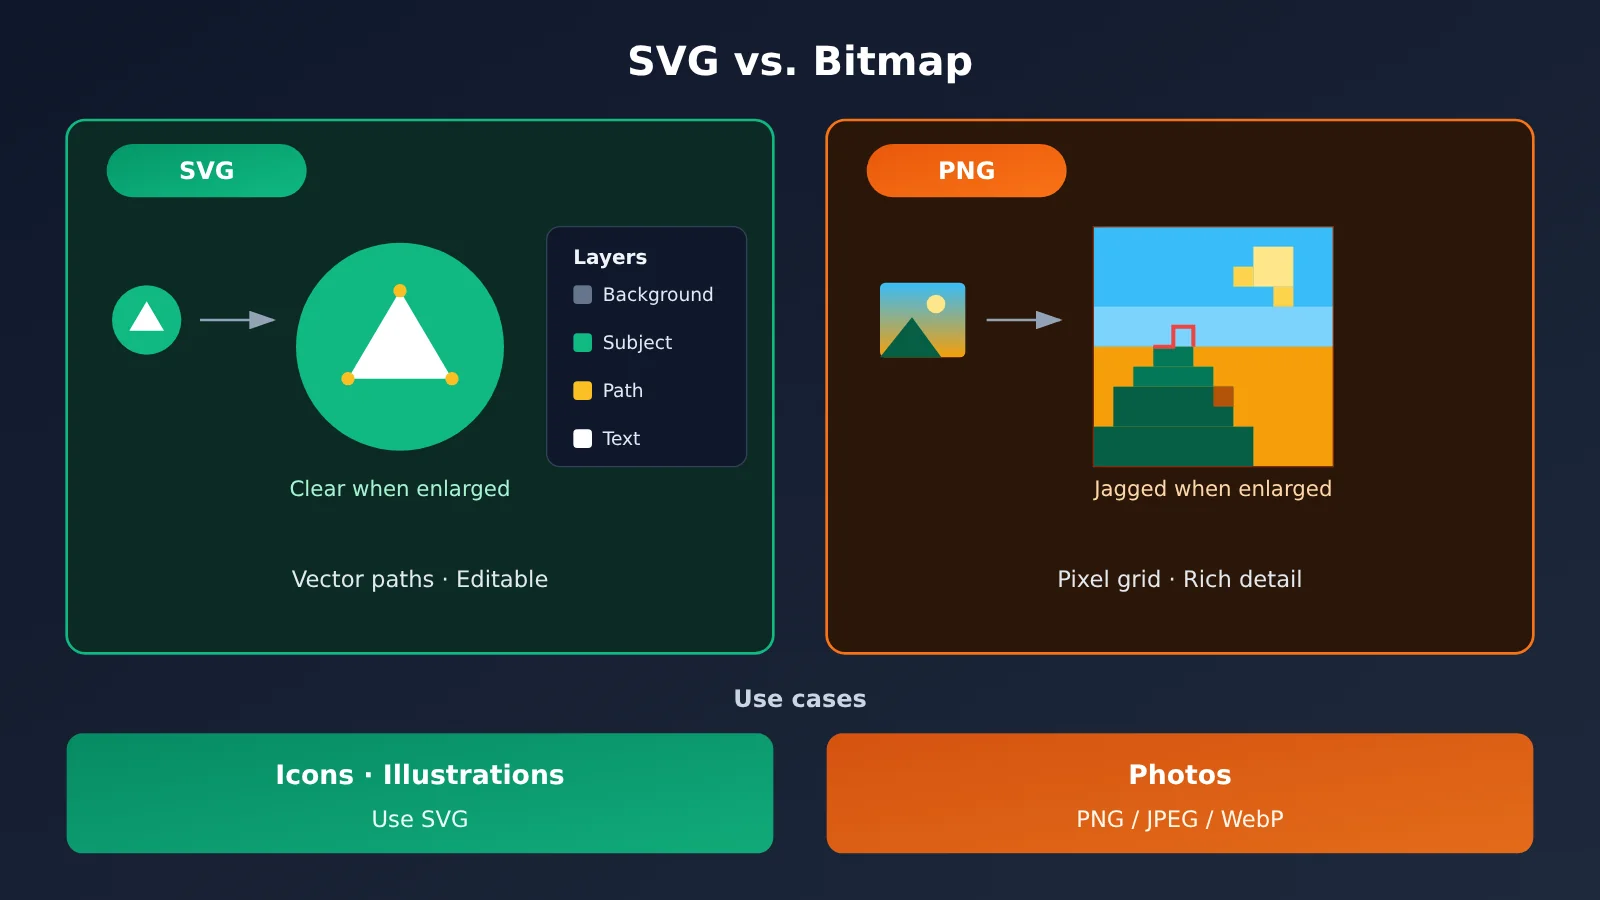
💡 Choosing an output format: Check the official documentation for the exact API fields used to output formats such as SVG and GIF. If you’re connecting through APIYI at apiyi.com, first check the platform documentation to confirm whether it passes through the output format you need before adding SVG export to your production workflow.
How GPT Image 2.6 Differs Between ChatGPT and the API
This is where the distinction matters most. Many tutorials treat interactive ChatGPT features as API parameters, leaving developers trying to use fields that don’t exist. Based on the information currently available, saved references and the complexity dial are primarily ChatGPT features, while the API focuses on the Flare / Sunburst models and output formats such as GIF and SVG.
| Capability | ChatGPT | Official API | Third-Party Aggregation Platforms |
|---|---|---|---|
| saved references | Supported; useful for continuous creative work | Check the official documentation to confirm support | Depends on whether the upstream provider offers it |
| complexity dial | Primarily a ChatGPT feature | Check whether the parameter is exposed | Depends on whether the upstream provider offers it |
| image markup | Interactive selection and annotation | Refer to the official documentation | Depends on whether the upstream provider offers it |
| Flare / Sunburst | Users don’t need to select a model manually | Both models are available through the API | APIYI apiyi.com offers Flare / Sunburst options; check the console for version 2.6 availability |
| GIF / SVG output | Supported | Refer to the official documentation for specific fields | Check the platform documentation to see whether they’re passed through |
There are three key takeaways. First, don’t treat ChatGPT features as API parameters. Until they’re confirmed in the official documentation, consider all related fields unverified. Second, third-party platforms may pass through only some capabilities. Even if the upstream API supports a field, the intermediary may not yet have adapted to it. Third, if a capability isn’t available through the API yet, you can fill the gap in your own system with tools such as reference image libraries and version management.
What to Know About Accessing the GPT Image Series Through APIYI
APIYI provides an OpenAI-compatible interface. To connect, set base_url to https://api.apiyi.com/v1 and enter the GPT-Image model name shown in the console’s model list in the model field. You can use the Flare series for drafts and switch to the Sunburst series for final output, following the “fast first, refined later” approach discussed earlier.
Before getting started, check three things: whether GPT-Image 2.6 is available in the console, whether the new parameters are passed through, and whether SVG and GIF are included among the output formats. Check the console and documentation for pricing and availability too—don’t base your budget on third-party reports.
🚀 Quick start: The officially recommended approach is to register at APIYI apiyi.com and claim free test credits. Use an existing GPT-Image version to get your prompt and reference image workflow running. Once 2.6 is available in the console, you can migrate by replacing the model name.
GPT Image 2.6 Multi-Round Image Editing Workflow: Reference Images, Versions, Review, and Rollback
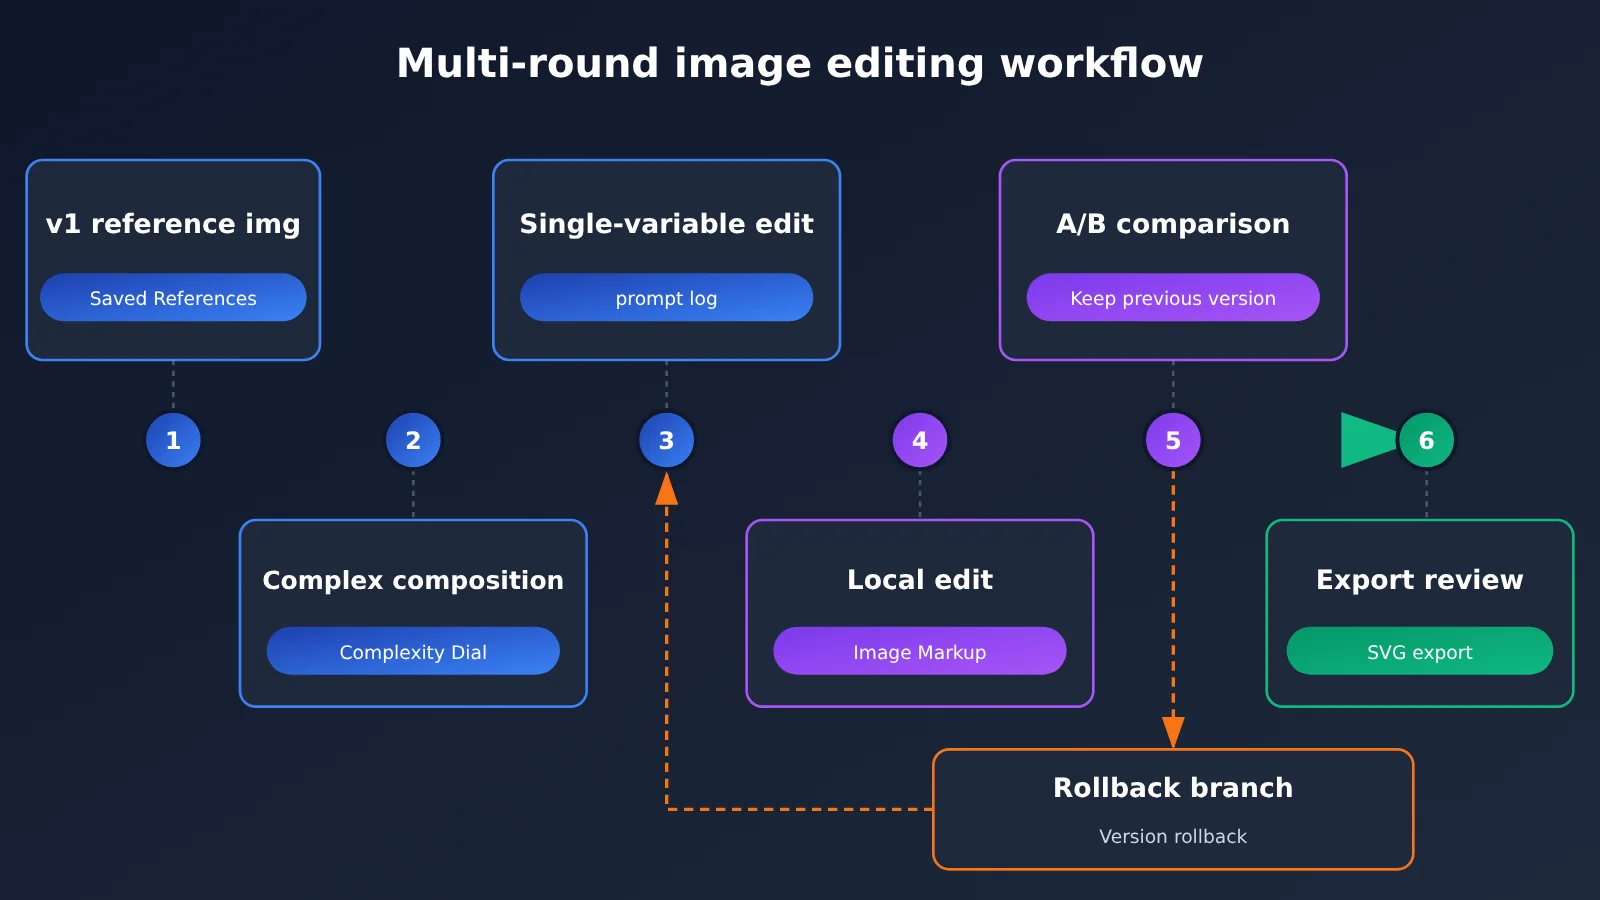
Even with plenty of features, you can end up in a cycle of rework without a clear workflow. The process below brings together the four features covered earlier and works well for posters, product images, character designs, UI assets, and other projects that need multiple rounds of iteration.
- Set a reference image and version number first: Confirm the baseline reference image before you start. In ChatGPT, you can use saved references; in an API workflow, store it in your own reference image library. Label the first version v1.
- Increase complexity during composition: Use a higher complexity dial setting (or a quality-first model) to establish the layout and text hierarchy in one go, so you don’t have to start over later.
- Change only one variable per round: If you’re changing colors in this round, change only colors. Swap objects in the next round. Changing multiple variables at once makes it hard to tell what caused a problem.
- Use image markup for local edits: Circle the area you want to change to reduce the chance of unintended edits, and lower the complexity to save time.
- Keep the previous version for A/B comparison: Once the new version is generated, compare it side by side with the previous one. Pay particular attention to things that shouldn’t change, such as faces, brand elements, and text.
- Record prompts, parameters, and model versions: For each version, record the full prompt, the model used (Flare or Sunburst), and key parameters so you can roll back and reproduce the result.
- Export and review the final version by format: For vector assets, export as SVG and check paths, text, colors, and layers. For photographic images, export as PNG, JPEG, or WebP.
Rollback is the safety net in this workflow. If an edit makes the overall result worse, don’t keep trying to fix the bad version. Go back to the last approved version and try a different approach. The more detailed your version records, the easier it is to roll back.
For developers, this record-keeping step can work alongside platform logs. In the APIYI apiyi.com console, you can view models, usage, billing, and invocation logs. Link each image version to its request time, model name, and usage to pinpoint where things started to go wrong and track how many iterations a project actually took. That gives you a basis for future cost estimates.
Frequently Asked Questions
Q1: Can I use GPT Image 2.6 saved references through the API?
Saved references are currently geared toward an ongoing creative workflow in ChatGPT. Check the official documentation to confirm whether the API supports saving reference images. Until there’s official confirmation, we recommend maintaining your own reference image library and explicitly passing reference images with each request. This approach doesn’t rely on server-side memory and makes migration easier.
Q2: What’s the difference between the complexity dial and choosing Flare or Sunburst?
The complexity dial controls how much the model “plans,” affecting how deeply it considers composition and layout. Flare and Sunburst are two different models, optimized for speed and image quality, respectively. The ideas are similar, but they aren’t equivalent. If the API doesn’t expose a complexity dial parameter yet, you can approximate a fast-to-polished workflow by using Flare for drafts and Sunburst for final versions.
Q3: Is SVG export suitable for every type of image?
No. SVG works best for icons, logos, flat vector illustrations, and line art for print. Photos and images with complex lighting can produce too many paths when vectorized, making the files bulky and difficult to edit. Use PNG, JPEG, or WebP for those instead. After exporting, check the paths, text-to-outline conversion, colors, and layers.
Q4: How can I quickly call GPT Image models through the API?
Register an account at APIYI apiyi.com to get an API key and free testing credits. Set `base_url` to `https://api.apiyi.com/v1`, then choose the Flare or Sunburst version of the GPT-Image series from the model list in the console. The platform currently offers the GPT-Image 2.5 / 2 series. Check the console and documentation for support for 2.6 and its new parameters.
Q5: Does image markup guarantee that areas outside the selection won’t change?
Not necessarily. Image markup significantly reduces the chance of unintended edits, but it doesn’t completely isolate the selected area. Areas outside it may still change slightly. After each edit, compare it with the previous version using an A/B comparison, paying particular attention to faces, brand marks, and text. If changes outside the selection affect the final deliverable, roll back to the previous version and edit again.
GPT Image 2.6 Summary and Multi-Round Image Editing Checklist
GPT Image 2.6 Key Takeaways
- The value is in less rework: A 50% speed boost is a start, but fewer rounds of corrections are 2.6’s main benefit.
- Use saved references for consistency: Anchor characters, products, and style to a baseline. API support still needs to be verified.
- Use the complexity dial to control planning depth: Turn it up for composition and down for small local edits. Starting high and finishing low saves the most time.
- Use image markup to control the editing area: Circle the area to change, but still check what’s outside it.
- Use SVG only for vector graphics: Export icons and illustrations as SVG; keep photos in bitmap formats.
- Distinguish ChatGPT from the API: Don’t assume interactive features are API parameters. Check the official documentation for supported fields.
- Check availability in the console: Use APIYI at apiyi.com to review the model list and usage logs and confirm whether 2.6 is available.
Multi-Round Image Editing and SVG Export Checklist
| Stage | Check | Done |
|---|---|---|
| Before starting | Confirmed the baseline reference image and labeled it v1 | ☐ |
| Before starting | Confirmed the features are available on the current platform (ChatGPT or API) | ☐ |
| Composition | Used a higher complexity setting or a quality-prioritized model for complex compositions and text layout | ☐ |
| Iteration | Changed only one variable per round | ☐ |
| Iteration | Circled the area for local edits and checked the surrounding area | ☐ |
| Iteration | Kept the previous version and completed an A/B comparison | ☐ |
| Iteration | Recorded the prompt, model version, and key parameters | ☐ |
| Export | Chose SVG or PNG / JPEG / WebP based on the image type | ☐ |
| SVG review | Paths have no fragments or unnecessary overlaps | ☐ |
| SVG review | Text is converted to outlines or retained as text according to delivery requirements | ☐ |
| SVG review | Color values match brand guidelines, and layers are clearly grouped | ☐ |
| Wrap-up | Checked usage logs to confirm the number of iteration rounds and cost | ☐ |
GPT Image 2.6 turns image editing from something that depends on luck into an engineering task you can manage with a repeatable workflow. Keep reference images, complexity, local markup, and export formats under control, and you’ll naturally cut down on rework.
If you’re planning to integrate this workflow into your product, start by using the existing GPT-Image series through APIYI at apiyi.com to get the full pipeline working, then migrate smoothly when 2.6 becomes available. The platform offers a free allowance and a unified interface for multiple models, making it easy to compare and switch between Flare and Sunburst.
📚 References
- OpenAI Image Generation Documentation: GPT Image models and parameter descriptions
- Link:
platform.openai.com/docs/guides/images -
Notes: The primary source for verifying whether saved references, the complexity dial, and SVG / GIF output are available through the API
-
OpenAI Model List: An overview of the different GPT-Image versions
- Link:
platform.openai.com/docs/models -
Notes: Check the model names and capability differences between Flare and Sunburst
-
APIYI Documentation Center: Platform model support and parameter passthrough
- Link:
docs.apiyi.com - Notes: Check whether GPT-Image 2.6 is available and whether the new parameters are passed through
Author: APIYI Technical Team
Technical discussions: Contact us through the APIYI homepage at apiyi.com. For more integration resources, visit the documentation center at docs.apiyi.com.