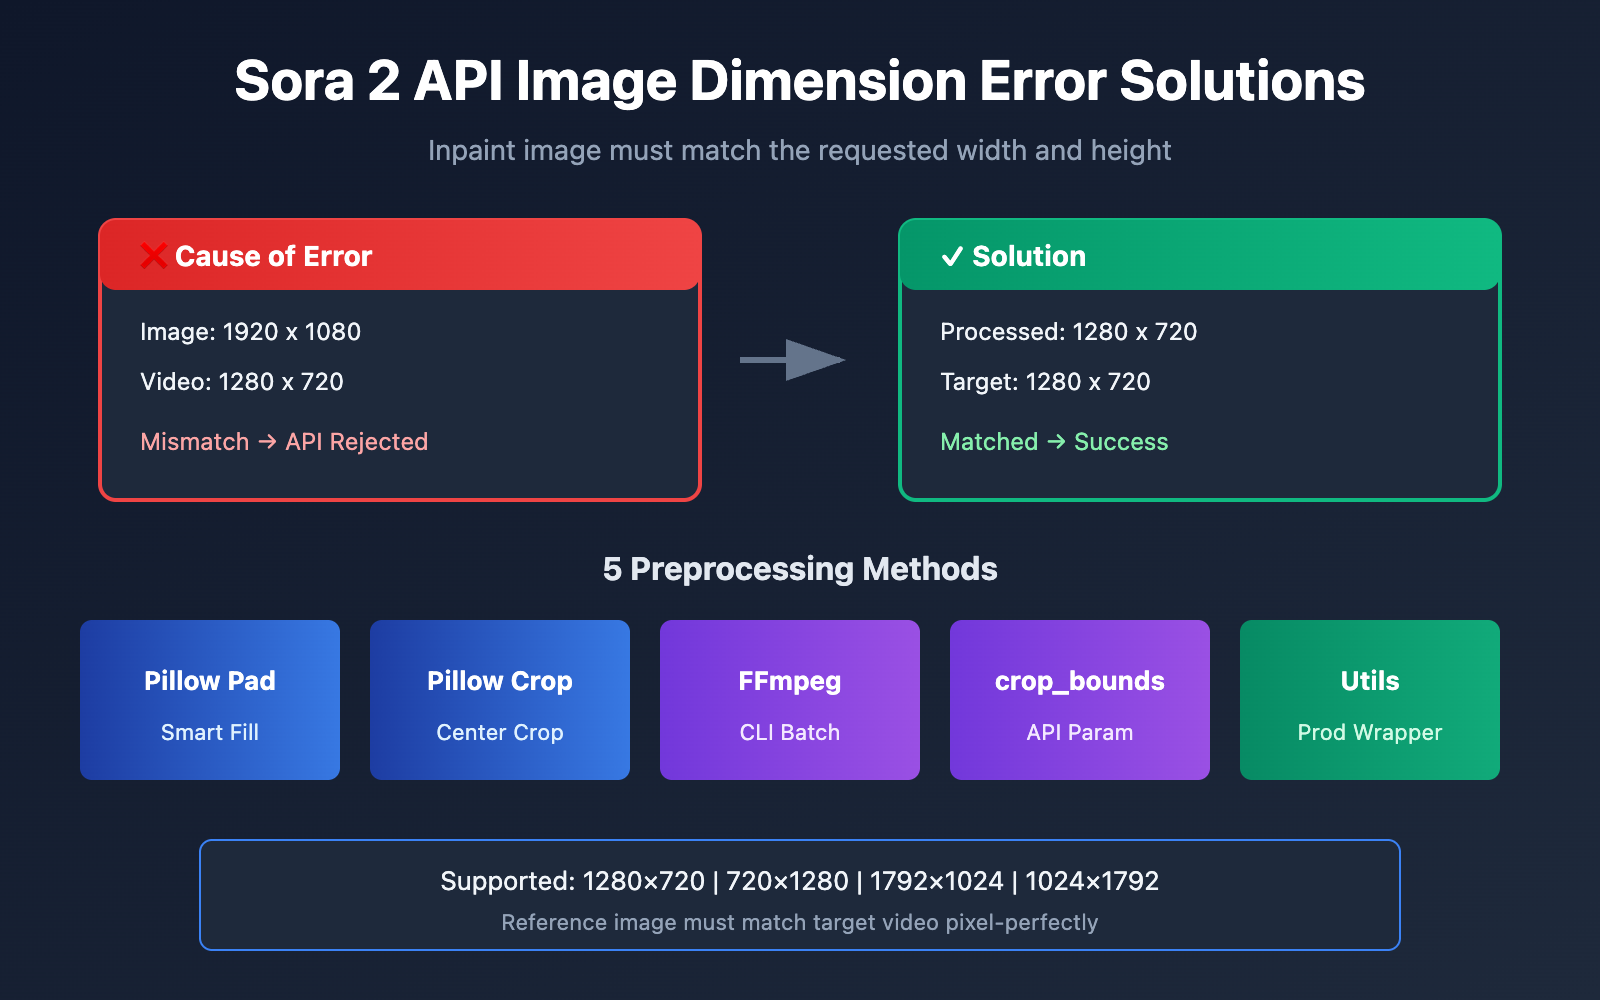
When using the Sora 2 API for Image-to-Video generation, dimension mismatch of the reference image is one of the most common errors developers encounter. This article will dive deep into the root causes of the Inpaint image must match the requested width and height error and provide five proven solutions.
Key Value: By the end of this article, you'll understand the Sora 2 API's image validation rules and learn how to use Python (Pillow) and FFmpeg for preprocessing to completely eliminate dimension errors.
Analyzing Sora 2 API Image Dimension Errors
When you call the Sora 2 API's image-to-video functionality, you might see the following error message:
{
  "error": {
    "message": "Inpaint image must match the requested width and height",
    "type": "invalid_request_error",
    "param": null,
    "code": null
  }
}
This indicates that the dimensions of the reference image (input_reference) you uploaded don't match the target video resolution.
Sora 2 API Mandatory Image Matching Rules
The Sora 2 API employs a strict dimension validation mechanism:
| Validation Item | Requirement | Description |
|---|---|---|
| Width Match | Image Width = Video Width | Must be pixel-perfect |
| Height Match | Image Height = Video Height | Must be pixel-perfect |
| Formats | JPEG, PNG, WebP | All three formats are supported |
| Transmission | multipart/form-data | Must be uploaded as a file |
Supported Video Resolutions in Sora 2 API
According to OpenAI's official documentation, the Sora 2 API currently supports the following resolutions:
| Resolution | Width x Height | Ratio | Use Case |
|---|---|---|---|
| 720p Landscape | 1280 x 720 | 16:9 | YouTube, Web video |
| 720p Portrait | 720 x 1280 | 9:16 | Douyin, TikTok, Reels |
| 1080p Landscape (Pro) | 1792 x 1024 | ~16:9 | HD landscape video |
| 1080p Portrait (Pro) | 1024 x 1792 | ~9:16 | HD portrait video |
🎯 Important Pro-tip: Your reference image must be pixel-perfect compared to your chosen target resolution. For instance, if you select 1280×720, your image must be exactly 1280×720 pixels—even being off by a single pixel will trigger an error.
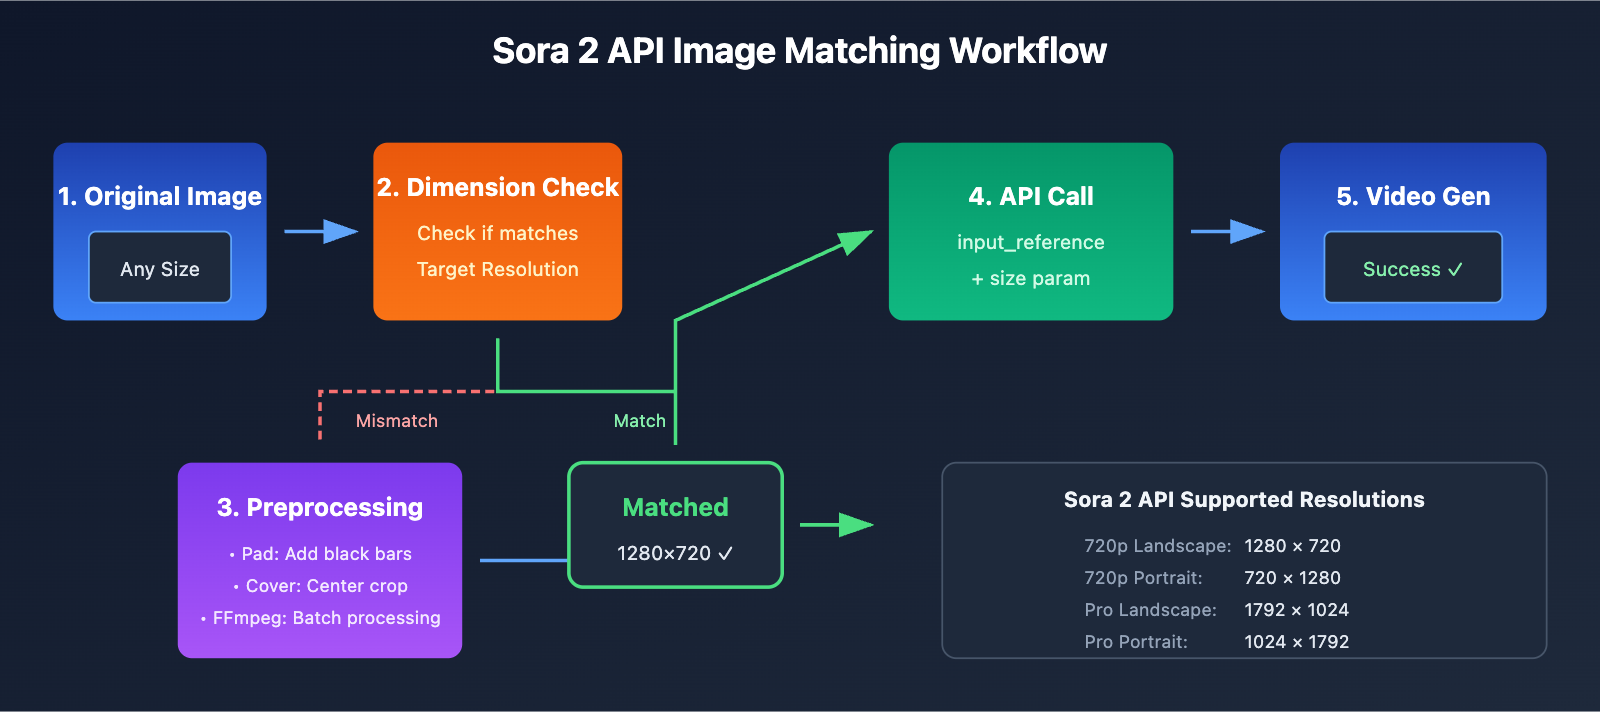
5 Solutions for Sora 2 API Image Reference Dimension Errors
Solution 1: Smart Padding with Python Pillow
Using Pillow's ImageOps.pad() method is a smart way to handle images of any size. It maintains the aspect ratio while padding the image to your target dimensions:
from PIL import Image, ImageOps
import openai

# Sora 2 API 支持的标准分辨率
SORA_RESOLUTIONS = {
    "landscape_720p": (1280, 720),
    "portrait_720p": (720, 1280),
    "landscape_1080p": (1792, 1024),
    "portrait_1080p": (1024, 1792),
}

def preprocess_image_for_sora(image_path, target_resolution="landscape_720p"):
    """预处理图片以匹配 Sora 2 API 尺寸要求"""
    target_size = SORA_RESOLUTIONS[target_resolution]

    # 打开原图
    img = Image.open(image_path)

    # 使用 pad 方法:保持宽高比,填充黑色背景
    processed = ImageOps.pad(img, target_size, color=(0, 0, 0))

    # 保存处理后的图片
    output_path = image_path.replace(".jpg", "_sora_ready.jpg")
    processed.save(output_path, "JPEG", quality=95)

    return output_path

# 使用示例
processed_image = preprocess_image_for_sora("my_image.jpg", "landscape_720p")

# 调用 Sora 2 API - 通过 APIYI 统一接口
client = openai.OpenAI(
    api_key="YOUR_API_KEY",
    base_url="https://api.apiyi.com/v1"  # 使用 APIYI 统一接口
)

with open(processed_image, "rb") as f:
    response = client.videos.create(
        model="sora-2",
        prompt="A serene landscape comes to life",
        size="1280x720",
        input_reference=f
    )
🚀 Quick Start: We recommend using the APIYI (apiyi.com) platform to quickly test the Sora 2 API. It provides ready-to-use endpoints, making integration a breeze without complex configurations.
Solution 2: Center Cropping with Python Pillow (Keep the Subject)
If you want to keep the main subject of your image and avoid black bars, center cropping is the way to go:
from PIL import Image

def center_crop_for_sora(image_path, target_width, target_height):
    """居中裁剪图片以匹配 Sora 2 API 尺寸要求"""
    img = Image.open(image_path)
    orig_width, orig_height = img.size

    # 计算目标宽高比
    target_ratio = target_width / target_height
    orig_ratio = orig_width / orig_height

    if orig_ratio > target_ratio:
        # 原图更宽,按高度缩放后裁剪两边
        new_height = target_height
        new_width = int(orig_width * (target_height / orig_height))
    else:
        # 原图更高,按宽度缩放后裁剪上下
        new_width = target_width
        new_height = int(orig_height * (target_width / orig_width))

    # 先缩放
    img = img.resize((new_width, new_height), Image.LANCZOS)

    # 再居中裁剪
    left = (new_width - target_width) // 2
    top = (new_height - target_height) // 2
    right = left + target_width
    bottom = top + target_height

    cropped = img.crop((left, top, right, bottom))

    output_path = image_path.replace(".jpg", f"_{target_width}x{target_height}.jpg")
    cropped.save(output_path, "JPEG", quality=95)

    return output_path

# 为横屏 720p 视频准备垫图
processed = center_crop_for_sora("my_photo.jpg", 1280, 720)
Solution 3: Batch Processing with FFmpeg Command Line
For scenarios where you need to process files in bulk, FFmpeg is the most efficient choice:
Center Crop Mode (Cover):
# Scale to maintain ratio, then center crop to target dimensions
ffmpeg -i input.jpg -vf "scale=1280:720:force_original_aspect_ratio=increase,crop=1280:720" output_sora.jpg
Padding Mode (Letterbox):
# Scale while maintaining ratio, pad missing areas with black
ffmpeg -i input.jpg -vf "scale=1280:720:force_original_aspect_ratio=decrease,pad=1280:720:(ow-iw)/2:(oh-ih)/2:black" output_sora.jpg
Batch Processing Script:
#!/bin/bash
# Batch process all .jpg images in the current directory to Sora 2 API 720p landscape format

for file in *.jpg; do
    ffmpeg -i "$file" \
        -vf "scale=1280:720:force_original_aspect_ratio=increase,crop=1280:720" \
        -q:v 2 \
        "sora_ready_$file"
done
Solution 4: Using the crop_bounds Parameter (Built-in API Cropping)
The Sora 2 API includes a crop_bounds parameter, allowing you to specify a crop area directly within the API call:
import openai

client = openai.OpenAI(
    api_key="YOUR_API_KEY",
    base_url="https://api.apiyi.com/v1"  # 使用 APIYI 统一接口
)

# 使用 crop_bounds 指定裁剪区域(以比例形式)
with open("full_size_image.jpg", "rb") as f:
    response = client.videos.create(
        model="sora-2",
        prompt="动态视频效果",
        size="1280x720",
        input_reference=f,
        crop_bounds={
            "left_fraction": 0.1,    # 左边裁掉 10%
            "top_fraction": 0.1,     # 顶部裁掉 10%
            "right_fraction": 0.9,   # 右边保留到 90%
            "bottom_fraction": 0.9   # 底部保留到 90%
        },
        frame_index=0  # 图片作为第一帧
    )
⚠️ Note: When using
crop_bounds, the resulting cropped area still needs to match the target video resolution. We suggest using this alongside some light pre-processing.
Solution 5: A Complete Image Preprocessing Utility Class
Here's a production-ready utility class that includes multiple processing modes:
from PIL import Image, ImageOps
from pathlib import Path
import io

class SoraImagePreprocessor:
    """Sora 2 API 垫图预处理工具"""

    RESOLUTIONS = {
        "1280x720": (1280, 720),
        "720x1280": (720, 1280),
        "1792x1024": (1792, 1024),
        "1024x1792": (1024, 1792),
    }

    def __init__(self, target_resolution="1280x720"):
        if target_resolution not in self.RESOLUTIONS:
            raise ValueError(f"不支持的分辨率: {target_resolution}")
        self.target_size = self.RESOLUTIONS[target_resolution]

    def pad(self, image_path, bg_color=(0, 0, 0)):
        """填充模式:保持原图比例,添加背景色填充"""
        img = Image.open(image_path)
        return ImageOps.pad(img, self.target_size, color=bg_color)

    def cover(self, image_path):
        """覆盖模式:保持原图比例,居中裁剪"""
        img = Image.open(image_path)
        return ImageOps.fit(img, self.target_size, Image.LANCZOS)

    def stretch(self, image_path):
        """拉伸模式:强制拉伸到目标尺寸(不推荐)"""
        img = Image.open(image_path)
        return img.resize(self.target_size, Image.LANCZOS)

    def to_bytes(self, img, format="JPEG", quality=95):
        """将 PIL Image 转换为字节流,用于 API 上传"""
        buffer = io.BytesIO()
        img.save(buffer, format=format, quality=quality)
        buffer.seek(0)
        return buffer

    def process_and_save(self, image_path, mode="cover", output_path=None):
        """处理并保存图片"""
        if mode == "pad":
            processed = self.pad(image_path)
        elif mode == "cover":
            processed = self.cover(image_path)
        elif mode == "stretch":
            processed = self.stretch(image_path)
        else:
            raise ValueError(f"不支持的模式: {mode}")

        if output_path is None:
            p = Path(image_path)
            output_path = p.parent / f"{p.stem}_sora_{self.target_size[0]}x{self.target_size[1]}{p.suffix}"

        processed.save(output_path, quality=95)
        return output_path

# 使用示例
preprocessor = SoraImagePreprocessor("1280x720")

# 方式1:处理并保存
output = preprocessor.process_and_save("my_image.jpg", mode="cover")
print(f"处理完成: {output}")

# 方式2:直接获取字节流用于 API 调用
img = preprocessor.cover("my_image.jpg")
image_bytes = preprocessor.to_bytes(img)
View the full example code
import openai
from PIL import Image, ImageOps
import io

class SoraImagePreprocessor:
    """Sora 2 API 垫图预处理工具"""

    RESOLUTIONS = {
        "1280x720": (1280, 720),
        "720x1280": (720, 1280),
        "1792x1024": (1792, 1024),
        "1024x1792": (1024, 1792),
    }

    def __init__(self, target_resolution="1280x720"):
        if target_resolution not in self.RESOLUTIONS:
            raise ValueError(f"不支持的分辨率: {target_resolution}")
        self.target_size = self.RESOLUTIONS[target_resolution]

    def cover(self, image_path):
        """覆盖模式:保持原图比例,居中裁剪"""
        img = Image.open(image_path)
        return ImageOps.fit(img, self.target_size, Image.LANCZOS)

    def to_bytes(self, img, format="JPEG", quality=95):
        """将 PIL Image 转换为字节流"""
        buffer = io.BytesIO()
        img.save(buffer, format=format, quality=quality)
        buffer.seek(0)
        return buffer


def generate_video_with_image(image_path, prompt, resolution="1280x720"):
    """
    使用预处理后的图片生成 Sora 2 视频

    Args:
        image_path: 原始图片路径
        prompt: 视频描述提示词
        resolution: 目标分辨率

    Returns:
        视频生成任务 ID
    """
    # 1. 预处理图片
    preprocessor = SoraImagePreprocessor(resolution)
    processed_img = preprocessor.cover(image_path)
    image_bytes = preprocessor.to_bytes(processed_img)

    # 2. 初始化客户端 - 通过 APIYI 统一接口
    client = openai.OpenAI(
        api_key="YOUR_API_KEY",
        base_url="https://api.apiyi.com/v1"
    )

    # 3. 调用 Sora 2 API
    response = client.videos.create(
        model="sora-2",
        prompt=prompt,
        size=resolution,
        input_reference=image_bytes,
        duration=5  # 视频时长(秒)
    )

    return response


# 完整调用示例
if __name__ == "__main__":
    result = generate_video_with_image(
        image_path="landscape_photo.jpg",
        prompt="The scene comes alive with gentle wind moving through the trees",
        resolution="1280x720"
    )
    print(f"视频生成任务已提交: {result}")
Comparing Sora 2 API Image Preprocessing Modes
Choosing the right preprocessing mode is crucial for the final video quality:
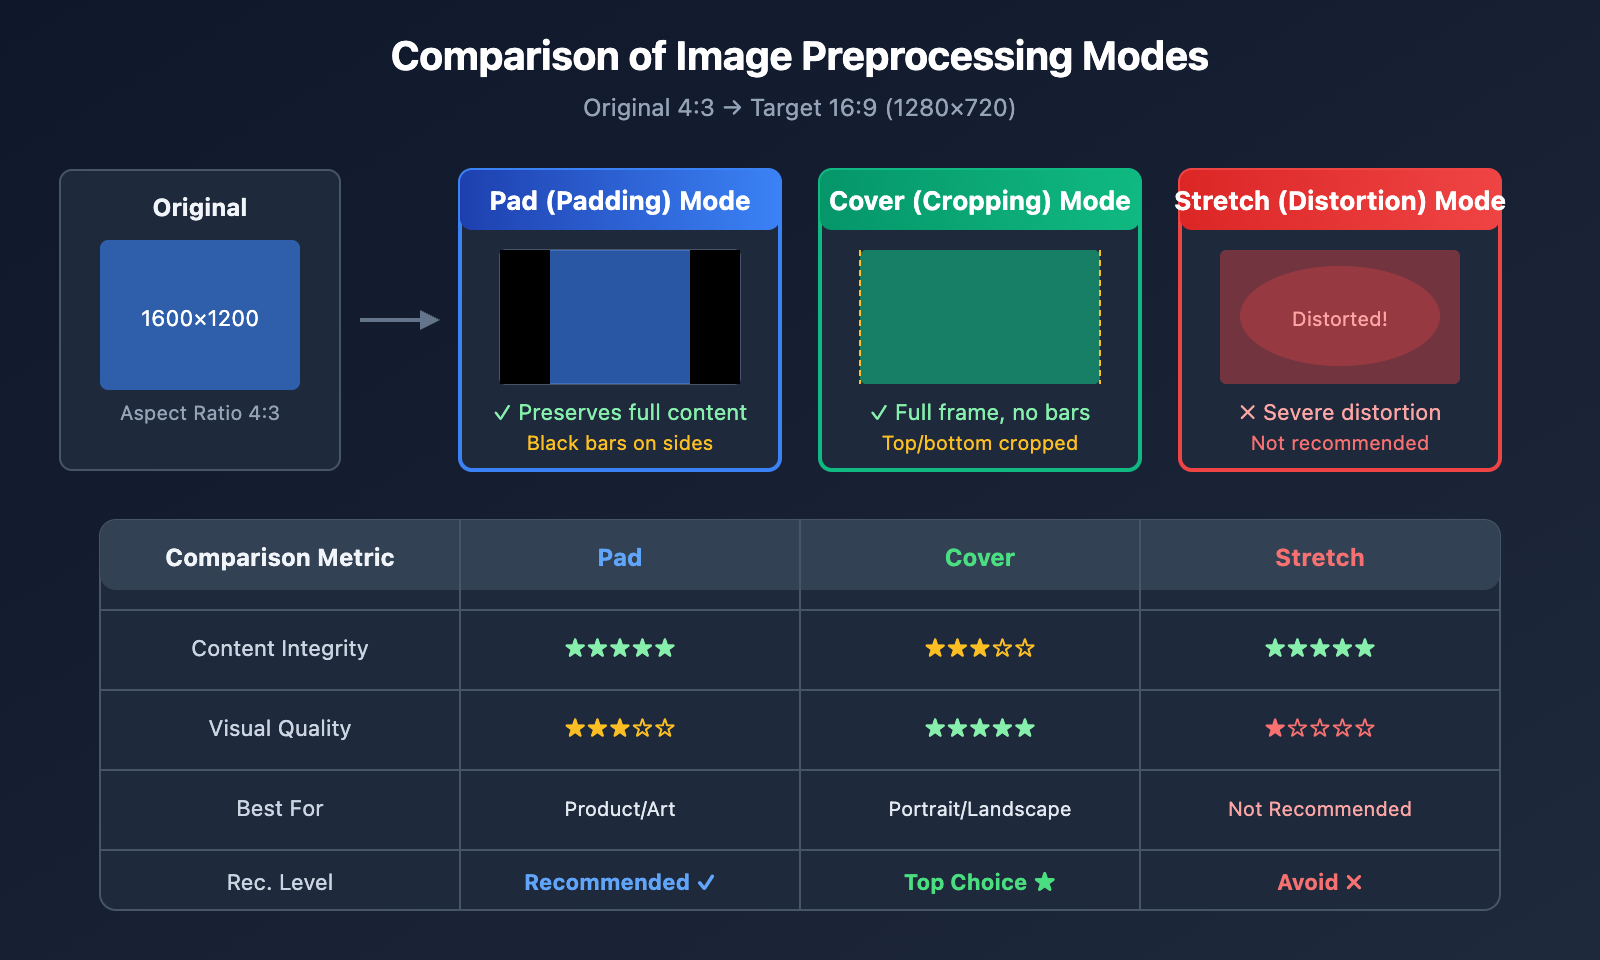
| Preprocessing Mode | Method | Pros | Cons | Best For |
|---|---|---|---|---|
| Pad | Maintain ratio, add bars | Keeps full image | Black bars | High integrity requirements |
| Cover | Maintain ratio, center crop | Full frame, no bars | Edges may be lost | Subject-centered images |
| Stretch | Force resize | Simple | Image distortion | Not recommended |
💡 Pro Tip: Your choice depends on your specific image and the desired output. We recommend running some tests on the APIYI (apiyi.com) platform to see which mode works best for your needs.
Recommended Modes for Different Scenarios
| Image Type | Recommended Mode | Description |
|---|---|---|
| Portraits | Cover | Keeps the person centered and intact |
| Landscapes | Pad or Cover | Depends on the composition |
| Product Photos | Pad | Ensures the entire product is visible |
| Digital Art | Pad | Preserves artistic integrity |
| UI Screenshots | Cover | Key info is usually centered |
Sora 2 API Image Referencing FAQ
Q1: Why are the Sora 2 API size requirements for reference images so strict?
Sora 2 uses the reference image as the video's first frame, and the model needs to generate subsequent motion starting from this exact frame. If the image dimensions don't match your target video, the model can't correctly initialize the generation process. This is a technical limitation designed by OpenAI to ensure consistent generation quality.
When calling the API via the APIYI platform, we recommend completing image preprocessing on the client side to get the best results.
Q2: Which image format should I choose during preprocessing?
The Sora 2 API supports three formats: JPEG, PNG, and WebP.
- JPEG: Recommended for photos; files are small and upload quickly.
- PNG: Best for scenarios requiring transparent backgrounds or lossless quality.
- WebP: A balance of quality and size, though compatibility is slightly lower.
We suggest using JPEG with the quality parameter set between 90-95. This maintains high quality while keeping file sizes manageable.
Q3: What should I do if the image quality drops after processing?
Quality degradation is usually caused by a few common factors:
- Over-compression: Try bumping your JPEG quality up to 95.
- Upscaling too much: Always try to use an original image with a resolution close to your target.
- Resampling algorithms: Use
Image.LANCZOSinstead ofImage.NEAREST.
# High-quality processing settings
img = img.resize(target_size, Image.LANCZOS)  # Use Lanczos algorithm
img.save(output_path, "JPEG", quality=95)     # Save with high quality
Q4: How can I batch process a large number of images?
For batch processing scenarios, we recommend using FFmpeg or Python multithreading:
from concurrent.futures import ThreadPoolExecutor
import os

def batch_process(image_dir, output_dir, resolution="1280x720"):
    preprocessor = SoraImagePreprocessor(resolution)

    def process_single(filename):
        input_path = os.path.join(image_dir, filename)
        output_path = os.path.join(output_dir, f"sora_{filename}")
        return preprocessor.process_and_save(input_path, "cover", output_path)

    image_files = [f for f in os.listdir(image_dir) if f.endswith(('.jpg', '.png'))]

    with ThreadPoolExecutor(max_workers=4) as executor:
        results = list(executor.map(process_single, image_files))

    return results
You can get high-volume API quotas through the APIYI platform, which is perfect for large-scale video generation projects.
Q5: Will my image be rejected if it contains a human face?
Yes. According to OpenAI's current policies, reference images containing real human faces will be rejected by the Sora 2 API. If your project requires people in the video, we suggest:
- Using images where faces aren't clearly visible.
- Using AI-generated virtual character images.
- Using abstract or stylized artistic representations of people.
Sora 2 API Reference Image Size Quick Sheet
For quick reference, here's the complete dimension matching table:
| Target Video | Image Width | Image Height | API size Parameter | Best Use Case |
|---|---|---|---|---|
| 720p Landscape | 1280 | 720 | "1280×720" | YouTube, Web |
| 720p Portrait | 720 | 1280 | "720×1280" | Douyin, TikTok |
| Pro Landscape | 1792 | 1024 | "1792×1024" | HD Landscape |
| Pro Portrait | 1024 | 1792 | "1024×1792" | HD Portrait |
📌 Tip: Available platforms include APIYI and the official OpenAI API. We recommend choosing a platform with fast response times and competitive pricing for your development and testing.
Summary
Sora 2 API image padding size errors are one of the most common issues developers run into. Here’s the core approach to solving them:
- Understand the rules: Your reference image must match the target video's dimensions exactly, right down to the pixel.
- Choose your mode: Pick either Pad or Cover mode depending on your image content.
- Pre-processing: Use Python Pillow or FFmpeg to handle the images beforehand.
- Verify dimensions: After processing, always double-check that the image size actually matches your target.
We recommend using APIYI (apiyi.com) to quickly test your image pre-processing and check the video generation quality.
Author: APIYI Team | For more AI development tips, visit apiyi.com
References:
- OpenAI Sora API Documentation: Image-to-Video interface guide
- Link:
platform.openai.com/docs/guides/video-generation
- Link:
- Pillow Official Documentation: ImageOps image processing module
- Link:
pillow.readthedocs.io/en/stable/reference/ImageOps.html
- Link:
- FFmpeg Official Documentation: Video and image processing filters
- Link:
ffmpeg.org/ffmpeg-filters.html
- Link: