Author's Note: A deep dive into the technical limitations and practical solutions for face consistency in Nano Banana Pro. We'll cover reference image strategies, prompt templates, multi-round editing workflows, and how to iterate at a low cost ($0.05/run) using APIYI.
When using Nano Banana Pro to generate model photos, the most common complaints are: "The face always looks distorted," "They look weirdly bloated," or "The person looks different in every scene." There are solutions, but first, you need to understand a key reality: Nano Banana Pro currently cannot achieve 100% face consistency across different generations. The model re-interprets facial features every single time—that's a limitation of the architecture, not your prompts.
Core Value: By the end of this article, you'll understand the root causes of face consistency issues, master the best practices for combining reference images, prompts, and multi-round iterations, and learn how to use APIYI's $0.05/run pricing to find the perfect result through repeated testing.
Let's Get This Straight: Why is Face Consistency So Hard?
| Issue | Root Cause | Solvable via Prompts? |
|---|---|---|
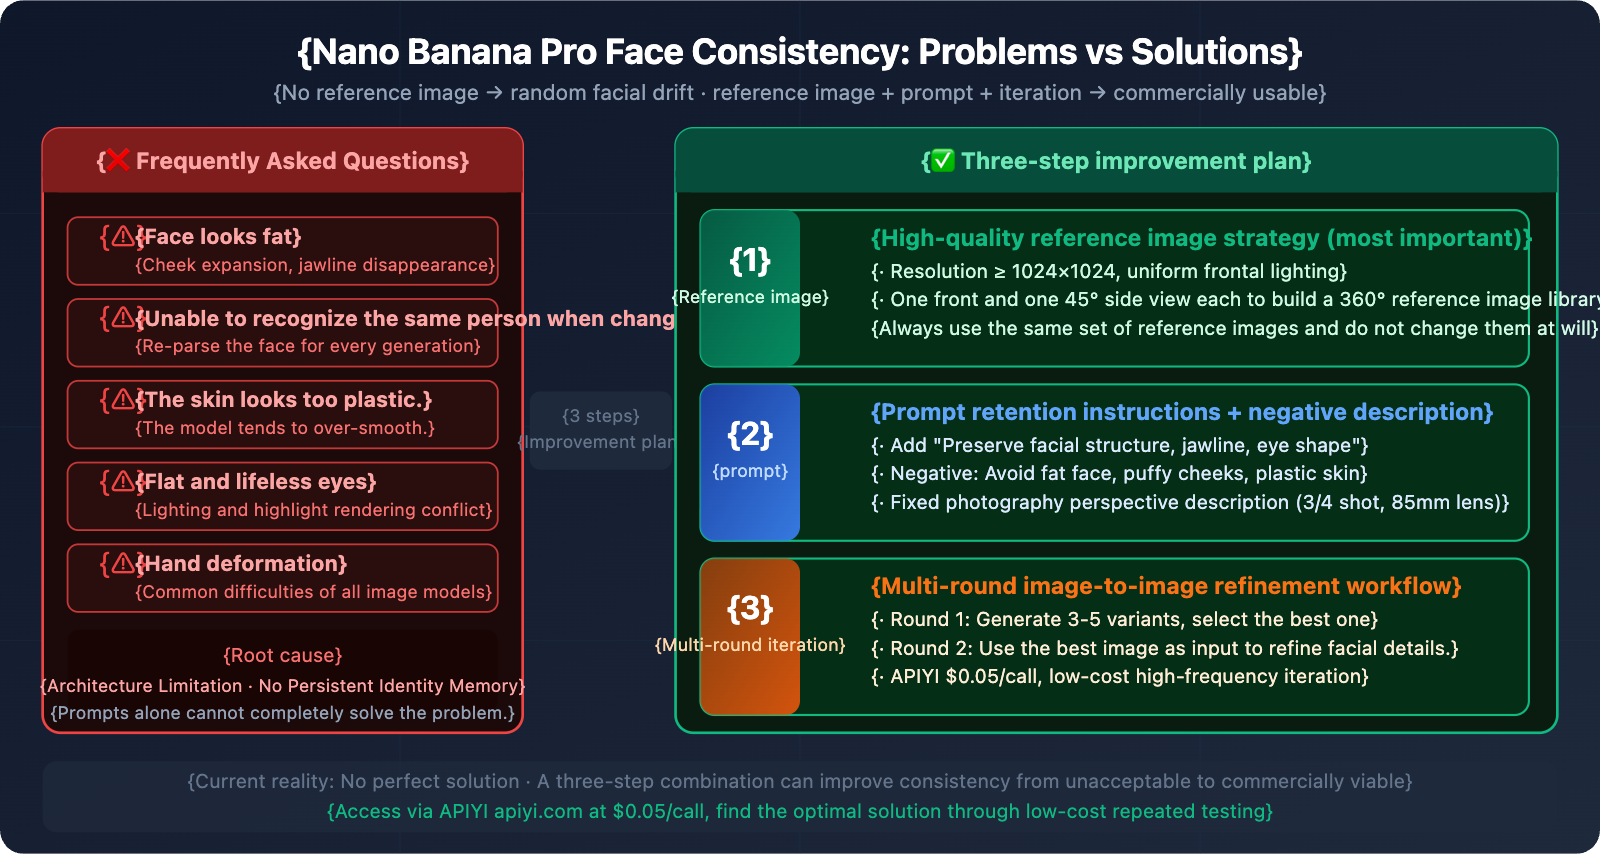
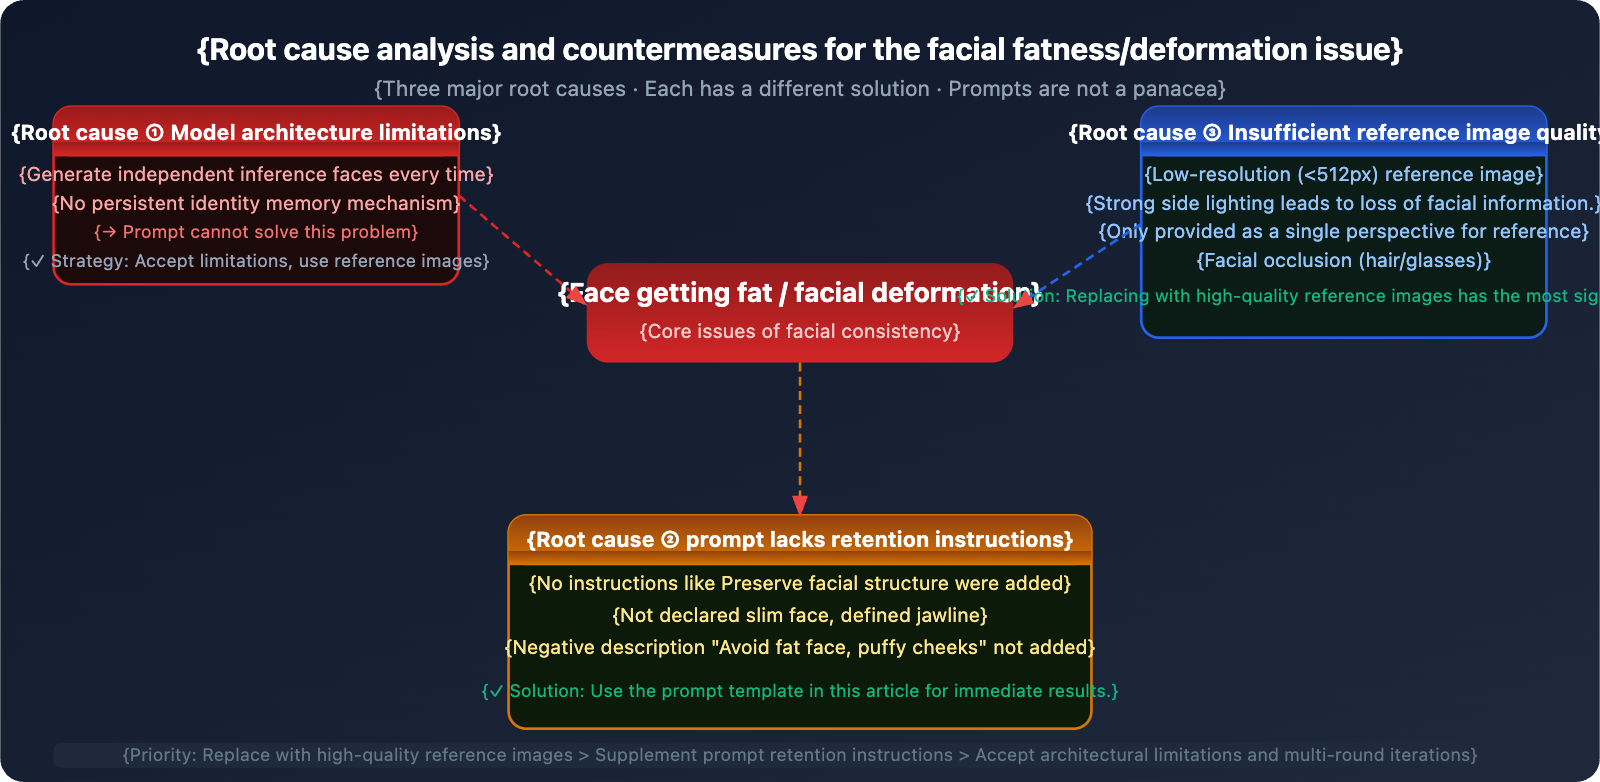
| Face looks bloated/wider | The model re-interprets facial structure; slight angle changes cause proportional drift. | Partially improved, but hard to avoid entirely. |
| Unrecognizable in new scenes | Each generation is an independent inference with no persistent identity memory. | Requires reference images; prompts alone aren't enough. |
| Plastic/Waxy skin texture | The model tends to smooth skin, losing pore details. | Can be significantly improved with negative prompts. |
| Flat/Lifeless eyes | Conflict between lighting direction and eye highlight rendering. | Can be improved with explicit lighting instructions. |
| Deformed hands | Complex hand structures are a common challenge for all image models. | Partially improved. |
Core Insight: Nano Banana Pro isn't specifically designed for face locking; its strengths lie in image quality and text rendering. Compared to specialized face consistency tools like Stable Diffusion (with LoRA), Flux (highly realistic), or InstantID, Nano Banana Pro has structural limitations in this dimension. Improving your prompts helps, but it's not a magic bullet—you need a combination of reference images + prompts + iteration strategies to maximize consistency.
Nano Banana Pro Face Consistency Boundaries
Official Consistency Mechanisms
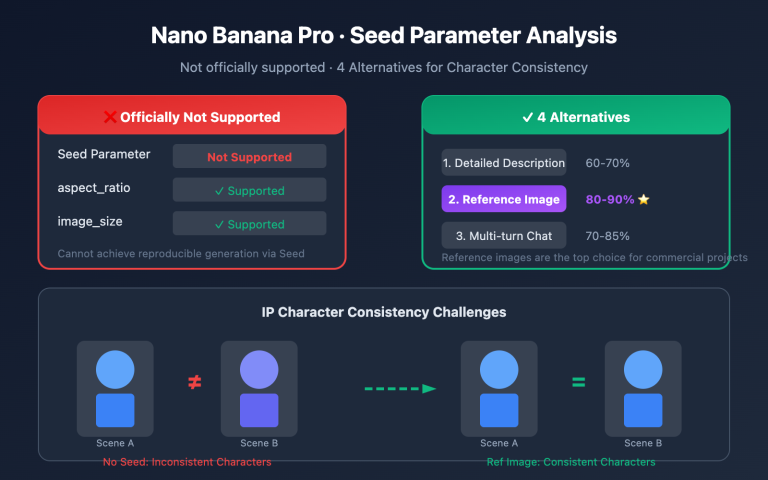
Nano Banana Pro natively supports face consistency through reference images. Here are the technical details:
- Up to 14 Reference Images: You can upload up to 14 images for reference, though fidelity is highest with 6 or fewer.
- Maintain Up to 5 People Simultaneously: The model can track facial features for up to 5 characters in a single generation.
- Identity Latent Mechanism: The model maps faces to a "stable latent representation," maintaining identity anchors even when changing scenes.
- Image-to-Image Editing: After uploading a reference photo, you can use instructions to change clothing, backgrounds, or poses without altering the face.
Actual Limitations (A Candid Assessment)
Official Claims                      Real-world Experience
──────────────────────────────────────────────────────────────────────────
"Lock facial identity"       →    Subtle drift still exists in every generation
"Cross-scene consistency"    →    Lighting/angle changes trigger face re-parsing
"14 reference images"        →    Effect drops if reference quality is poor
"5 people simultaneously"    →    Consistency dips noticeably with more than 2
Conclusion: Currently, Nano Banana Pro's face consistency sits in the "usable" to "good" range, but it's still a far cry from "perfect." If your project requires extreme precision (like celebrity-endorsed photoshoots or forensic use), we recommend combining it with professional tools.
4 Core Improvement Techniques
Technique 1: Reference Image Strategy (The Most Important)
The quality of your reference image is the deciding factor for face consistency—it's far more important than the prompt itself.
| Reference Element | Recommended Standard | Avoid |
|---|---|---|
| Resolution | 1024×1024 or higher | Blurry images below 512px |
| Lighting | Even, frontal lighting; no strong side shadows | Backlighting or heavy shadows on one side |
| Angles | One frontal + one 45° side profile | Using only a single angle |
| Obstructions | Face fully visible; no glasses or hats | Hands covering the face or hair blocking eyes |
| Expressions | Natural, neutral expressions | Exaggerated expressions (affects facial structure perception) |
Build a 360° Reference Library (Recommended for e-commerce model scenarios):
Reference Folder Structure:
model_ref/
├── front_neutral.jpg      # Frontal, neutral expression
├── front_smile.jpg        # Frontal, smiling
├── side_left_45.jpg       # Left 45°
├── side_right_45.jpg      # Right 45°
└── three_quarter.jpg      # 3/4 view (the most common composition)
When generating, upload 2-3 reference images (the frontal one + the angle closest to your target composition). Don't swap out your reference image combinations every time.
Technique 2: Prompt Structure Optimization
Adding explicit face preservation instructions is the most direct way to improve results via prompts:
❌ Wrong Way (No preservation instructions):
"A young Asian woman wearing a red dress, studio lighting, 4K"

✅ Right Way (Includes full preservation instructions):
"A young Asian woman wearing a red dress, studio lighting, 4K.
Preserve exact facial structure, eye shape, jawline, and skin texture
from reference image. Realistic skin with visible pores and texture,
not smooth or plastic. Natural face proportions, slim face shape.
Sharp eyes with natural highlights."
Specific prompts for the "fat face" issue:
Add to positive prompts:
"slim face, defined jawline, natural facial proportions,
realistic bone structure, angular cheekbones"

Negative concepts (describe effects to avoid at the end of the prompt):
Avoid: "fat face, round puffy cheeks, bloated face,
overly smooth skin, plastic skin, waxy appearance,
airbrushed, over-retouched, flat eyes, doll-like"
Fixing the composition angle (Crucial): Use the same photographic perspective description for every generation. Changes in angle are one of the main reasons the model re-interprets the face:
Recommended fixed phrasing:
"3/4 portrait shot, eye-level camera angle,
medium close-up, [focal length: 85mm portrait lens equivalent]"
Technique 3: Multi-round Editing Workflow (Img2Img)
Don't try to get the perfect result in one go. A professional workflow follows a "global first, local later" approach:
Round 1: Global Composition
→ Upload reference image + full prompt
→ Generate 3-5 variants, pick the one with the closest facial proportions

Round 2: Face Refinement (Img2Img)
→ Use the best result from the previous round as the new input image
→ Focus the prompt on the face: "Refine face detail,
  sharpen eyes, maintain exact facial structure,
  improve skin texture realism. Keep everything
  else unchanged."

Round 3: Local Inpainting (If needed)
→ Fix details like hands or stray hairs separately
→ Prompt: "Fix hands to have 5 fingers,
  natural hand pose. Keep face and body unchanged."
🚀 Low-cost Iteration: A multi-round workflow means a single set of images might require 5-15 API calls. By accessing via APIYI (apiyi.com), each call is only $0.05. The total cost for a complete set of model photos is kept between $0.25-$0.75, saving you over 79% compared to the official site's $1.20-$3.60.
Technique 4: Fixed Generation Parameters (API Level)
When iterating in batches via API, keeping these parameters consistent helps reduce random "drift":
import google.generativeai as genai
import base64

genai.configure(
    api_key="YOUR_APIYI_KEY",
    # APIYI endpoint, $0.05/call
    client_options={"api_endpoint": "vip.apiyi.com"}
)

model = genai.GenerativeModel("gemini-3-pro-image-preview")

# Fixed face consistency prompt template
FACE_CONSISTENCY_PROMPT = """
Fashion model in {outfit}, {scene}.
Preserve exact facial structure, eye shape, jawline, and skin texture
from reference image. Natural slim face proportions, defined cheekbones.
Realistic skin with visible pores, not airbrushed or plastic.
Sharp clear eyes with natural highlights. 3/4 portrait shot,
eye-level, 85mm portrait lens equivalent.
Avoid: fat face, puffy cheeks, overly smooth skin, flat eyes.
4K resolution, {aspect_ratio} aspect ratio.
"""

def generate_with_face_ref(
    reference_image_path: str,
    outfit: str,
    scene: str,
    output_path: str,
    aspect_ratio: str = "2:3"
):
    """
    Generate model images with face consistency using a reference image.
    Called via APIYI (apiyi.com), $0.05/call.
    """
    # Read reference image
    with open(reference_image_path, "rb") as f:
        ref_data = base64.b64encode(f.read()).decode()

    prompt = FACE_CONSISTENCY_PROMPT.format(
        outfit=outfit, scene=scene, aspect_ratio=aspect_ratio
    )

    response = model.generate_content(
        [
            {
                "inline_data": {
                    "mime_type": "image/jpeg",
                    "data": ref_data
                }
            },
            prompt
        ],
        generation_config=genai.GenerationConfig(
            response_modalities=["IMAGE"],
            resolution="4K",
            aspect_ratio=aspect_ratio
        )
    )

    for part in response.candidates[0].content.parts:
        if part.inline_data and part.inline_data.mime_type.startswith("image/"):
            with open(output_path, "wb") as f:
                f.write(base64.b64decode(part.inline_data.data))
            return output_path
    return None


# Batch generate model images for different scenes (using the same reference)
scenes = [
    {"outfit": "white linen blazer", "scene": "minimalist studio, white background", "output": "model_studio.png"},
    {"outfit": "casual denim jacket", "scene": "urban street, natural daylight",    "output": "model_street.png"},
    {"outfit": "elegant evening gown", "scene": "hotel lobby, warm ambient light",  "output": "model_evening.png"},
]

for s in scenes:
    result = generate_with_face_ref(
        reference_image_path="model_ref/front_neutral.jpg",
        outfit=s["outfit"],
        scene=s["scene"],
        output_path=s["output"]
    )
    print(f"{'✓' if result else '✗'} {s['output']}")
# 3 images, total cost on APIYI: $0.15
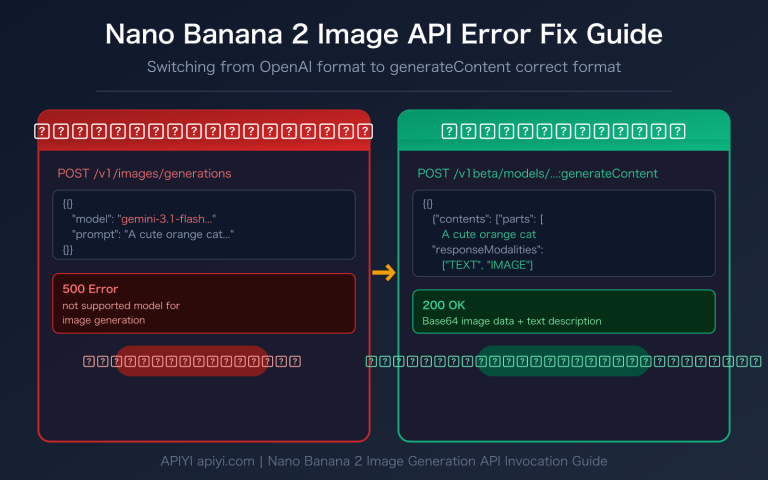
Note: The
vip.apiyi.comin the code is the access endpoint for APIYI (apiyi.com). It's fully compatible with the native Google Gemini format, so no format conversion is needed.
Full Prompt Template Library
Here is a collection of full prompt templates for different shooting styles that you can copy and use directly:
Template A: E-commerce Clothing Model (White/Solid Background)
[Reference image: front-facing portrait of model]

Fashion model wearing {clothing_description}, posed naturally against a clean
white studio background. Professional e-commerce product photography.

FACE PRESERVATION (critical):
- Preserve exact facial structure, bone geometry, and proportions
  from reference image
- Maintain original eye shape, eyelid fold, and iris color
- Keep original jawline definition and chin shape
- Realistic skin texture with visible pores, natural micro-details
- Slim natural face shape matching reference — avoid any widening

PHOTOGRAPHY SETTINGS:
- 3/4 portrait shot, eye-level camera angle
- 85mm portrait lens equivalent, shallow depth of field
- Soft diffused studio lighting, Rembrandt lighting setup
- Model facing slightly left, engaging with camera

AVOID: fat face, puffy cheeks, bloated jaw, plastic skin,
airbrushed appearance, flat emotionless eyes, wax figure look.

Resolution: 4K, aspect ratio: 2:3
Template B: Lifestyle/Outdoor Model
[Reference image: front-facing portrait of model]

Young woman in {scene_description}, wearing {clothing_description}.
Lifestyle photography style, candid natural pose.

IDENTITY LOCK:
- This is the SAME person as in the reference image
- Preserve all facial features: eye shape, nose bridge width,
  lip shape, jawline, cheekbone height
- Do not alter face geometry in any way
- Natural skin tone and texture, no over-smoothing

ENVIRONMENT: {scene_details}, natural daylight, golden hour lighting
POSE: {pose_description}, natural relaxed posture

QUALITY: editorial fashion photography, shot on full-frame camera,
natural color grading.

NEGATIVE: overweight appearance, fat face, double chin,
plastic surgery look, uncanny valley, distorted anatomy.

Resolution: 4K, aspect ratio: 4:5
Template C: Multi-round Refinement (Img2Img)
[Input: previous generation result that needs face refinement]

Refine and improve the face in this image ONLY.
Do not change: background, clothing, body position, lighting.

FACE IMPROVEMENTS NEEDED:
1. Slim the face shape slightly, reduce cheek width by 10-15%
2. Sharpen the jawline definition
3. Add more realistic skin texture (visible pores, subtle imperfections)
4. Improve eye clarity — add natural catch lights, deepen iris color
5. Soften any plastic or over-retouched appearance

Keep all other elements 100% identical to the input image.
This is a targeted face-only refinement pass.

Resolution: 4K, same aspect ratio as input.
Reference Image Quality Checklist
Before uploading your reference image, use this checklist to see if it makes the cut:
| Check Item | Standard | Quick Check Method |
|---|---|---|
| Resolution | ≥ 1024×1024 px | Check file properties |
| Face Proportion | Face takes up at least 1/3 of the frame | Visual check; tiny images yield poor results |
| Lighting Uniformity | No harsh side lighting; both eyes clearly visible | Check if one side of the face is too dark |
| Angle | Front-facing or up to a 45° profile | Quality drops significantly beyond a 60° angle |
| Obstructions | No hair, glasses, or hats blocking key facial areas | Ensure eyes, nose, and mouth are all visible |
| Expression | Natural/neutral or a smile | Avoid exaggerated expressions (gummy smiles, frowning, etc.) |
| Background | Simple, with clear contrast against the face | Solid colors work best |
| Clarity | Facial details (eyelashes, eyebrows) are sharp | Zoom in to 200% to verify |
Scoring Criteria:
- Pass all 8 → Excellent quality; you'll maximize face consistency.
- Pass 5-7 → Usable, but you might see some "drift" in the results.
- Fewer than 5 → Better swap the image; even the best prompts can't save a bad reference.
💡 Pro Tip: Before you start a massive batch run, try generating 3-5 test images with a single reference. Manually check if the consistency meets your business needs before scaling up. Testing on APIYI (apiyi.com) only costs about $0.15-$0.25, so it's a very low-risk way to start.
AI Tool Face Consistency: A Side-by-Side Comparison
| Tool | Face Consistency | Realism | Customization Difficulty | Best For |
|---|---|---|---|---|
| Nano Banana Pro | ★★★☆☆ (Ref image assisted) | ★★★★★ | Low (Native support) | E-commerce/Fashion, where slight drift is okay |
| Midjourney V7 | ★★☆☆☆ | ★★★★☆ | Medium (Workarounds needed) | Artistic creation; not for strict consistency |
| Flux (Dev/Pro) | ★★★★☆ | ★★★★★ | Medium | Realistic portraits with high consistency needs |
| Stable Diffusion + LoRA | ★★★★★ | ★★★☆☆ | High (Requires training) | Extremely high consistency; fixed specific characters |
| InstantID / IP-Adapter | ★★★★★ | ★★★★☆ | High (Requires deployment) | Professional face locking; ID-verification grade |
| DALL-E 3 | ★★★☆☆ | ★★★★☆ | Low | Precise prompt execution; average consistency |
💡 Selection Advice: If your use case allows for a 5-15% facial drift (like e-commerce model swaps), Nano Banana Pro combined with the tips in this article is your most cost-effective bet. If you need absolute consistency (the exact same character across 100 images), go for specialized tools like Stable Diffusion + LoRA or InstantID. You can easily switch between these and test them via APIYI's (apiyi.com) multi-model interface.
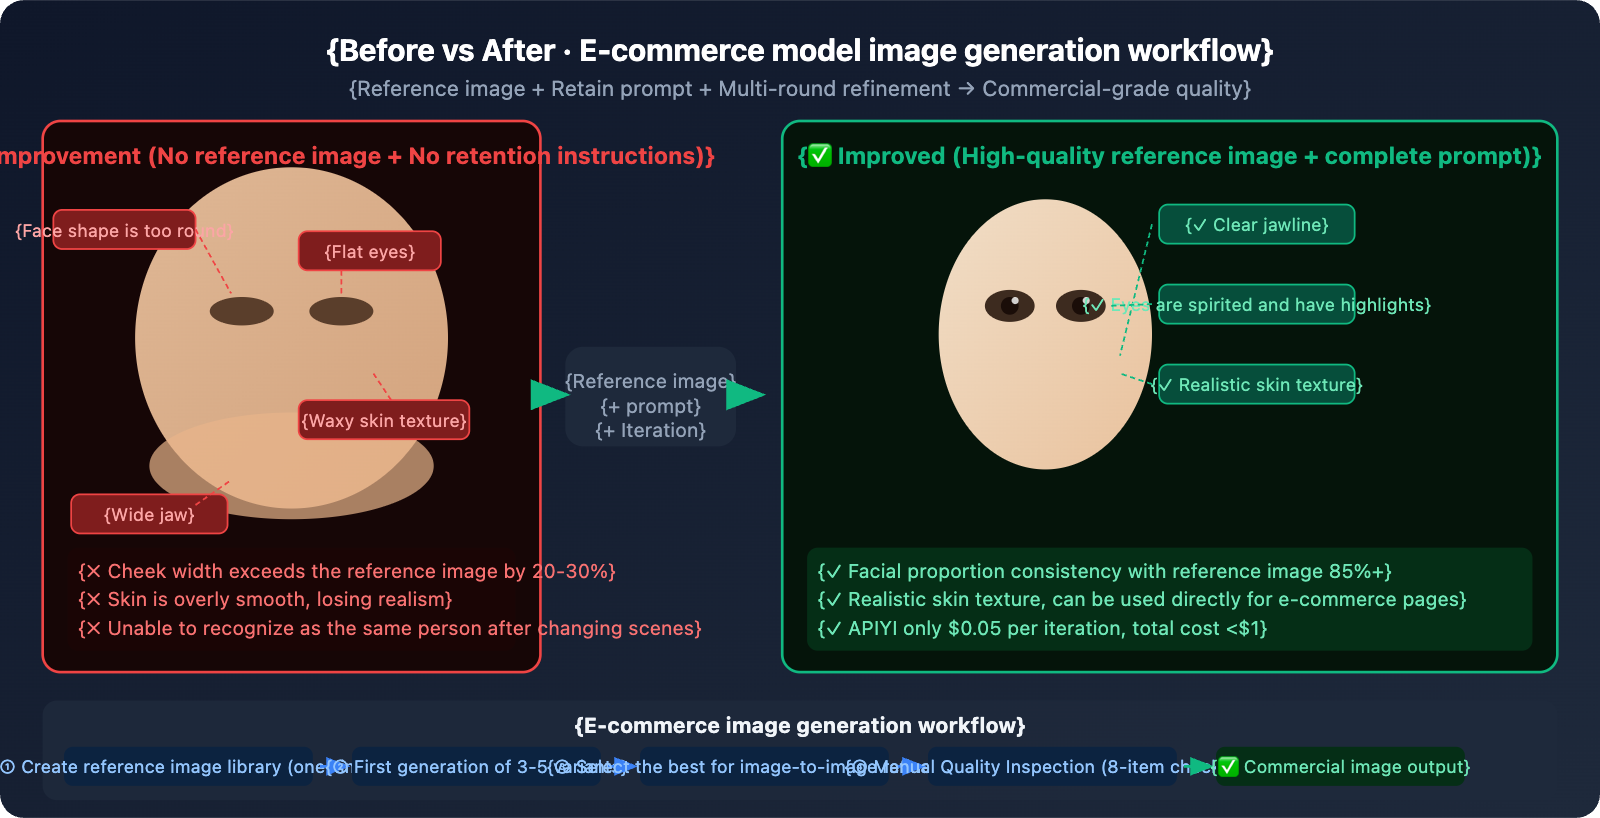
E-commerce Model Scene: Full Workflow
The unique challenge of e-commerce is the need for the same model to remain consistent across multiple outfits × multiple scenes, while generating images quickly in batches.
Recommended Workflow
Phase 1: Build a Reference Library (One-time Task)
1. Shoot or prepare 3-5 high-quality model reference images
   - Front view with a neutral expression, 1024×1024 or higher
   - 45° side profile (one for each side)
   - 3/4 profile (most common for clothing display)
2. Use a unified naming convention and store them in a fixed folder
3. Use the same set of reference images for every API call
Phase 2: Generate Template (Initial Finalization)
1. Upload 2 reference images (front + 3/4 profile)
2. Use the full retention prompt + target clothing description
3. Generate 5-10 variants
4. Manually select the 1-2 images closest to the standard
5. Use the approved images as "finalized references" for subsequent rounds
Phase 3: Batch Outfit Swapping (Scaling Up)
# Batch generation based on finalized references, APIYI costs $0.05 per image
outfits = ["Red Cheongsam", "White Suit", "Casual Denim", "Evening Gown"]
for outfit in outfits:
    generate_with_face_ref(
        reference_image_path="approved_ref.png",  # Finalized reference
        outfit=outfit,
        ...
    )
Phase 4: QC and Selection
Perform the following checks after each batch output:
□ Is the face shape close to the reference? (Focus on cheekbones and jawline)
□ Are the eyes expressive? Are the highlights natural?
□ Is the skin texture realistic? (Avoid a waxy look)
□ Do the hands look normal? (5 fingers, natural posture)
□ For those that fail, perform a second round of Image-to-Image (i2i) refinement
🎯 Cost Estimation: For 100 e-commerce model images (including 20% redo for failed ones), the total cost via APIYI (apiyi.com) is about $6. Compared to $28.8 on the official site, you're saving 79%.
Controlling API Costs for Batch Iterations
In model image production, iteration is inevitable. Here's a cost comparison estimated across different production scales:
| Production Scale | Total Calls (incl. iterations) | APIYI Cost | Official Google Cost | Savings |
|---|---|---|---|---|
| Small-scale Test (10 images) | ~30 calls | $1.50 | $7.20 | $5.70 |
| Medium Project (50 images) | ~150 calls | $7.50 | $36.00 | $28.50 |
| Large E-commerce (200 images) | ~600 calls | $30.00 | $144.00 | $114.00 |
| Monthly Maintenance (ongoing) | ~2000 calls | $100.00 | $480.00 | $380.00 |
Cost Control Tips:
- Test with 2K resolution first: Confirm you're happy with the facial proportions before switching to 4K. This helps save on iteration costs (though APIYI charges $0.05 for 1K/2K/4K alike, it saves processing overhead).
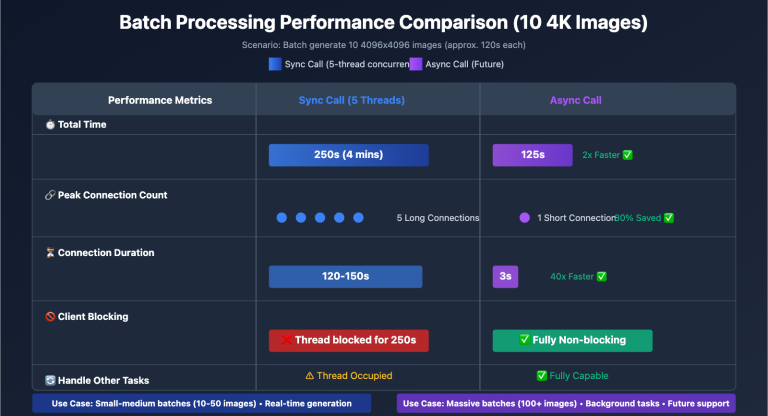
- Batch concurrent calls: Use
asyncioto run 5-10 requests concurrently, significantly shortening the time it takes to output a batch. - Cache reference image results locally: Avoid re-reading and encoding the reference image for every single call.
import asyncio
import google.generativeai as genai
import base64

genai.configure(
    api_key="YOUR_APIYI_KEY",
    client_options={"api_endpoint": "vip.apiyi.com"}  # APIYI, $0.05/call
)
model = genai.GenerativeModel("gemini-3-pro-image-preview")

# Pre-encode reference image (avoid redundant I/O)
with open("model_ref/front_neutral.jpg", "rb") as f:
    REF_IMAGE_DATA = base64.b64encode(f.read()).decode()

async def generate_one(prompt: str, output_path: str) -> bool:
    """Single asynchronous generation"""
    try:
        loop = asyncio.get_event_loop()
        response = await loop.run_in_executor(
            None,
            lambda: model.generate_content(
                [
                    {"inline_data": {"mime_type": "image/jpeg", "data": REF_IMAGE_DATA}},
                    prompt
                ],
                generation_config=genai.GenerationConfig(
                    response_modalities=["IMAGE"],
                    resolution="4K",
                    aspect_ratio="2:3"
                )
            )
        )
        for part in response.candidates[0].content.parts:
            if part.inline_data and part.inline_data.mime_type.startswith("image/"):
                with open(output_path, "wb") as f:
                    f.write(base64.b64decode(part.inline_data.data))
                return True
    except Exception as e:
        print(f"  Error: {e}")
    return False

async def batch_generate(tasks: list) -> None:
    """Concurrent batch generation, concurrency limit set to 5"""
    sem = asyncio.Semaphore(5)
    async def with_sem(t):
        async with sem:
            ok = await generate_one(t["prompt"], t["output"])
            print(f"{'✓' if ok else '✗'} {t['output']}")
    await asyncio.gather(*[with_sem(t) for t in tasks])

# Usage example
tasks = [
    {"prompt": "Model in red dress, white background... [Full prompt here]", "output": f"out_{i:03d}.png"}
    for i in range(20)
]
asyncio.run(batch_generate(tasks))
# 20 images generated concurrently, total APIYI cost: $1.00
💰 Cost Summary: By accessing via APIYI (apiyi.com), you can keep the cost of a full set of model images under $1, even with heavy iterations. That's way cheaper than hiring a photographer or subscribing to professional AI tools.
FAQ
Q1: My prompt is super detailed, so why is the face still distorted?
The prompt is only half the battle. Not using a reference image is usually the main culprit. Without one, Nano Banana Pro tries to "invent" a face from scratch every time, making facial features completely random. This isn't a prompt issue.
How to fix it:
- Prepare 1-2 high-quality reference images (front-facing, 1024px+, even lighting).
- Upload the reference image alongside your prompt using the Image-to-Image interface.
- Explicitly add this to your prompt: "Preserve exact facial structure from reference image."
Using the Image-to-Image interface via APIYI (apiyi.com) works exactly like the code shown in this article.
Q2: I used a reference image but the face still looks too “puffy.” Any specific negative prompts?
A "fat face" usually happens when the model over-expands the cheek area during rendering. Try this specific negative prompt combo:
Add this to the end of your prompt (describing what to avoid):
Avoid generating: fat face, round puffy cheeks, bloated facial features,
chubby chin, double chin, wide jaw, swollen face appearance.
Maintain: slim face shape, defined angular jawline, high cheekbones,
natural facial bone structure matching reference image.
Also, check your reference image: if it was shot from a low angle (looking up), the model will exaggerate the jawline. Using a straight-on eye-level reference image usually works better.
Q3: Nano Banana Pro vs. Stable Diffusion—which is better for batch model images?
They're suited for different needs:
| Dimension | Nano Banana Pro + APIYI | Stable Diffusion + LoRA |
|---|---|---|
| Facial Consistency | Good with ref images, some drift | Extremely high, almost locked in |
| Learning Curve | Very low, direct API calls | High, requires training LoRA models |
| Cost per Image | $0.05 (APIYI) | Requires own GPU or paid platform |
| Image Quality | Native 4K, top-tier quality | Depends on base model and LoRA quality |
| Batch Speed | Cloud-based, ready anytime | Limited by local GPU power |
| Best Use Case | Fast iterations, medium consistency | Fixed characters, high consistency |
The Verdict: Choose Nano Banana Pro + APIYI (apiyi.com) for quick starts and medium consistency requirements. Choose Stable Diffusion + LoRA if you have a fixed character and need 100% consistency.
Summary
Key takeaways for handling face consistency in Nano Banana Pro:
- Know the limits: Nano Banana Pro can't achieve 100% face consistency across different generations. This is an architectural bottleneck, not a problem with your prompt.
- Reference images are king: High-quality reference photos (1024px+, even lighting, multiple angles) are the most effective way to improve results—they're far more critical than the prompt itself.
- Beef up your prompts: Add explicit retention instructions (like
Preserve facial structure) and negative descriptions (likeAvoid fat face, plastic skin). - Iterate, iterate, iterate: Start with a global view and move to local details. Use the best result from your previous round as the reference image for the next to gradually dial in the look.
While there's no "perfect" solution yet, the combination of reference images, prompts, and multi-round iterations can boost consistency from "unacceptable" to "commercial grade." We recommend accessing the model via APIYI (apiyi.com) at just $0.05 per call. This makes high-frequency experimentation affordable, helping you find that optimal prompt combination.
References
-
Nano Banana Pro Character Consistency: The Complete Guide
- Link:
wavespeed.ai/blog/posts/google-nano-banana-pro-complete-guide-2026 - Description: Covers reference image limits and detailed instructions for the Face Lock feature.
- Link:
-
Fixing Face Softening and Distortion in Nano Banana Pro
- Link:
skywork.ai/blog/how-to-fix-nano-banana-faces-softness-hands-eyes-guide-2025 - Description: A library of negative prompts and best practices for multi-round repairs.
- Link:
-
E-commerce Fashion Image Generation with Nano Banana Pro
- Link:
glbgpt.com/hub/how-to-create-ai-generated-fashion-images-for-ecommerce-using-nano-banana-pro - Description: A complete workflow for batch-producing AI-generated e-commerce models.
- Link:
-
APIYI Platform Documentation
- Link:
docs.apiyi.com - Description: Native Gemini format integration guides and Image-to-Image API usage instructions.
- Link:
Author: Technical Team
Join the Conversation: Feel free to share your face consistency debugging tips in the comments! For more AI image generation tricks, visit the APIYI (apiyi.com) tech community.