Note: A deep dive into why Nano Banana Pro doesn't support the seed parameter and practical workarounds for when you've found a look you love and want to replicate it in bulk.
Here's a real piece of user feedback: "I modified an image and I'm thrilled with the result. Now I want to generate a bunch more with that exact same look—how do I do that? Every time I hit generate, it's different." This is a classic pain point when doing batch image-to-image with Nano Banana Pro. Even if you use your favorite image as a reference, the results still vary. The reason is simple: Nano Banana Pro doesn't officially support the seed parameter. Every generation is a completely fresh, random inference process.
Core Value: This post gets straight to the point. We'll explain why there's no seed and why reference images aren't always enough, then give you 5 effective workarounds to help you replicate that perfect look as closely as possible.

5 Alternatives: From Most Direct to Most Radical
Option 1: Precise Quantified Prompts (Most Immediate Results)
The Problem: "Make the image a little darker" → Results are sometimes too dark, sometimes too light.
The root cause is that "a little bit" is too vague. Nano Banana Pro can't guarantee a consistent understanding of "a little bit" every time. The solution is to replace vague descriptions with numerical values:
❌ Vague Prompt:
"Make this image slightly darker"

✅ Quantified Prompt:
"Apply a subtle darkening effect equivalent to reducing brightness by
approximately 15-20%. The image should feel slightly moodier but all
details must remain clearly visible. Do NOT go dark. The result should
be close to: brightness 85% of original, contrast unchanged."
Quantified phrasing for common adjustments:
Brightness Adjustment:
"brightness at 85% of original" (15% reduction)
"increase brightness by 10%, keep contrast" (10% increase)

Tone Adjustment:
"add a very subtle warm orange tint, color shift about 10%"
"slight cool blue cast, saturation unchanged"

Style Intensity:
"apply film grain texture at 20% opacity, barely noticeable"
"add very subtle vignette at corners, 15% strength"
💡 Key Tip: Use degree modifiers like "approximately X%", "not exceeding Y%", or "subtle/barely noticeable" in your prompts to explicitly tell the model the boundaries of the change.
Option 2: Satisfactory Result + Precise Prompt Combination (Top Recommendation)
Simply uploading a reference image can yield unstable results, but the Reference Image + Quantified Prompt combination works much better:
import google.generativeai as genai
import base64

genai.configure(
    api_key="YOUR_APIYI_KEY",
    client_options={"api_endpoint": "vip.apiyi.com"}  # APIYI $0.05/call
)
model = genai.GenerativeModel("gemini-3-pro-image-preview")

def apply_consistent_effect(
    source_image_path: str,      # New image to process
    approved_result_path: str,   # First satisfactory result (as style reference)
    effect_description: str,     # Precisely quantified effect description
    output_path: str
) -> str:
    """
    Reproduce a satisfactory effect on a new image
    Uses dual anchoring: reference image + precise quantified prompt
    """
    # Read both images
    with open(source_image_path, "rb") as f:
        source_data = base64.b64encode(f.read()).decode()
    with open(approved_result_path, "rb") as f:
        approved_data = base64.b64encode(f.read()).decode()

    prompt = f"""
I have two reference images:
- Image 1 (source): The new image I want to process
- Image 2 (approved result): A previous edit I was very happy with

Please apply the SAME effect from Image 2 to Image 1.
The effect is: {effect_description}

Critical instructions:
- The degree of change should match Image 2 EXACTLY
- Do not over-apply the effect
- Keep all other image properties unchanged
- If unsure about intensity, err on the side of LESS change
"""

    response = model.generate_content(
        [
            {"inline_data": {"mime_type": "image/jpeg", "data": source_data}},
            {"inline_data": {"mime_type": "image/jpeg", "data": approved_data}},
            prompt
        ],
        generation_config=genai.GenerationConfig(
            response_modalities=["IMAGE"],
            resolution="4K",
            aspect_ratio="1:1"
        )
    )

    for part in response.candidates[0].content.parts:
        if part.inline_data and part.inline_data.mime_type.startswith("image/"):
            with open(output_path, "wb") as f:
                f.write(base64.b64decode(part.inline_data.data))
            return output_path
    return None


# Usage Example
result = apply_consistent_effect(
    source_image_path="new_product_photo.jpg",
    approved_result_path="approved_dark_edit.jpg",
    effect_description="subtle darkening, brightness reduced by approximately 15-20%, "
                       "image should be slightly moodier but all details clearly visible",
    output_path="output_consistent.png"
)
# $0.05 per call (APIYI apiyi.com)
🚀 Pro Tip: This method moves consistency from "completely random" to "highly likely to meet expectations," but it's still not 100%. I'd recommend generating 2-3 variants per batch (since
candidateCountmight error out, just call it multiple times) and manually picking the best one. APIYI's low cost of $0.05/call makes multiple sampling very affordable.
Option 3: Multiple Sampling + Batch Filtering (Best for Batch Scenarios)
The most practical solution for current scenarios: Generate 3-5 variants for each new image and filter for the best one manually or programmatically.
import asyncio
import base64
import os
import google.generativeai as genai

genai.configure(
    api_key="YOUR_APIYI_KEY",
    client_options={"api_endpoint": "vip.apiyi.com"}  # APIYI $0.05/call
)
model = genai.GenerativeModel("gemini-3-pro-image-preview")

EFFECT_PROMPT = """
Apply subtle darkening effect:
- Brightness: approximately 85% of original (reduce by ~15%)
- Mood: slightly darker, more atmospheric
- Details: all elements must remain clearly visible
- Do NOT: make it too dark, change colors dramatically, lose details
This is a subtle, refined adjustment - less is more.
"""

async def generate_variants(image_path: str, n_variants: int = 3) -> list:
    """Generate n variants for the same image for filtering"""
    with open(image_path, "rb") as f:
        img_data = base64.b64encode(f.read()).decode()

    async def one_call(i: int) -> str:
        output = image_path.replace(".jpg", f"_v{i+1}.png")
        loop = asyncio.get_event_loop()
        try:
            response = await loop.run_in_executor(None, lambda: model.generate_content(
                [{"inline_data": {"mime_type": "image/jpeg", "data": img_data}},
                 EFFECT_PROMPT],
                generation_config=genai.GenerationConfig(
                    response_modalities=["IMAGE"],
                    resolution="4K"
                )
            ))
            for part in response.candidates[0].content.parts:
                if part.inline_data:
                    with open(output, "wb") as f:
                        f.write(base64.b64decode(part.inline_data.data))
                    return output
        except Exception as e:
            print(f"  Variant {i+1} failed: {e}")
        return None

    # Generate multiple variants concurrently
    results = await asyncio.gather(*[one_call(i) for i in range(n_variants)])
    return [r for r in results if r]


async def batch_process(image_list: list, n_variants: int = 3):
    """Batch process multiple images, generating multiple variants for each"""
    for img_path in image_list:
        print(f"\nProcessing: {img_path}")
        variants = await generate_variants(img_path, n_variants)
        cost = len(variants) * 0.05
        print(f"  Generated {len(variants)} variants, cost ${cost:.2f} (APIYI)")
        print(f"  Files: {variants}")
        print(f"  → Please manually select the best variant")


# Example: Process 5 images, generating 3 variants each
images = ["photo_01.jpg", "photo_02.jpg", "photo_03.jpg", "photo_04.jpg", "photo_05.jpg"]
asyncio.run(batch_process(images, n_variants=3))
# 5 images × 3 variants = 15 calls, total APIYI cost $0.75
Cost Estimation:
| Scale | Variants | Total Calls | APIYI Cost |
|---|---|---|---|
| 10 images | 3 per image | 30 | $1.50 |
| 50 images | 3 per image | 150 | $7.50 |
| 100 images | 2 per image | 200 | $10.00 |
Option 4: Switch to Models Supporting Seeds (The Ultimate Solution)
If your business truly requires precise reproducibility, the most thorough solution is to switch to a model that natively supports seeds:
Imagen API (Vertex AI) — Also from Google, supports seeds:
from google.cloud import aiplatform
from vertexai.preview.vision_models import ImageGenerationModel

# Imagen API supports the seed parameter
model = ImageGenerationModel.from_pretrained("imagen-3.0-generate-002")
response = model.generate_images(
    prompt="your prompt here",
    seed=42,              # ✅ Officially supported!
    number_of_images=1,
    add_watermark=False   # Watermarks must be disabled when using seeds
)
# Same seed + same prompt → Same result (high reproducibility)
Stable Diffusion / Flux — Full seed ecosystem:
# Access Flux via APIYI (apiyi.com), supports seeds
import requests

response = requests.post(
    "https://vip.apiyi.com/v1/images/generations",
    headers={"Authorization": "Bearer YOUR_APIYI_KEY"},
    json={
        "model": "flux-dev",      # or flux-schnell
        "prompt": "your prompt",
        "seed": 12345,            # ✅ Full seed support
        "width": 1024,
        "height": 1024
    }
)
# Lock the seed → Batch generate perfectly consistent base images
Option 5: Image Post-processing (Highest Precision, Most Stable)
If your requirement is to batch apply fixed brightness/tone adjustments (like darkening everything by 15%), using AI generation isn't actually the best choice — image post-processing is the right tool for the job:
from PIL import Image, ImageEnhance
import os

def batch_darken(input_dir: str, output_dir: str, brightness_factor: float = 0.85):
    """
    Precise batch brightness adjustment
    brightness_factor: 0.85 = 15% reduction, fully reproducible, zero randomness
    """
    os.makedirs(output_dir, exist_ok=True)
    files = [f for f in os.listdir(input_dir) if f.lower().endswith(('.jpg', '.png', '.webp'))]

    for filename in files:
        img = Image.open(os.path.join(input_dir, filename))
        enhancer = ImageEnhance.Brightness(img)
        # Precise brightness control, results are identical every time
        darkened = enhancer.enhance(brightness_factor)
        darkened.save(os.path.join(output_dir, filename))
        print(f"✓ {filename} → Brightness {brightness_factor*100:.0f}%")

# Batch process, zero API cost, 100% reproducible
batch_darken("input_images/", "darkened_output/", brightness_factor=0.85)
Comparison of Use Cases:
| Adjustment Type | Recommended Tool | Reason |
|---|---|---|
| Uniform Brightness/Contrast/Saturation | PIL / Photoshop Batch | Precise, reproducible, zero cost |
| Uniform Tone Filters (Warm/Cool) | PIL / LUT Filters | 100% consistency |
| Complex Style Transfer (Change background/subject) | Nano Banana Pro | Where AI's true value lies |
| Precise Reproduction with Creative Changes | Imagen API (with seeds) | Balances quality and consistency |
🎯 Honest Advice: If you just want to batch "darken images by 15%," please use PIL's
ImageEnhance.Brightness. It's free, 100% consistent, and takes one line of code. The value of AI image generation lies in complex content understanding and creative generation, not in precise parametric adjustments.
Seed Support Comparison for Mainstream AI Image Models
| Model | Seed Support | Replication Stability | Notes |
|---|---|---|---|
| Nano Banana Pro | ❌ Not supported | Low, random every time | Can be partially improved using reference images + prompts |
| Imagen API | ✅ Officially supported | High | Reproducible with the same seed and prompt |
| Stable Diffusion | ✅ Full support | Very high | Open-source ecosystem, self-deployed or cloud-based |
| Flux Dev/Pro | ✅ Supported | High | Strong realism, accessible via API |
| Midjourney | ✅ --seed parameter |
Medium (reference level) | Same seed yields similar styles but not identical results |
| DALL-E 3 | ❌ Not supported | Low | Similar limitations to Nano Banana Pro |
💡 Platform Tip: Through APIYI, you can access multiple image models like Nano Banana Pro, Flux, and Stable Diffusion via a single interface. Using one API Key to switch between different models makes it easy to choose the right tool whether you need seed support or not.
FAQ
Q1: Is there a way to “hack” a seed effect on Nano Banana Pro?
There isn't a "hack" in the true sense. Some third-party platforms (like fal.ai) add a seed parameter to their API wrapper layer, but this only controls randomness at their platform level. It's not the same as a native Google Gemini image generation seed—in reality, its impact on the final image's reproducibility is very limited.
The closest thing to a "seed effect" is this combo: Precise quantified prompts + using a satisfactory result as a reference image + multi-sample filtering. Combining these three can boost consistency from total randomness to about a 60-70% hit rate, but it'll never be 100%.
If your workflow has a hard requirement for reproducibility, I'd recommend switching to the Imagen API. Through APIYI (apiyi.com), you can access multiple services simultaneously for side-by-side testing.
Q2: I want to batch-reproduce a “slightly darker” effect. What’s the fastest way?
It depends on the nature of "dark":
- If it's just brightness/exposure adjustments: Use Python PIL
ImageEnhance.Brightness(img).enhance(0.85)for batch processing. It's 10 lines of code, zero cost, and 100% consistent. - If it involves style, atmosphere, or AI content generation (e.g., "darker tones while giving the background a more cinematic feel"): Use Option 2 (Reference Image + Quantified prompt). You can make batch calls via APIYI (apiyi.com) at $0.05 per image, generate 2-3 variants, and then manually pick the best one.
Q3: Will Nano Banana Pro support seed parameters in the future?
There's no official announcement yet. Looking at Google's product roadmap, the Imagen API is the service specifically designed for precise, controllable image generation (including seeds), while Gemini image generation leans more toward "high-quality creative generation." Since they have different positionings, the possibility of Nano Banana Pro adding a seed parameter exists but is uncertain.
You can follow the Google AI Blog (blog.google/technology/google-deepmind) and the Gemini API changelog (ai.google.dev/gemini-api/docs/changelog) for the latest updates. If there's an update, we'll be the first to post a guide on APIYI (apiyi.com).
Summary
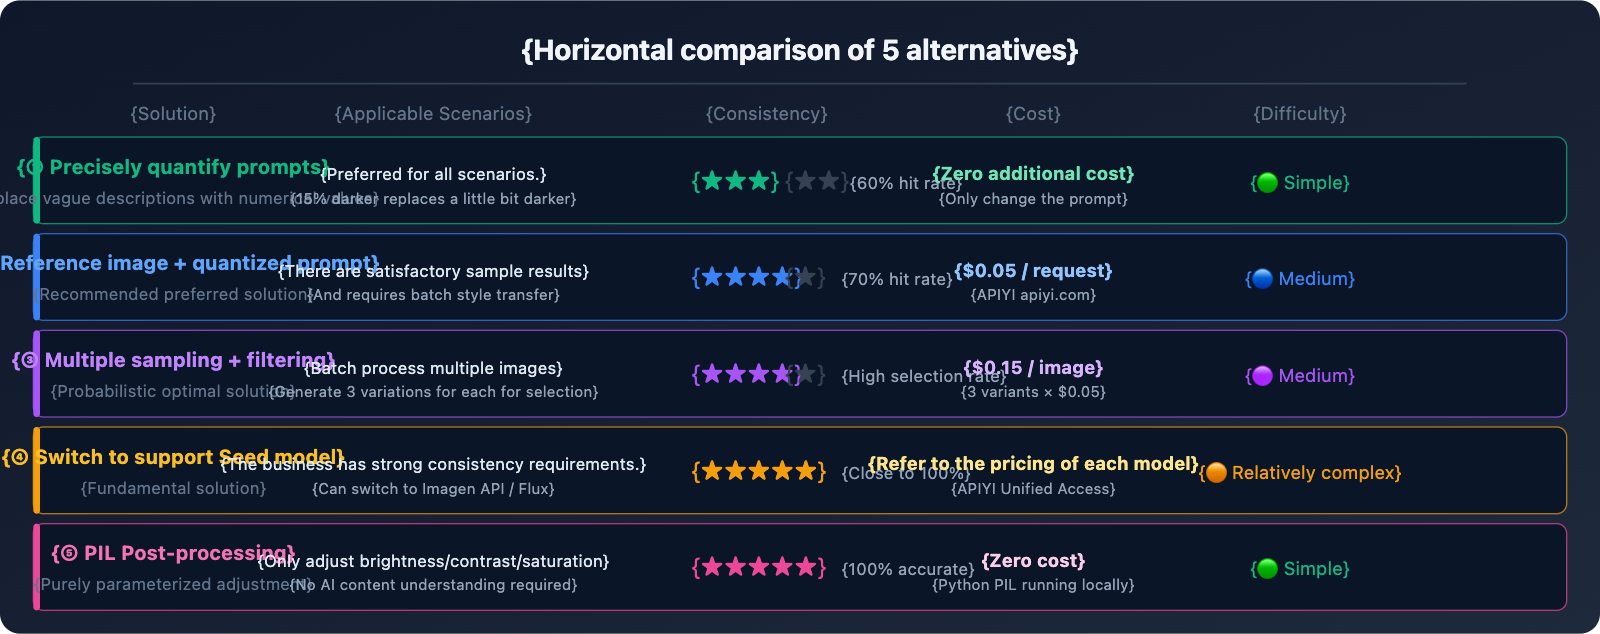
We have to face the fact that Nano Banana Pro doesn't support the seed parameter. Choose from these 5 alternatives based on your scenario:
- Precise Quantified Prompts: Replace vague descriptions like "a little bit" with numerical values for immediate results.
- Reference Image + Quantified Prompt: Use two images as input (source image + satisfactory result) and precisely describe the degree of the effect you want to reproduce.
- Multi-sample Filtering: Generate 2-3 variants for each prompt. With APIYI's low cost of $0.05 per generation, you can manually pick the closest one.
- Switch to Imagen API / Flux: If your business has strict reproducibility requirements, switch to a model that natively supports seeds.
- PIL Post-processing: If you're just doing fixed brightness or tone adjustments, AI isn't the best tool—using PIL is much more accurate.
There's no silver bullet; just pick the solution that fits your current needs. The low cost of multiple sampling ($0.05/time) makes a "trial-and-error" strategy completely viable on the APIYI (apiyi.com) platform, whereas it would be 5x more expensive at the official price ($0.24/time).
References
-
Google Gemini API Image Generation Parameters Documentation
- Link:
ai.google.dev/gemini-api/docs/image-generation - Description: Official list of supported parameters for generationConfig, confirming the absence of the seed field.
- Link:
-
Vertex AI Imagen API Documentation (with seed support)
- Link:
cloud.google.com/vertex-ai/generative-ai/docs/image/generate-images - Description: Usage and limitations of the seed parameter in the Imagen API.
- Link:
-
Gemini Python SDK GitHub Issue #536
- Link:
github.com/google-gemini/deprecated-generative-ai-python/issues/536 - Description: Community discussion confirming that the seed parameter isn't supported in Gemini image generation.
- Link:
-
APIYI Platform Multi-Model Integration
- Link:
docs.apiyi.com - Description: Unified integration instructions for Nano Banana Pro / Imagen / Flux.
- Link:
Author: Technical Team
Technical Discussion: Dealing with similar consistency issues in batch generation? Feel free to discuss in the comments. For more AI image generation practical tips, visit the APIYI apiyi.com technical community.