Want to call gpt-image-2 directly in your local ComfyUI for text-to-image, Mask refinement, and multi-image compositing, but hitting walls with official OpenAI node network restrictions, quotas, or parameter control? This guide shows you the shortest path to get the whole workflow running: install one community extension, swap your API proxy service, and light up the gpt-image-2 node on your ComfyUI canvas in just 5 minutes.
gpt-image-2 is the "reason-before-generate" image model released by OpenAI in 2026. It excels at dense text rendering, UI infographics, comic storyboarding, and precision Mask editing while keeping the non-edited areas pixel-perfect. However, integrating it into ComfyUI's node graphs using official Partner Nodes can be a headache for many users due to connectivity or authentication issues.
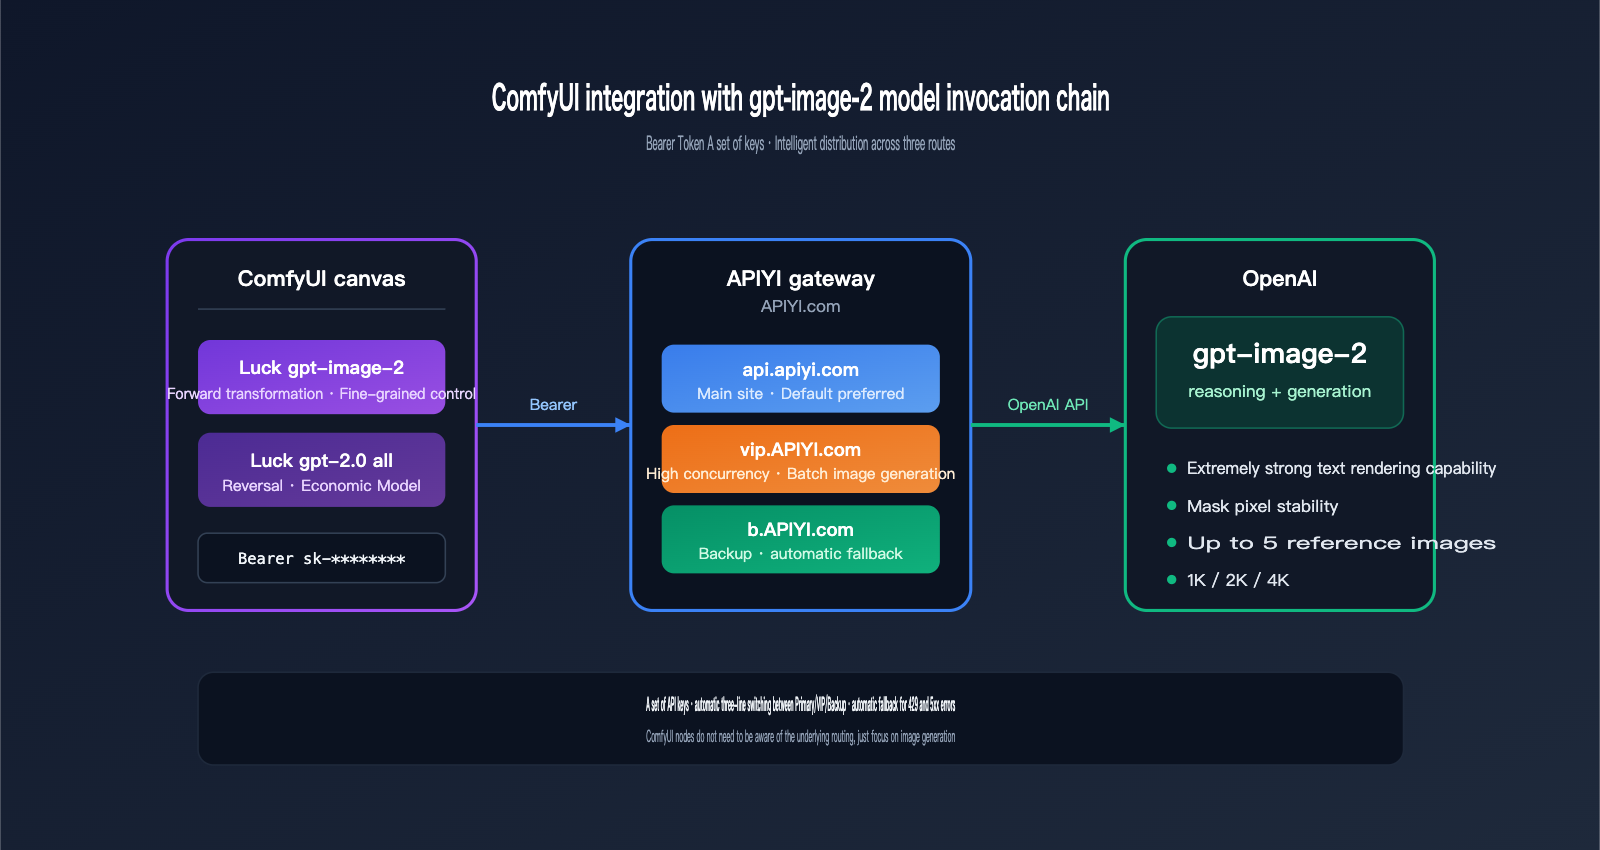
Comfyui-Luck-gpt2.0 is currently the most stable gpt-image-2 integration solution in the ComfyUI community. It provides both "fine-tuned control" and "economical batch" nodes, allowing you to generate 4K high-quality outputs or run $0.03/image batch sketches. It works with any gateway compatible with OpenAI's API. For this guide, we recommend using APIYI (apiyi.com), which offers three reliable routes—api.apiyi.com, vip.apiyi.com, and b.apiyi.com—with plug-and-play Bearer Token support.
By following this ComfyUI gpt-image-2 integration tutorial, you'll get:
- A
Luck gpt-image-2/Luck gpt-2.0 allnode that you can find by double-clicking on your ComfyUI canvas. - A parameter cheat sheet covering 1K/2K/4K resolutions, 15 aspect ratios, and Mask refinement.
- Two ready-to-use workflow examples (4K text-to-image + Mask inpainting).
- A troubleshooting list to help you dodge common errors like timeouts, 429 rate limits, and Mask format mismatches.
1. Why Integrate gpt-image-2 into ComfyUI?
1.1 Three New Capabilities gpt-image-2 Brings to ComfyUI
Before gpt-image-2, creating text-heavy posters or UI infographics in ComfyUI largely relied on brute-forcing SDXL + ControlNet, often resulting in blurry text or broken layouts. As OpenAI's first "reasoning-first" image model, gpt-image-2 plans the composition before putting "pen to paper," making it perfect for ComfyUI's modular workflow:
| Capability | Previous Local Solution | After Integrating gpt-image-2 |
|---|---|---|
| Dense Text Rendering | Required OCR & post-editing | Direct generation of 7-item, 11pt Helvetica centered lists |
| Mask Inpainting | Often destroyed surrounding pixels | "Pixel-stable" outside edit zones; protects faces and composition |
| Multi-image Consistency | Complex IPAdapter tuning | Up to 5 reference images; maintains character/product fidelity |
| Ultra-High Res | Constant Hires.fix tweaking | Native support for 1K/2K/4K in a single pass |
1.2 Why Choose Comfyui-Luck-gpt2.0 Over Official Nodes
ComfyUI added the OpenAI GPT-Image node via Partner Nodes in v0.19.4, but it defaults to a direct connection to OpenAI, which frequently hangs on SSL handshakes or 429 rate limits in restricted network environments. Comfyui-Luck-gpt2.0 provides the fix:
- ✅ Region-Friendly: Defaults to an API proxy service compatible with OpenAI's interface; supports
api.apiyi.complus redundant backups. - ✅ Broader Parameters: Exposes more granular settings than official nodes, such as
image_size,quality,output_compression, andoutput_format. - ✅ Dual Node Setup: Includes both a "fine-control" node and an "economical" batch-processing node.
- ✅ Chinese Prompt Support: The batch node offers more stable semantic understanding for Chinese prompts.
💡 Gateway Recommendation: This guide uses APIYI
apiyi.comas the entry point for gpt-image-2. It supports both the Responses API and Images API formats, matching the two endpoint types in Comfyui-Luck-gpt2.0 perfectly and saving you from secondary configuration.
1.3 Who Is This Tutorial For?
| Your Role | What You'll Gain |
|---|---|
| ComfyUI Veteran | Insert a high-quality "cover/poster" node into existing workflows, skipping Photoshop text cleanup. |
| AIGC Commercial Photographer | Mask refinement + multiple reference images for stable product/model replication. |
| Creator / Blogger | One-click generation of 4K vertical 2:3 covers, replacing stock image libraries. |
| Developer | Treat ComfyUI as a local Stable Diffusion wrapper and use gpt-image-2 for API test integration. |
II. Core Components for Integrating gpt-image-2 into ComfyUI
2.1 Overview of the Comfyui-Luck-gpt2.0 Plugin
Comfyui-Luck-gpt2.0 is an open-source custom node package for ComfyUI, available on GitHub at github.com/luckdvr/Comfyui-Luck-gpt2.0. It’s not just a single node, but a "suite." Once installed, it registers two independent nodes in your ComfyUI node menu:
Comfyui-Luck-gpt2.0
├── Luck gpt-image-2       # Forward node: Precise control, true size parameters
└── Luck gpt-2.0 all       # Reverse node: Economy mode, switchable endpoints
Both nodes share the same external interface and require you to provide:
- A
base_urlcompatible with the OpenAI protocol (we recommend the APIYI serviceapi.apiyi.com). - An API key in
Bearer YOUR_API_KEYformat. - Your text prompt or image input.
2.2 Which node should you choose? A simple comparison
This is the most important table in this article. Review it carefully before moving on:
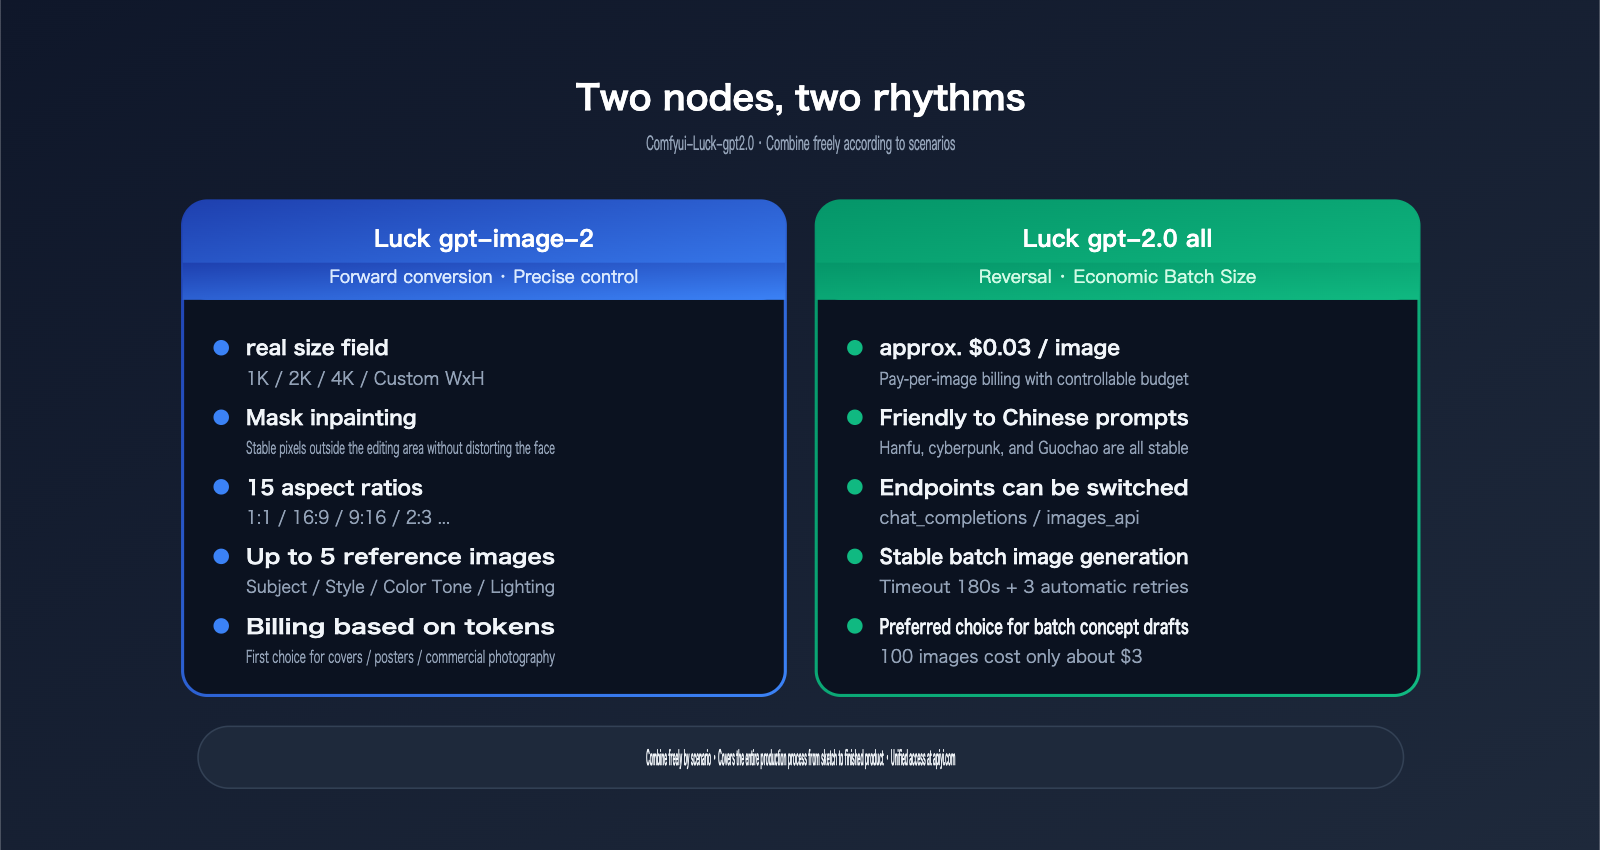
| Feature | Luck gpt-image-2 (Forward) | Luck gpt-2.0 all (Reverse) |
|---|---|---|
| Backend Model | gpt-image-2 |
gpt-image-2-all |
| Purpose | Precise control, high-quality output | Cost-effective, batching, Chinese-friendly |
| Size Parameter | ✅ True size field |
❌ Implicit via prompt |
| Resolution | AUTO / 1K / 2K / 4K / Custom | Default size |
| Aspect Ratio | 15 presets + Custom WxH | Expressed via prompt |
| Mask Inpainting | ✅ Supported | ❌ Not supported |
| Reference Images | Up to 5 | Up to 5 |
| Quality | auto / low / medium / high | Fixed |
| Output Format | PNG / JPEG / WebP | PNG |
| Endpoint | images_api (fixed) |
Switchable (chat_completions / images_api) |
| Pricing Basis | Token-based | Approx. $0.03/image |
| Best For | Posters, covers, commercial photos, Mask edits | Batch drafts, concepts, Chinese prompts |
2.3 API Backend: Why We Recommend APIYI (apiyi.com)
Comfyui-Luck-gpt2.0 itself is essentially a "shell"; the actual calls to gpt-image-2 are handled by the gateway you specify in the base_url. It requires the gateway to meet two criteria:
- Full OpenAI Protocol Compatibility: Including full support for
/v1/images/generations,/v1/responses, and/v1/chat/completionsroutes. - Native Routing for gpt-image-2: It must correctly identify
model=gpt-image-2andmodel=gpt-image-2-all.
🎯 Integration Tip: We recommend accessing gpt-image-2 through the APIYI (apiyi.com) platform. It supports both the
gpt-image-2forward mode andgpt-image-2-allreverse mode. It uses a unified Bearer Token for authentication and handles automatic failover between the main site (api.apiyi.com) and backup lines (vip.apiyi.com/b.apiyi.com), significantly reducing failures caused by single-point network instability during batch processing in ComfyUI.
Here’s how the different endpoints differ:
| Domain | Purpose | Use Case |
|---|---|---|
api.apiyi.com |
Primary | The default choice for daily use in ComfyUI workstations. |
vip.apiyi.com |
High-concurrency | Best for large batch jobs, parallel node processing, and overnight queues. |
b.apiyi.com |
Failover | Used as a backup export if the main site experiences fluctuations. |
All three lines share the same API key. In your Comfyui-Luck-gpt2.0 node, you only need to change a single string to switch between them.
III. Complete Installation Steps for Integrating gpt-image-2 into ComfyUI
3.1 Environment Prerequisites
Before you get started, make sure your ComfyUI environment meets these requirements:
| Item | Requirement | Check Command |
|---|---|---|
| ComfyUI Version | v0.3+ or newer recommended | First line in console on startup |
| Python Version | 3.10 / 3.11 / 3.12 | python3 --version |
| Git Availability | Accessible directly in terminal | git --version |
| Disk Space | ≥ 500 MB (for plugin + dependencies) | df -h |
| Network | Access to GitHub + api.apiyi.com |
curl -I api.apiyi.com |
⚠️ Common Pitfall: If you're using a one-click installer on Windows (like the QiuYe version),
python3might point to the built-in Python. You'll need to use.\python_embeded\python.exeinstead.
3.2 Installing the Plugin: 4 Simple Steps
Installing the ComfyUI gpt-image-2 plugin takes just four commands. Open your terminal, navigate to your ComfyUI root directory, and run:
# 1. Navigate to the custom_nodes directory
cd ComfyUI/custom_nodes

# 2. Clone the Comfyui-Luck-gpt2.0 repository
git clone https://github.com/luckdvr/Comfyui-Luck-gpt2.0.git

# 3. Install Python dependencies
cd Comfyui-Luck-gpt2.0
python3 -m pip install -r requirements.txt

# 4. Restart ComfyUI
If you're using a Windows portable package, replace step 3 with:
cd Comfyui-Luck-gpt2.0
..\..\python_embeded\python.exe -m pip install -r requirements.txt
After restarting, check the console for logs like these:
[Comfyui-Luck-gpt2.0] Registered node: Luck gpt-image-2
[Comfyui-Luck-gpt2.0] Registered node: Luck gpt-2.0 all
Seeing these two registration lines confirms that the ComfyUI gpt-image-2 integration is ready to go.
3.3 Obtaining Your APIYI Key
- Visit the official APIYI website at
apiyi.com. - Register/log in and go to the Console → API Keys.
- Click "Create New Key." It's recommended to enable "Usage Limits" and set an initial limit of ¥20–50 for verification.
- Copy the key string starting with
sk-and keep it safe.
🔐 Security Tip: Create a dedicated key for ComfyUI and set a daily usage limit. Since local plugins store the key within node parameters, it can easily leak if you export your workflow JSON. Using a separate key makes it easier to revoke if necessary.
3.4 Inserting Nodes into the ComfyUI Canvas
Once ComfyUI is open:
- Double-click on an empty area of the canvas to open the node search box.
- Type
Luck gpt-image-2(for standard) orLuck gpt-2.0 all(for all-in-one). - Select the node, and ComfyUI will place it at your cursor location.
After the node appears, fill in these three key fields:
| Field | Value | Description |
|---|---|---|
base_url |
https://api.apiyi.com/v1 |
Main site address (don't forget the /v1) |
api_key |
sk-xxxxxxxxxxxxxxxx |
Copied from the APIYI console |
model |
gpt-image-2 or gpt-image-2-all |
Depends on the node; usually pre-filled |
3.5 Your First Generation: A Minimal Workflow
Let's run a simple 1024×1024 text-to-image task with Luck gpt-image-2 to verify the connection:
[Luck gpt-image-2]
  ├── base_url     = https://api.apiyi.com/v1
  ├── api_key      = sk-xxxxxxxx
  ├── prompt       = A minimalist product poster, dark navy background,
  │                  centered title "HELLO 2026" in large Helvetica font,
  │                  tiny stars scattered around
  ├── image_size   = 1K
  ├── aspect_ratio = 1:1
  ├── quality      = medium
  └── output_format = png
      │
      ▼
[Preview Image]
Connect the image output of the Luck gpt-image-2 node to ComfyUI's built-in Preview Image node and click "Queue." After about 20–40 seconds, you should see a square poster with the "HELLO 2026" title on the right side of your canvas. If the text is clear and centered, you've successfully integrated gpt-image-2 into ComfyUI.
🎯 Troubleshooting: If this fails, 90% of the time it's because the
base_urlis missing/v1or thesk-prefix was omitted from the key. Go back to the APIYI apiyi.com console to copy the key again and double-check thebase_url.
IV. Quick Reference for Core gpt-image-2 Parameters
4.1 Resolution (image_size)
The image_size field in the Luck gpt-image-2 node determines the output resolution:
| image_size | Actual Dimensions (1:1 example) | Typical Use Case |
|---|---|---|
| AUTO | Model decides automatically | Exploratory generation |
| 1K | 1024×1024 | Sketches, avatars, emojis |
| 2K | 2048×2048 | Blog headers, covers |
| 4K | Up to 3840×3840 | Posters, printing, large displays |
| custom | WIDTHxHEIGHT | Custom ad slots, long images |
Requirements for custom mode:
- Width and height must be multiples of 16.
- The longest side cannot exceed 3840 px.
- Recommended formats:
1600x900,2048x1152,1088x1920.
4.2 Aspect Ratio (aspect_ratio)
The gpt-image-2 node supports 15 aspect ratio presets. Here are the 8 most common:
| aspect_ratio | Best For |
|---|---|
| 1:1 | Avatars, social media squares, product images |
| 16:9 | Blog headers, video thumbnails |
| 9:16 | TikTok/Shorts, mobile wallpapers |
| 2:3 | Movie posters, Pinterest feeds |
| 3:2 | Photography, camera aspect ratios |
| 4:3 | Slideshows, PPTs |
| 21:9 | Wide banners, landscape web headers |
| 4:5 | Instagram posts |
You can use the other 7 presets as needed, or select custom and enter your own WxH in custom_size to override the presets.
4.3 Quality Levels (quality)
| quality | Speed | Cost | Best For |
|---|---|---|---|
| auto | Medium | Medium | Let the model decide |
| low | Fast | Low | Batch sketches, mood previews |
| medium | Medium | Medium | Blog posts, social media |
| high | Slow | High | Covers, posters, print materials |
Rule of thumb: Always use quality=high for wide aspect ratios (21:9) or high resolutions (4K) to avoid loss of detail.
4.4 Output Format and Compression
| output_format | output_compression | Best For |
|---|---|---|
| png | Ignored | Transparent backgrounds, post-processing |
| jpeg | 85–95 | Blog content images |
| webp | 75–85 | Websites, mobile-first content |
output_compression only applies to jpeg/webp modes, with values from 0–100. Higher numbers mean larger file sizes and better quality.
4.5 Reference Images and Masks
- Reference images: Connect up to 5
IMAGEinputs. The model uses these as anchors for composition, style, or characters. - Mask: Connect a black-and-white image of the exact same dimensions as the first reference image. White pixels represent "edit here," while black pixels represent "keep stable." This is one of the most powerful features of gpt-image-2.
🎯 Pro Tip: Use a
LoadImagenode in ComfyUI to load your source image, then useMaskToImage/ImageInvertto create your mask. For complex workflows, check the gpt-image-2 sample workflows atdocs.apiyi.com—you can often copy and paste them directly into your canvas with Ctrl+V.
5. Three Practical Workflows for Integrating gpt-image-2 in ComfyUI
5.1 Workflow A: High-Quality 4K Text-to-Image Poster
Goal: Generate a 3840×5760 (2:3) cinematic movie poster with clear text and a focused composition.
[PrimitiveNode: prompt string]
  │
  ▼
[Luck gpt-image-2]
  ├── base_url     = https://api.apiyi.com/v1
  ├── api_key      = sk-xxxx
  ├── prompt       = (from upstream)
  ├── image_size   = 4K
  ├── aspect_ratio = 2:3
  ├── quality      = high
  ├── output_format = png
  ├── timeout      = 360
  └── max_retries  = 3
      │
      ▼
[SaveImage: filename_prefix = poster_4k]
Example prompt:
A cinematic poster for a sci-fi novel titled "NEON HORIZON",
dark blue and magenta gradient sky, lone silhouette standing on a cliff,
bold serif title centered at the top, subtle tagline at bottom in small caps,
highly detailed, 35mm film grain.
Key takeaways:
image_size=4K+aspect_ratio=2:3≈ 3840×5760.quality=highis crucial for text clarity; lower settings may cause glyph distortion.timeoutmust be ≥ 360 seconds, as 4K generation can take 3–5 minutes.
5.2 Workflow B: Mask Inpainting (Background Replacement/Detail Refinement)
Goal: Replace the plain white background of a coffee cup product image with a "marble texture tabletop" while keeping the foreground cup and shadows perfectly intact.
[LoadImage: coffee_cup.png]      [LoadImage: coffee_cup_mask.png]
        │                                  │
        ▼                                  ▼
              [Luck gpt-image-2]
              ├── prompt     = Replace the background with a luxurious
              │                white marble countertop, soft natural
              │                window light from the left
              ├── image_1    = ← coffee_cup.png
              ├── mask       = ← coffee_cup_mask.png  (white=background area)
              ├── image_size = 2K
              ├── quality    = high
                    │
                    ▼
              [SaveImage]
Key rules for Masks:
- The mask image must have the exact same dimensions as
image_1. - White (255,255,255) = Area to be edited.
- Black (0,0,0) = Area to keep stable.
- Grayscale = Proportional blending (useful for edge feathering).
💡 Fidelity Tip: Apply a 3–5 px Gaussian blur to the mask edges to avoid a "sticker-like" seam. gpt-image-2 handles grayscale transitions well, making it perfect for product photography background replacement.
5.3 Workflow C: Economy Mode for Batching 100 Concept Drafts
Goal: Design 100 clothing concepts for a character at approximately $0.03 each, keeping the total cost around $3.
[TextFileReader: 100 prompts]
          │
          ▼ (loop/queue)
[Luck gpt-2.0 all]
  ├── base_url    = https://vip.apiyi.com/v1   ← Use high-concurrency route for batches
  ├── api_key     = sk-xxxx
  ├── endpoint    = chat_completions
  ├── model       = gpt-image-2-all
  ├── timeout     = 180
  └── max_retries = 3
      │
      ▼
[SaveImage: filename_prefix = concept_###]
Three reasons why the Luck gpt-2.0 all node is best for this:
- Per-image billing: At ~$0.03/image, it's easier to budget than token-based billing.
- Chinese prompt friendly: Concept drafts often use Chinese terms like "Hanfu modification" or "Cyberpunk," and this node offers higher stability.
- Endpoint switching: The
chat_completionsmode handles long prompts better.
🎯 Batch Stability: When running batches, set
base_urltovip.apiyi.com,max_retriesto 3, andtimeoutto 180 seconds. The VIP route on APIYI (apiyi.com) automatically distributes traffic to backup gateways during 429/5xx errors, preventing long tasks from crashing midway.
6. Advanced Techniques for Integrating gpt-image-2 in ComfyUI
6.1 Hybrid Pipeline: gpt-image-2 for Subject + Local Models for Style
gpt-image-2 excels at "complex composition + text layout," but it may lag behind SDXL/Flux in anime, pixel art, or specific artist styles. Recommended hybrid pipeline:
[Luck gpt-image-2]  → Generate subject composition (with text/logo)
        ↓
[VAE Encode]        → Convert back to latent
        ↓
[KSampler: Flux/SDXL + LoRA] → Style transfer / Clarity refinement
        ↓
[Upscaler: 4x-UltraSharp] → Upscale to 8K
This approach leverages gpt-image-2's "text-writing" capability while utilizing the "style freedom" of local models, usually resulting in higher quality than a single model.
6.2 Multi-Reference Image Consistency: Keeping Subjects Stable
Enable the 5 reference image inputs in Luck gpt-image-2 to significantly improve character or product consistency:
| Reference Slot | Recommended Content |
|---|---|
| image_1 | Clear front view of the subject |
| image_2 | Side/back view of the subject |
| image_3 | Detail close-up (Logo, texture) |
| image_4 | Scene atmosphere reference |
| image_5 | Tone/lighting reference |
Emphasize in your prompt to "maintain the character identity from image_1" or "use the lighting direction from image_4" for highly stable results.
6.3 Batch Consistency: Generating 8 Series Images at Once
gpt-image-2 can return up to 8 images with consistent subjects in a single request. Set the n parameter (sometimes called batch_size) to 8 in the Luck gpt-image-2 node:
Luck gpt-image-2
  ├── prompt = character turnaround sheet of a cyberpunk girl,
  │            8 different poses, same outfit, same face,
  │            white background, character sheet layout
  └── n = 8
Suitable for:
- Character turnaround sheets (8 angles)
- Product variants (8 colors/packaging)
- Storyboards (8 frames)
6.4 Exposing ComfyUI Workflows as an API
If you use ComfyUI as a "private server" for your frontend, the output of the Comfyui-Luck-gpt2.0 node can be consumed directly by ComfyUI's /prompt endpoint. By using APIYI (apiyi.com) multi-exit routes as the backend, the entire chain becomes:
Your Frontend → ComfyUI HTTP API → Luck gpt-image-2 node
                                      ↓
                          api.apiyi.com / vip.apiyi.com
                                      ↓
                               OpenAI gpt-image-2
This is the fastest path to packaging a "ComfyUI workflow" into an "external image API."
VII. ComfyUI Integration with gpt-image-2: FAQ
Q1: I've installed the nodes, but I can't find Luck gpt-image-2 in the canvas?
Check these four items:
- Does the
ComfyUI/custom_nodes/Comfyui-Luck-gpt2.0/directory exist? - Are all dependencies in
requirements.txtinstalled correctly? (Pay close attention torequestsandPillow). - Are there any red
ImportErrormessages in the ComfyUI console when it starts up? - Did you perform a "full restart" of ComfyUI? (Refreshing the browser page with Ctrl+R doesn't count).
Q2: Getting a 401 Unauthorized or Invalid API key error?
99% of the time, it's an issue with your Key or base_url:
- The Key must include the
sk-prefix. - The
base_urlmust end with/v1(do not just writehttps://api.apiyi.com). - Do not manually add
Bearerin front of your Key; the node appends it automatically.
Q3: Getting a 429 Too Many Requests error?
You've hit a rate limit. Here are two ways to handle it:
- Short-term: Set
max_retriesto 3 or higher, allowing the node to wait and retry automatically. - Long-term: Change your
base_urlfromapi.apiyi.comtovip.apiyi.comorb.apiyi.com. The latter two are high-concurrency/backup routes.
Quick Reference for Error Codes:
| Error Code | Meaning | Action |
|---|---|---|
| 401 | Invalid Key | Re-copy and check for the sk- prefix |
| 403 | Insufficient Permissions | Confirm the model is enabled in your APIYI dashboard |
| 408 | Timeout | Increase timeout to 360 seconds |
| 429 | Rate Limited | Switch to a VIP route + increase retries |
| 500/502 | Server Fluctuation | Automatic retry for 3 attempts, or switch to the b route |
Q4: 4K generations always time out?
- Set
timeoutto 480 seconds (a 4Kgpt-image-2generation withquality=highcan occasionally take up to 6 minutes). max_retries=2is enough; too many retries will add up to a long wait.- If your network is slow, try using
image_size=2Kand then use an Upscaler node to get to 4K; it usually feels much faster.
Q5: The Mask isn't aligning correctly in the editor?
- Ensure the Mask and the original image have the same width and height without pixel offset.
- Ensure the Mask is pure black and white without an alpha channel.
- White areas must be absolute (255, 255, 255); avoid light grays.
- You can add an
ImageThresholdnode before your Mask input to force binary values.
Q6: Can I use this completely offline?
No. gpt-image-2 is an OpenAI cloud-based model and requires access via a gateway. However, you can achieve "pseudo-high availability" by using the three exit routes provided by APIYI (apiyi.com): it will automatically switch if the main site fluctuates, providing an experience similar to local deployment.
Q7: Chinese prompts keep resulting in gibberish?
- The standard node (
Luck gpt-image-2) is better at English typography. - For Chinese prompts, we recommend the "all-round" node (
Luck gpt-2.0 all), as it uses thegpt-image-2-allmodel, which handles Chinese more consistently. - If you must use the standard node with Chinese, write the prompt as
render Chinese text "你好世界"instead of letting the model "guess" what to write.
Q8: How can I estimate costs?
- Standard Node (
gpt-image-2): Charged by token usage. A 2K image is roughly $0.08–$0.15, and 4K high-quality is about $0.25–$0.40. - "All-round" Node (
gpt-image-2-all): Charged per image, about $0.03/image. - We recommend enabling "Daily Usage Limits" in your APIYI (apiyi.com) dashboard and running 50–100 images to establish a baseline.
VIII. Summary of ComfyUI Integration with gpt-image-2
Integrating gpt-image-2 into ComfyUI essentially means you get the power of a top-tier cloud model combined with local precision nodes in a single canvas. By following this guide, you should have:
- ✅ Installed the Comfyui-Luck-gpt2.0 plugin and registered the two new nodes.
- ✅ Obtained your Key from the APIYI
apiyi.comdashboard and configured yourbase_url/api_key. - ✅ Successfully run a minimal text-to-image workflow to confirm the link is active.
- ✅ Mastered parameter combinations including 1K/2K/4K, 15 aspect ratios, four quality levels, and PNG/JPEG/WebP formats.
- ✅ Successfully executed at least one practical workflow, such as 4K text-to-image, Mask inpainting, or batch economical mode.
The greatest value of integrating gpt-image-2 with ComfyUI is turning "OpenAI's top-tier image model" into just another node on your canvas. You no longer need to switch back and forth between your browser and local tools; you can chain your entire pipeline in one go: gpt-image-2 generates the base → SDXL for stylization → Upscaler for upsampling → SaveImage to export.
🎯 Next Steps: We suggest applying for a test key on the APIYI
apiyi.complatform (with a set limit), running your first image using the §3.5 minimal workflow, and then moving on to the three practical workflows in §5. If you run into parameter issues, refer back to the §4 quick reference table, and check the §7 FAQ for error codes. For more complex JSON workflows, check out the ComfyUI section of the official APIYI documentation atdocs.apiyi.com.
You now have a complete, production-ready ComfyUI gpt-image-2 integration solution. Happy creating on your ComfyUI canvas!
Author: APIYI Technical Team
Resources:
- Plugin Repository: github.com/luckdvr/Comfyui-Luck-gpt2.0
- APIYI Official Website: apiyi.com
- APIYI Documentation: docs.apiyi.com
- APIYI Main Site: api.apiyi.com (Backup: vip.apiyi.com / b.apiyi.com)