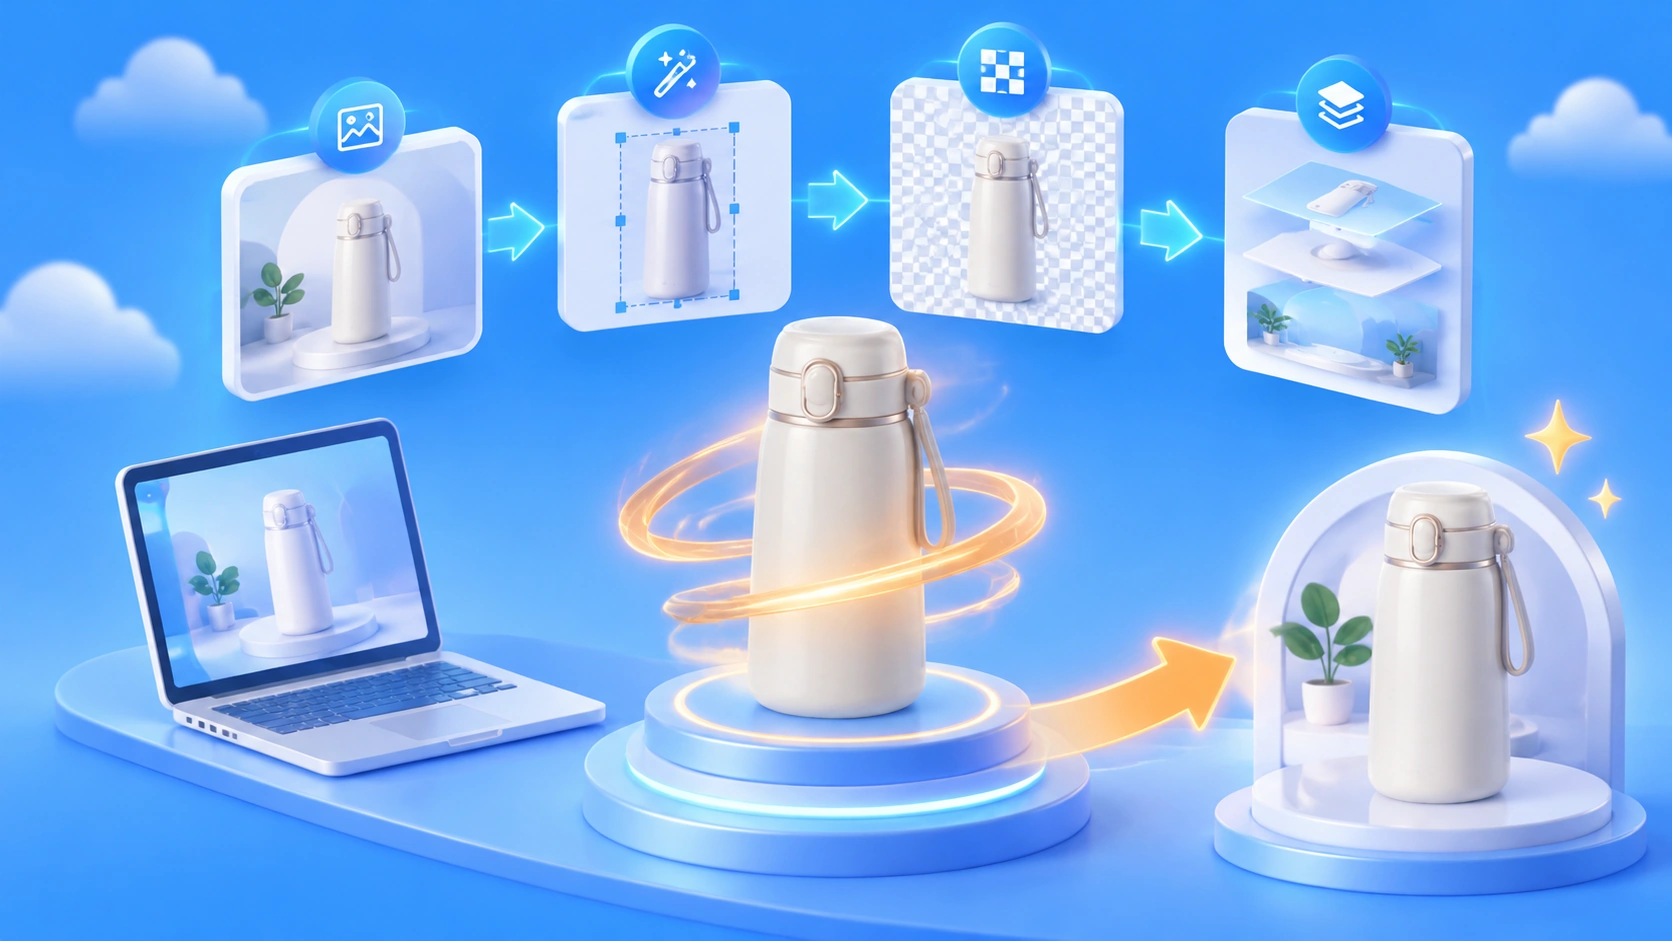
Author’s note: Combine four kinds of operations — scene generation, continuous editing, transparent assets, and poster layer separation — with external orchestration and quality checks, and you can build a reusable product-image production pipeline.
For e-commerce teams producing product images, the hard part usually isn’t “getting one good-looking image” — it’s everything that comes after. Operations wants a new background, design wants a transparent subject, paid media wants a price change, and every tweak can mean redoing the entire image. Seedream 5.5, released by ByteDance on November 9, 2026, puts continuous editing, native RGBA transparent output, layer separation of up to 99 layers, and rich-text OCR into a single model — and these capabilities line up neatly with the stages of product-image production.
This isn’t a recap of a launch event’s feature list. This article uses a single stainless-steel insulated tumbler throughout, walking through the actual working order: how each step is invoked, how it consumes the previous step’s output, and what it ultimately delivers. It also separates three kinds of information: capabilities shown officially, third-party hands-on observations, and the automation workflow designed for this article.
Key takeaway: By the end, you’ll have a process design that goes from raw product photo to deliverable assets — including the key parameters for the four stages, Chinese-language prompts you can adapt directly, how to reassemble the fields returned by layer separation, and the quality-check points to set up before going live.
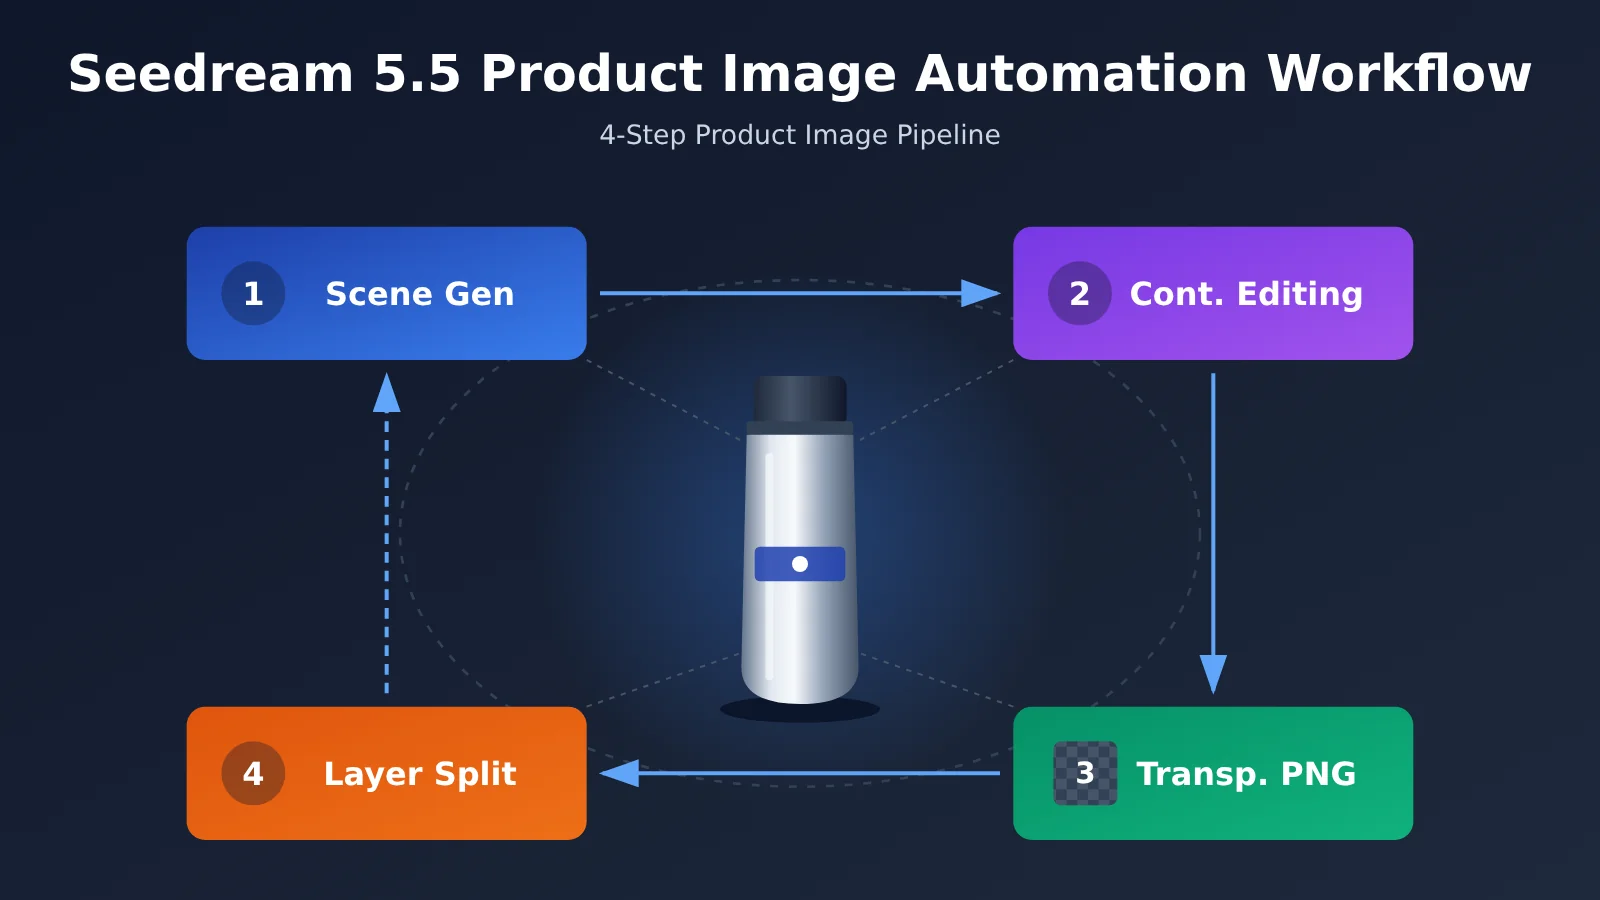
One-line summary: Seedream 5.5’s value isn’t just generating product images — it’s breaking product visual production into a series of steps that connect to one another, then assembling them into a complete workflow through API orchestration and downstream design tools.
To know: 5 terms used in this article
- Multi-turn editing: Feeding the previous round’s generated image as input to the next round, refining it step by step.
- Alpha channel: The channel that records how transparent each pixel is. It’s the A in RGBA, and JPEG doesn’t support it.
- OCR: Recognizing text content in an image. During layer separation, Seedream 5.5 also estimates the text’s position and approximate styling.
- z_index: A field returned by layer separation that indicates the stacking order of layers, with the base image at 0.
- API: An interface that lets programs call a service. Every automation workflow in this article is built on API calls.
Why Seedream 5.5 Product Image Automation Can’t Rely on One-Shot Image Generation?
Take listing a thermos as an example. A single product typically needs five types of visual assets: a main image on a white or clean background, lifestyle scene images, a transparent subject that can be dropped into any layout, marketing posters with a headline and price, and versions that get adjusted repeatedly during major promotions. If each asset type is produced as one flat image in a single generation, every later change means regenerating it, and the product’s appearance can drift from version to version.
One-shot generation has two structural problems. First, changes aren’t controllable: you just want to swap the background, but the lid structure or logo gets redrawn along with it. Second, assets aren’t reusable: once a poster is generated, the product, text, and decorations are stuck in the same pixel layer, so changing the price means redoing the whole image. These are also the pain points ByteDance listed in its launch post, including local edits spilling into other areas, subject drift after multiple edits, the need for manual cutouts, and the difficulty of separating layers from a flat image.
Seedream 5.5’s approach is to break these problems apart and handle them separately. The editing stage emphasizes preserving unedited areas, transparent output removes the need for cutouts, and layer separation turns a flat poster back into assets that can be recomposed. But the model only handles “generation and decomposition”—orchestration, storage, quality checks, and final compositing still need to be handled by the application and design tools.
Seedream 5.5 Product Image Automation Workflow: How Does One Photo Become Reusable Assets?
Let’s start with the big picture. The workflow below is a business workflow we designed around the official API’s capabilities — it isn’t a one-click feature the platform ships out of the box:
- Ingest the original product photo: Your business system supplies the real product image, the product description, and the visual requirements; the original is kept permanently.
- Scene generation: The original image serves as the reference image, and the output is the product’s key visual.
- Multi-round editing: The previous round’s output becomes the next round’s input — swapping backgrounds, changing lighting, and other edits.
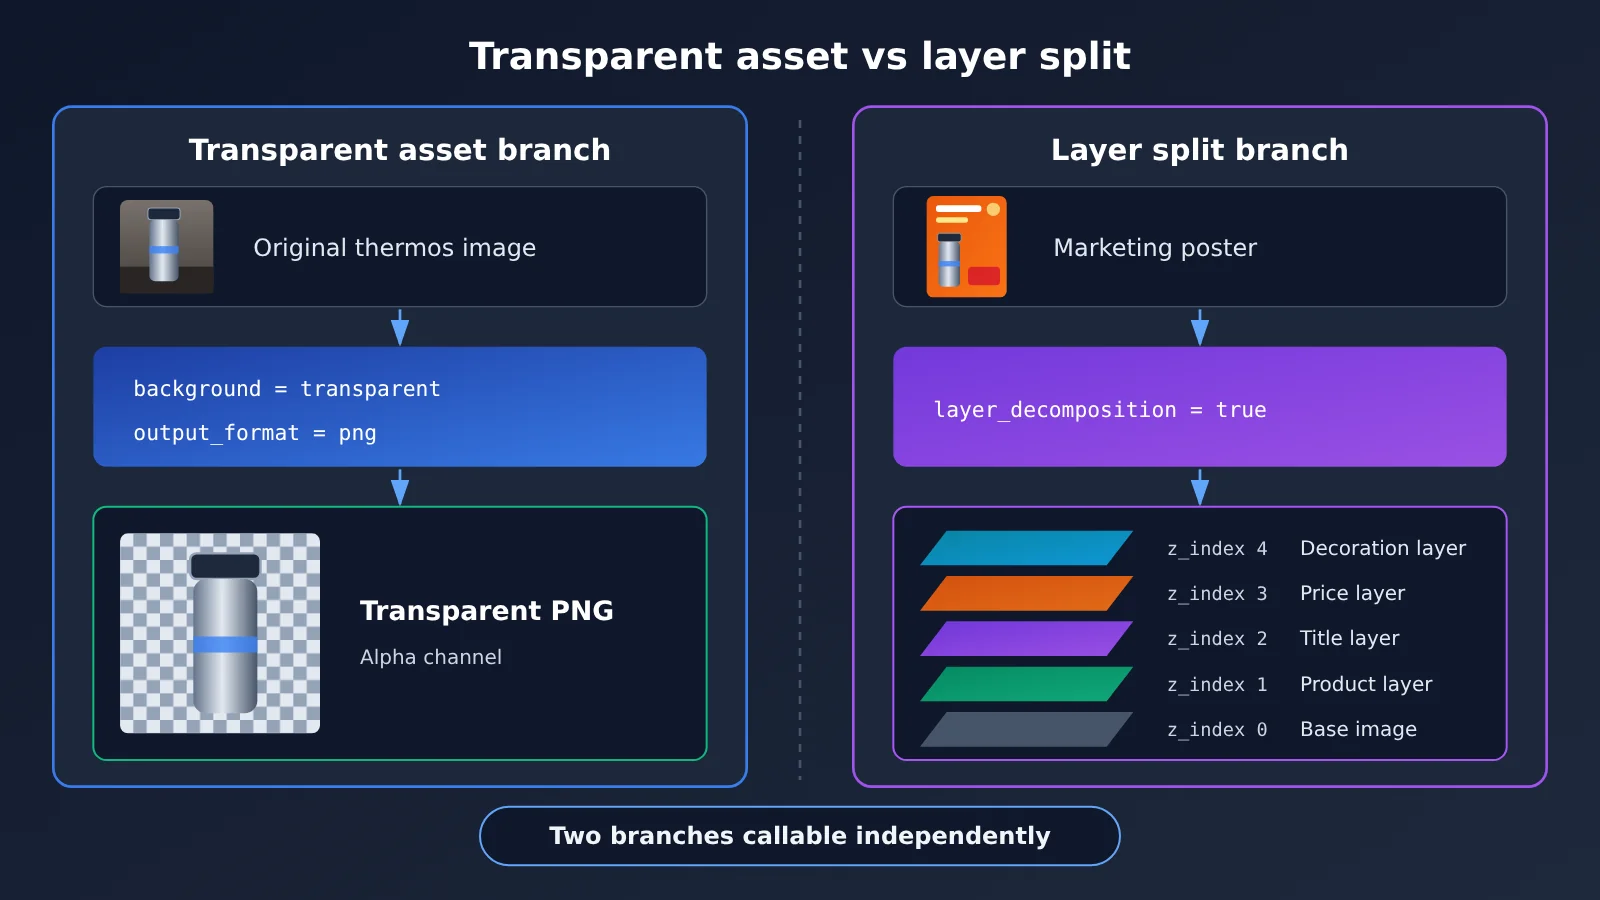
- Two branches: The transparent asset branch outputs an RGBA PNG directly from the original product photo; the layer split branch decomposes a finished poster into layers and returns the layer images plus coordinates.
- Design composition: A downstream program or design tool reads the layers, coordinates, and OCR data, then re-lays out the design.
- Quality check and asset archiving: After human or rule-based review, files are archived and delivered by version.
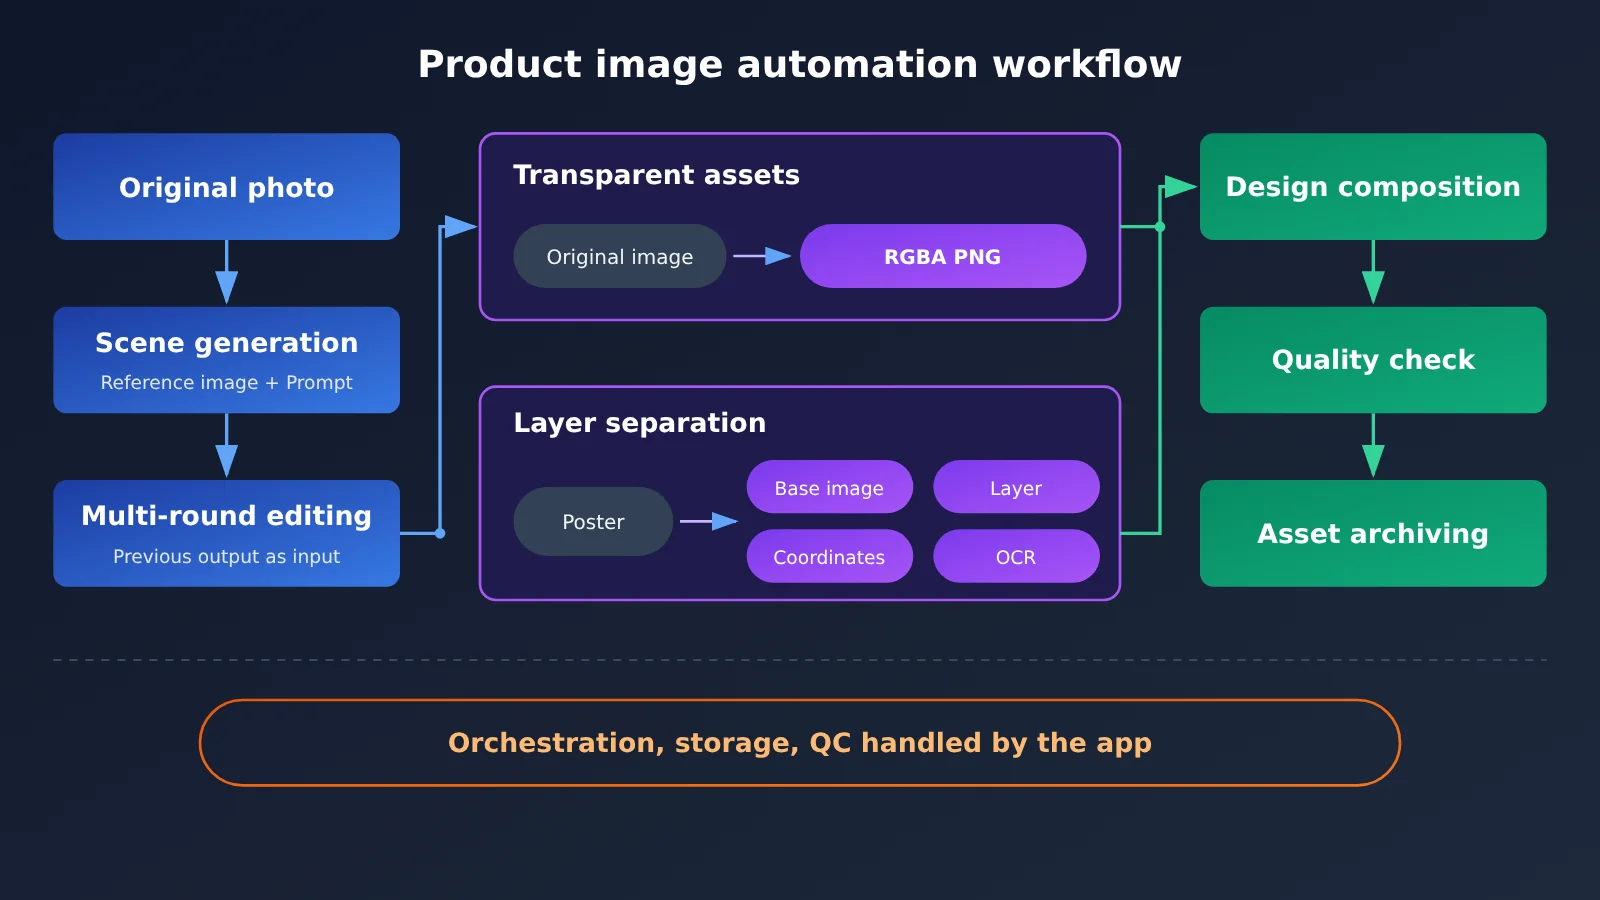
The most important design conclusion here is: transparent assets and layer splitting are two branches you can call independently — they don’t have to run in sequence. If all you need is a transparent hero shot of the thermos, just take the original product photo and generate an RGBA asset directly; there’s no need to build a poster first and then split it. You only reach for layer splitting when you already have a complete poster containing the product, headline, price, and decorations, and you want to reuse the elements inside it.
📌 Workflow validation tip: Before you build anything, use the unified interface at APIYI apiyi.com to run each step’s request through once end-to-end — confirm the parameters and response structure, then decide whether to wire it into your production orchestration system. Which image models you can actually call depends on the platform’s model list.
Step 1 of Seedream 5.5 Product Image Automation: Generating Product Scenes with a Reference Image
The input for step one is the original photo of a thermos, and the output is a scene key visual you can use on a product detail page. Volcengine Ark’s endpoint is https://ark.cn-beijing.volces.com/api/v3/images/generations, and the model ID is doubao-seedream-5-5-261028. In the BytePlus international docs, the Model ID is dola-seedream-5-5-261028, and third-party platforms may use different model names or support a different set of parameters — check before you call.
One table makes the key configuration for all four stages easy to grasp up front:
| Stage | Key request fields | Input | Output |
|---|---|---|---|
| Scene generation | image, prompt, size, background:"opaque" |
Original product photo | Full scene image |
| Sequential editing | Previous round’s data[].url as this round’s image |
Previous round’s output | Edited scene image |
| Transparent assets | background:"transparent", output_format:"png" |
Original product photo | PNG with an alpha channel |
| Layer decomposition | layer_decomposition:true, layer_decomposition_options |
One complete poster | Base image + individual layers |
The default size for a standard generation task is 2K. You can also specify 1K or 1.5K, or set custom width and height within the allowed range (roughly 920,000 to 4,620,000 total pixels, with an aspect ratio from 1:16 to 16:1). The current official docs don’t include a 4K tier. watermark defaults to true, which stamps an “AI generated” mark in the bottom-right corner — whether to turn it off depends on your compliance requirements.
The scene generation prompt (a teaching example, not a tested result):
使用参考图中的不锈钢保温杯作为唯一商品主体,生成一张用于电商详情页的高端生活方式场景图。保温杯置于现代风格的浅色办公桌上,侧面自然窗光,真实摄影质感。严格保留商品原有杯身形状、杯盖结构、材质、颜色和标识。画面为 1:1,不添加额外商品。
The phrases “唯一商品主体” (“the only product subject”) and “不添加额外商品” (“don’t add extra products”) in the prompt aren’t optional decoration. In a test on November 11, 2026, Segmind observed that after a single shoe was placed into a lifestyle scene, the result turned into a pair of shoes — and the shooting angle changed too. Product images are extremely sensitive to quantity and structure, so those constraints need to go into the prompt and into your quality checks as well.
Seedream 5.5 Scene Generation: A Minimal Call Example
Here’s a Python demo for the first step. The example follows the OpenAI-compatible image generation path. Whether extended fields like layer_decomposition can be passed through, and whether the model name matches, depends on the documentation of the platform you’re using:
import requests

resp = requests.post(
    "https://api.apiyi.com/v1/images/generations",  # APIYI unified interface
    headers={"Authorization": "Bearer YOUR_API_KEY"},
    json={
        "model": "doubao-seedream-5-5-261028",  # refer to the platform's model list
        "prompt": "Use the stainless steel thermos in the reference image as the only product subject... do not add extra products.",
        "image": "https://your-cdn.com/cup_original.png",
        "size": "2K",
        "background": "opaque",
        "output_format": "png",
        "response_format": "url",
        "watermark": False,
    },
    timeout=120,
)
print(resp.json()["data"][0]["url"])
There’s a good reason timeout is set so generously. Third-party observations show huge variation in single-call latency: Segmind reports an average of about 24 seconds per image, while SeedRouter measured 29–47 seconds for 1K output and about 59 seconds for 2K poster layer decomposition. These are just observations from individual platforms and shouldn’t be treated as a universal benchmark—but they’re enough to show that synchronous blocking calls aren’t suited to batch tasks.
🚀 Quick start: If your team is already using an OpenAI-compatible SDK, you can get an API key and a free trial quota for new users through APIYI at apiyi.com. Start by validating your prompt on a small batch of product images, then scale up to bulk processing.
Seedream 5.5 Product Image Automation Step 2: Continuous Editing for Repeated Revisions
After reviewing the office desk scene, the operations team asked to switch it to a café. The input for this step isn’t the original photo—it’s the hero image approved in step one. Download and save the data[].url returned by the previous round, then submit it as this round’s image. Text-to-image and single-image editing generate only one result per call, so the “100 consecutive edits” people talk about is a capability shown in the official demo; each round is a separate generation call, and your workflow has to submit them one at a time.
The principle for writing prompts for continuous editing is simple: describe only what changes in this round, and explicitly list the objects that must be preserved.
Replace the office desk background with a warm wooden café scene; change only the environmental background and ambient light. Keep the thermos' shape, size proportions, color, lid, logo, placement angle, and overall composition unchanged, and make sure the product always remains a single subject.
The official guidance recommends setting background to opaque when doing continuous edits with RGB images; this usually helps with edit consistency. Here’s one way to think about it: the editing chain passes along a full scene image, and introducing an alpha channel adds another layer of uncertainty to every round. That’s why this workflow keeps transparent assets on a separate branch and doesn’t let them enter the editing chain.
Third-party tests have given mixed signals. On November 11, Xinghai Intelligence Bureau ran a three-round test on the Doubao web version, changing a jacket’s color and swapping its background. The person’s pose and clothing didn’t drift noticeably, but the author explicitly said they didn’t test 100 rounds. Segmind ran 12 rounds of edits on a single product image; the background area showed no obvious pixel changes beyond the level-32 threshold, but the image as a whole gradually got darker, with the 12th round averaging about a 5.1 color-level shift compared with the 2nd round. In another case, when adding text to a shoe’s narrow heel pull tab, the model altered the pull tab’s structure to fit the text.
For the thermos workflow, this leads to two engineering recommendations:
- Start every round from the “approved version” rather than chaining edits indefinitely. Archive each approved hero image separately; if something goes wrong, roll back to that version and edit again.
- Limit the length of the editing chain—for example, set a maximum number of rounds. Once you exceed it, go back to the original image and regenerate the scene to avoid cumulative color drift.
Seedream 5.5 Product Image Automation Step 3: Extract Transparent Product Assets Directly
The transparent asset branch takes the original product photo as input, not the edited scene image. That gives you a subject that’s as close as possible to the real product, ready to drop into detail-page templates, ad layouts, or other compositing tasks. The two key settings to focus on are:
{
  "model": "doubao-seedream-5-5-261028",
  "image": "https://your-cdn.com/cup_original.png",
  "prompt": "提取参考图中的保温杯主体,去除桌面、背景、其他物品及其投影,保留完整杯身、杯盖和产品细节。输出单个独立商品素材,边缘自然清晰,背景完全透明,PNG 格式。",
  "background": "transparent",
  "output_format": "png",
  "response_format": "url"
}
Note that output_format must be png; JPEG doesn’t support an alpha channel. Compared with the previous generation, Seedream 5.5 supports text-to-transparent-image generation, and for image-to-transparent-image it can use up to 10 reference images, which don’t need to have their own alpha channel. In transparent-output scenarios, Seedream 5.0 Pro / Flash only supports a single PNG reference image that already has an alpha channel.
Quality checks for transparent assets need to go further than a quick visual glance. The official examples show complex edges such as snowy owl feathers, but in Segmind tests, transparent edges on backpacks and hard goods came out fairly clean; glass products that needed true see-through transparency failed on both attempts. An insulated tumbler is rigid stainless steel, so it’s relatively low difficulty, but if it’s a glass tumbler or has a transparent lid, that’s where you should focus your checks. Suggested checks:
- Overlay the PNG on pure black, pure white, and colored backgrounds to look for fringing and residual shadows.
- Read the alpha channel programmatically to confirm the background is fully 0 and the subject has no unintended semi-transparent holes.
- Compare with the original image to verify that the lid, handle, logo, and other structures are intact.
Seedream 5.5 Product Image Automation, Step 4: Splitting a Marketing Poster into Independent Layers
The promo poster is done: thermos body, main headline, subtitle, price, decorative graphics, and background all flattened into one image. Now you need to change the price from 129 to 99, or swap the Chinese poster for an English version. That’s when you call layer decomposition:
{
  "model": "doubao-seedream-5-5-261028",
  "image": "https://your-cdn.com/cup_poster.png",
  "prompt": "Split the product poster into independent layers: product subject, main headline, subtitle, price text, decorative graphics, and background. Preserve each element's original position, size ratio, and visual style. Treat the product subject and the text as separate layers, keep the other background elements in the base image, and naturally fill in the areas covered by the removed elements.",
  "layer_decomposition": true,
  "layer_decomposition_options": {
    "max_images": 15,
    "text_recognition": true
  }
}
A few constraints that are easy to trip over: layer decomposition accepts only 1 PNG or JPEG input, with pixel dimensions between 512×512 and 6000×6000; you can’t attach a background parameter, or it’ll throw an error; the default size is auto; output layers are always PNG, and output_format only determines the base image’s format. max_images takes values from 2 to 100, defaulting to 30 (including the base image) — it’s a ceiling, not a guaranteed count. In the official poster example, setting a max of 15 actually returned 13 images (1 base image + 12 layers), 9 of which were text layers carrying OCR results.
How to Use the Layer Return Fields in Seedream 5.5
The value of layer decomposition lies in the fact that its return fields can be consumed by programs:
| Returned field | Practical use | How downstream uses it |
|---|---|---|
data[].url |
Download the base image and each layer | Transfer to your own storage within 24 hours |
data[].z_index |
Stacking order; the base image is 0 | Stack in ascending order |
data[].name / description |
Layer name and semantic description | Automatically recognize layers like “product body” or “price” |
bounding_box.absolute |
[left, top, right, bottom] pixel coordinates |
Restore positions on a canvas at the original size |
bounding_box.normalized |
0—1000 normalized coordinates | Convert positions using the new canvas width and height |
text_recognition |
OCR information for the aligned text layer | Read the text, line positions, and approximate styles |
The official recomposition method is: place the z_index=0 base image first, then stack the transparent layers in ascending z_index order. A layer’s width is right-left and its height is bottom-top. If the target canvas is 1080×1350, the normalized left coordinate converts to left / 1000 × 1080.
The OCR structure is text_recognition → text / lines[] → bounding_box / runs[] → style, where style contains fields such as similar_font_family, foreground_color, bold, italic, underline, strikethrough, shadow, and translucent. To change a price: hide the original price layer, read its position, color, and similar font, then have the design program redraw it with the new copy.
One boundary needs emphasis: this doesn’t automatically generate a PSD. similar_font_family is only a similarity judgment for fonts; handwriting and artistic text may have no OCR results, and there’s no guarantee every piece of text can be split into an independent layer. Also, layer decomposition is billed per image actually output — 13 outputs means 13 images billed.
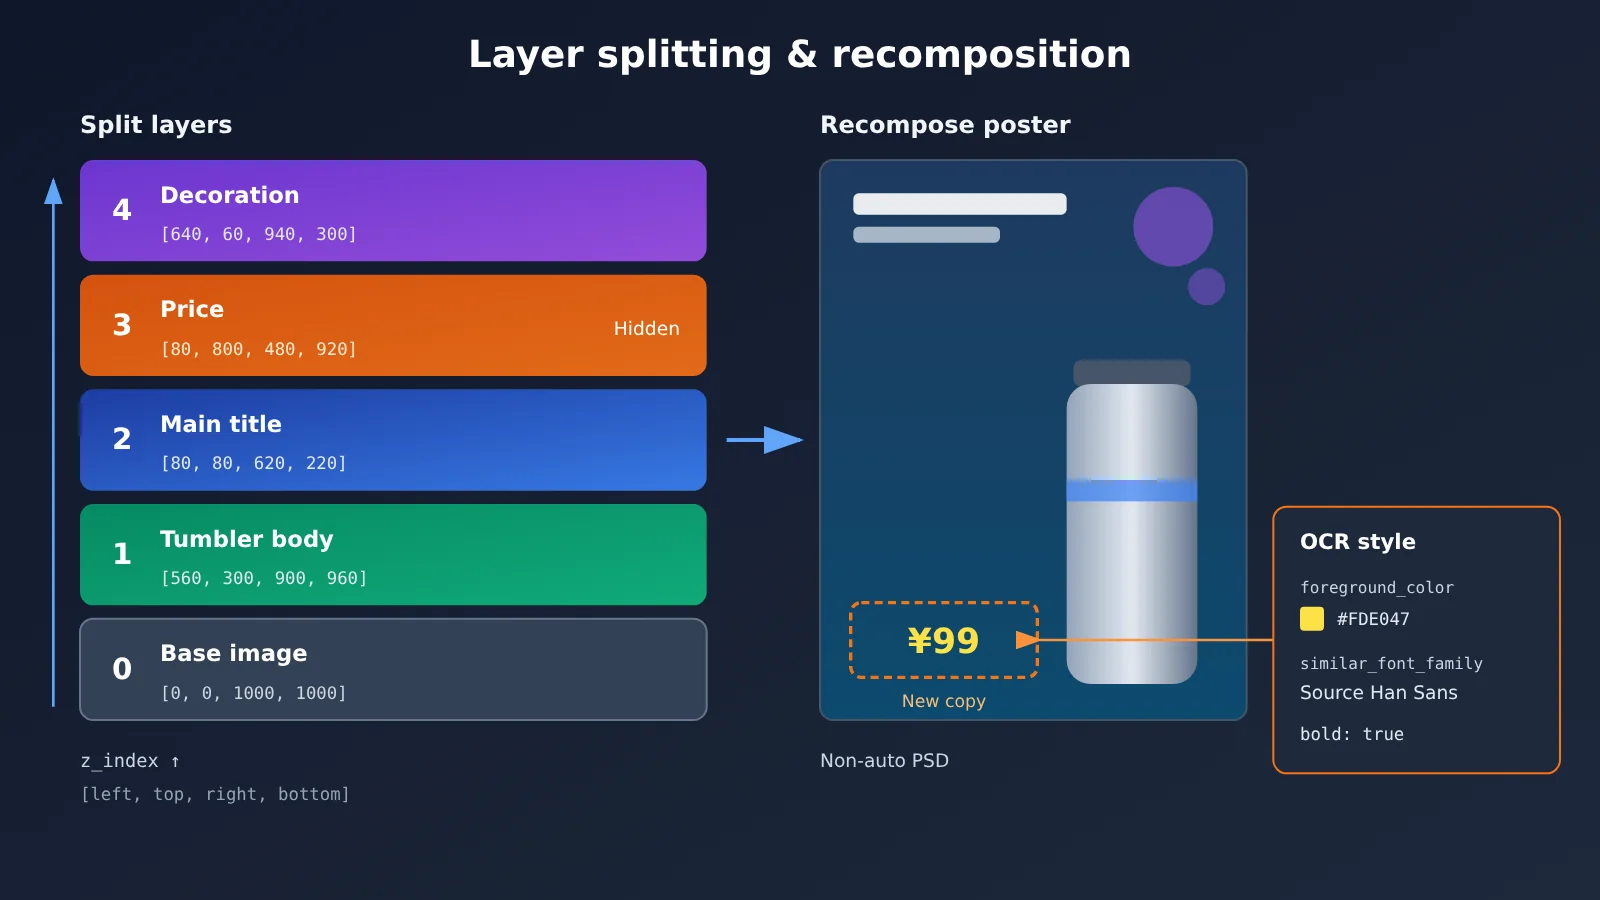
Wiring Together the Four Stages of Seedream 5.5 Product Image Automation
Once each of the four stages works on its own, the real problem becomes the handoffs: what each step delivers, when the next step fires, and what to do when something breaks. The table below puts inputs, outputs, and QC checkpoints side by side (an engineering suggestion, not an official spec):
| Stage | Deliverable | Condition to trigger next step | Suggested checks |
|---|---|---|---|
| Original image intake | Raw photos, product ID, authorization info | Materials complete | Original dimensions, authorization, ID |
| Scene generation | Scene key visual PNG | Manual confirmation passed | Quantity, shape, color, logo |
| Sequential editing | Per-round version PNGs + prompt log | Ops confirmation or round limit reached | Changes in unspecified regions, color drift |
| Transparent asset | RGBA PNG | Alpha check passed | Subject integrity, edge fringing, transparent materials |
| Layer decomposition | Base image, layers, coordinate JSON, OCR | Layer count and positions reasonable | Missed layers, background inpainting, stacking order |
| Design composition | Final poster, detail page assets | Text review passed | Price, model number, brand spelling |
| Archive delivery | Versioned asset package | — | Target dimensions, format, version number |
A few engineering details have to be designed up front. First, persistence: generated image URLs expire after 24 hours, so you have to download and re-host them promptly. Second, version retention: keep at least three versions — the original product photo, the confirmed key visual, and the final design assets. Third, exception handling: retry on timeout, handle anomalous returned layer counts, and roll back to the last confirmed version when QC fails. Fourth, rate limiting: the Volcano Ark model list shows a maximum IPM of 500 (not a hard guarantee), and layer decomposition may pre-deduct quota based on max_images, so don’t set max_images blindly high.
On rollout pacing, you can move gradually from manual operation to API orchestration: first run the thermos case by hand in Jimeng or Doubao, then wire up a single product with a script, and finally hook into a queue and asset library for batch processing. Keep the manual QC checkpoint in place permanently — whether a product’s structure is accurate can’t be judged just by whether it “looks real.”
View the full orchestration code (scene generation → editing → transparency branch → layer split & recomposition)
import requests, io, time
from PIL import Image

BASE_URL = "https://api.apiyi.com/v1"  # APIYI OpenAI-compatible endpoint
API_KEY = "YOUR_API_KEY"
MODEL = "doubao-seedream-5-5-261028"   # Refer to the platform's model list

def gen(payload: dict, retries: int = 2) -> dict:
    """Unified call with simple retry handling"""
    payload = {"model": MODEL, "response_format": "url", **payload}
    for i in range(retries + 1):
        try:
            r = requests.post(f"{BASE_URL}/images/generations",
                              headers={"Authorization": f"Bearer {API_KEY}"},
                              json=payload, timeout=180)
            r.raise_for_status()
            return r.json()
        except Exception as e:
            if i == retries:
                raise
            time.sleep(5 * (i + 1))

def persist(url: str, path: str) -> str:
    """URLs expire after 24 hours, so you must save them elsewhere (locally here; use object storage in production)"""
    with open(path, "wb") as f:
        f.write(requests.get(url, timeout=60).content)
    return path

def scene(original_url: str, prompt: str) -> str:
    res = gen({"image": original_url, "prompt": prompt, "size": "2K",
               "background": "opaque", "output_format": "png", "watermark": False})
    return res["data"][0]["url"]

def edit(prev_url: str, prompt: str) -> str:
    # Use the previous round's output as this round's input
    return scene(prev_url, prompt)

def transparent(original_url: str, prompt: str) -> str:
    res = gen({"image": original_url, "prompt": prompt,
               "background": "transparent", "output_format": "png"})
    return res["data"][0]["url"]

def decompose(poster_url: str, prompt: str, max_images: int = 15) -> list:
    # Note: layer decomposition requests must not include the background parameter
    res = gen({"image": poster_url, "prompt": prompt,
               "layer_decomposition": True,
               "layer_decomposition_options": {"max_images": max_images,
                                               "text_recognition": True}})
    return res["data"]

def recompose(layers: list, canvas_w: int, canvas_h: int, skip=()) -> Image.Image:
    """Stack layers in ascending z_index order, mapping normalized coordinates onto the new canvas"""
    canvas = Image.new("RGBA", (canvas_w, canvas_h))
    for layer in sorted(layers, key=lambda x: x["z_index"]):
        if layer.get("name") in skip:
            continue  # e.g. skip the old price layer and let the design tool redraw it
        img = Image.open(io.BytesIO(requests.get(layer["url"]).content)).convert("RGBA")
        l, t, r, b = layer["bounding_box"]["normalized"]
        x, y = int(l / 1000 * canvas_w), int(t / 1000 * canvas_h)
        w, h = int((r - l) / 1000 * canvas_w), int((b - t) / 1000 * canvas_h)
        canvas.alpha_composite(img.resize((w, h)), (x, y))
    return canvas

if __name__ == "__main__":
    original = "https://your-cdn.com/cup_original.png"
    v1 = scene(original, "使用参考图中的不锈钢保温杯作为唯一商品主体……不添加额外商品。")
    persist(v1, "cup_v1_office.png")       # Move on to the next step after manual confirmation
    v2 = edit(v1, "将办公桌背景替换为温暖的木质咖啡厅场景……确保商品始终为单个主体。")
    persist(v2, "cup_v2_cafe.png")
    persist(transparent(original, "提取参考图中的保温杯主体……背景完全透明,PNG 格式。"),
            "cup_alpha.png")
    layers = decompose("https://your-cdn.com/cup_poster.png", "将商品海报拆分为独立图层……")
    for ly in layers:
        ocr = ly.get("text_recognition")
        if ocr:
            print(ly["z_index"], ocr["text"])  # Hand off to the design tool to replace the copy
    recompose(layers, 1080, 1350).save("cup_poster_rebuilt.png")
Seedream 5.5 Product Image Automation Cost Estimate
The following estimates are based on the standard RMB unit prices in the official Volcengine Ark “Model Pricing” (updated November 12, 2026), excluding third-party platform add-on fees: input image RMB 0.05/image; output image up to 2.61 million pixels RMB 0.13/image, and 2.61 million to 4.63 million pixels RMB 0.23/image.
| Thermos mug workflow step (editorial derivation) | Calculation basis | Cost per run |
|---|---|---|
| Scene generation | 1 reference image, 2048×2048 output | 0.05 + 0.23 = RMB 0.28 |
| Each round of continuous editing | 1 input image, 2048×2048 output | RMB 0.28 |
| Transparent asset | 1 reference image, 2048×2048 output | RMB 0.28 |
| Poster layer separation | 1 input image, assuming 6 outputs all in the lower tier | 0.05 + 6×0.13 = RMB 0.83 |
| Poster layer separation (upper-limit case) | Same as above, all 6 in the higher tier | 0.05 + 6×0.23 = RMB 1.43 |
Based on “1 generation + 2 editing rounds + 1 transparent asset + 1 layer separation (lower-tier assumption),” a single product costs about RMB 1.95, with the cost of producing the poster itself counted separately. Layer separation cost grows linearly with the number of layers, which is why max_images needs to be set as needed. For reference, at official prices for single-reference-image 2K square image editing, Seedream 5.0 Pro is RMB 0.60 and 5.5 is RMB 0.28, but the input image billing rules differ between the two generations and can’t be generalized to all tasks.
Seedream 5.5 Product Image Automation FAQ
Q1: What is the Seedream 5.5 product image automation workflow?
It’s a business workflow designed in this article around the official Seedream 5.5 API capabilities: the original product photo goes through scene generation and continuous editing, then splits into two branches — transparent assets and layer decomposition — and finally an external program handles compositing, QC, and archiving. The model handles generation and decomposition; the workflow orchestration is not an official one-click feature.
Q2: What’s the difference between transparent assets and layer decomposition, and do I have to do both?
No, you don’t. Transparent assets means outputting a single subject with an alpha channel directly from the original product photo; layer decomposition means breaking a finished poster into a background plus multiple layers, and returning coordinates and OCR. Use the former when you only need the product subject, and the latter when you need to reuse the text and decorations inside the poster.
Q3: When was Seedream 5.5 released, and can I use the API now?
ByteDance officially released it on November 9, 2026. As of November 12, Volcano Ark’s model list, invocation tutorials, and billing tables already include Seedream 5.5; Jimeng, Doubao, and Doubao Work have also integrated it. Availability may differ by account, region, and third-party platform, so check your actual console.
Q4: Which product image scenarios is this workflow best suited for?
– **Product detail page scene images**: quickly produce multiple lifestyle scenes for the same product.
– **Multi-version hero images**: continuous iteration with different backgrounds and lighting.
– **Transparent subject assets**: reusable across templated detail pages and ad layouts.
– **Poster repricing and localization**: after decomposition, swap out prices or replace copy with foreign-language text.
Q5: How can I quickly test and validate this workflow through the API?
Start with a small batch to validate:
1. Register at APIYI apiyi.com and get an API key plus free trial credits;
2. Check the platform’s model list to confirm which image models are available and what parameters they support;
3. Run the thermos cup example using the sample code in this article (with `base_url` set to `https://api.apiyi.com/v1`).
Whether extended parameters like `layer_decomposition` are supported depends on the platform documentation.
Q6: What are the known limitations of Seedream 5.5 for product images?
Third-party tests show: multi-round editing can still suffer gradual color drift; the model may alter the product structure — or even change the number of subjects — to satisfy text or composition requirements; materials like transparent glass don’t always get correct alpha; and dense small text can still distort in later edits. Human QC is essential in production. If you want to compare how other models handle these steps at the same time, you can switch and test them through the unified interface at APIYI apiyi.com.
Q7: Can layer decomposition output a PSD directly?
No. Layer decomposition returns a background plus transparent PNG layers, `z_index`, `bounding_box`, and OCR info, so you need a design program or tool to read that data and reassemble it. OCR’s font matching is a similarity guess, not a faithful restoration of the original font.
Q8: The docs say it supports 100 consecutive edits — can I chain them indefinitely in production?
Not recommended. The 100 rounds are an official demo case; each round is an independent invocation and doesn’t mean any image can achieve the same results. Segmind’s 12-round test already showed a slight drop in overall brightness. We recommend setting a cap on the number of rounds and re-editing from a confirmed version.
Seedream 5.5 Product Image Automation: Key Takeaways
- Clear division across four steps: Scene generation produces the key visual; continuous editing handles modifications; transparency and layer separation handle asset reuse.
- Two independent branches: Transparent assets come from the original product image; layer separation only targets the complete poster and is invoked as needed.
- Use opaque for the editing chain: The official recommendation is RGB continuous editing with
background:"opaque". - Layer separation doesn’t take a background: It accepts only 1 PNG/JPEG and is billed by the actual number of outputs.
- Field-driven recomposition: Stack in ascending
z_indexorder and use normalized coordinates to fit the new canvas. - Persistence and quality checks are essential: URLs expire after 24 hours, and the product structure must be manually reviewed.
- Validate with a small batch first: You can use APIYI (apiyi.com) to test prompts and response structures with a small batch of product images.
Summary: Moving Seedream 5.5 Product Images from One-Off Creation to Asset Production
Getting back to the goal of delivering product images, here’s how Seedream 5.5’s four capabilities divide the work:
- Scene generation determines the quality of the hero visual: reference image plus tightly constrained prompt, locking down product shape, logo, and count.
- Sequential editing determines editing stability: feed the previous round’s output into the next round as input, describe only what changes, and start from a confirmed version.
- Transparent assets and layer separation determine reusability: one saves you the cutout work, the other turns a flat poster back into reassemblable data.
- Orchestration and QA determine controllable cost: bill by actual output, set round and
max_imageslimits, and keep three versions.
The model is just one production unit in the pipeline — asset management, compositing, and QA still have to be handled by your own system. I’d suggest taking one real product and running all four stages manually first, then gradually moving to API orchestration. To validate results quickly, try APIYI (apiyi.com) — the platform offers an OpenAI-compatible interface and free credits for new users, making it easy to run small-scale testing before going live.
📚 References
- Seedream 5.5 official launch announcement: core upgrades, official examples, and benchmarks
- Link:
seed.bytedance.com/zh/blog/more-realistic-images-more-stable-editing-across-100-rounds-introducing-seedream-5-5 -
Note: source of the official demos for 100-round editing, transparent assets, and layer separation
-
Volcano Ark Seedream 5.5 official tutorial: parameters, invocation examples, and sample asset pack
- Link:
console.volcengine.com/ark/region:cn-beijing/docs/seedream-5-5 -
Note: configuration details for multi-round editing, transparent output, layer splitting, and OCR
-
Volcano Ark image generation API: request fields and response structure
- Link:
console.volcengine.com/ark/region:cn-beijing/docs/image-generation-api -
Note: definitions of fields such as
z_index,bounding_box, andtext_recognition -
Volcano Ark model pricing: RMB billing rules (updated November 12, 2026)
- Link:
console.volcengine.com/ark/region:cn-beijing/docs/model-pricing -
Note: the pricing basis for the cost estimates in this article
-
Segmind technical blog: hands-on testing of 36 billed generations and 12 editing rounds
- Link:
blog.segmind.com/seedream-5-5-is-here-edit-in-rounds-transparent-pngs-and-layers/ -
Note: third-party observations on color drift, transparent materials, and changes to product structure
-
Xinghai Intelligence Bureau hands-on test: commercial design scenario testing
- Link:
eet-china.com/mp/a538489.html -
Note: real-world feedback on e-commerce color changes, transparent PNGs, and text issues
-
SeedRouter model page: observations on API invocation latency
- Link:
seedrouter.ai/zh/models/seedream-5-5 - Note: reference end-to-end latency for different outputs and layer-splitting tasks
Author: APIYI Technical Team
Technical discussion: Feel free to contact us via the APIYI website homepage; more integration docs are available at docs.apiyi.com