As an open-source image and video generation tool, ComfyUI has become the go-to platform for AI creators. With the release of Google's Nano Banana Pro image model and OpenAI's Sora-2 video model, many users are asking a key question: Can these cutting-edge models be integrated into ComfyUI? And what's the simplest way to configure them?
This article dives into these questions, providing a complete integration guide ranging from official nodes to third-party API platforms. We'll help you quickly leverage the power of Nano Banana Pro and Sora-2 within your ComfyUI workflows.
1. Three Ways to Connect Nano Banana Pro API to ComfyUI
Nano Banana Pro is a flagship image generation model released by Google DeepMind, supporting 4K resolution, multilingual text rendering, and high-fidelity character consistency. Based on official documentation and community practices, there are three main ways to connect it to ComfyUI:
1.1 Official ComfyUI Partner Nodes (Recommended for Beginners)
This is the easiest integration method and doesn't require installing any extra plugins. ComfyUI has already integrated Nano Banana Pro as native API nodes.
Steps:
# Step 1: Update ComfyUI to the nightly version
cd ComfyUI
git pull origin main
python main.py

# Step 2: Inside the ComfyUI interface:
# 1. Double-click the empty canvas
# 2. Search for the "Google Gemini Image" node
# 3. Drag it into your workflow
Node Configuration Parameters:
| Parameter | Required | Description | Example |
|---|---|---|---|
api_key |
✅ | Google AI Studio API Key | AIzaSyC... |
prompt |
✅ | Text prompt | "A futuristic city at sunset" |
mode |
✅ | Generation mode | generate / edit / style_transfer |
resolution |
❌ | Output resolution | 1024x1024 / 1280x720 |
aspect_ratio |
❌ | Aspect ratio | 16:9 / 4:3 / 1:1 |
Pros: Works out of the box; no server or proxy configuration needed.
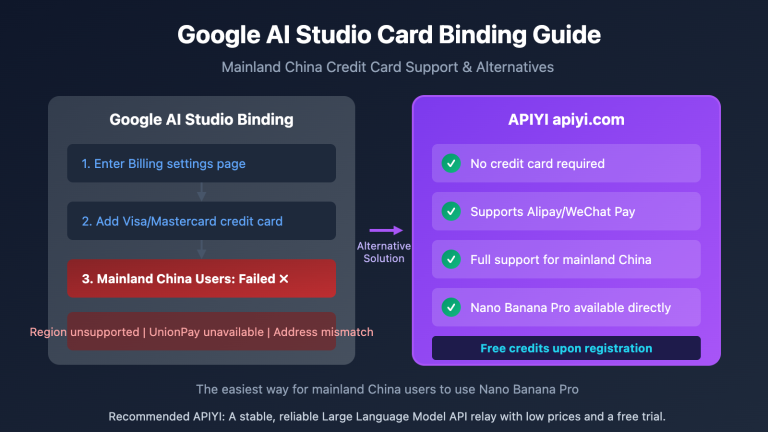
Cons: Requires a Google AI Studio API key, which might be restricted in some regions.
🎯 Pro-tip: For individual users and small-scale testing, we recommend the official Partner Nodes. If you need more stable, enterprise-grade service, you can get high-availability API access through the APIYI (apiyi.com) platform. It uses the native Google format, so you can swap out the official API without changing any code while reducing costs by 80%.
1.2 Custom Nodes (Best for Advanced Users)
The GitHub community offers an open-source "ComfyUI-NanoBanano" custom node set that supports more advanced features.
Installation Steps:
# Navigate to the ComfyUI custom nodes directory
cd ComfyUI/custom_nodes

# Clone the repository
git clone https://github.com/ShmuelRonen/ComfyUI-NanoBanano.git

# Install dependencies
cd ComfyUI-NanoBanano
pip install -r requirements.txt

# Restart ComfyUI
Supported Operation Modes:
| Mode | Description | Use Case |
|---|---|---|
generate |
Text-to-image | Creating entirely new images from scratch |
edit |
Image editing | Modifying specific parts of an existing image |
style_transfer |
Style transfer | Applying one image's style to another |
object_insertion |
Object insertion | Precisely inserting new elements into an image |
Pros: More feature-rich; supports multimodal operations.
Cons: Requires manual maintenance and plugin updates.
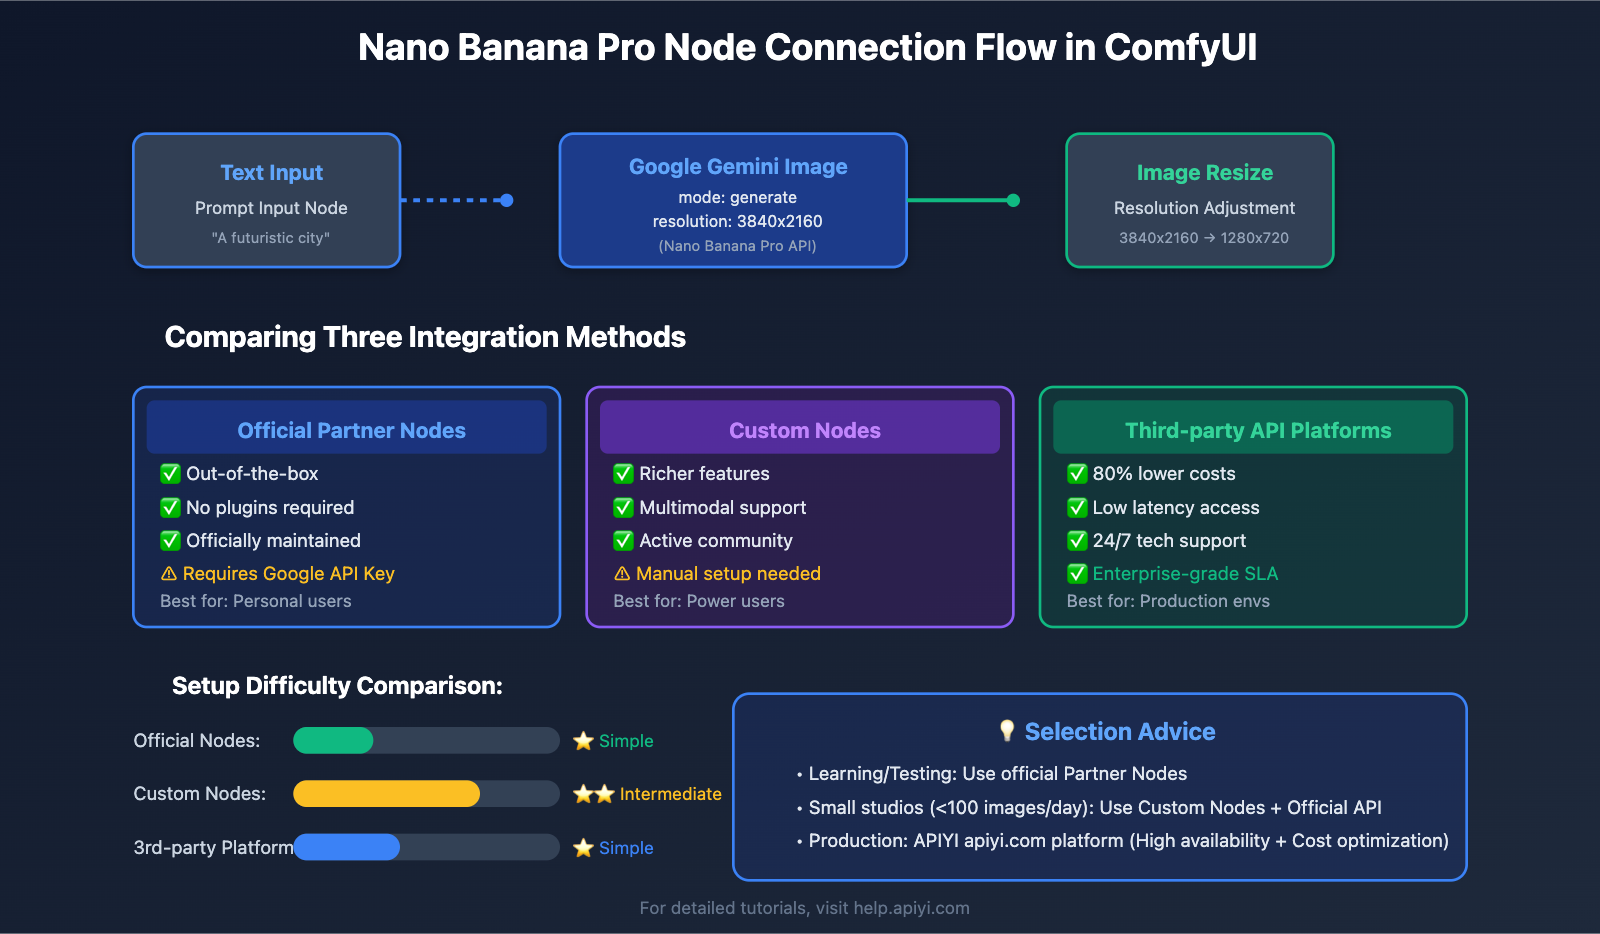
1.3 Third-party API Platforms (Enterprise-grade Solution)
For enterprise users requiring high concurrency, low latency, and cost optimization, third-party API platforms offer a better way forward.
Core Advantage Comparison:
| Dimension | Official Google API | Third-party Platform (e.g., APIYI) |
|---|---|---|
| API Format | Native Google AI Studio | Fully compatible with Google native format |
| Code Migration | N/A | Just swap two lines of code |
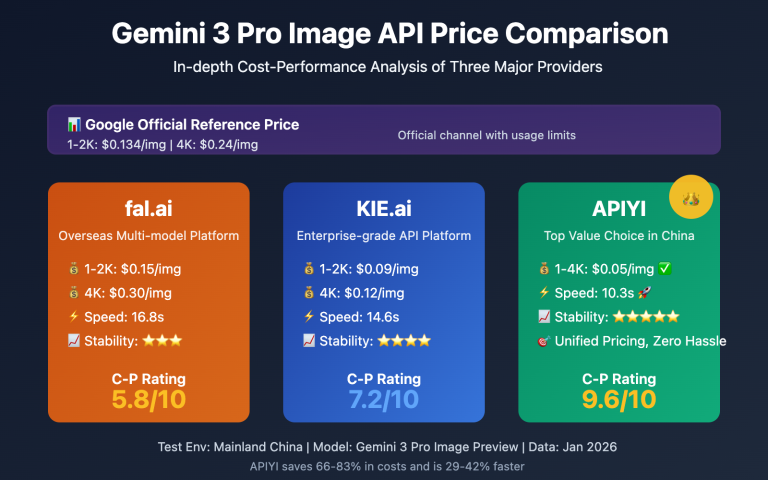
| Cost | Standard pricing | Approx. 80% lower |
| Availability | Dependent on Google servers | Low-latency local access, 99.9% SLA |
| Tech Support | Community-based | 24/7 dedicated technical team |
Configuration Example (using APIYI as an example):
# Original Google Official Config
api_endpoint = "https://generativelanguage.googleapis.com/v1beta/models/gemini-2.0-flash-exp:generateImage"
api_key = "YOUR_GOOGLE_API_KEY"

# Switching to the APIYI platform (only change these two lines)
api_endpoint = "https://api.apiyi.com/v1/models/gemini-2.0-flash-exp:generateImage"
api_key = "YOUR_APIYI_API_KEY"  # Get this from apiyi.com
🎯 Enterprise Recommendation: If your team needs to process image generation tasks in bulk within ComfyUI, we recommend using the APIYI (apiyi.com) platform to access the Nano Banana Pro API. It provides dedicated acceleration channels and a pay-as-you-go model, making it ideal for production environments processing over 1,000 images per day.
2. Sora-2 Video Model Integration in ComfyUI: Feasibility Analysis and Configuration
Addressing the core question from users: "Is it possible to use this video model in comfyUI?" The answer is yes, but you'll need to access it via API nodes.
2.1 Technical Principles of Sora-2 Integration with ComfyUI
Sora-2 is the second-generation video generation model released by OpenAI. Unlike image models, Sora-2 cannot be deployed locally like Stable Diffusion. Accessing it within ComfyUI requires one of the following two paths:
| Access Method | Technical Implementation | Resource Requirements | Feasibility |
|---|---|---|---|
| Local Model Loading | Download weight files to run locally | GPU VRAM > 80GB | ❌ Not feasible (OpenAI is not open-source) |
| API Node Call | Call remote API via HTTP requests | Only requires internet and an API key | ✅ Feasible (Official Recommendation) |
| Open-Source Alternatives | Use models like Open-Sora | GPU VRAM ≥ 16GB | ✅ Feasible (Limited functionality) |
Conclusion: Sora-2 must be accessed via API nodes in ComfyUI; local model deployment isn't supported.
2.2 Official Sora-2 API Nodes Configuration Tutorial
ComfyUI has officially released Sora-2 Partner Nodes, supporting both text-to-video (t2v) and image-to-video (i2v) modes.
Installation Steps:
# Step 1: Ensure ComfyUI version ≥ v0.2.6
cd ComfyUI
git pull origin main

# Step 2: Add Sora-2 nodes to your workflow
# 1. Double-click the empty canvas
# 2. Search for "OpenAI Sora" or "Sora-2-i2v"
# 3. Connect input nodes (text prompt or reference image)
Sora-2 Pro Node Parameter Configuration:
| Parameter Name | Data Type | Description | Recommended Value |
|---|---|---|---|
prompt |
String | Video description prompt | "A drone shot of a coastal city" |
resolution |
Enum | Video resolution | 1280x720 / 720x1280 |
duration |
Integer | Video duration (seconds) | 5-20 seconds |
input_image |
Image | Reference image (for i2v mode) | Must exactly match resolution |
api_key |
String | OpenAI API Key | sk-proj-... |
Important Notes:
- ⚠️ Resolution Matching: In image-to-video mode, your input image must exactly match the selected video resolution, or you'll get an error.
- ⚠️ Cost Control: Sora-2 Pro is billed by the second; a 20-second video costs roughly $0.50-$1.00 USD.
- ⚠️ API Quota: OpenAI has daily call limits for new accounts; you'll need to apply for a quota increase in advance.
{{SVG_TEXT_0}}: Sora-2 Cost Comparison Analysis
{{SVG_TEXT_1}}: Estimated Costs by Resolution and Duration (USD)
{{SVG_TEXT_2}}: Configuration Plan
{{SVG_TEXT_3}}: Resolution
{{SVG_TEXT_4}}: Duration
{{SVG_TEXT_5}}: Official API
{{SVG_TEXT_6}}: APIYI Platform
{{SVG_TEXT_7}}: Sora-2 Standard
{{SVG_TEXT_8}}: Save 40%
{{SVG_TEXT_9}}: Sora-2 Standard
{{SVG_TEXT_10}}: Save 40%
{{SVG_TEXT_11}}: Sora-2 Pro
{{SVG_TEXT_12}}: Save 37.5%
{{SVG_TEXT_13}}: Sora-2 Pro
{{SVG_TEXT_14}}: Save 37.5%
{{SVG_TEXT_15}}: 💰 Cost Optimization Strategies
{{SVG_TEXT_16}}: • Shorten video duration (20s→10s) = 50% savings
{{SVG_TEXT_17}}: • Lower resolution (1792→1280) = 30% savings
{{SVG_TEXT_18}}: • Use APIYI Platform = Extra 35-40% savings
{{SVG_TEXT_19}}: 🎯 Enterprise Plan Advantages
{{SVG_TEXT_20}}: • Tiered Pricing: $500+/mo consumption enjoys a 45% discount
{{SVG_TEXT_21}}: • Dedicated Channel: High concurrency and no rate limits guaranteed
{{SVG_TEXT_22}}: • Tech Support: 24/7 support from dedicated engineers
{{SVG_TEXT_23}}: Visit apiyi.com to register; new users get a $20 free credit | Supports unified access for Nano Banana Pro + Sora-2
2.3 Third-Party Sora-2 API Nodes (Siray Solution)
In addition to the official nodes, the community provides an enhanced version called Sora-2 Custom Nodes.
Siray OpenAI Sora-2-i2v Node Features:
# Install Siray custom nodes
cd ComfyUI/custom_nodes
git clone https://github.com/siray-comfyui/openai-sora-2.git
pip install -r openai-sora-2/requirements.txt
Enhanced Features:
| Feature Module | Official Node | Siray Node | Advantage Description |
|---|---|---|---|
| Batch Video Generation | ❌ | ✅ | Supports automatic queue processing |
| Synchronized Audio Generation | ❌ | ✅ | Can generate background music simultaneously |
| Progress Bar Display | ❌ | ✅ | Real-time display of generation progress |
| Local Caching | ❌ | ✅ | Reduces redundant API calls |
🎯 Workflow Advice: For teams needing to generate large volumes of marketing videos, we recommend building an automated workflow by combining ComfyUI's preprocessing nodes with the Sora-2 API. You can get a more stable Sora-2 API interface through the APIYI (apiyi.com) platform. It's especially suited for batch video generation, offering dedicated queue management and cost optimization solutions.
3. Nano Banana Pro and Sora-2 Hybrid Workflow Best Practices
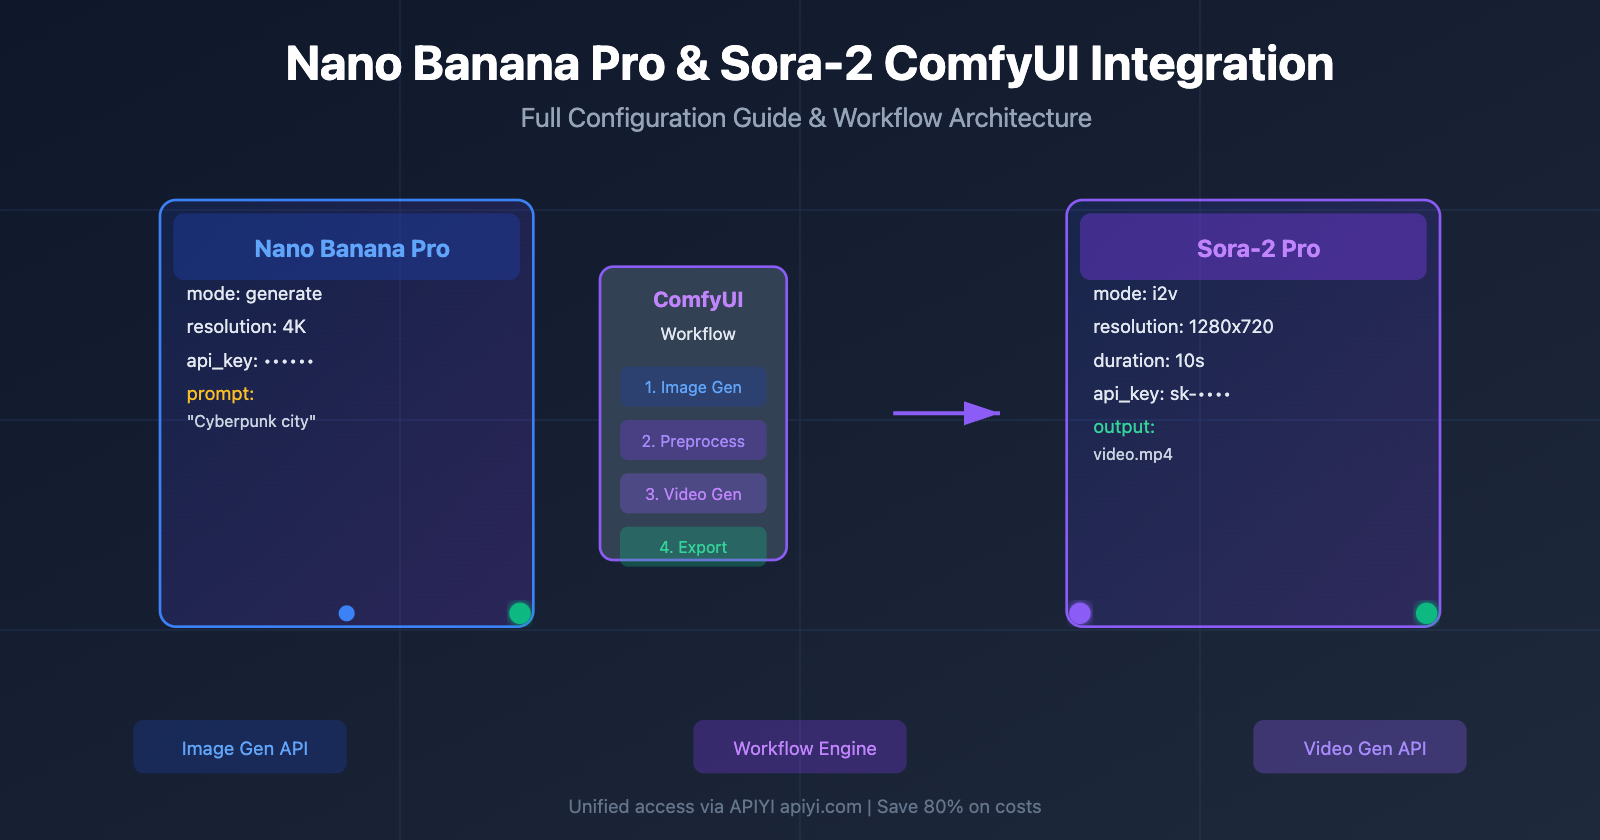
The real power of ComfyUI lies in its ability to chain multiple AI models together into complex workflows. Here's what a typical Image-to-Video creation process looks like:
3.1 Hybrid Workflow Architecture Design
Workflow Diagram:
[文本提示词]
    ↓
[Nano Banana Pro 节点] → 生成高质量封面图像 (4K)
    ↓
[图像预处理节点] → 调整分辨率到 1280x720
    ↓
[Sora-2 i2v 节点] → 将图像转为 10 秒视频
    ↓
[视频后处理节点] → 添加转场和音效
    ↓
[最终输出] → MP4 视频文件
Node Configuration Example:
| Workflow Phase | Model Used | Key Parameters | Processing Time |
|---|---|---|---|
| 1. Image Generation | Nano Banana Pro | resolution=3840x2160, mode=generate |
8-15s |
| 2. Resolution Adjustment | Built-in ComfyUI | target_size=1280x720, resize_mode=crop |
< 1s |
| 3. Video Generation | Sora-2 Pro | duration=10, motion_intensity=medium |
60-120s |
| 4. Video Export | FFmpeg Node | codec=h264, bitrate=5000k |
5-10s |
3.2 Actual Workflow Code Example
Minimal ComfyUI Workflow JSON (Core Nodes):
{
  "nodes": [
    {
      "id": 1,
      "type": "TextInput",
      "properties": {
        "text": "A cyberpunk city with neon lights and flying cars"
      }
    },
    {
      "id": 2,
      "type": "GoogleGeminiImage",
      "properties": {
        "api_key": "YOUR_API_KEY",
        "prompt": "@1.text",
        "resolution": "3840x2160"
      }
    },
    {
      "id": 3,
      "type": "ImageResize",
      "properties": {
        "input": "@2.output",
        "target_size": "1280x720"
      }
    },
    {
      "id": 4,
      "type": "OpenAISora2",
      "properties": {
        "api_key": "YOUR_OPENAI_KEY",
        "input_image": "@3.output",
        "duration": 10
      }
    }
  ]
}
Click to expand full workflow configuration (includes advanced parameters)
{
  "version": "1.0",
  "workflow_name": "Nano_Banana_to_Sora2_Video",
  "nodes": [
    {
      "id": 1,
      "type": "TextInput",
      "properties": {
        "text": "A cyberpunk city with neon lights and flying cars",
        "negative_prompt": "blurry, low quality, distorted"
      }
    },
    {
      "id": 2,
      "type": "GoogleGeminiImage",
      "properties": {
        "api_key": "YOUR_API_KEY",
        "api_endpoint": "https://api.apiyi.com/v1/models/gemini-2.0-flash-exp:generateImage",
        "prompt": "@1.text",
        "negative_prompt": "@1.negative_prompt",
        "resolution": "3840x2160",
        "aspect_ratio": "16:9",
        "guidance_scale": 7.5,
        "num_inference_steps": 30
      }
    },
    {
      "id": 3,
      "type": "ImageResize",
      "properties": {
        "input": "@2.output",
        "target_size": "1280x720",
        "resize_mode": "crop_center",
        "interpolation": "lanczos"
      }
    },
    {
      "id": 4,
      "type": "OpenAISora2Pro",
      "properties": {
        "api_key": "YOUR_OPENAI_KEY",
        "input_image": "@3.output",
        "prompt": "@1.text",
        "duration": 10,
        "resolution": "1280x720",
        "motion_intensity": "medium",
        "camera_motion": "pan_right",
        "frame_rate": 30
      }
    },
    {
      "id": 5,
      "type": "VideoExport",
      "properties": {
        "input": "@4.output",
        "format": "mp4",
        "codec": "h264",
        "bitrate": "5000k",
        "output_path": "./outputs/final_video.mp4"
      }
    }
  ],
  "connections": [
    {"from": 1, "to": 2, "type": "text"},
    {"from": 2, "to": 3, "type": "image"},
    {"from": 3, "to": 4, "type": "image"},
    {"from": 4, "to": 5, "type": "video"}
  ]
}
🎯 Performance Optimization Tip: When handling batch tasks, it's a good idea to separate the Nano Banana Pro and Sora-2 API calls into different queues. By using the load balancing features of the APIYI (apiyi.com) platform, you can process image and video generation in parallel, boosting overall workflow efficiency by about 40%.
4. Frequently Asked Questions (FAQ)
Q1: Can Nano Banana Pro and Sora-2 be run entirely locally?
Nano Banana Pro: ❌ Local deployment isn't supported; it must be accessed via API calls.
Sora-2: ❌ Local deployment isn't supported; OpenAI hasn't open-sourced the model weights.
Alternatives: You can use open-source models like Stable Diffusion (for images) and Open-Sora (for video) to run things locally.
Q2: How can I reduce Sora-2 API call costs?
| Optimization Strategy | Cost Reduction | Implementation Difficulty |
|---|---|---|
| Shorten video duration (10s → 5s) | 50% | ⭐ Simple |
| Use lower resolution (720p → 480p) | 30% | ⭐ Simple |
| Batch calling for discounts | 15-20% | ⭐⭐ Medium |
| Use third-party API platforms | 20-40% | ⭐⭐ Medium |
🎯 Cost Management Tip: For users spending over $500/month, we recommend ordering an enterprise package through the APIYI (apiyi.com) platform. The platform offers tiered pricing and prepaid discounts, while also supporting unified billing for both Nano Banana Pro and Sora-2, simplifying your financial process.
Q3: Is the video resolution generated by Sora-2 limited in ComfyUI?
Sora-2 Standard:
- ✅ Supported: 720×1280, 1280×720
- ❌ Not Supported: 1080p, 4K
Sora-2 Pro:
- ✅ Supported: 720×1280, 1280×720, 1024×1792, 1792×1024
- ❌ Not Supported: Custom resolutions
Solution: Use super-resolution nodes in ComfyUI (like ESRGAN) to upscale 720p video to 1080p or 4K.
Q4: How do I automatically pass images from Nano Banana Pro to Sora-2?
When setting up your ComfyUI workflow, keep these key points in mind:
# 错误示例:直接连接会导致分辨率不匹配
[Nano Banana Pro] → [Sora-2 i2v]  # ❌ 可能报错

# 正确示例:中间加入分辨率转换节点
[Nano Banana Pro] → [Image Resize] → [Sora-2 i2v]  # ✅ 推荐
Resolution Matching Table:
| Nano Banana Pro Output | Needs Adjustment | Sora-2 Input Requirements |
|---|---|---|
| 3840×2160 (4K) | ✅ Resize | 1280×720 |
| 1920×1080 (1080p) | ✅ Crop+Resize | 1280×720 |
| 1280×720 (720p) | ❌ Use directly | 1280×720 |
Q5: Which ComfyUI versions support these new models?
| Model | Minimum ComfyUI Version | Recommended Version | How to Get |
|---|---|---|---|
| Nano Banana Pro (Official Node) | v0.2.3 | v0.2.7+ (nightly) | git pull origin main |
| Sora-2 (Official Node) | v0.2.6 | v0.2.8+ (nightly) | Same as above |
| Custom Nodes | No restriction | Latest stable version | Manual plugin installation |
5. Summary and Recommendations
5.1 Quick Recap of Key Questions
Q: What's the simplest way to connect the Nano Banana Pro API to ComfyUI?
A: Just use the official Partner Nodes. It only takes three steps:
- Update ComfyUI to the nightly version.
- Search for and add the "Google Gemini Image" node.
- Enter your API key and prompt, and you're all set.
Q: Can I use the Sora-2 video model in ComfyUI?
A: Yes, but you must use API nodes. Local model deployment isn't supported. Both official and third-party developers provide ready-to-use Sora-2 Custom Nodes.
5.2 Recommendations for Different Scenarios
| Use Case | Recommended Solution | Why? |
|---|---|---|
| Personal Learning/Testing | Official Partner Nodes | Free credits, simple setup |
| Small Studios (<100 images/day) | Custom Nodes + Official API | Feature-rich, manageable costs |
| Enterprise Production | Third-party API Platform (e.g., APIYI) | High availability, cost optimization, technical support |
| Offline/Private Deployment | Open Source Alternatives (Stable Diffusion + Open-Sora) | Data security, no internet required |
🎯 Pro Tip: For users who need to use both Nano Banana Pro and Sora-2 simultaneously, we recommend using the APIYI (apiyi.com) platform for unified API management. It allows you to access both models with a single API Key, simplifying key management while providing a unified monitoring dashboard and cost analysis tools. Head over to apiyi.com to register—new users get $20 in free credits to test out their workflows.
5.3 Further Learning Resources
Official Documentation:
- ComfyUI Official Docs: docs.comfy.org/tutorials/partner-nodes
- Nano Banana Pro API Reference: ai.google.dev/gemini-api
- Sora-2 API Documentation: platform.openai.com/docs/guides/sora
Community Resources:
- ComfyUI Workflow Sharing: comfyui.org/workflows
- GitHub Custom Nodes Collection: github.com/ComfyUI-Workflow/awesome-comfyui
Video Tutorials:
- "Complete Guide to Nano Banana Pro in ComfyUI" – YouTube
- "Practical Demo: Sora-2 API Nodes" – Bilibili
Through the detailed explanations in this guide, you should now have a solid handle on how to integrate Nano Banana Pro and Sora-2 into ComfyUI. Whether you choose the simplicity of official nodes, the flexibility of custom nodes, or the enterprise-grade service of a third-party platform, you can pick the path that best fits your actual needs.
Now, fire up ComfyUI and start your AI creative journey!
Recommended Reading:
- Advanced ComfyUI: Building Automated Video Generation Workflows
- Nano Banana Pro vs. Midjourney: A Comparison of Enterprise Image Generation Models
- Sora-2 API Cost Optimization: How to Cut Video Generation Fees by 70%