Claude doesn’t “draw” videos, but it’s becoming one of the best models at “writing” them. Over the past few months, overseas developer communities have produced a growing number of examples: give Claude Code a single prompt, and ten minutes later, you have an MP4 with animation, voice-over, and subtitles. Since the release of Claude Opus 5.5 on September 22, the quality of these workflows has taken another step forward. This article explains how Claude Opus 5.5 generates videos with code, the four core stages involved, and a practical toolchain, so you can understand how the whole process works.
Core value: By the end of this article, you’ll understand the underlying logic of “code as video,” know which tools handle SVG assets, audio, animation, and subtitles, and be able to assess whether your business is a good fit for using the Claude Opus API to produce videos in batches.
Key Takeaways: Generating Videos with Code Using Claude Opus 5.5
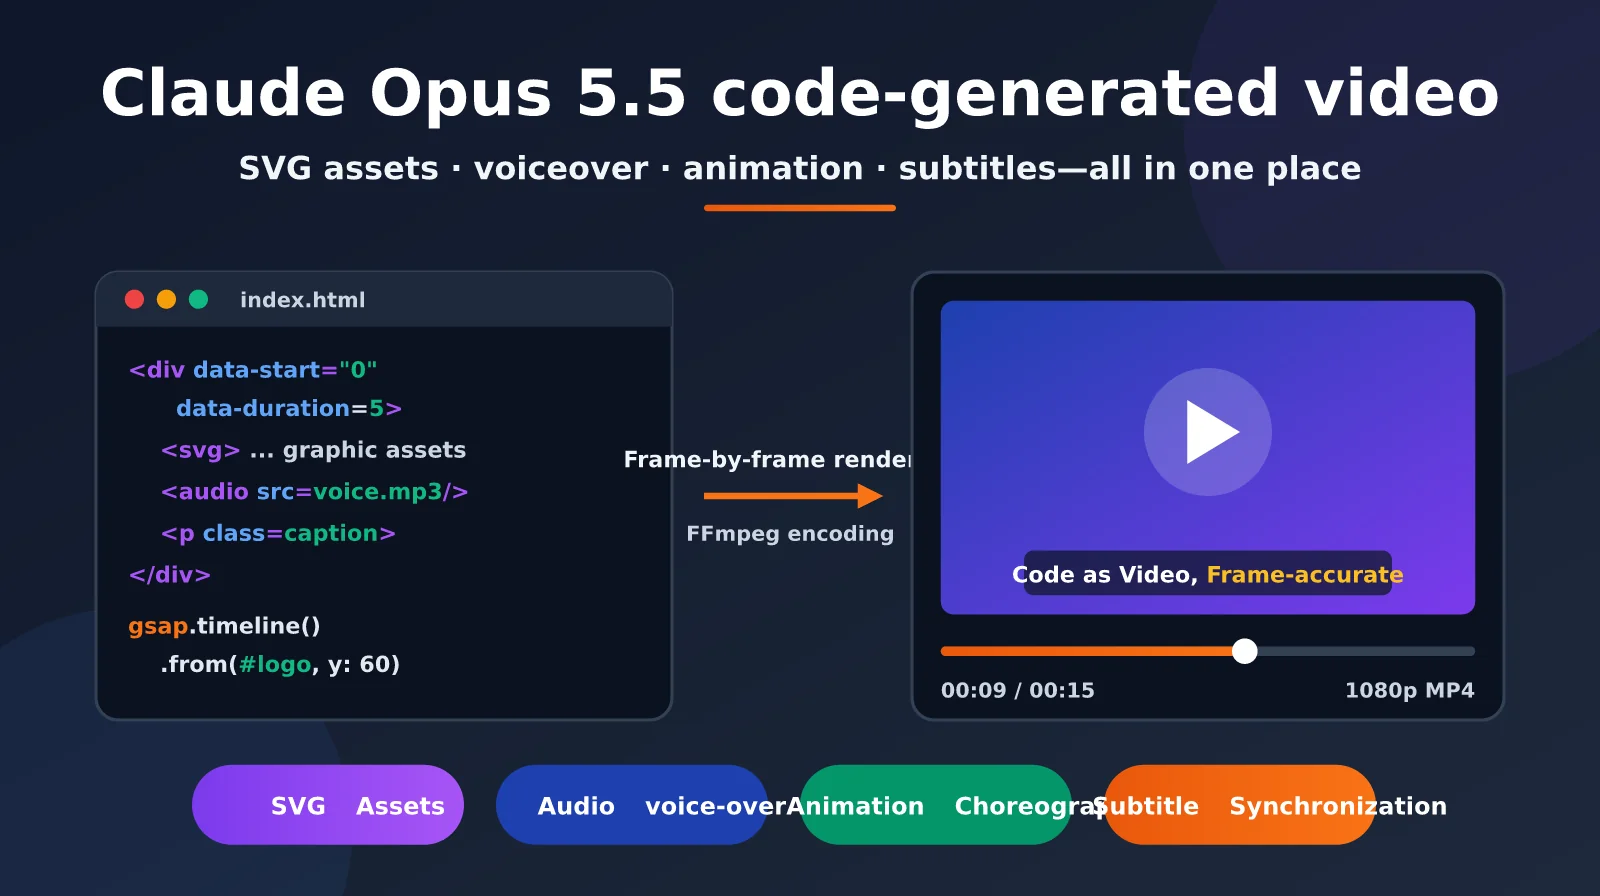
Let’s first clear up a common misconception: Claude Opus 5.5 isn’t a video generation model like Sora or Veo, and it doesn’t output pixels directly. Instead, it writes “video source code,” usually an HTML page or a set of React components. A rendering engine then takes frame-by-frame screenshots in a headless browser and uses FFmpeg to encode them into an MP4. In other words, a video becomes a frontend project that can be version-controlled and revised repeatedly.
This approach has one advantage that AI diffusion models struggle to match: determinism. No matter how many times you render the same code, the result is identical. Text stays sharp, icons don’t become distorted, and timing is accurate down to the frame. As one overseas creator who used Opus to make a promotional video put it, the UI is pixel-perfect, timing is frame-accurate, and every change only requires re-rendering rather than editing the video again.
| Dimension | Code-generated video (Claude) | Diffusion-generated video (Sora/Veo-style) |
|---|---|---|
| Output method | Writes HTML/React code, then renders it frame by frame in a browser | Generates pixel frames directly |
| Text and charts | Pixel-perfect and 100% accurate | May contain typos and distortions |
| Controllability | Can be adjusted frame by frame; simply re-render to apply changes | Changes require generating a new result |
| Best suited for | Explainer animations, product demos, data visualizations, and subtitled short videos | Real-world scenes, people, and cinematic shots |
| Cost per generation | Model tokens plus local rendering; nearly negligible | Charged by the second; relatively expensive |
Why Claude Opus 5.5
Writing a video with code is essentially a long-chain Agent task: write the script, design the storyboard, build the components, configure the voice-over, render the video, inspect the frames, and then make revisions. According to Anthropic, Opus 5.5 is the strongest model in the Opus family for Agent capabilities. It offers a 1M-token context window and up to 128K output tokens. Anthropic also describes it as “the best Opus yet” for visual understanding, with the ability to interpret screenshots and charts with high fidelity. This means it can not only write animation code, but also understand the frames it has rendered, identify issues such as text overflow and overlapping elements, and fix them on its own.
In terms of pricing, Opus 5.5 costs $4 per million input tokens and $20 per million output tokens, while cached reads cost just $0.20. Anthropic says typical workloads are approximately 40% cheaper than with Opus 5. Video projects often need to repeatedly read the same component code and design specifications, so the lower caching price is especially useful for these scenarios.
🎯 Technical tip: If you want to try Opus 5.5’s ability to write video code, you can call
claude-opus-5-5directly through APIYI apiyi.com. The platform already supports the full Claude model lineup and uses an OpenAI-compatible interface, making it easy to switch and test within an existing project.
The Four Key Stages of Claude Opus 5.5 Code-Generated Video
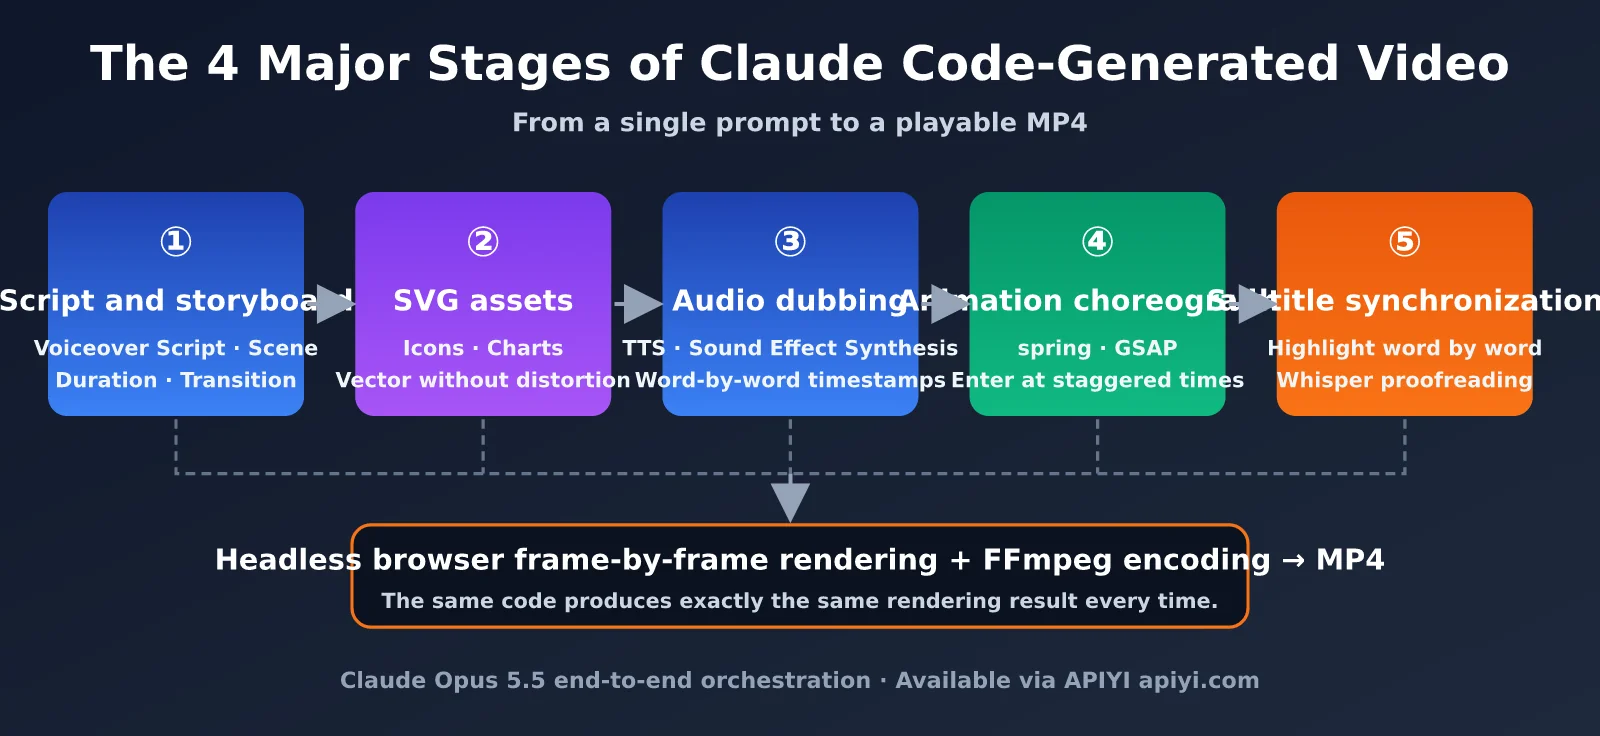
A complete video consists of four layers: visual assets, sound, motion, and text. In a “code as video” workflow, Claude can handle all four in one place through code or tool calls—though each stage is implemented differently.
Stage 1: Generating Visual Assets with SVG
Graphic assets are where Claude shines. Since SVG is XML text, it can directly write icons, flowcharts, axes, logo animations, and character silhouettes. These assets scale without losing quality, making them ideal for 1080p and even 4K output. Compared with searching stock libraries, Claude-generated SVG can strictly follow your brand colors and fonts. Every element can have an ID, so later animations can target individual paths precisely.
For photorealistic assets, Claude takes an “invoke rather than generate” approach. In an Agent workflow, it can call an image model to create background images or read product screenshots you provide, then use code to add Ken Burns pans and zooms, masks, and annotations. HyperFrames even provides a dedicated /media-use skill for parsing and orchestrating image, icon, and audio assets.
Stage 2: Audio and Voiceover
Claude doesn’t produce audio itself, but it handles the audio orchestration. Here are three common approaches:
- TTS voiceover: Claude writes the narration script, calls a text-to-speech service such as ElevenLabs to generate the voiceover, and retrieves word-level timestamps at the same time.
- Code-synthesized sound effects: Clicks, transition swooshes, and notification sounds can be synthesized directly with the Web Audio API—no audio files required.
- Background music orchestration: Licensed music is added to the project as an asset, while code controls fade-ins, fade-outs, volume envelopes, and ducking—automatically lowering the BGM when speech begins.
The open-source project claude-explains is a typical example. It supports multiple TTS engines, including gtts, espeak-ng, and supertonic. Claude embeds voice cue points into HTML scenes, allowing an animation to trigger exactly at the millisecond a specific word is spoken.
Stage 3: Animation Orchestration
Animation is the biggest difference between “video written in code” and a standard PowerPoint presentation. In Remotion, every frame is a React render. Claude uses useCurrentFrame() to read the current frame number, then uses spring() and interpolate() to calculate each element’s position, opacity, and scale. In HyperFrames, Claude can directly build timelines with GSAP, CSS animations, Lottie, or Three.js. The framework takes over all browser timing APIs to ensure animations remain perfectly synchronized during frame-by-frame rendering.
Great animation isn’t just about making things move—it needs rhythm, too. Remotion’s official Agent Skills include 28 modular rule files that teach the model best practices for spring parameters, staggered entrances, transitions, subtitles, and more. With these Skills installed, Opus 5.5 can produce animation that’s already close to the standard of a professional motion designer.
Stage 4: Subtitle Synchronization
Subtitles can come from two sources. The first is “script first, audio second”: Claude writes the narration script, the TTS service returns word-level timestamps, and Claude directly generates dynamic subtitles with word-by-word highlighting—the most common style on short-form video platforms. The second is “audio first, script second”: for existing spoken footage, Claude Code can call Whisper to transcribe it into SRT, perform another pass to verify brand names and correct typos, then burn the subtitles into the video or export them as a subtitle file.
| Stage | What Claude Handles | Common Tools | Automation Level |
|---|---|---|---|
| SVG assets | Directly writes SVG graphics, icons, and charts | Native SVG, image model invocation | High |
| Audio and voiceover | Writes narration, calls TTS, synthesizes sound effects with code | ElevenLabs, gtts, Web Audio | Medium-high |
| Animation orchestration | Writes timelines, spring animations, and transitions | Remotion, HyperFrames, GSAP | High |
| Subtitle synchronization | Generates dynamic subtitles from timestamps and proofreads them | TTS timestamps, Whisper | High |
| Rendering and output | Calls the CLI to render and validates output with frame captures | Headless Chrome, FFmpeg | High |
Mainstream Frameworks for Code-Generated Video with Claude Opus 5.5
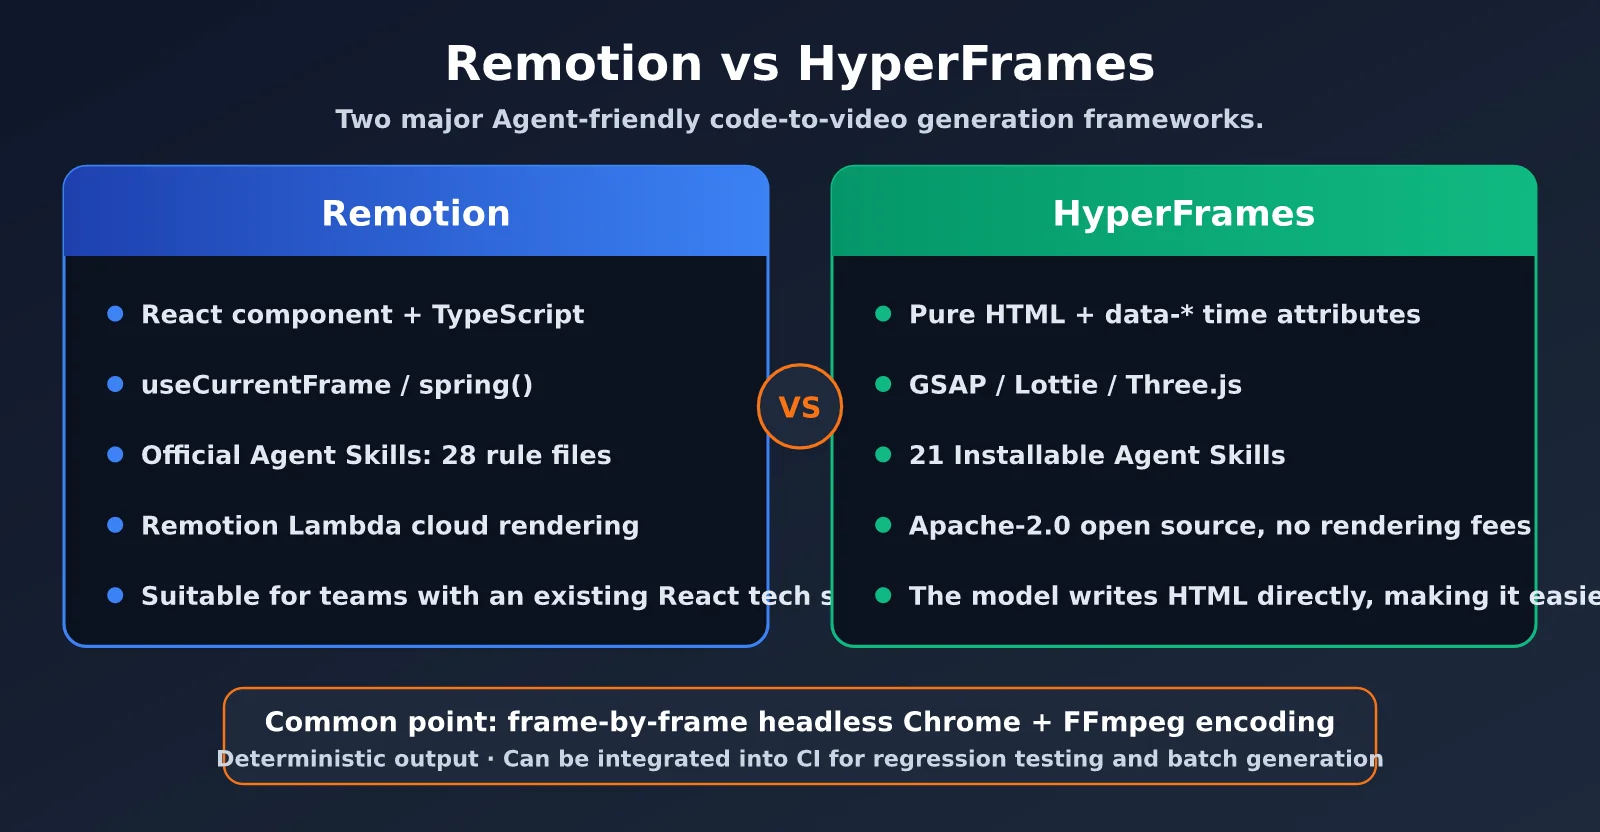
The two most popular approaches in overseas communities today are Remotion and HyperFrames. Both are specifically optimized for AI Agents. Remotion is built on React and has a mature ecosystem, making it a good fit for frontend teams. HyperFrames was open-sourced by HeyGen in 2026 under the Apache-2.0 license. It lets you write plain HTML directly, which is more model-friendly.
| Comparison | Remotion | HyperFrames |
|---|---|---|
| Authoring | React components + TypeScript | Plain HTML + timing attributes such as data-start |
| Animation | spring(), interpolate() |
GSAP, CSS, Lottie, Three.js, and more |
| Agent support | Official Agent Skills (28 rule files) | 21 installable Skills |
| Quick start | npx create-video + npx remotion skills add |
npx hyperframes init |
| License | Free for individuals and small teams; larger companies need a commercial license | Apache-2.0, with no rendering fees |
| Best for | Teams that already use React | Users who want a lightweight solution and want the model to write HTML directly |
The core principle behind both frameworks is nearly identical: run headless Chrome, “scrub” the timeline frame by frame, and capture screenshots before passing them to FFmpeg for encoding. As a result, the same input always produces the same video. This means videos can enter the CI pipeline just like code, enabling regression testing and even batch generation.
Typical Workflow: From One Sentence to MP4
Using the workflow recommended by Remotion as an example, creating a video in Claude Code generally takes four steps:
- Initialize the project: Run
npx create-video --yes --blank my-video, then install Agent Skills withnpx remotion skills addand startnpm run devto open the preview. - Create the storyboard first: Ask Claude to generate a scene-by-scene storyboard containing the visuals, narration, duration, and transitions. Confirm it before writing any code—this can significantly reduce rework.
- Write and self-check the code: Claude writes the components scene by scene. After rendering keyframes, it uses its visual capabilities to check for text overflow, alignment, and color issues, then fixes them automatically.
- Render and iterate: Create a draft at half resolution with motion blur disabled, and re-render only the shots that have changed. Once the video is finalized, export the full-resolution MP4.
According to tests by overseas creators, a 10–15-second product promo can go from prompt to first cut in about 10 minutes, while each cloud render costs only a few cents.
🚀 Get started quickly: If you don’t use Claude Code and instead want to integrate this workflow into your own backend service, we recommend calling Claude Opus 5.5 through APIYI at apiyi.com. The platform provides a unified API, allowing Opus 5.5 to handle code generation and Sonnet 5 to handle batch revisions, which makes it easier to control costs.
Batch-Produce Videos with the Claude Opus API
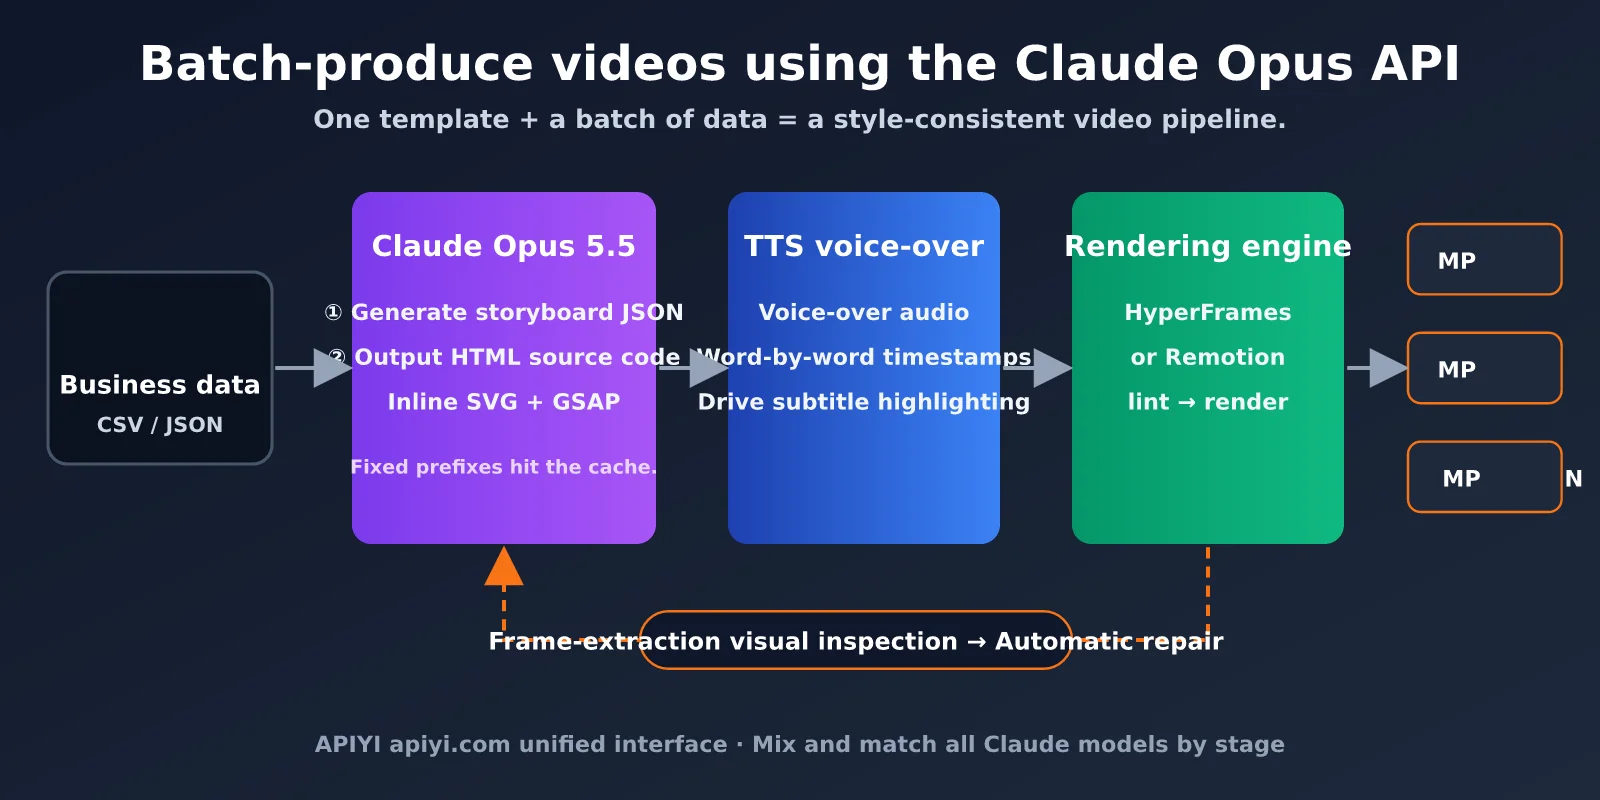
Claude Code is ideal for manually polishing one video, but if you need to generate dozens of product explainers, data updates, or course animations every day, you’ll need to move the workflow to an API. The idea is simple: put the video templates and design guidelines into the system prompt, have the model output HyperFrames HTML for each piece of business data, and then execute the rendering command on your server.
Here’s a minimal example that asks Opus 5.5 to generate the source code for a 15-second explainer animation:
from openai import OpenAI

client = OpenAI(
    api_key="YOUR_API_KEY",
    base_url="https://api.apiyi.com/v1"  # APIYI unified API
)

resp = client.chat.completions.create(
    model="claude-opus-5-5",
    messages=[
        {"role": "system", "content": "You are a motion designer. Output a complete HyperFrames HTML file,"
                                      "1920x1080, dark background, using inline SVG and a GSAP timeline,"
                                      "with data-start/data-duration attributes on every element. Output code only."},
        {"role": "user", "content": "Create a 15-second animation introducing the 4 stages of code-generated video, with line-by-line subtitles."}
    ],
)
open("index.html", "w").write(resp.choices[0].message.content)
# Then run: npx hyperframes render
Expand: Complete Batch Workflow with Voiceover and Subtitles
import json, subprocess
from openai import OpenAI

client = OpenAI(api_key="YOUR_API_KEY", base_url="https://api.apiyi.com/v1")

def build_video(topic: str, out_dir: str):
    # 1. Ask Claude to generate the narration script and storyboard (JSON)
    plan = client.chat.completions.create(
        model="claude-opus-5-5",
        messages=[{"role": "user", "content":
            f"Create a 30-second storyboard for the topic 「{topic}」. Output JSON: "
            '[{"scene":1,"narration":"...","visual":"...","seconds":5}]'}],
    ).choices[0].message.content
    scenes = json.loads(plan)

    # 2. Call your chosen TTS service to generate the voiceover and obtain word-level timestamps
    #    timestamps = my_tts(scenes)  # For example, ElevenLabs' with-timestamps endpoint

    # 3. Give the storyboard and timestamps to Claude and have it output HyperFrames HTML
    html = client.chat.completions.create(
        model="claude-opus-5-5",
        messages=[{"role": "user", "content":
            f"Generate HyperFrames HTML based on the storyboard {json.dumps(scenes, ensure_ascii=False)},"
            "including inline SVG assets, GSAP animations, an audio track, and word-level highlighted subtitles. Output code only."}],
    ).choices[0].message.content
    open(f"{out_dir}/index.html", "w").write(html)

    # 4. Render the MP4
    subprocess.run(["npx", "hyperframes", "render"], cwd=out_dir, check=True)
There are several engineering details worth noting when producing videos in batches. First, put your design guidelines, component library, and example code in a fixed prefix for the prompt. Opus 5.5’s cached input costs only $0.20 per million tokens, so repeated calls become much cheaper. Second, run npx hyperframes lint once before rendering for syntax validation. If it fails, send the error back to the model for automatic repair. Finally, you can call the model again to perform visual quality checks on screenshots of the rendered keyframes, creating a closed loop of “generation → rendering → inspection → repair.”
| Model | Recommended role | Strengths | Available platforms |
|---|---|---|---|
| Claude Opus 5.5 | Storyboard design, complex animation, visual quality checks | Strongest Agent capabilities and best visual understanding | APIYI at apiyi.com, official API |
| Claude Sonnet 5 | Writing standard scenes, batch revisions | Excellent cost-performance ratio and fast response times | APIYI at apiyi.com, official API |
| Claude Haiku 4.5 | Subtitle proofreading, copy rewriting | Lowest cost and low latency | APIYI at apiyi.com, official API |
💰 Cost optimization: In real-world projects, you don’t need to use Opus for every step. We recommend mixing Claude models by task through APIYI at apiyi.com: use Opus 5.5 for the initial design, then use Sonnet 5 to apply templates in batches. This can typically cut overall costs by more than half.
Claude Opus 5.5 Code-to-Video: Frequently Asked Questions
Can Claude Opus 5.5 generate videos with real people directly?
No. Claude generates code and excels at animations involving graphics, text, charts, and interfaces. For real people, live-action footage, and cinematic shots, you’ll still need video models such as Sora or Veo. The two can work together: Claude handles the orchestration, while video models provide live-action source clips.
Can I use it if I don’t know how to code?
Yes. Once you’ve installed Skills for Remotion or HyperFrames in Claude Code, the entire workflow can be handled largely through natural-language conversations. You only need to review the storyboard and preview frames. If you’d like to test the model first, register through APIYI apiyi.com and invoke Claude Opus 5.5 online with a small amount of credits.
How much does it cost to generate a video?
For a 30-second explainer animation, a complete generation typically consumes tens of thousands to hundreds of thousands of tokens. At Opus 5.5’s $4/$20 pricing, the cost usually ranges from a few cents to around one dollar, plus TTS costs. Local rendering is free. It’s best to use APIYI apiyi.com to estimate the per-video cost with real tasks before deciding on batch production volume.
What if the generated animation often has overflowing or overlapping text?
Let the model “see” its own work. Render screenshots of several key frames and send them back to Opus 5.5, then ask it to identify and fix layout issues. This is exactly where Opus 5.5’s visual capabilities shine. At the same time, define fixed safe margins and maximum font sizes in the prompt to significantly reduce these problems.
Summary: Claude Opus 5.5 Brings Video into the “Programmable” Era
Using Claude Opus 5.5 to generate video with code essentially turns video production into software engineering. SVG handles visual assets; TTS and code-based compositing handle audio; Remotion or HyperFrames handle animation and rendering; timestamps drive subtitle synchronization; and Claude acts as the director that connects every stage. It won’t replace live-action production or diffusion models, but for explainer animations, product demos, data reports, and subtitle-based short videos, it already delivers greater accuracy, control, and extremely low marginal costs.
For developers, the next step worth exploring is turning this workflow into an API-driven, batch-production pipeline: one template, one dataset, and one Opus 5.5 invocation loop can continuously produce videos with a consistent style. We recommend connecting to the full Claude model lineup through APIYI apiyi.com, then starting with a 15-second animation to validate your video automation workflow.
References:
– Anthropic Claude Opus 5.5 overview: anthropic.com/claude/opus
– Official Remotion guide for Claude Code: remotion.dev/docs/ai/claude-code
– HyperFrames open-source repository: github.com/heygen-com/hyperframes
– claude-explains open-source project: github.com/noelpuig/claude-explains
– Danny Stuart’s Opus + Remotion promo video workflow: dannystuart.substack.com
About the Author: The APIYI technical team focuses on AI Large Language Model API integration and engineering practices. Feel free to connect through APIYI apiyi.com to discuss practical Claude code-to-video implementations.