Many developers want to enable OpenClaw AI Agents to automatically generate images. This article will show you how to create a custom Skill for OpenClaw in 5 steps to connect the Nano Banana Pro image generation API, achieving a complete workflow from chat commands to automated image output.
Core Value: By the end of this article, you'll master how to create custom Skills for OpenClaw and learn how to connect to Nano Banana Pro via the APIYI platform for text-to-image, image editing, and batch processing, giving your AI Agent professional-grade image generation capabilities.
Overview of Nano Banana Pro Image API Core Capabilities
Before we dive into the integration, let's look at what Nano Banana Pro can bring to your OpenClaw Agent.
Nano Banana Pro (officially Gemini 3 Pro Image Preview) is a professional-grade AI image generation model from Google DeepMind. Built on Gemini 3 Pro, it's widely regarded as "the best model for generating images with correctly rendered and clearly readable text."
Nano Banana Pro Technical Parameters
| Capability | Parameter | Description |
|---|---|---|
| Text Rendering | Error rate < 10% | Industry-leading accuracy for single-line text |
| Output Resolution | 1K / 2K / 4K | Native high resolution, no post-processing needed |
| Reference Images | Up to 14 images | Supports multi-image synthesis and character consistency |
| Character Consistency | Up to 5 characters | Face consistency across different scenes |
| Thinking Mode | Thinking Process | Visualization of complex composition reasoning |
| Search Grounding | Google Search | Visual generation based on real-time data |
🎯 Access Advice: The official Nano Banana Pro requires a Google Cloud account with an overseas credit card, which can be a high barrier. We recommend using the APIYI (apiyi.com) platform. It offers flat pricing at $0.05/image (about 80% off the official 4K price), supports Alipay/WeChat Pay, and doesn't require an overseas card.
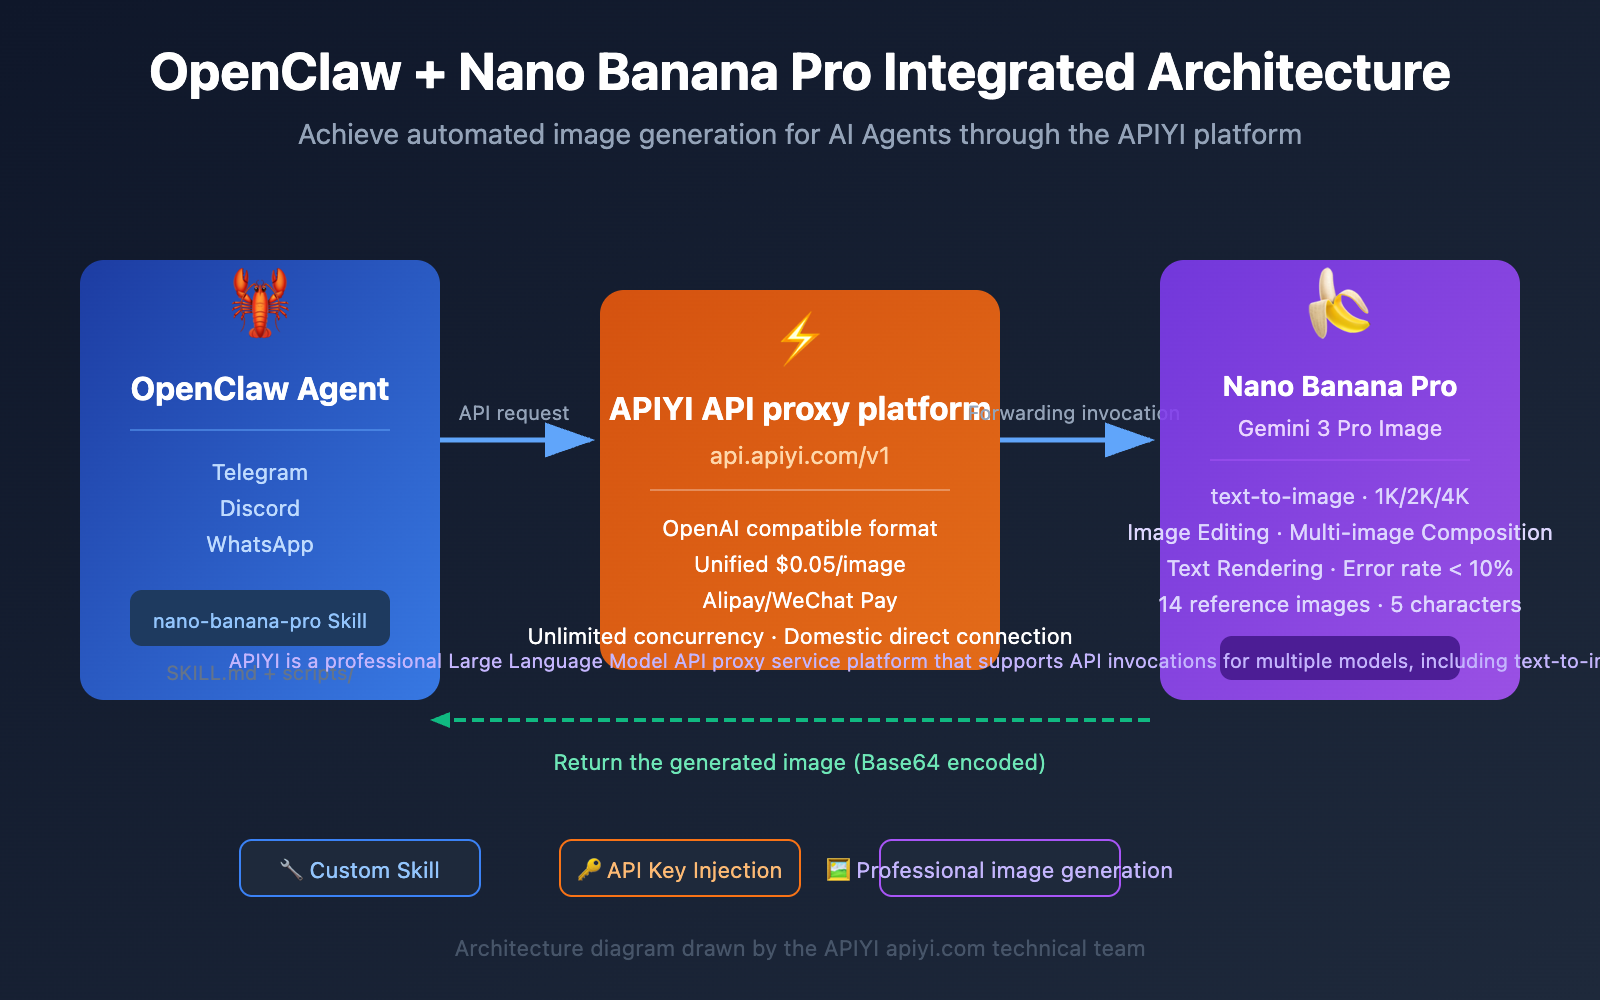
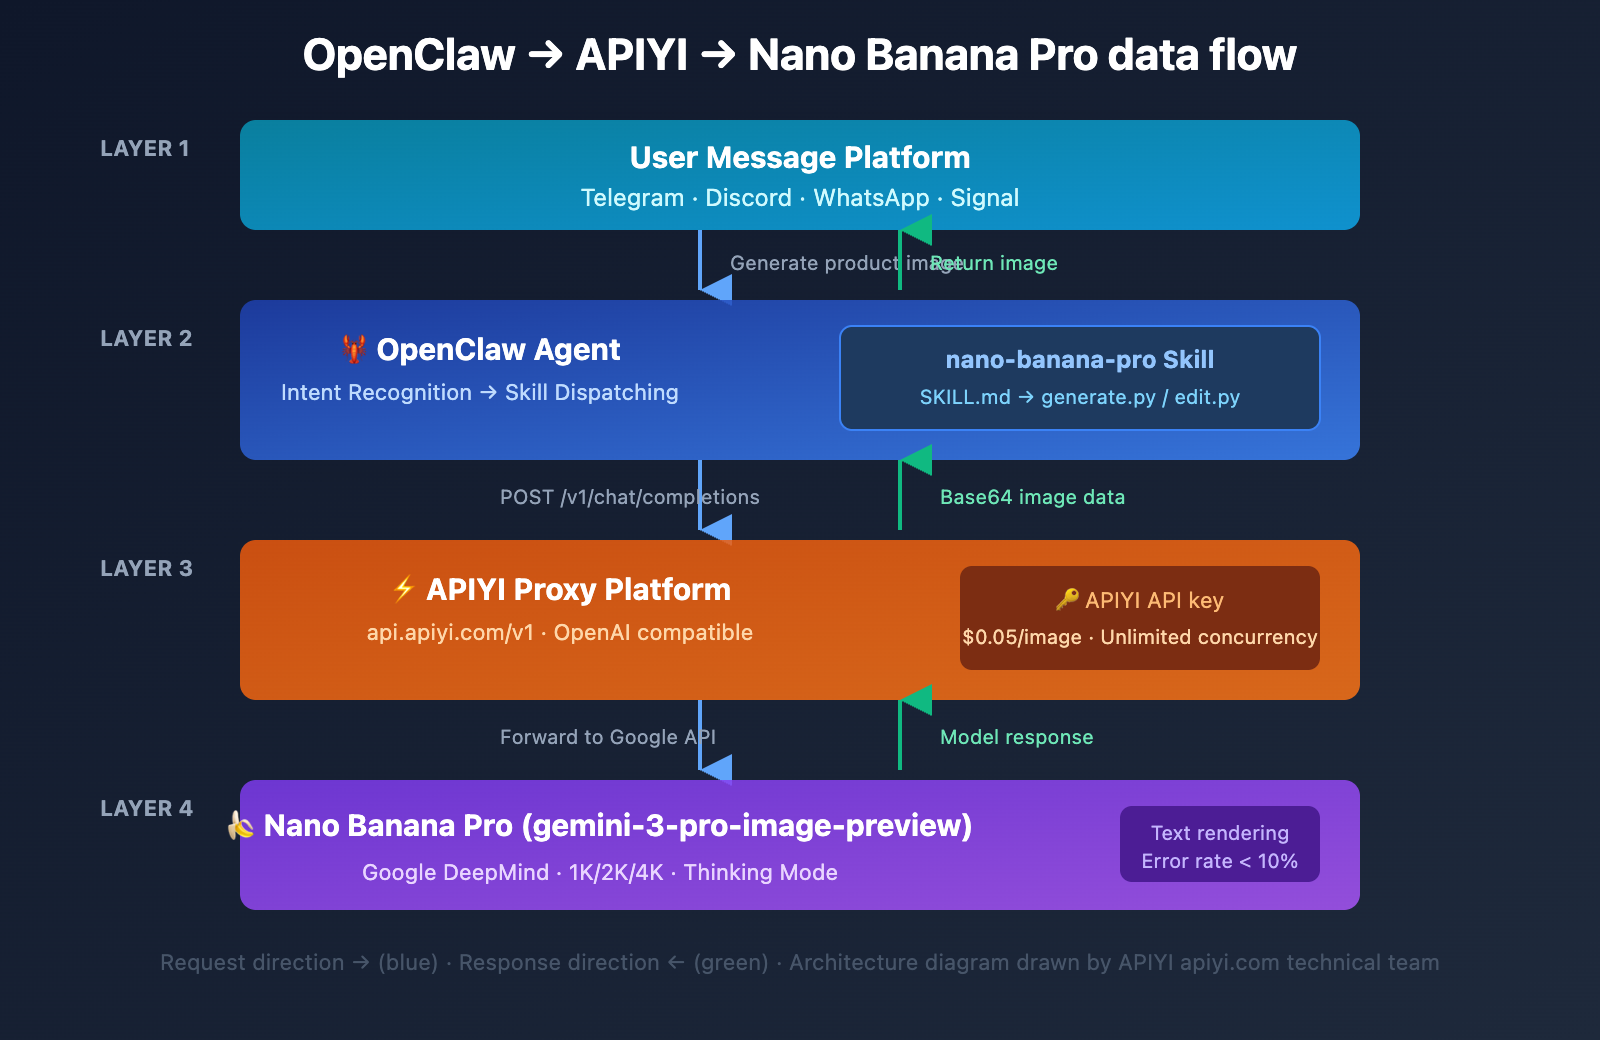
Complete Architecture for Integrating OpenClaw Skill with Nano Banana Pro
Understanding the overall architecture will make the rest of the configuration a breeze.
Why Choose Integration via APIYI
| Comparison | Google Official Direct | Via APIYI (apiyi.com) |
|---|---|---|
| 4K Unit Price | $0.24/image | $0.05/image (80% off) |
| Payment Method | Overseas Credit Card | Alipay/WeChat Pay/USDT |
| API Format | Google Native SDK | Gemini Native Format Compatible |
| Network Requirements | Requires VPN/Proxy | Direct Connection from Mainland China |
| Concurrency Limits | Subject to Quota Limits | Unlimited Concurrency, RPM 2000+ |
| Enterprise Discounts | None | Up to 20% Bonus on Top-ups |
Step 1: Create the OpenClaw Skill Directory Structure
# Create the Skill directory structure
mkdir -p ~/.openclaw/skills/nano-banana-pro/scripts
cd ~/.openclaw/skills/nano-banana-pro
touch SKILL.md scripts/generate.py scripts/edit.py
Step 2: Writing the SKILL.md Definition File
SKILL.md is the core file OpenClaw uses to recognize and invoke your Skill. It's made up of YAML front matter and Markdown instructions.
---
name: nano-banana-pro
description: Generate and edit images using Nano Banana Pro (Gemini 3 Pro Image) via APIYI platform. Supports text-to-image, image editing, multi-image composition, and batch processing.
version: 1.0.0
metadata:
  openclaw:
    requires:
      env:
        - APIYI_API_KEY
      bins:
        - python3
    primaryEnv: APIYI_API_KEY
emoji: "🎨"
---

# Nano Banana Pro Image Generation Skill


## Features
- **Text-to-Image**: Generate high-quality images (1K/2K/4K) based on text descriptions.
- **Image Editing**: Modify, composite, and transform the style of existing images.
- **Batch Processing**: Supports batch generation and batch editing.
How to Use
Generate Image
exec python3 scripts/generate.py --prompt "description" --aspect-ratio "16:9" --resolution "2K"
Edit Image
exec python3 scripts/edit.py --instruction "editing instruction" --image-url "image URL"
Important Notes
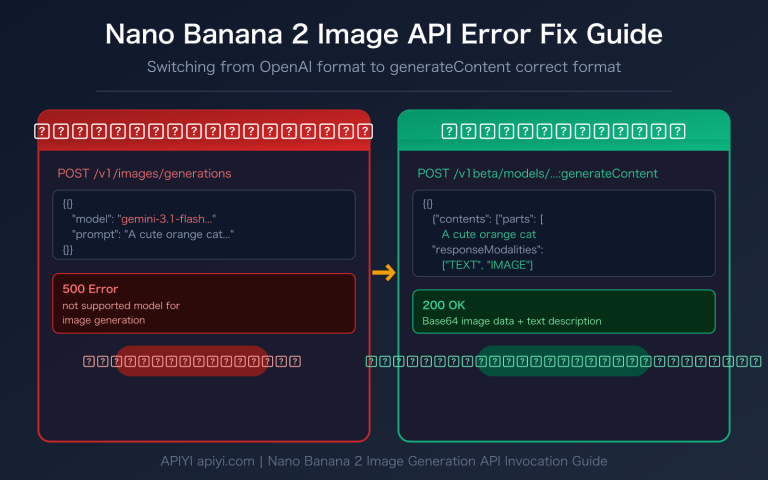
- Uses Gemini native API format:
/v1beta/models/{model}:generateContent - 4K images take about 60 seconds; we recommend setting
exec timeout=120. - For best results, we recommend using English prompts.
💡 Dev Tip: Once
primaryEnv: APIYI_API_KEYis declared, OpenClaw automatically injects the API key into the Skill's runtime environment. Your script can read it directly via environment variables—no hardcoding required!
Step 3: Writing the text-to-image script generate.py
This is the core script. It handles parameters passed from OpenClaw and calls the Nano Banana Pro API to generate images.
Quick curl Test (Gemini Native Format)
Start with a quick curl command to verify the API connection. It's the fastest way to test things out:
curl -s -X POST \
  "https://api.apiyi.com/v1beta/models/gemini-3-pro-image-preview:generateContent" \
  -H "Authorization: Bearer sk-YOUR_APIYI_KEY" \
  -H "Content-Type: application/json" \
  -d '{
    "contents": [{
      "parts": [
        {"text": "Create a picture of a nano banana dish in a fancy restaurant with a Gemini theme"}
      ]
    }],
    "generationConfig": {
      "responseModalities": ["IMAGE"],
      "imageConfig": {
        "aspectRatio": "16:9",
        "imageSize": "2K"
      }
    }
  }' | python3 -c "
import sys, json, base64
data = json.load(sys.stdin)
img_data = data['candidates'][0]['content']['parts'][0]['inlineData']['data']
sys.stdout.buffer.write(base64.b64decode(img_data))
" > gemini-native-image.png
Once successful, a gemini-native-image.png file will be generated in your current directory.
Python Script (Gemini Native Format)
#!/usr/bin/env python3
"""Nano Banana Pro Text-to-Image Script - OpenClaw Skill (Gemini Native Format)"""
import os, json, base64, argparse, requests
from datetime import datetime

API_KEY = os.environ.get("APIYI_API_KEY", "")
API_BASE = "https://api.apiyi.com/v1beta/models"  # APIYI Gemini native interface

def generate_image(prompt, aspect_ratio="16:9", resolution="2K"):
    url = f"{API_BASE}/gemini-3-pro-image-preview:generateContent"
    headers = {
        "Authorization": f"Bearer {API_KEY}",
        "Content-Type": "application/json"
    }
    data = {
        "contents": [{"parts": [{"text": prompt}]}],
        "generationConfig": {
            "responseModalities": ["IMAGE"],
            "imageConfig": {
                "aspectRatio": aspect_ratio,
                "imageSize": resolution
            }
        }
    }
    response = requests.post(url, headers=headers, json=data, timeout=120)
    response.raise_for_status()
    result = response.json()

    # Gemini native format: Extract inlineData from candidates
    parts = result["candidates"][0]["content"]["parts"]
    for part in parts:
        if "inlineData" in part:
            img_bytes = base64.b64decode(part["inlineData"]["data"])
            filename = f"nano_banana_{datetime.now().strftime('%Y%m%d_%H%M%S')}.png"
            with open(filename, "wb") as f:
                f.write(img_bytes)
            print(f"Image generated: {filename} ({len(img_bytes)/1024:.1f} KB)")
            return filename
    print("Failed to extract image data")
    return None

if __name__ == "__main__":
    parser = argparse.ArgumentParser()
    parser.add_argument("--prompt", required=True)
    parser.add_argument("--aspect-ratio", default="16:9")
    parser.add_argument("--resolution", default="2K", help="Resolution: 1K/2K/4K")
    args = parser.parse_args()
    generate_image(args.prompt, args.aspect_ratio, args.resolution)
🚀 Quick Start: The code above uses the Gemini native format interface from APIYI (apiyi.com). The endpoint is
/v1beta/models/{model}:generateContent, and the response structure is identical to the official Google API. Just create an API key in the APIYI console at api.apiyi.com to get started.
Step 4: Writing the Image Editing Script edit.py
Nano Banana Pro doesn't just generate images; it also supports editing existing ones.
#!/usr/bin/env python3
"""Nano Banana Pro Image Editing Script - OpenClaw Skill (Gemini Native Format)"""
import os, json, base64, argparse, requests
from datetime import datetime

API_KEY = os.environ.get("APIYI_API_KEY", "")
API_BASE = "https://api.apiyi.com/v1beta/models"

def edit_image(instruction, image_url, extra_images=None):
    url = f"{API_BASE}/gemini-3-pro-image-preview:generateContent"
    headers = {"Authorization": f"Bearer {API_KEY}", "Content-Type": "application/json"}

    # Build multimodal parts in Gemini native format
    parts = [{"text": instruction}]
    # Convert image URL to base64 inline data
    img_resp = requests.get(image_url, timeout=30)
    parts.append({"inlineData": {"mimeType": "image/png",
                                  "data": base64.b64encode(img_resp.content).decode()}})
    if extra_images:  # Support multi-image synthesis (up to 14 reference images)
        for img_url in extra_images[:13]:
            r = requests.get(img_url, timeout=30)
            parts.append({"inlineData": {"mimeType": "image/png",
                                          "data": base64.b64encode(r.content).decode()}})

    data = {
        "contents": [{"parts": parts}],
        "generationConfig": {"responseModalities": ["IMAGE"]}
    }
    response = requests.post(url, headers=headers, json=data, timeout=120)
    response.raise_for_status()
    result_parts = response.json()["candidates"][0]["content"]["parts"]
    for part in result_parts:
        if "inlineData" in part:
            filename = f"edited_{datetime.now().strftime('%Y%m%d_%H%M%S')}.png"
            with open(filename, "wb") as f:
                f.write(base64.b64decode(part["inlineData"]["data"]))
            print(f"Editing complete: {filename}")
            return filename
    return None

if __name__ == "__main__":
    parser = argparse.ArgumentParser()
    parser.add_argument("--instruction", required=True)
    parser.add_argument("--image-url", required=True)
    parser.add_argument("--extra-images", nargs="*")
    args = parser.parse_args()
    edit_image(args.instruction, args.image_url, args.extra_images)
Image Editing Capabilities Summary
| Editing Type | Prompt Example | Processing Time |
|---|---|---|
| Background Replacement | "Remove background and add sunset" | ~10s |
| Style Transfer | "Convert to anime style" | ~15s |
| Element Addition | "Add sunglasses to the person" | ~10s |
| Multi-image Synthesis | "Combine these logos and add…" | ~20s |
| Text Addition | "Add title text: Hello World" | ~10s |
| Color Adjustment | "Make the image warmer, increase contrast" | ~8s |
Step 5: Configuring OpenClaw and Testing
Configuring the API Key
Add the Skill configuration to your OpenClaw config file at ~/.openclaw/openclaw.json:
{
  "skills": {
    "entries": {
      "nano-banana-pro": {
        "enabled": true,
        "apiKey": "sk-your-APIYI-key"
      }
    }
  }
}
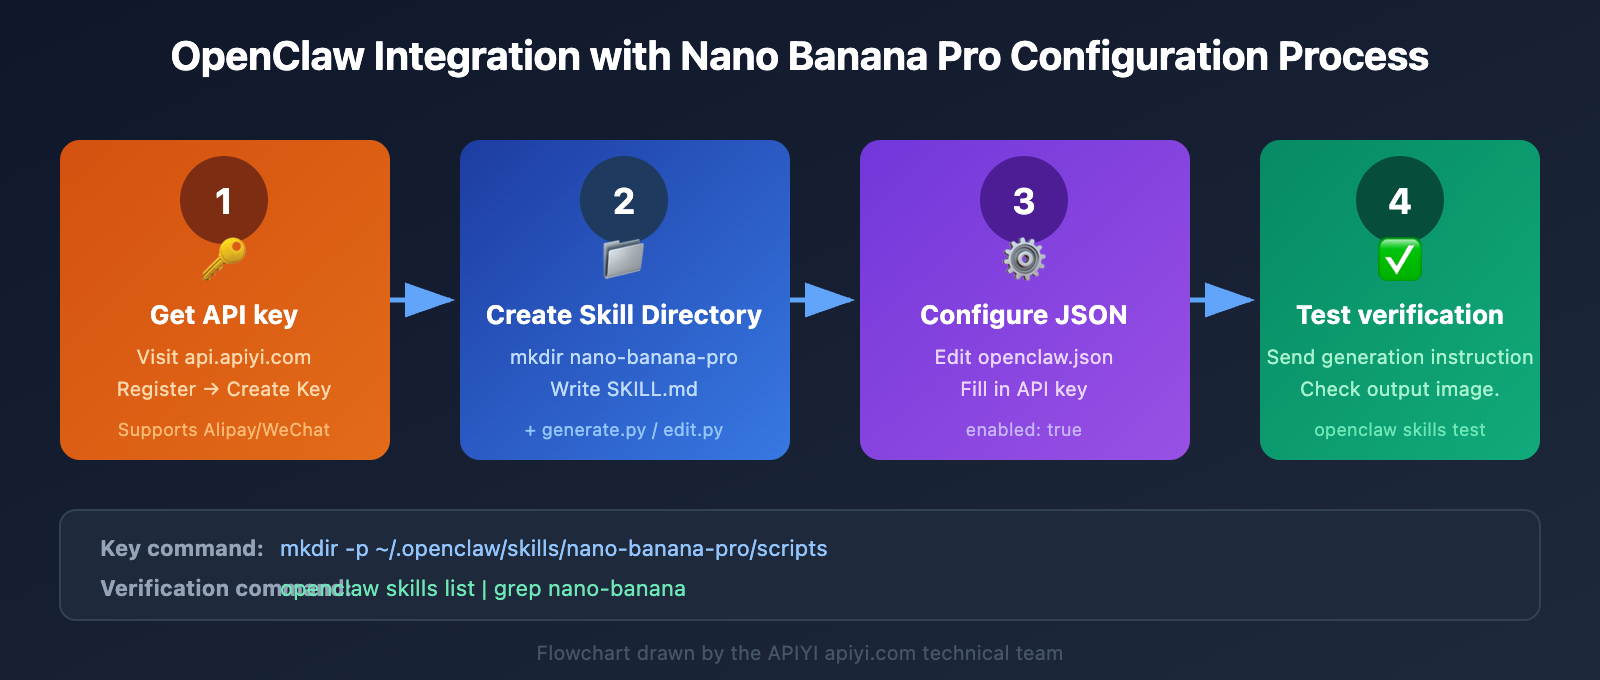
Testing the Skill
Send a test prompt in your messaging platform to verify the functionality:
Generate a modern minimalist e-commerce product display image, white background, product centered.
Verify that the Skill is correctly loaded:
openclaw skills list | grep nano-banana
openclaw skills test nano-banana-pro
💰 Cost Optimization: Nano Banana Pro is priced at a flat $0.05 per image through APIYI (apiyi.com), regardless of resolution. If your project averages over 5,000 images a day, you can snag a top-up bonus of up to 20%, cutting your cost per image to just $0.04.
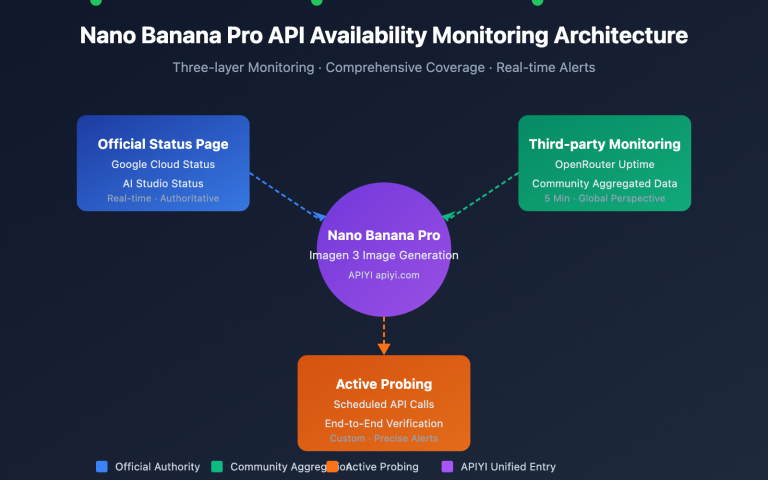
Nano Banana Pro API Cost vs. Performance Comparison
Choosing the right integration method is crucial for long-term use.
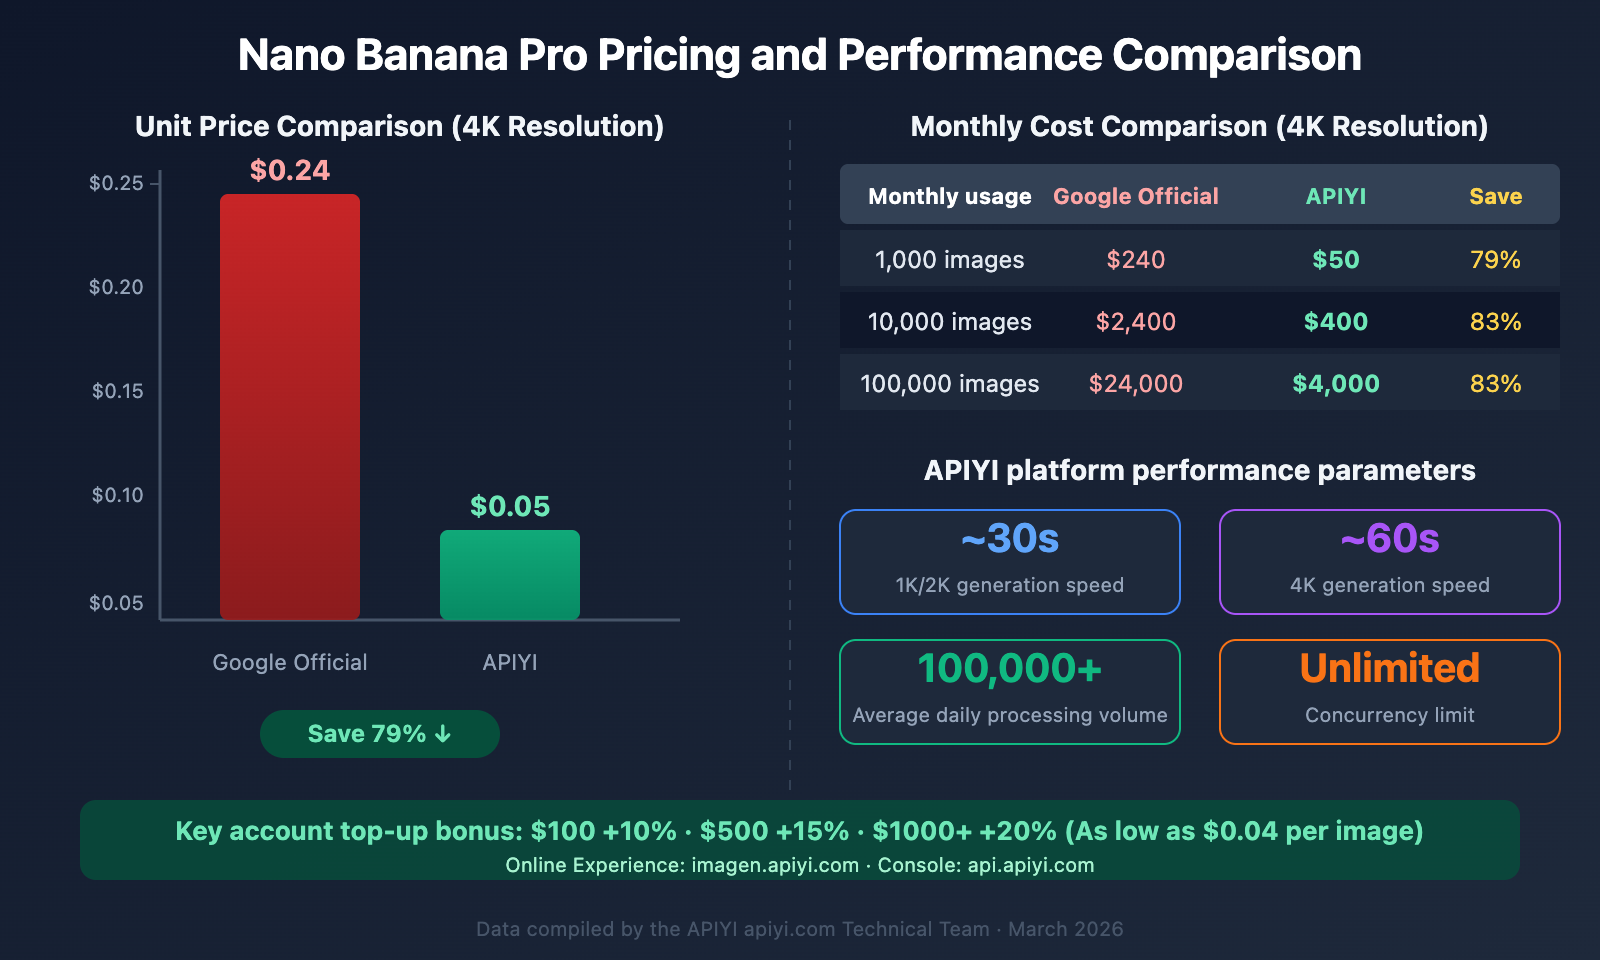
The SVG chart above illustrates the detailed pricing comparison and performance specs. Key data: Accessing Nano Banana Pro via APIYI brings the cost per 4K image down to just $0.05 (an 80% discount compared to the official $0.24 price). With top-up bonuses for high-volume users, this can drop as low as $0.04 per image. The platform handles 100,000+ images daily with no concurrency limits.
FAQ
Q1: What dependencies are required to integrate OpenClaw with Nano Banana Pro?
You only need Python 3 and the requests library. We use the Gemini native format interface (/v1beta/models/{model}:generateContent) provided by APIYI (apiyi.com) for model invocation, so there's no need to install Google's google-generativeai SDK. Just run pip install requests. You can even test it directly with a curl command without any dependencies at all.
Q2: What should I do if OpenClaw reports a timeout when generating 4K images?
Generating 4K images with Nano Banana Pro takes about 60 seconds. In the usage instructions within SKILL.md, we recommend using exec timeout=120 or exec timeout=180 when calling the script in OpenClaw to prevent the task from being interrupted by the default timeout.
Q3: Can I use other image generation models instead of Nano Banana Pro?
Absolutely. The APIYI (apiyi.com) platform supports multiple image generation models simultaneously. You just need to modify the model parameter in generate.py to switch. The API format remains identical, so no other code changes are necessary.
Q4: How can I ensure the security of my OpenClaw Skill?
There are three key measures: First, inject your API key via environment variables—don't hardcode it into your scripts. Second, only use Skills you've created yourself; avoid installing image generation skills from unknown sources on ClawHub (over 820 malicious skills have already been identified). Third, regularly check your OpenClaw logs to ensure there are no unauthorized calls.
Q5: What editing operations are supported, and how is the quality?
Nano Banana Pro supports background replacement, style transfer, adding/removing elements, multi-image composition (up to 14 reference images), and text rendering. Text rendering is its standout feature, with a single-line text error rate below 10%, which far outperforms DALL-E 3 and Midjourney. By using the APIYI platform for editing functions, it costs only $0.05 per call and typically finishes in about 10 seconds.
Summary
By following the 5 steps in this tutorial, you've mastered the complete process of creating a custom Skill for OpenClaw to access the Nano Banana Pro image API:
- Create the Skill Directory — A standard structure with
SKILL.md+scripts/. - Write SKILL.md — Declare dependencies, environment variables, and usage instructions.
- Write the Text-to-Image Script — Call Nano Banana Pro via the APIYI Gemini native format interface.
- Write the Editing Script — Support multi-image composition, background replacement, and style transfer.
- Configure and Test — Set your key in
openclaw.jsonand verify the functionality.
We recommend using APIYI (apiyi.com) to access Nano Banana Pro. You'll enjoy flat pricing of $0.05 per image (which is 80% off the official 4K price) and a unified interface for Claude, GPT-4o, DeepSeek, and more. You can also try out the image generation for free at imagen.apiyi.com.
This article was written by the APIYI technical team, focusing on Large Language Model API integration practices and Agent development tutorials. For more technical guides, please visit the APIYI Help Center: help.apiyi.com