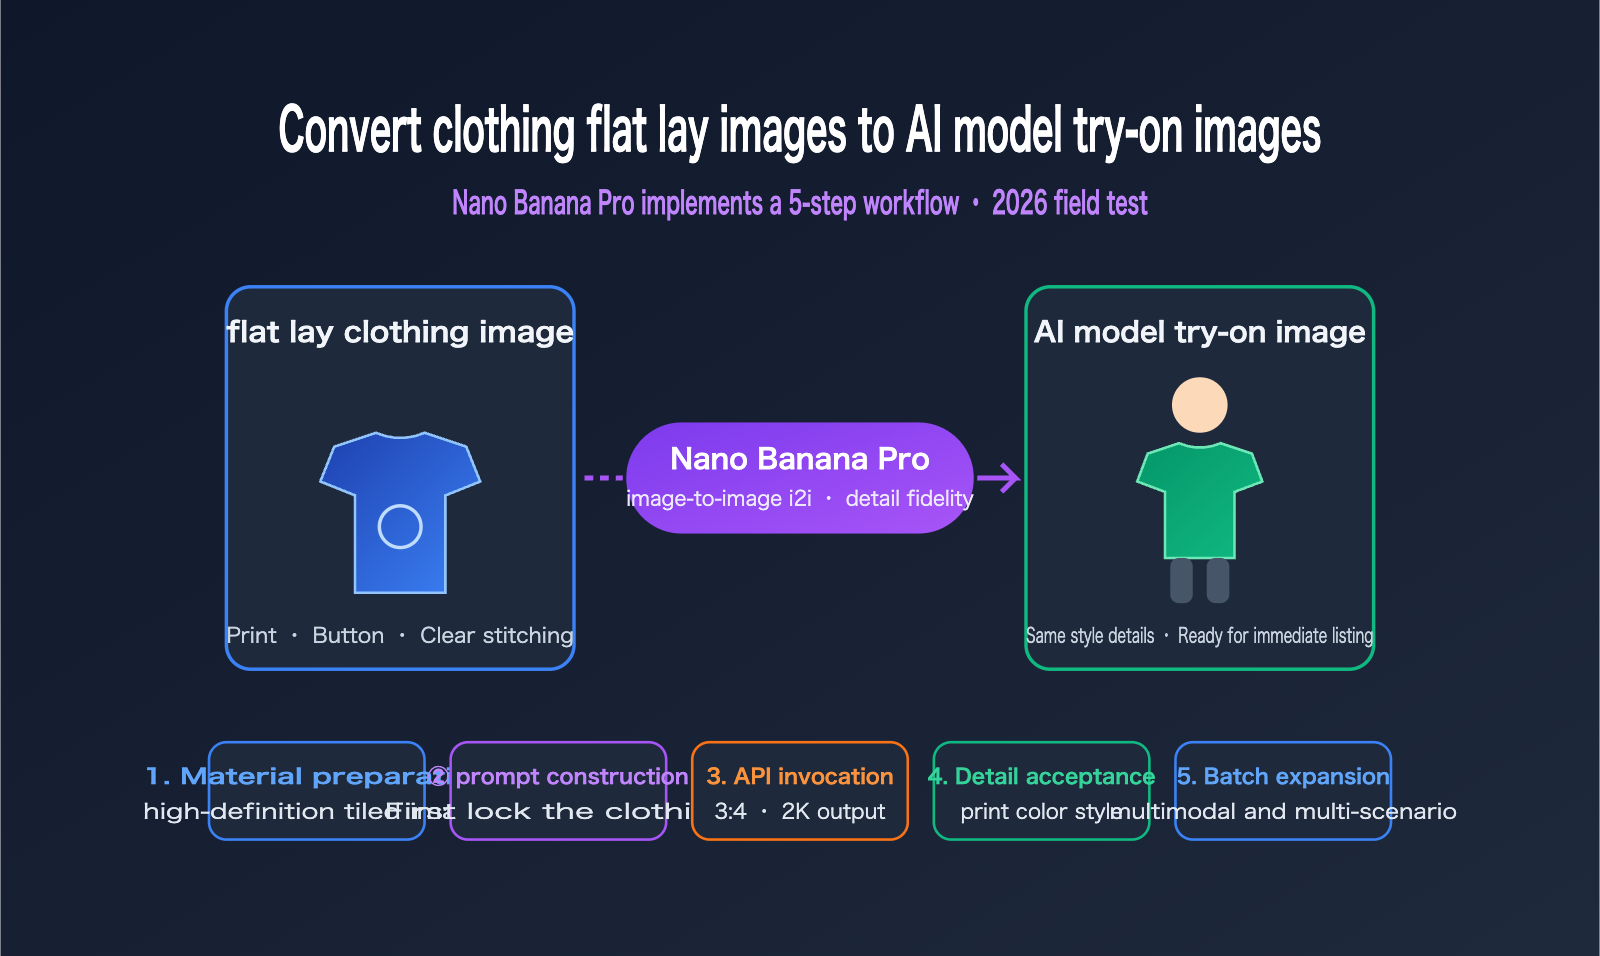
If you only have flat-lay or ghost mannequin photos of your clothing but need high-quality on-model shots, you're facing the most common challenge in e-commerce operations. Traditional photoshoots—involving models, photographers, studio rentals, and retouching—can easily cost thousands of dollars and take 1–2 weeks to complete. For fast-fashion giants like SHEIN, annual photography costs run into the hundreds of millions. This article introduces the 5-step workflow for converting flat-lay images to on-model shots using Nano Banana Pro, helping you leverage image-to-image (i2i) capabilities to turn a flat product photo into a professional AI-generated model shot ready for your storefront.
Core Value: By the end of this article, you'll master the complete API workflow for flat-to-model conversion, learn how to write prompts that preserve clothing details, and discover how to fix common issues like garment distortion or color shifting—all while keeping costs at the $0.10 per-image level.
Core Essentials for Flat-to-Model Conversion: Nano Banana Pro Analysis
Nano Banana Pro is the community nickname for the Gemini 3 Pro Image model released by Google DeepMind. Since its launch in November 2025, it has quickly become the go-to choice for clothing-related image-to-image tasks. It can "dress" flat clothing images onto AI-generated models while preserving fabric textures, patterns, and natural lighting—exactly the capability most needed for this use case.
| Core Capability | Description | Value for Fashion Scenarios |
|---|---|---|
| Multi-Image Input | Supports up to 14 reference images at once | Can input flat-lay + model reference + scene images simultaneously |
| Detail Fidelity | Naturally maps patterns/logos onto 3D surfaces while keeping lighting | Prints, embroidery, and buttons remain accurate |
| Resolution Tiers | 1K / 2K / 4K output options | 2K for product detail pages, 4K for hero images |
| Multi-turn Consistency | Supports multi-turn editing, keeping characters stable | Maintains consistent model appearance across front/side angles |
| Aspect Ratio Control | Specify aspect ratio via the aspectRatio parameter |
Adapts to e-commerce standards like 3:4 or 1:1 |
The Cost Breakdown of Nano Banana Pro
Cost is the primary driver for fashion merchants shifting from traditional photography to AI. Real-world data from overseas communities shows that a traditional photoshoot costs over $3,500 and takes 1–2 weeks. In contrast, generating 50+ variations with AI costs only $10–$35 and takes just minutes.
| Comparison Metric | Traditional Photoshoot | Nano Banana Pro |
|---|---|---|
| Total Cost per Session | From $3,500 | $10–$35 (for 50 variations) |
| Cost per Image | ~$50–$100 (amortized) | ~$0.05–$0.134 (varies by resolution) |
| Turnaround Time | 1–2 weeks | Minutes |
| Re-shoots | Requires booking models/studios | Just update the prompt |
| Multi-market Models | Separate shoots for each market | Switch model identity via prompt |
💡 Cost Tip: Nano Banana Pro is billed per request, starting at approximately $0.05 for 1K/2K tiers. If you have a high volume of SKUs and need batch processing, we recommend using the aggregated API from APIYI (apiyi.com). It offers pay-as-you-go pricing and supports high concurrency, making it ideal for pipelines generating hundreds of images daily.
It's important to note that AI is currently best suited for replacing detail page and lifestyle images; for main product images and runway-level photography, we still recommend keeping some traditional human-led shoots. The industry is in the early stages of this transition, so starting with low-risk image types is the safest way to integrate AI into your workflow.
Nano Banana Pro: 5-Step Workflow for Converting Flat-Lay to On-Model Images
Let's get straight to the point. The entire workflow consists of 5 steps: Material Preparation → Prompt Engineering → API Invocation → Quality Assurance → Batch Scaling. The first two steps determine the quality ceiling, while the last three ensure efficiency and stability.
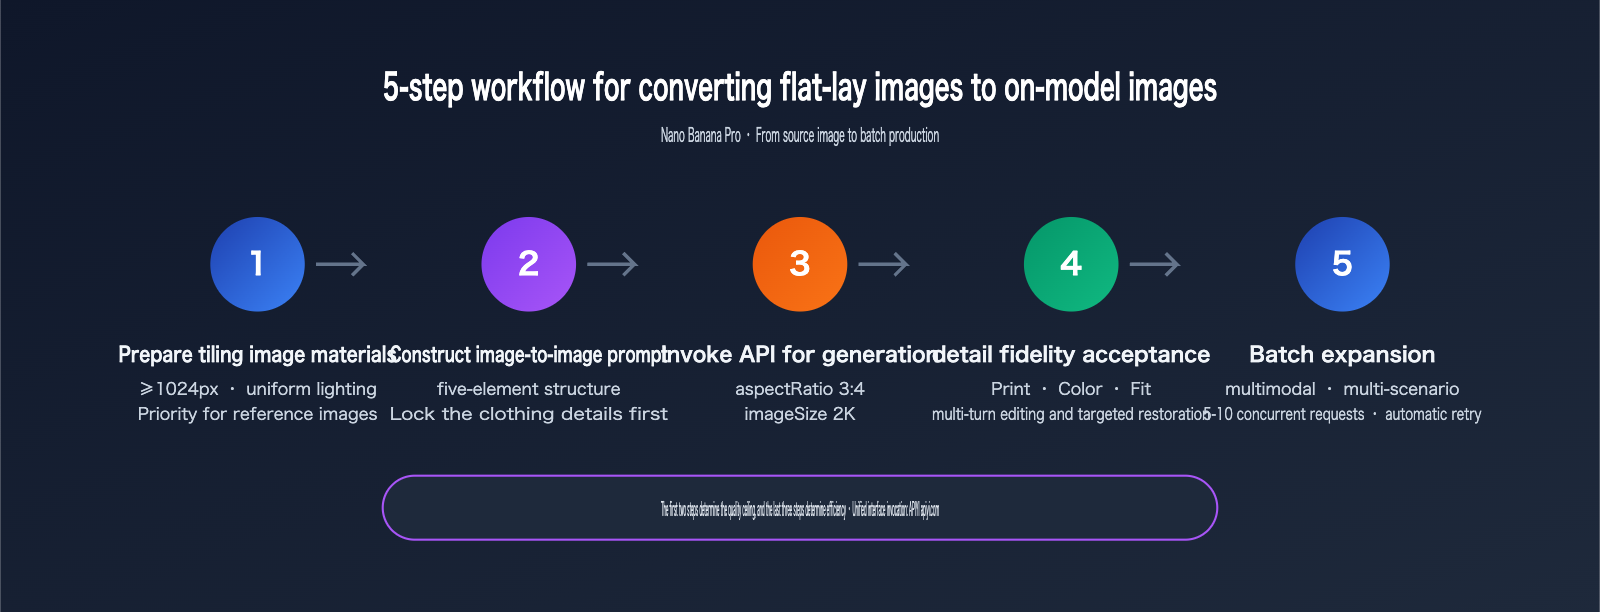
Step 1: Prepare High-Quality Flat-Lay Material
The quality of your source image directly dictates the final on-model result. The model needs to understand the garment's silhouette, fabric texture, and pattern placement from the flat-lay. Blurry or heavily wrinkled source images will distort this information. Qualified flat-lay materials should meet these criteria:
- Resolution of at least 1024px, with prints and logos clearly identifiable;
- Garment laid out flat, avoiding large areas of wrinkles that obscure the silhouette;
- Uniform lighting without harsh shadows, with solid or light-colored backgrounds being ideal;
- Full front view included, with clear boundaries for the neckline, cuffs, and hem.
"Ghost mannequin" or hanger shots also work well with this workflow. Because they already have a draped form, they often provide better silhouette reconstruction than pure flat-lays. If you have both, prioritize the hanger shot.
Step 2: Construct the i2i Prompt (Five-Element Structure)
Google's official prompt recommendations suggest including five elements: Subject, Composition, Action, Scene, and Style. For the flat-lay to on-model scenario, I recommend using this structured template. The core principle is to lock in the garment first, then describe the model and scene:
Generate an image: A [model description] wearing the exact garment from the
reference image, preserving the original fabric texture, print pattern,
buttons and stitching. [pose and action]. [scene and lighting]. [composition and style].
Here is a practical example (using English prompts is recommended for more stable model understanding):
Generate an image: A young East Asian female model wearing the exact
floral linen shirt from the reference image, preserving the original
print pattern, collar shape and button details. Standing naturally with
one hand in pocket. Bright studio with soft daylight, light gray
backdrop. Full-body shot, 3:4 ratio, e-commerce fashion photography style.
Note that the preserving the original... section is the soul of the prompt. Explicitly listing the details you need to preserve (prints, collar type, buttons) will significantly improve the model's fidelity. We'll dive deeper into the principles of this writing style in the detail preservation section later.
Step 3: Call the Nano Banana Pro API for Image-to-Image
Nano Banana Pro uses the native Gemini interface format, with the model named gemini-3-pro-image-preview. Here is a minimal invocation example, submitting the flat-lay image as base64 along with your prompt:
import requests, base64

API_URL = "https://api.apiyi.com/v1beta/models/gemini-3-pro-image-preview:generateContent"
headers = {"x-goog-api-key": "YOUR_API_KEY"}

with open("flat-lay-shirt.png", "rb") as f:
    img_b64 = base64.b64encode(f.read()).decode()

payload = {
    "contents": [{"parts": [
        {"text": "Generate an image: A female model wearing the exact shirt from the reference image, preserving print and buttons. Studio lighting, full-body, e-commerce style."},
        {"inline_data": {"mime_type": "image/png", "data": img_b64}}
    ]}],
    "generationConfig": {"imageConfig": {"aspectRatio": "3:4", "imageSize": "2K"}}
}

resp = requests.post(API_URL, headers=headers, json=payload, timeout=300)
print(resp.status_code)  # The returned inlineData is the base64 of the generated image
Two parameters are worth noting: setting aspectRatio to 3:4 aligns with mainstream e-commerce platform standards for main product images; imageSize set to 2K offers the best balance between clarity and cost. 4K is better for scenarios requiring zooming and cropping but takes longer—I suggest setting your timeout to 360 seconds.
🎯 Integration Tip: Official Nano Banana Pro channels (Vertex / AI Studio) can occasionally experience 503 rate-limiting during peak hours, which can be disruptive for apparel sellers doing batch processing. We recommend connecting via APIYI (apiyi.com). The platform provides multi-channel redundancy, allows you to switch to models like
gpt-image-2for comparison using the same key, and saves you from the hassle of multi-platform registration and card binding.
Step 4: Detail Fidelity QA (Must-Check Before Listing)
Whether an AI-generated model image is ready for listing depends on how consistent the garment details are with the physical product—"not as described" is a major cause of e-commerce returns. I recommend checking each generated image against this checklist:
| QA Item | Check Content | Typical Failure Signs |
|---|---|---|
| Print Pattern | Position, size, completeness | Pattern "re-imagined" or shifted |
| Color Accuracy | Main color matches source | Overall color cast or saturation shift |
| Silhouette | Shape, length, fit | Slim-fit becomes boxy, short becomes long |
| Details | Button count, zippers, pockets | Buttons added/missing, pockets disappear |
| Human Anatomy | Hands, face, limb proportions | Deformed fingers, limb clipping |
If a result fails, you don't necessarily need to regenerate the whole image. Nano Banana Pro supports multi-turn conversational editing. Simply append an instruction to perform a targeted fix, such as Keep everything unchanged, only restore the chest print to match the reference image exactly. This is more cost-effective than a full regeneration and prevents changes to parts that were already correct.
Step 5: Batch Scaling for Multiple Models and Scenes
Once a single style passes QA, you can start batching. Keep the garment-locking instructions consistent and only swap out the model and scene descriptions. A single flat-lay can be expanded into a full set of assets: generate studio shots, street style, and cafe scenes for the same shirt, or create AI model images with different ethnicities (e.g., European, Middle Eastern, Southeast Asian) for different markets.
The key to the batching phase is managing concurrency and failure retries. Nano Banana Pro takes anywhere from a dozen seconds to a minute per generation, so I recommend running your queue with a concurrency of 5-10 and setting failed tasks to auto-retry once. For larger pipelines, check out the batch processing and concurrency optimization documentation at the APIYI help center (help.apiyi.com), which includes ready-to-use queue scripts.
Nano Banana Pro: Mastering Clothing Detail Fidelity with Advanced Prompts
Getting your workflow running is just the baseline; the real difference in output quality comes down to how well your prompts control clothing details. This section distills findings from 35 prompt variations tested by the overseas community. The core takeaway is simple: fabric before style.

Test data shows that when you explicitly state the fabric type (e.g., ribbed cotton, washed denim, silk satin) in your prompt, you get reliable, high-quality textures in about 8 out of 10 generations. Using generic terms like "clothing" or "shirt" only yields reliable results about 3 times. The reason is that fabric terms directly dictate how the model renders luster, folds, and drape—silk needs to show flowing light, denim requires twill texture, and knits need ribbed structures. These all rely on explicit triggers in your prompt.
| Detail Type | Recommended Prompting | Purpose |
|---|---|---|
| Fabric Texture | ribbed cotton knit / washed denim / silk satin |
Triggers accurate rendering of luster and folds |
| Print Locking | preserving the original print pattern exactly |
Prevents the pattern from being "re-imagined" |
| Hardware Locking | keep all buttons, zippers and stitching unchanged |
Prevents buttons from appearing/disappearing or stitching from vanishing |
| Color Anchoring | the exact same color as the reference image |
Suppresses color drift |
| Lighting/Atmosphere | soft daylight / golden hour backlighting |
Controls lighting using photography terminology |
Another high-frequency tip is to "assign roles" to your reference images. When passing multiple images (e.g., a flat lay + pose reference + background reference), specify the purpose of each in the prompt: Image 1 is the garment source, image 2 is the pose reference, image 3 is the background. Nano Banana Pro has excellent comprehension of multi-image roles; once the tasks are clearly divided, the rate of image confusion drops significantly.
📘 Model Selection Reference: If your clothing images are mostly solid-colored basics, Nano Banana 2 (non-Pro) is cheaper and faster, offering better cost-effectiveness. Save the Pro version for complex prints and high-detail items. You can use the same API key to switch between both models on the APIYI (apiyi.com) platform; I recommend running 10 tests on each to decide which should be your primary model.
Common Pitfalls in Flat-Lay to On-Model Conversion and How to Fix Them
Even with well-structured prompts, clothing remains a category with several common failure points. Knowing how to fix them in advance can save you a ton of time and money on re-generations.
| Failure Phenomenon | Root Cause | Fix Strategy |
|---|---|---|
| Silhouette Distortion (e.g., waist becomes boxy) | Flat-lay images lack 3D structural info | Use a hanging garment photo as the source, or add silhouette descriptions like slim-fit waist |
| Color Drift | Scene lighting description has warm/cool bias | Add exact same color anchor, change scene lighting to neutral studio lighting |
| Print Re-generation | Pattern wasn't explicitly locked | Add preserving the print exactly, ensure the print area is high-res in the source |
| Fabricated Back Details | Source image only shows the front | You must provide a back-view flat lay; don't let the model guess |
| Hand/Face Deformity | Inherent difficulty in human generation | Change the pose to hands-in-pockets, holding a bag, etc., or use multi-round editing to fix hands |
| Safety Filter Triggers | Sensitive wording in "try-on" instructions | Use positive phrasing like wearing the garment from the reference, avoid terms like "swap" or "replace" |
A quick note on color drift: it's the #1 complaint in AI fashion generation because color discrepancies lead directly to higher return rates. Beyond prompt anchoring, a more reliable method is to compare the generated image and the source image side-by-side on the same screen. If the main color HEX value deviates significantly, regenerate immediately. Don't try to fix it with post-processing—color correction will alter the model's skin tone as well.
For batch production, I recommend building a "remediation library" based on the fixes above. If an item fails your quality checklist, automatically append the corresponding fix prompt for a multi-round edit. This mechanism, combined with the high-concurrency channels at APIYI (apiyi.com), can compress the processing time for a single garment—from flat-lay to a full set of qualified on-model images—to under 10 minutes.
FAQ
Q1: How do I choose between Nano Banana Pro and gpt-image-2 for converting flat-lay images to on-model shots?
Nano Banana Pro excels at rendering fine details like fabric textures and embroidery, and it supports multi-turn editing and refinement, making it ideal for complex prints. gpt-image-2 has an edge in compositional design and text rendering, which is perfect for poster-style presentations. I recommend testing 10 images of each on APIYI (apiyi.com) using the same source set to see which performs better for your specific product category before deciding on your primary model.
Q2: Can AI-generated model images be used directly on e-commerce platforms?
Technically, yes, but keep two things in mind: First, some platforms require AI-generated content to be labeled, so check the latest policies of your target platform before uploading. Second, the images must accurately represent the product. Discrepancies in prints or colors can lead to returns and complaints, so be sure to complete the detail verification checklist in Step 4.
Q3: How many usable on-model shots can I generate from a single flat-lay image?
In practice, a high-quality source image can typically yield 20–50 verified variations (different models, poses, and scenes). Beyond that, you'll start to see significant homogeneity, and the marginal value drops. For the same style in multiple colors, I recommend providing a separate source image for each color rather than relying on prompts to change colors, as this carries a high risk of color inaccuracy.
Q4: What should I do if I encounter a 503 error or generation failure during model invocation?
Official channels for Nano Banana Pro may experience 503 rate-limiting during peak hours. For batch tasks, it's best to implement automatic retry and fallback logic (e.g., switching to Nano Banana 2 if a request fails). When calling via APIYI (apiyi.com), the platform provides multi-channel redundancy, which significantly lowers the failure rate. If you run into stability issues, feel free to reach out to technical support for troubleshooting.
Summary
Converting flat-lay images to on-model shots is currently the highest-ROI AI application for fashion e-commerce. Your source material costs are essentially zero (since every SKU requires flat-lay photography anyway), and the resulting AI model images can directly replace expensive real-life model shoots. The 5-step workflow covered in this article—material preparation, five-element prompts, API invocation, detail verification, and batch scaling—combined with the "fabric first, style second" prompting principle and our six-point contingency plan, is enough to support a scalable pipeline, from testing a single style to producing hundreds of images daily.
The industry is currently in the early window of transitioning from real-life shoots to AI. The most reliable path we've found is to first migrate your product detail pages and scene shots to an AI pipeline, and then gradually expand once you've gathered performance data. If you're ready to start testing, you can register at APIYI (apiyi.com) to claim your testing credits, run your first flat-lay image using the code templates provided in this article, and then gradually layer on batch processing capabilities.
Author: APIYI Team
Technical Support: The models mentioned in this article, including Nano Banana Pro and gpt-image-2, can all be accessed via the unified APIYI (apiyi.com) interface. New users can register to receive free testing credits.