
Author’s note: This article shows how to send your first request to Gemini 4 Neon over two different protocols on APIYI, and which fields and logs you should check once the request goes through.
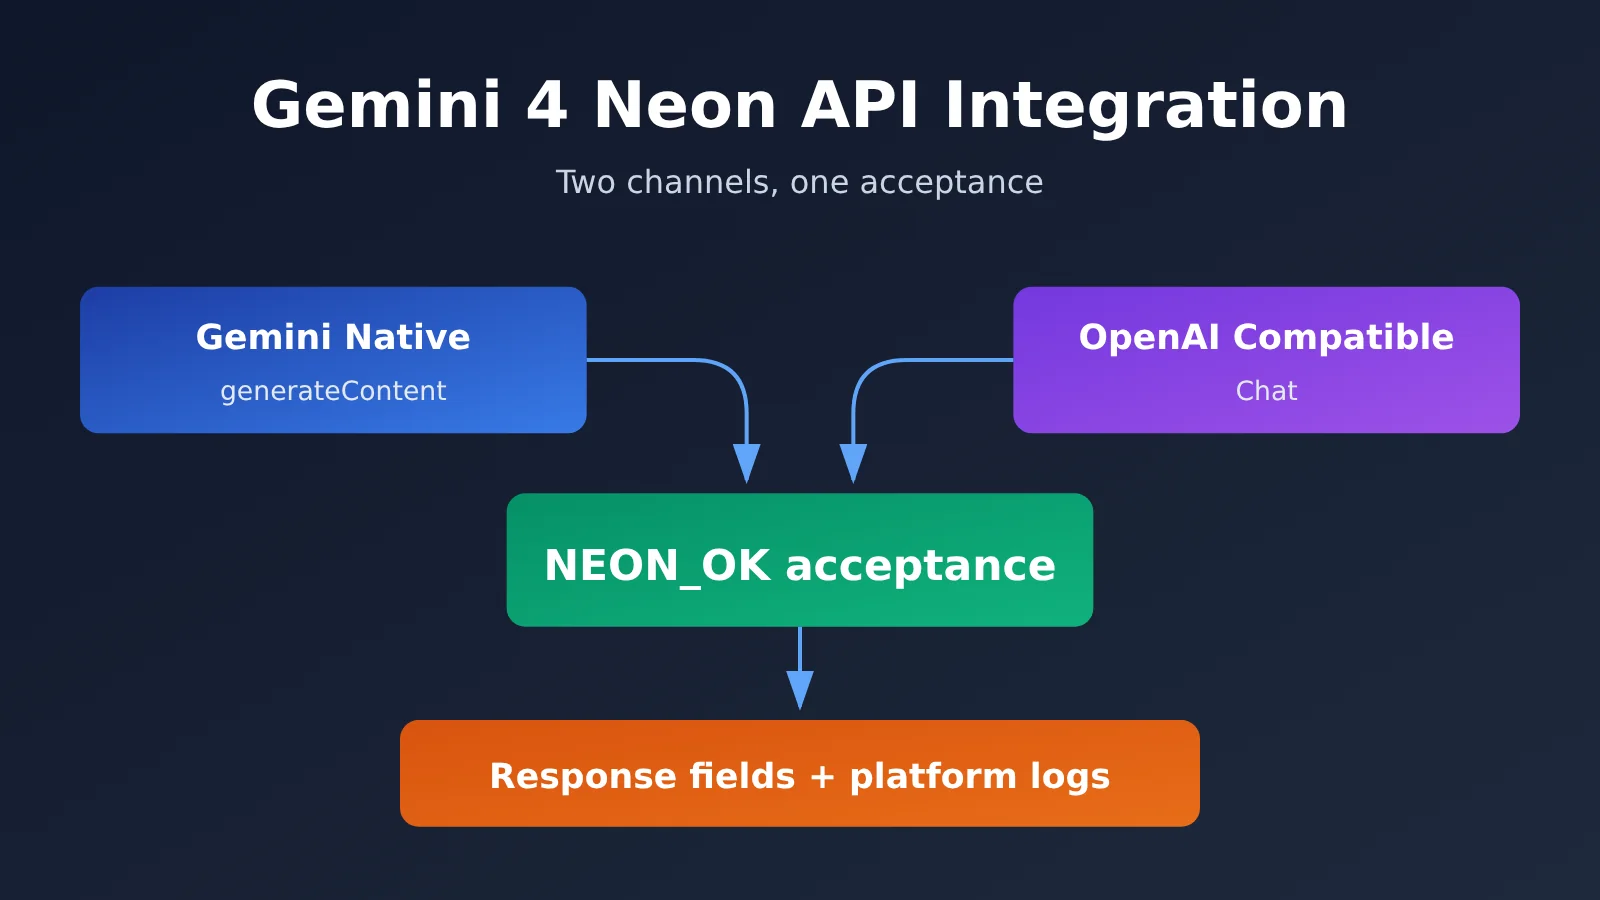
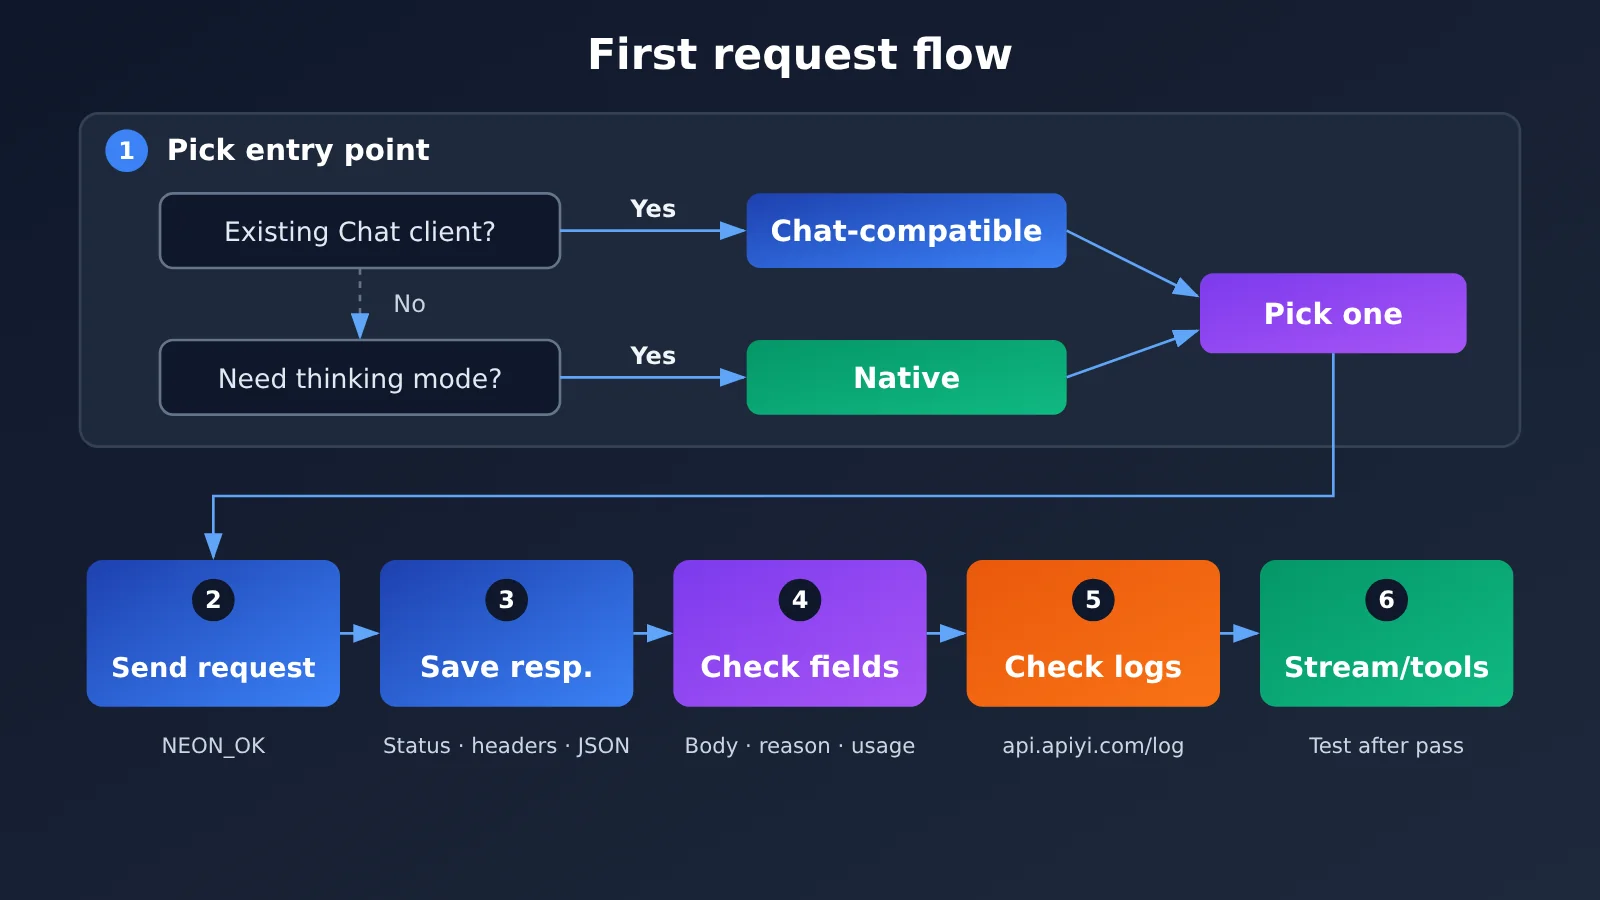
Bottom line first: if your project already has an OpenAI Chat client, take the OpenAI-compatible Chat Completions endpoint — you only need to swap base_url and the model name. If you need to explicitly set Gemini’s thinking level, take Gemini’s native generateContent endpoint and specify it in generationConfig.thinkingConfig.thinkingLevel. Either way, get plain text working with the same short prompt first, then validate against the HTTP status, response body, stop reason, usage, and platform logs. Once that passes, move on to testing streaming output, tool calling, and the rest.
Here’s the background. Google shipped Gemini 4 Neon in the November 18, 2026 AI Studio changelog and declared it GA. APIYI confirmed it was listed at 11:45 Beijing time on 2026-11-20; the public pricing catalog shows gemini-4-neon, and the available groups are default and svip. Every example in this article is written against the APIYI docs and the SDK docs — no paid endpoints were called, and there are no measured statistics anywhere in this piece.
Gemini 4 Neon API Integration Knowledge Map and Index
The whole integration process comes down to three steps: pick the endpoint, send the request, then verify the output and logs. Each step’s output becomes the input for the next one. The table below puts the order of these three steps, the reasoning behind that order, and what you should walk away with at each stage — use it as a knowledge map or as a reading index.
| No. | Step | What the previous step gives you | Why it’s ordered this way | Goal of this step |
|---|---|---|---|---|
| 1 | Choose the entry point (1.1 Chat-compatible / 1.2 Native and thinking levels) | Your existing code stack and your need for thinking levels | The entry point determines the URL, the auth style, and the field structure — everything downstream depends on it | Commit to one protocol instead of debugging two paths at the same time |
| 2 | Send the same short request (2.1 native cURL / 2.2 Python SDK) | The entry point and request format you’ve settled on | A fixed, short prompt takes differences in model capability out of the picture and tests only whether the pipeline works | Capture the full status code, response headers, and response body |
| 3 | Verify (3.1 fields / 3.2 identity and logs / 3.3 preserve evidence of failure) | The raw response saved in step 2 | Look at the response itself first, then line it up against platform logs — evidence from nearest to farthest | Decide whether “text succeeded” actually holds up; if it doesn’t, leave evidence you can trace |
Reading tip: If you only use one protocol, read the relevant subsection in Section 1, then jump straight to either 2.1 or 2.2 — but read Section 3 in full.
To Know: Essential Gemini 4 Neon API Terminology
| Term | Brief explanation |
|---|---|
generateContent |
Gemini’s native non-streaming generation endpoint; the request body organizes content with contents and parts |
thinkingLevel |
The thinking-level field under generationConfig.thinkingConfig in the native API; the examples in this article use high |
| thought part | A part in a native response that’s flagged as thinking content; exclude it when concatenating the body text |
finishReason / finish_reason |
The stop-reason fields for the native and compatible APIs, respectively |
X-Shellapi-Request-Id |
The request identifier APIYI returns in the raw response headers or in the error message, used for troubleshooting |
1 Choosing the Gemini 4 Neon API Entry Point
Both entry points target the same model; the difference lies in the protocol shape and which parameters you can control. Below is a side-by-side comparison, followed by two subsections explaining when to choose each.
| Item | OpenAI-compatible Chat | Native Gemini |
|---|---|---|
| URL | https://api.apiyi.com/v1 + Chat Completions |
https://api.apiyi.com/v1beta/models/gemini-4-neon:generateContent |
| Best for | Projects that already have an OpenAI SDK or Chat client | Projects that need explicit control over Gemini parameters |
| Thinking level | Not passed in this article | thinkingConfig.thinkingLevel |
| Answer text location | choices[0].message.content |
the non-thought text inside candidates[0].content.parts |
| Model identifier | model in the response |
modelVersion in the response (if returned) |
1.1 Gemini 4 Neon Compatible Entry Point: Reuse Your Existing Chat Client
If your existing code uses the OpenAI Python SDK or another Chat Completions client, the lowest-effort change is to set base_url to https://api.apiyi.com/v1 and use gemini-4-neon as the model name; the message structure stays the same. The upside is that your business-layer code barely needs to change, and when something goes wrong it’s easier to tell whether the issue is the network, authentication, or the model.
There are a few boundaries to spell out if you take this route. First, don’t pass reasoning_effort. Google’s own compatibility layer maps it, but that doesn’t mean APIYI’s compatible endpoint makes the same promise. Second, this article doesn’t use the /v1/responses endpoint. Third, the older thinkingBudget syntax and the minimal level are also out of scope here. If you really need to control the thinking level, use the native entry point in section 1.2 instead.
1.2 Gemini 4 Neon Native Entry Point: Set the Thinking Level Explicitly
The native entry point uses Gemini’s own request structure. You pass the thinking level explicitly through generationConfig.thinkingConfig.thinkingLevel; the value used in the APIYI dedicated example is "high". Native responses also split thought content and answer text into different parts, so you need to filter explicitly when reading the answer; section 2.1 shows the exact approach.
For authentication, this native example uses the Authorization: Bearer header rather than the key query-parameter pattern commonly seen in Gemini’s official examples. When migrating existing native code, check this point first.
2 Send the Same Short Request to the Gemini 4 Neon API
Both protocols use the same prompt: Reply with exactly NEON_OK and nothing else. This prompt has a very short expected output, so the result is easy to judge. If the response isn’t NEON_OK, there’s a problem in the request path or parsing step, and you can rule out interference like “the model just has a different answer style.” Always read the API key from the APIYI_API_KEY environment variable—don’t write it into code or command history.
2.1 Gemini 4 Neon Native cURL and JSON Extraction
The command below saves the HTTP status code, response headers, and JSON response body separately. You’ll use all three in the Section 3 verification.
curl -sS -X POST "https://api.apiyi.com/v1beta/models/gemini-4-neon:generateContent" \
  -H "Authorization: Bearer ${APIYI_API_KEY}" \
  -H "Content-Type: application/json" \
  -D neon_native_headers.txt \
  -o neon_native_body.json \
  -w "%{http_code}\n" \
  -d '{
    "contents": [
      {"role": "user", "parts": [{"text": "Reply with exactly NEON_OK and nothing else."}]}
    ],
    "generationConfig": {
      "thinkingConfig": {"thinkingLevel": "high"}
    }
  }' > neon_native_status.txt
When reading the body, concatenate every text from candidates[0].content.parts that isn’t a thought—don’t just take the first part. The examples below use jq; if you don’t have jq installed, you can swap in any JSON parsing tool:
# Body: concatenate non-thought text
jq -r '[.candidates[0].content.parts[]? | select(.thought != true) | .text // empty] | join("")' neon_native_body.json

# Finish reason, usage, and model version (output null when a field is missing; don't fill in a value yourself)
jq '{finishReason: .candidates[0].finishReason, usageMetadata, modelVersion}' neon_native_body.json

# Platform request ID
grep -i "x-shellapi-request-id" neon_native_headers.txt
2.2 Calling Gemini 4 Neon with the Python OpenAI SDK and Reading the Response
The compatibility endpoint uses with_raw_response, so you get both the parsed object and the raw response headers. max_retries=0 disables automatic SDK retries so a single failure isn’t hidden by retries, and so you don’t end up with multiple logs on the platform that don’t match up to a specific request.
import os
from openai import OpenAI, APIStatusError, APIConnectionError

client = OpenAI(
    api_key=os.environ["APIYI_API_KEY"],
    base_url="https://api.apiyi.com/v1",  # APIYI OpenAI-compatible endpoint
    max_retries=0,
    timeout=120.0,
)

try:
    raw = client.chat.completions.with_raw_response.create(
        model="gemini-4-neon",
        messages=[{"role": "user", "content": "Reply with exactly NEON_OK and nothing else."}],
        max_tokens=4096,
    )
    print("HTTP:", raw.status_code)
    print("X-Shellapi-Request-Id:", raw.headers.get("x-shellapi-request-id"))

    completion = raw.parse()
    if not completion.choices:
        print("choices 为空,不读取正文")
    else:
        choice = completion.choices[0]
        print("content:", choice.message.content)
        print("finish_reason:", choice.finish_reason)
    print("usage:", completion.usage)
    print("model:", completion.model)

except APIStatusError as e:
    print("HTTP:", e.status_code)
    print("X-Shellapi-Request-Id:", e.response.headers.get("x-shellapi-request-id"))
    print("error:", e.message)  # Before logging, confirm it doesn't contain sensitive information such as keys
except APIConnectionError as e:
    print("未拿到 HTTP 响应:", type(e).__name__)
One thing to watch in this code: when choices is empty, don’t write choices[0] directly, or you’ll throw an index error and hide the real problem. Connection errors have no HTTP status code and no response headers, so handle them separately from APIStatusError.
3 Validating the First Request to the Gemini 4 Neon API
The goal of validation is to determine whether “the plain-text request succeeded” actually holds. HTTP 2xx with the expected NEON_OK body only tells you that this one text request succeeded. It doesn’t prove model identity, and it shouldn’t be treated as a performance test result.
3.1 HTTP Status, Body, Stop Reason, and Usage
| Check | Native Field | Compatibility Field | Pass Condition |
|---|---|---|---|
| HTTP status | stored status | raw.status_code |
2xx |
| Body | concatenation of non-thought text |
choices[0].message.content |
equals NEON_OK |
| Stop reason | candidates[0].finishReason |
choices[0].finish_reason |
recorded, and consistent with the body situation |
| Usage | usageMetadata |
usage |
recorded, for cross-referencing against logs |
If a field doesn’t exist in the response, record it as “not returned” rather than inferring a value from experience. Read the stop reason together with the body. When the body is empty and the stop reason isn’t a normal finish, the problem usually lies in the generation process, not in the parsing code.
3.2 What native modelVersion, compatible model, and logs can each tell you
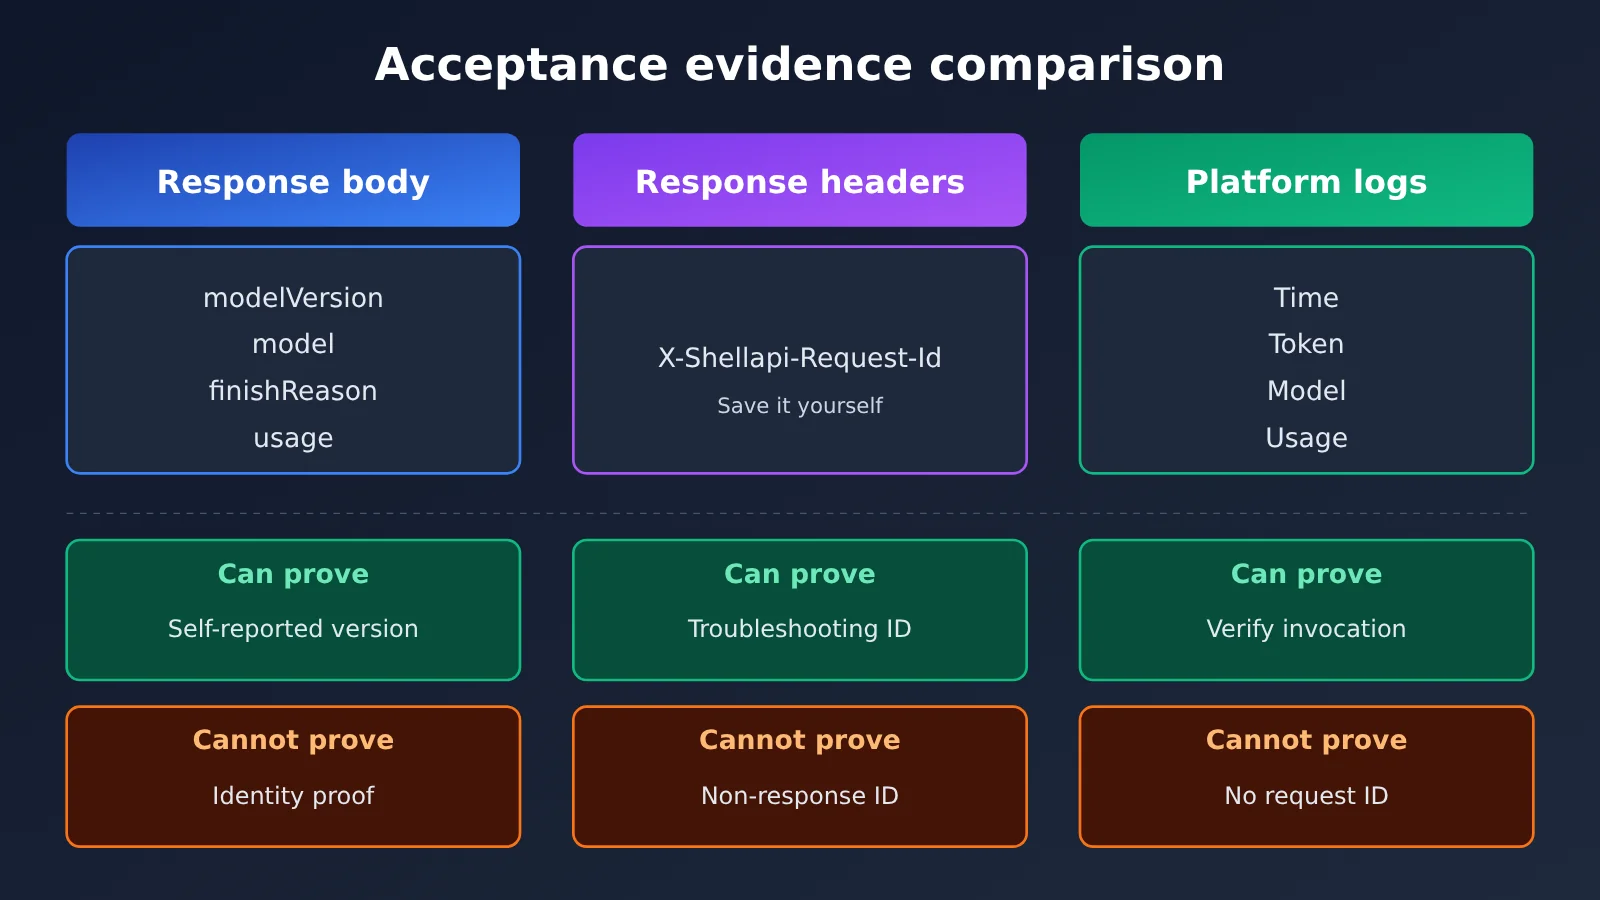
Each of these pieces of information proves a different scope, so don’t treat them as interchangeable when you’re recording evidence:
| Info | Source | Can tell you | Cannot tell you |
|---|---|---|---|
modelVersion |
Native response body (if returned) | The model version the response reports about itself | Can’t serve as identity proof on its own |
model |
Compatible response body | The model name the response reports about itself | Same as above |
| Platform logs | api.apiyi.com/log |
Cross-check this call by time, token, model, and usage | The console doesn’t show the request ID |
X-Shellapi-Request-Id |
Original response headers or error messages | The request identifier used for platform troubleshooting | It’s not responseId, not the Chat id, and not the SDK’s _request_id |
When you’re cross-checking logs, match them using the time the request was sent, the token you used, the model name gemini-4-neon, and the usage figures. Since the console doesn’t display the request ID, you have to capture X-Shellapi-Request-Id yourself from the response headers — you won’t be able to look it up in the console after the fact.
3.3 How to Preserve Evidence When Gemini 4 Neon Returns No Body or the Request Fails
When a request fails or comes back with no body, don’t retry right away—save the evidence in this order:
- Save the HTTP status code. If it’s a connection error, note the exception type.
- Save the raw response headers and extract
X-Shellapi-Request-Idfrom them. - Save the raw response body or error message, and strip out sensitive content such as the API key.
- Record the stop reason and usage (if any), along with the time the request was sent, the token name used, and the model name.
- Go to
api.apiyi.com/log, find the matching record by time and token, and then use the materials above to cross-check against the platform’s request ID troubleshooting docs.
One more thing to watch for with native responses: if the parts contain only thought content, the filtered body will end up empty. In that case, record “filtered body is empty” honestly—don’t treat thought content as body text just to get some output.
Once single-turn plain text passes acceptance the way described above, validate streaming output, tool calls, and other capabilities based on what your project needs. For each capability you add, run acceptance separately using the same method: “same request, save the raw response, cross-check logs.” This article doesn’t cover benchmarks or pricing—for that, refer to official announcements and the APIYI public catalog.
References
- Google AI Studio changelog (2026-11-18):
aistudio.google.com/docs/changelog - Gemini GenerateContentResponse structure:
aistudio.google.com/api-reference/generate-content - APIYI Gemini 4 Neon launch announcement and two-protocol examples:
docs.apiyi.com/news/gemini-4-neon-launch.md - APIYI Gemini response handling:
docs.apiyi.com/api-capabilities/gemini/response-handling - APIYI OpenAI-compatible response handling:
docs.apiyi.com/api-capabilities/openai/response-handling - APIYI request ID troubleshooting:
docs.apiyi.com/faq/request-id-troubleshooting - openai-python raw response access:
github.com/openai/openai-python
A journey of a thousand miles begins with a single step. — Tao Te Ching