
Author’s note: There are two main ways to have a coding Agent create video: render an MP4 frame by frame from code, or generate a web presentation and record it. This article compares how they work, what they deliver, and when to use each, then offers a five-step selection method.
Many developers are already used to having Claude Code, Cursor, and Codex write pages and scripts, but “having a coding Agent make a video” can still feel like a stretch. A common question is: If an Agent only writes code, how can it produce a well-paced video with sound that’s ready to publish? This article explores two approaches: frame-by-frame rendering from code and screen recording a web presentation, so you can decide which one fits your needs.
This isn’t another introduction to “one-click AI video generation.” Both approaches are based on real skills in the open-source garden-skills collection: motion-showreel handles frame-by-frame rendering from code, while web-video-presentation handles web presentation screen recording. Each has a defined workflow, checkpoints, and deliverables.
What you’ll get: By the end of this article, you’ll understand how each approach works and where its limits lie, be able to choose one for your video project in five steps, and know how to configure a suitable Large Language Model for your coding Agent.
Two Ways to Make Videos With Coding Agents
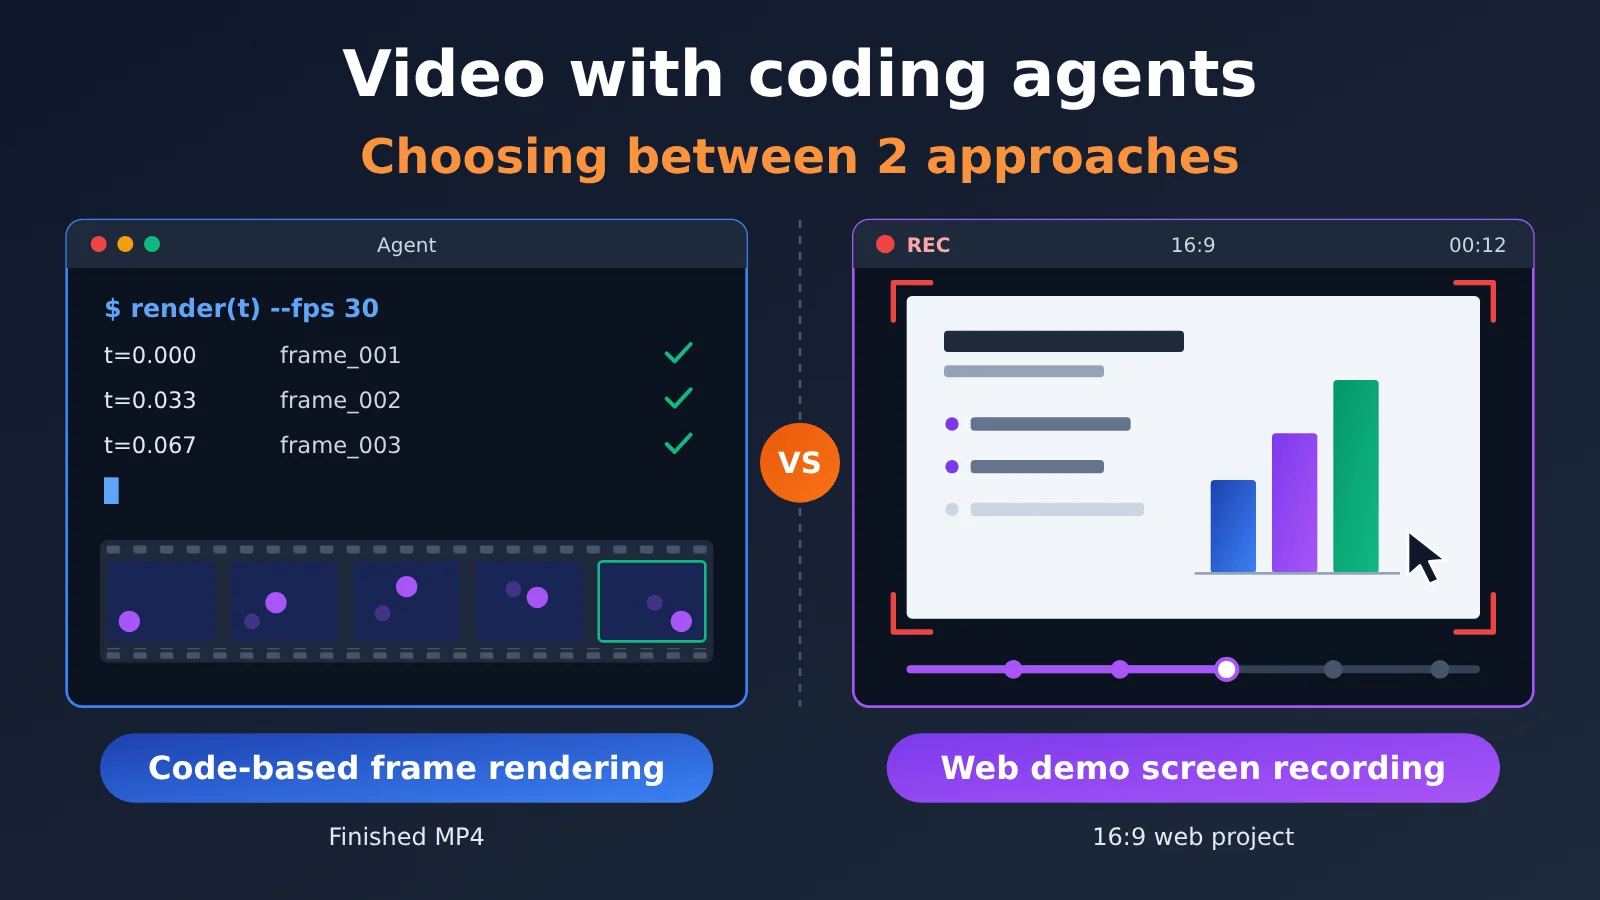
Here’s a quick look at the difference. With frame-by-frame code rendering, the Agent acts as both motion designer and render farm. With a screen-recorded web presentation, the Agent builds the presentation and a person hits record.
| Key Point | Frame-by-Frame Code Rendering (motion-showreel) | Screen-Recorded Web Presentation (web-video-presentation) |
|---|---|---|
| Core concept | A deterministic render(t) page, captured frame by frame over time |
A Vite + React + TypeScript web page, advanced by clicks or keystrokes and recorded on screen |
| Deliverable | Finished MP4 + editable source code | A recordable 16:9 web presentation project |
| Typical length | Short videos of 5–60 seconds; chapter-based videos up to about 20 minutes | Depends on the narration script, progressing through chapters and steps |
| Audio | Visuals, music, sound effects, and narration share one timeline | Optional narration audio synthesis, with one narration beat per visual step |
| Best for | Product promos, logo intros, kinetic typography, looping animations | Lessons, article-to-video projects, product demos, technical talks |
How Frame-by-Frame Code Rendering Works
The key to motion-showreel is determinism. The Agent writes a page that exposes a render(t) function: given a time t, it produces one specific frame. The renderer calls the function and captures each frame at the chosen frame rate. Because the same page can produce stills, contact sheets, three-direction style boards, proxy versions, and masters, everything from the initial proposal to the finished video comes from the same source. You won’t run into a preview that looks great but a final video that looks different. Motion blur, supersampling, and film grain are all controlled through render settings.
For audio, this approach puts cuts, beats, and sound effects on the same timeline, using shared timing values. Music can be synthesized with the built-in zero-dependency synthesizer or Tone.js sampled piano, or aligned with your own track using beat and drop detection. Narration reads only the script you provide, and the visuals follow the actual speech timestamps—not the other way around.
How Screen-Recorded Web Presentations Work
web-video-presentation takes a different approach: it treats video as a “presentation that moves.” It uses a fixed 1920×1080 stage that scales to the viewport, keeping the image stable during screen recording. A (chapter, step) cursor drives the presentation, and each click or keystroke advances one visual step corresponding to a line of narration.
This path is closer to the traditional “write the script → build the slides → record” workflow. The skill first rewrites the original article into a narration script, then maps the script’s beats to full-screen scenes. It pauses for your confirmation at each stage: the script, theme, outline, implementation pattern, and optional audio. During recording, the progress controls appear only when you hover over them, keeping the stage clean.
Comparing the Two Workflows: How Coding Agents Make Videos
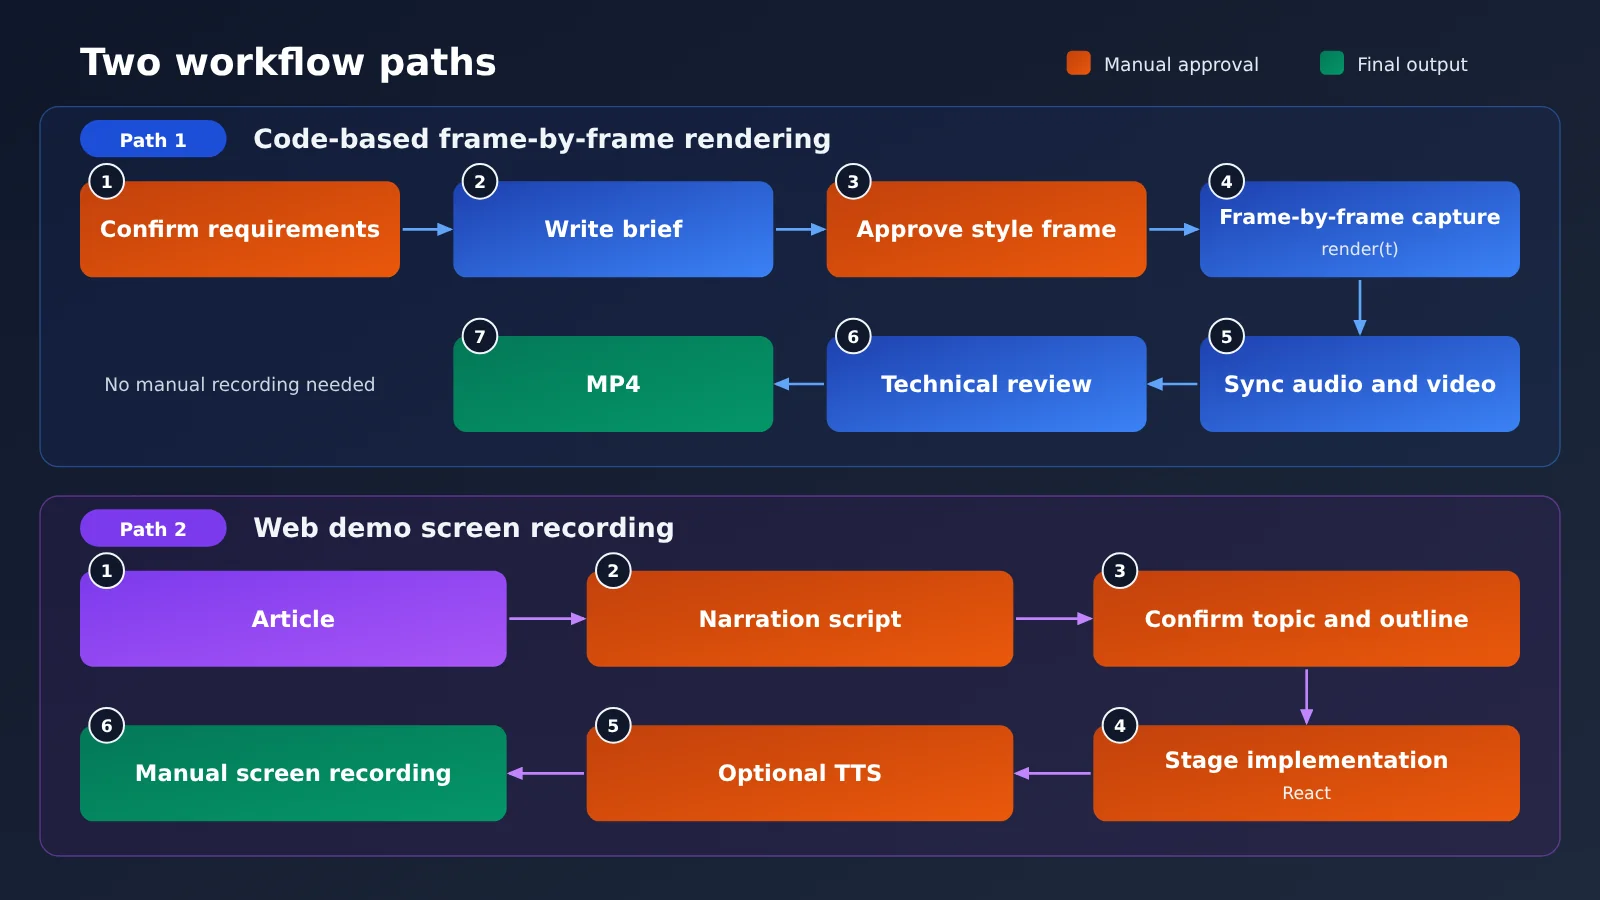
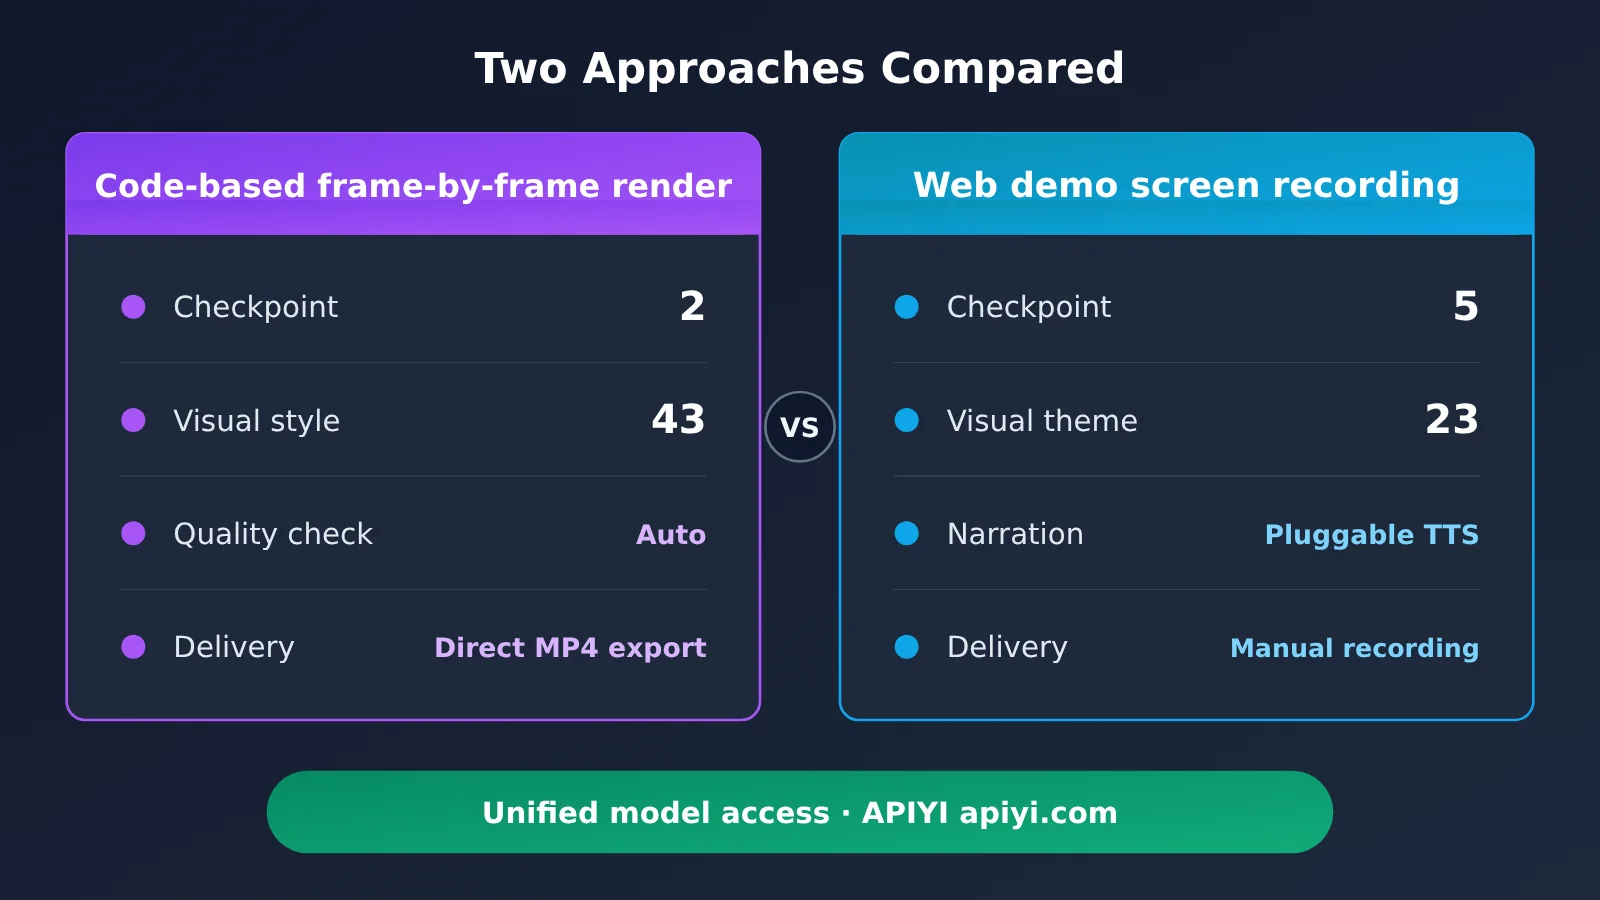
If you only look at the final video files, the two approaches may seem similar. But their workflows place very different demands on people and models. The table below compares them across eight dimensions.
| Dimension | Frame-by-Frame Code Rendering | Web Presentation Screen Recording |
|---|---|---|
| Human checkpoints | 2: confirm requirements and approve a style frame | 5: script, theme, outline, implementation mode, and optional audio |
| Style assets | A library of 43 styles (Swiss editorial, ink wash, synthwave, soft 3D, cinematic title sequences, Chinese-inspired trends, and more) | 23 built-in themes (editorial, terminal, engineering blueprint, Swiss International Style, and more) |
| Style definition | Appearance, motion, camera language, and sound palette | Design tokens controlling colors, typography, and layout |
| Voice options | Gemini / MiniMax TTS reads only the user’s script; real recordings are also supported | Pluggable TTS, with built-in MiniMax mmx-cli and OpenAI TTS, plus integration snippets for ElevenLabs, edge-tts, Azure, Google Cloud, and macOS say |
| Music and sound effects | Sourced separately, with automatic ducking under speech | Focuses mainly on narration, with less emphasis on background music |
| Quality checks | Dimensions, frame rate, duration, frame count, black frames, loudness, true peak, loop seams, and determinism must all PASS | Relies on manual preview before recording |
| Manual recording required? | No; renders directly to MP4 | Yes; the web page must be captured with a screen recording tool |
| Current version | v0.1.0 | v1.2.2 |
There’s an easily overlooked design choice here: motion-showreel strictly separates “technical validation” from “aesthetic judgment.” The former consists of machine-checkable requirements that must all pass; the latter is left to the user, who makes the final call. This division prevents the Agent from overlooking black frames or excessive loudness just because it “thinks the video looks good.”
The web presentation approach leaves more control with the user. Five checkpoints may seem cumbersome, but they’re valuable for explainer videos: the wording of the script and the division into chapters are central to content quality, so it’s best for the author to approve them.
Quick Start: Making Videos with a Coding Agent
Step 1: Install a Skill
Both skills follow the SKILL.md specification and can be installed in Claude Code, Claude.ai, Cursor, Codex CLI, Gemini CLI, OpenCode, and other environments. The table below covers common installation methods. Enter the commands directly in your terminal or Agent chat.
| Installation method | What to do | Best for |
|---|---|---|
| skills CLI | Run npx skills add ConardLi/garden-skills -s motion-showreel, or replace the value after -s with web-video-presentation; add -a claude-code to specify the Agent |
Any Agent user who wants a one-line install |
| Claude Code plugin marketplace | First run /plugin marketplace add ConardLi/garden-skills, then install motion-showreel-skills@garden-skills or presentation-skills@garden-skills |
Claude Code users |
| Versioned zip from Releases | Download the zip for the desired version, verify its SHA-256 checksum, and extract it to .claude/skills/, .agents/skills/, or .codex/skills/ |
CI, offline environments, and teams that need reproducible builds |
| Manual copy | Clone the repository and copy the skill directory into your project’s skills directory | Developers who want to customize the skills |
Step 2: Set Up the Model
Most of the work a coding Agent does to make a video involves writing code, understanding requirements, and reviewing visuals. That makes the model’s coding ability and long-context performance especially important. If your Agent supports custom endpoints, you only need to configure two parameters: API key and base_url. For an OpenAI-compatible base_url, use https://api.apiyi.com/v1. For the Anthropic endpoint and its specific parameters, refer to the APIYI documentation at docs.apiyi.com.
Step 3: Start with a Clear Request
Providing the key details up front cuts down on back-and-forth. For frame-by-frame rendering from code, the skill will ask about the topic, duration, landscape or portrait orientation, music and sound effect sources, and narration mode. For a recorded web presentation, you’ll need to provide the original article or script and a rough chapter breakdown.
- Example request for frame-by-frame rendering: Make a 30-second landscape product video for a developer tool, in a synthwave style, with music from the built-in synthesizer and no narration.
- Example request for a recorded web presentation: Turn a technical article into an 8-minute explainer video with an engineering blueprint theme and Chinese narration.
🚀 Quick start: If you haven’t configured a model endpoint for your Agent yet, you can register at APIYI apiyi.com and get test credits. The platform supports both OpenAI and Anthropic API formats, so Agents like Claude Code and custom scripts can connect directly. This makes it easy to produce a short sample before deciding which path to take.
Step 4: Make Decisions at the Checkpoints
For frame-by-frame rendering, if you haven’t specified a style, the skill will present three distinct directions at the style-frame stage. This is the cheapest point to decide the look and feel of the finished video. For a recorded web presentation, implementation only begins after you approve the outline, making that the easiest time to revise chapters. For either approach, bring your main feedback to the checkpoints rather than waiting until the finished video needs rework.
Step 5: Review and Deliver
Frame-by-frame rendering delivers an MP4 and editable source code. Keep the source so you can change copy or colors later and simply render again. The recorded web presentation delivers a project: you’ll need to use a screen-recording tool to record each chapter and, if necessary, sync any optional TTS-generated audio with the recording in editing software.
Choosing a Model to Power Your Coding Agent for Video Creation
Neither skill is tied to a specific model, but results depend heavily on the Large Language Model powering the Agent. The table below lists relevant models available through APIYI. All prices are based on the APIYI pricing page at docs.apiyi.com/models; check that page for billing units and pricing details.
| Model | Role in This Workflow | APIYI Price (Input / Output / Cache) | Available Platform |
|---|---|---|---|
| claude-opus-5-5 | Complex animation sequencing, chapter planning for longer videos, primary coding model | $4 / $20 / $0.2 | APIYI apiyi.com |
| claude-sonnet-5-5 | Everyday coding with a balance of cost and performance | $2 / $10 / $0.1 | APIYI apiyi.com |
| kimi-k3.1-pro | Rewriting long-form content into narration scripts, organizing Chinese-language content | $2 / $10 / $0.2 | APIYI apiyi.com |
| deepseek-v4.1-flash | Lightweight tasks such as batch edits and subtitle cleanup | $0.3 / $1.2 / $0.006 | APIYI apiyi.com |
| gpt-image-2.6-flare / gpt-image-2.6-sunburst | Generating cover images, style reference images, and video assets | Text input $5 / image input $8, output $30 | APIYI apiyi.com |
A note on speech synthesis: motion-showreel has built-in support for Gemini and MiniMax TTS, while web-video-presentation includes MiniMax mmx-cli and OpenAI TTS. If you can’t find these TTS models on the APIYI pricing page, they’re not currently available through APIYI, though we plan to add them soon. Until then, use the relevant provider directly as described in the skill documentation, or choose another TTS option supported by the skill. The ERNIE model family is also not currently available through APIYI, so you’ll need a separate integration if your workflow depends on it.
💰 Cost tip: When creating videos, an Agent repeatedly reads the same brief, style definitions, and project code, so cache hit rates are often high. Choosing a model with cache pricing can significantly reduce the cost of multiple iterations. Compare individual models on the APIYI pricing page at docs.apiyi.com/models.
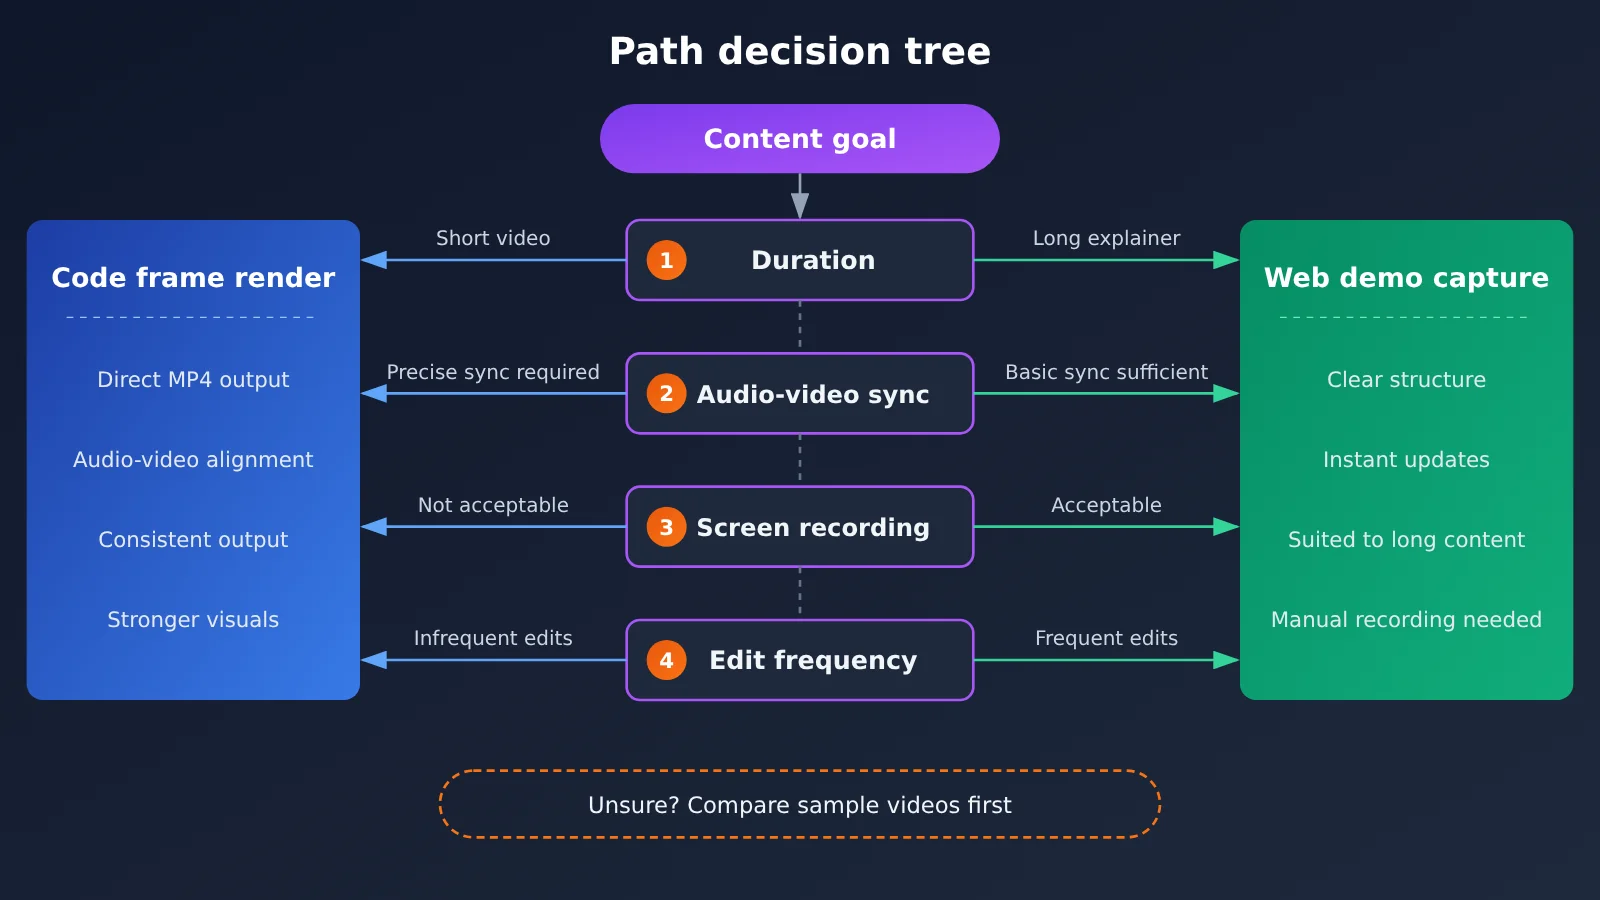
A 5-Step Decision Guide: Which Video Workflow Should Your Coding Agent Use?
Now that we’ve covered the principles and tools, you can choose a workflow by answering these five questions in order.
- Is the goal to explain something clearly or make it visually striking? For information-heavy content, choose a recorded web presentation. For visual impact, choose code-based frame-by-frame rendering.
- How long is the video? Short clips under 60 seconds are a natural fit for frame-by-frame rendering. For course lessons lasting 10 minutes or more, recorded web presentations are easier to maintain.
- Do you need precise audio-video synchronization? For editing to a beat, precisely timed sound effects, or seamless loops, only frame-by-frame rendering on a shared timeline can reliably deliver.
- Are you willing to record the screen manually? For fully automated output that can be rendered repeatedly in CI, choose frame-by-frame rendering. If you’re happy to narrate or record at your own pace, a recorded web presentation offers more flexibility.
- Will you make frequent changes later? Both workflows retain the source code, but changes to a web presentation are visible immediately. Frame-by-frame rendering requires you to render the video again.
| Typical scenario | Recommended workflow | Why |
|---|---|---|
| 30-second product launch promo | Code-based frame-by-frame rendering | Rich style library, synchronized audio and video, direct MP4 output |
| Logo intro / title sequence | Code-based frame-by-frame rendering | Deterministic rendering ensures consistent output every time |
| Technical article turned into an explainer video | Recorded web presentation | Automatically rewrites the narration script, with one step per beat |
| Online course chapter | Recorded web presentation | Consistent theme and clear chapter structure make individual lessons easy to maintain |
| Narrated year-in-review video | Code-based frame-by-frame rendering | Visuals follow actual speech timestamps, with support for longer, chapter-based videos |
| Product feature demo | Recorded web presentation | Click-driven, with control over the pace of the demo |
💡 Tip: If you’re not sure, give the Agent the same brief and ask it to produce both a 15-second sample video and a one-page presentation. Compare the output quality and iteration costs. With APIYI at apiyi.com, you can also use the same API key to switch between Claude, Kimi, DeepSeek, and other models, making it easy to compare how they perform on your project.
Frequently Asked Questions
Q1: What does it mean to have a coding Agent make a video?
It means using coding Agents such as Claude Code, Cursor, or Codex to create videos by writing code. Rather than calling a video generation model directly, the Agent uses web pages, animations, and rendering scripts to organize visuals and audio. The result is editable and reproducible.
Q2: What’s the difference between code-based frame-by-frame rendering and recording a web presentation?
Frame-by-frame rendering offers stronger visual effects and audio-visual synchronization and exports directly to MP4, but it’s better suited to shorter videos. Recording a web presentation is easier to structure and maintain, but requires manual recording. Think of the former as a motion graphics studio and the latter as a presentation slide project.
Q3: What versions are these two skills, and which Agents do they support?
According to the garden-skills repository, motion-showreel is at v0.1.0 and web-video-presentation is at v1.2.2. Both follow the SKILL.md specification and are officially listed as tested on Claude Code, Claude.ai, Cursor, Codex CLI, Gemini CLI, and OpenCode.
Q4: What are the best use cases for this approach?
– **Product marketing**: Launch teasers and animated feature highlights.
– **Brand visuals**: Logo animations, intros and outros, and animated typography posters.
– **Educational content**: Turning technical articles into explainer videos, course chapters, and internal training.
– **Developer content**: Architecture walkthroughs, tool demos, and introductions to open-source projects.
Q5: How do I configure a model API for a coding Agent?
Sign up at APIYI apiyi.com and create an API key, then enter the key and base_url in your Agent or script. APIYI supports both OpenAI and Anthropic API formats. See the documentation at docs.apiyi.com for endpoints and parameters, and docs.apiyi.com/models for model pricing.
Q6: Can the Agent write the narration itself?
The two skills take different approaches. motion-showreel’s TTS only reads scripts provided by the user, preventing the Agent from writing dialogue on its own. web-video-presentation rewrites the source article into a narration script, but you must approve it at the script checkpoint. You can use kimi-k3.1-pro or claude-sonnet-5-5 on APIYI to draft a script first, then review it yourself.
Q7: What are the known limitations of these two approaches?
Code-based frame-by-frame rendering relies on a browser to capture each frame, so longer videos take more time to render. Complex 3D or particle effects can add significantly to that time. The final quality of a recorded web presentation depends on the recording tool and operator, making full automation difficult. Some built-in TTS services also require separate activation. If you can’t find a model on the APIYI pricing page, it isn’t available yet.
Q8: Can I combine the two approaches?
Yes, and it’s common to do so. For example, you could use frame-by-frame rendering for a 10-second intro and chapter transitions, record a web presentation for the main explanation, and combine them in video editing software. Both approaches use web technologies, so they can share the same color and typography guidelines.
Key Takeaways: Creating Videos with Coding Agents
- The two approaches are fundamentally different: Frame-by-frame rendering exports MP4 directly; web presentations require manual screen recording.
- Frame-by-frame rendering relies on determinism: The same
render(t)page produces both the preview and the master, making results reproducible. - Web presentations rely on structure: Each visual step corresponds to one line of narration, making this approach well suited to longer explanations.
- Checkpoints shape quality: Two checkpoints suit a visual-first workflow; five suit a content-first workflow.
- Technical acceptance is separate from aesthetics: Hard checks for black frames, loudness, frame count, and more must all PASS.
- Model choice affects cost: You can access the models powering your workflow through APIYI; see docs.apiyi.com/models for pricing.
Summary
The question isn’t whether a coding agent can make a video—it’s which approach is right for the job:
- Code-based frame-by-frame rendering: Best for short videos, intros, and visually driven work with a strong rhythm. Audio and visuals share a timeline, and the finished video is exported directly.
- Web presentation with screen recording: Best for explainers, courses, and turning articles into videos. It’s clearly structured and easy to maintain.
- Five-step decision process: Choose your approach by considering the content goal, duration, audio-visual synchronization, whether screen recording is acceptable, and how often you’ll need to make changes.
Start with a 15-second sample to test the full workflow, then scale up to the actual project. For the models powering your workflow, we recommend using APIYI at apiyi.com to access the Claude, Kimi, DeepSeek, and GPT Image model families through a unified interface. It supports OpenAI and Anthropic API formats; check the pricing page for current rates.
📚 References
- GitHub – garden-skills: Repository for the motion-showreel and web-video-presentation skills
- Link:
github.com/ConardLi/garden-skills -
Details: Includes README files, SKILL.md files, and installation instructions for both skills
-
Agent Skills specification: SKILL.md format guide
- Link:
agentskills.io -
Details: Learn about skill directory structures and how agents load skills on demand
-
APIYI documentation: API integration guide
- Link:
docs.apiyi.com -
Details: Integration parameters for OpenAI- and Anthropic-compatible formats
-
APIYI model pricing page: Actual pricing for each model
- Link:
docs.apiyi.com/models - Details: This page is the source for all pricing data in this article
Author: APIYI Technical Team
Technical discussions: Contact us through the APIYI homepage. For more integration resources, visit the documentation at docs.apiyi.com.