Author's Note: This is a detailed guide on the complete workflow for deploying apps using Google AI Studio's Build mode. I'll show you how to export code to your local IDE and connect to low-cost API proxies like APIYI, significantly cutting your development costs.
Deploying apps from Google AI Studio is a hot topic for many developers. AI Studio's Build mode lets you quickly whip up React or Angular apps using natural language, but official API prices are pretty steep. Finding ways to lower those costs is the name of the game.
Core Value: By the time you finish this article, you'll have mastered the full deployment process for AI Studio apps. You'll learn how to export code to your local IDE and plug in low-cost API proxies, which can slash your dev costs by 50% to 80%.
Key Points for Deploying AI Studio Apps
| Point | Description | Value |
|---|---|---|
| Build Mode Development | Generate React apps using just natural language descriptions. | Rapid prototyping without writing code manually. |
| Code Export | Supports ZIP downloads and GitHub pushes. | Full control for local customization and development. |
| API Swapping | Just update the request endpoint and API Key. | Plug in low-cost proxy services to slash costs. |
| Deployment Options | Cloud Run / GitHub Pages / Own Server. | Flexibility to choose the best way to go live. |
Why export code and use a proxy API?
While developing directly within Google AI Studio is incredibly convenient, there's a major catch: you're paying full price for official APIs.
Gemini API Official Pricing (as of January 2026):
| Model | Input Price (per 1M tokens) | Output Price (per 1M tokens) |
|---|---|---|
| Gemini 3 Pro Preview | $2.00 | $12.00 |
| Gemini 2.5 Pro | $1.25 | $10.00 |
| Gemini 2.5 Flash | $0.075 | $0.60 |
If your app handles a lot of API calls, those costs add up fast. By using an API proxy (like APIYI at apiyi.com or wentuo.ai), you can snag much better rates.
The kicker is: The AI Studio online editor doesn't let you change the API request URL. The workaround? Export the code to your local IDE (like Cursor or VS Code), tweak the config, and then deploy it.

AI Studio App Deployment Step 1: Creating an App in Build Mode
Entering Build Mode
- Visit aistudio.google.com
- Click "Build" in the left sidebar
- Select "Create new app"
- Describe the app you want to create using natural language
Example prompt:
Create an AI translation app where users can input text,
call the Gemini API to translate it into a specified language,
supporting translation between Chinese, English, Japanese, and Korean.
The interface should be clean and modern, using a dark theme.
Build Mode Features
| Feature | Description |
|---|---|
| Real-time Preview | See the effects immediately after code modifications |
| Framework Selection | React by default; can be switched to Angular in settings |
| Conversational Development | Continuously optimize and modify the app through dialogue |
| Automatic API Integration | Automatically uses your AI Studio API Key |
Build mode will automatically generate a complete project structure, including:
geminiService.ts: Logic for API calls- Component files: UI interface code
- Configuration files: Project dependencies and settings
Tip: The code generated in Build mode uses the GenAI TypeScript SDK to call the Gemini API. Once exported, you can easily modify it to use other API endpoints.
AI Studio App Deployment Step 2: Exporting Code Locally
The AI Studio online editor doesn't allow you to modify the API request address, which is the core reason we need to export the code.
Method 1: Download as ZIP
- In the Build mode interface, click the "Download" button in the top right
- Select "Download as ZIP"
- Unzip to a local folder
- Open the project using an IDE like Cursor or VS Code
Method 2: Push to GitHub
- Click the GitHub icon in the top right
- OAuth authorization is required for the first-time use
- Select "Create new repository" or push to an existing one
- Clone the repository locally for development
Method 3: Get Code Snippets
For simple apps, you can directly grab the API call code:
- Click the "Get code" button
- Select your language: Python / JavaScript / REST API
- Copy the code into your project
Running the Exported Project Locally
# Enter the project directory after unzipping
cd your-ai-studio-app

# Install dependencies
npm install

# Start the development server
npm run dev
The project will now run locally, still using the original API Key and official endpoints for the time being.
AI Studio App Deployment Step 3: Connecting to a Low-Cost API Relay
This is the key step for cutting down your costs. Let's use APIYI (apiyi.com) as our example.
Locate the API Calling File
In your exported project, look for geminiService.ts or a similar file that handles API requests. The typical code structure looks like this:
// Original code - Using the official API
import { GoogleGenerativeAI } from "@google/generative-ai";

const genAI = new GoogleGenerativeAI(process.env.GEMINI_API_KEY);
const model = genAI.getGenerativeModel({ model: "gemini-2.0-flash" });
Switching to the Relay API
Relay services like APIYI are usually compatible with the OpenAI format. Here's how you'd modify it:
// Modified - Using the APIYI Relay
import OpenAI from "openai";

const client = new OpenAI({
    apiKey: "your-apiyi-key",  // Replace with your APIYI Key
    baseURL: "https://vip.apiyi.com/v1"  // APIYI endpoint
});

async function generateContent(prompt: string) {
    const response = await client.chat.completions.create({
        model: "gemini-2.0-flash",  // Model name stays the same
        messages: [{ role: "user", content: prompt }]
    });
    return response.choices[0].message.content;
}
View full modified example
// geminiService.ts - Fully modified version
import OpenAI from "openai";

// Configure the APIYI relay
const client = new OpenAI({
    apiKey: process.env.APIYI_KEY || "your-apiyi-key",
    baseURL: "https://vip.apiyi.com/v1"
});

// Example translation function
export async function translateText(
    text: string,
    targetLang: string
): Promise<string> {
    const systemPrompt = `You are a professional translator. Translate the text into ${targetLang}. Return only the translation result.`;

    const response = await client.chat.completions.create({
        model: "gemini-2.0-flash",
        messages: [
            { role: "system", content: systemPrompt },
            { role: "user", content: text }
        ],
        max_tokens: 2000
    });

    return response.choices[0].message.content || "";
}

// General chat function
export async function chat(
    messages: { role: string; content: string }[]
): Promise<string> {
    const response = await client.chat.completions.create({
        model: "gemini-2.0-flash",
        messages: messages as any,
        max_tokens: 4000
    });

    return response.choices[0].message.content || "";
}
Environment Variable Configuration
Create a .env file to store your API Key:
# .env file
APIYI_KEY=your-apiyi-api-key
Security Tip: Never hardcode your API Key directly in the code or commit it to a public repository. Always use environment variables to manage sensitive info.
AI Studio Deployment: API Relay Comparison
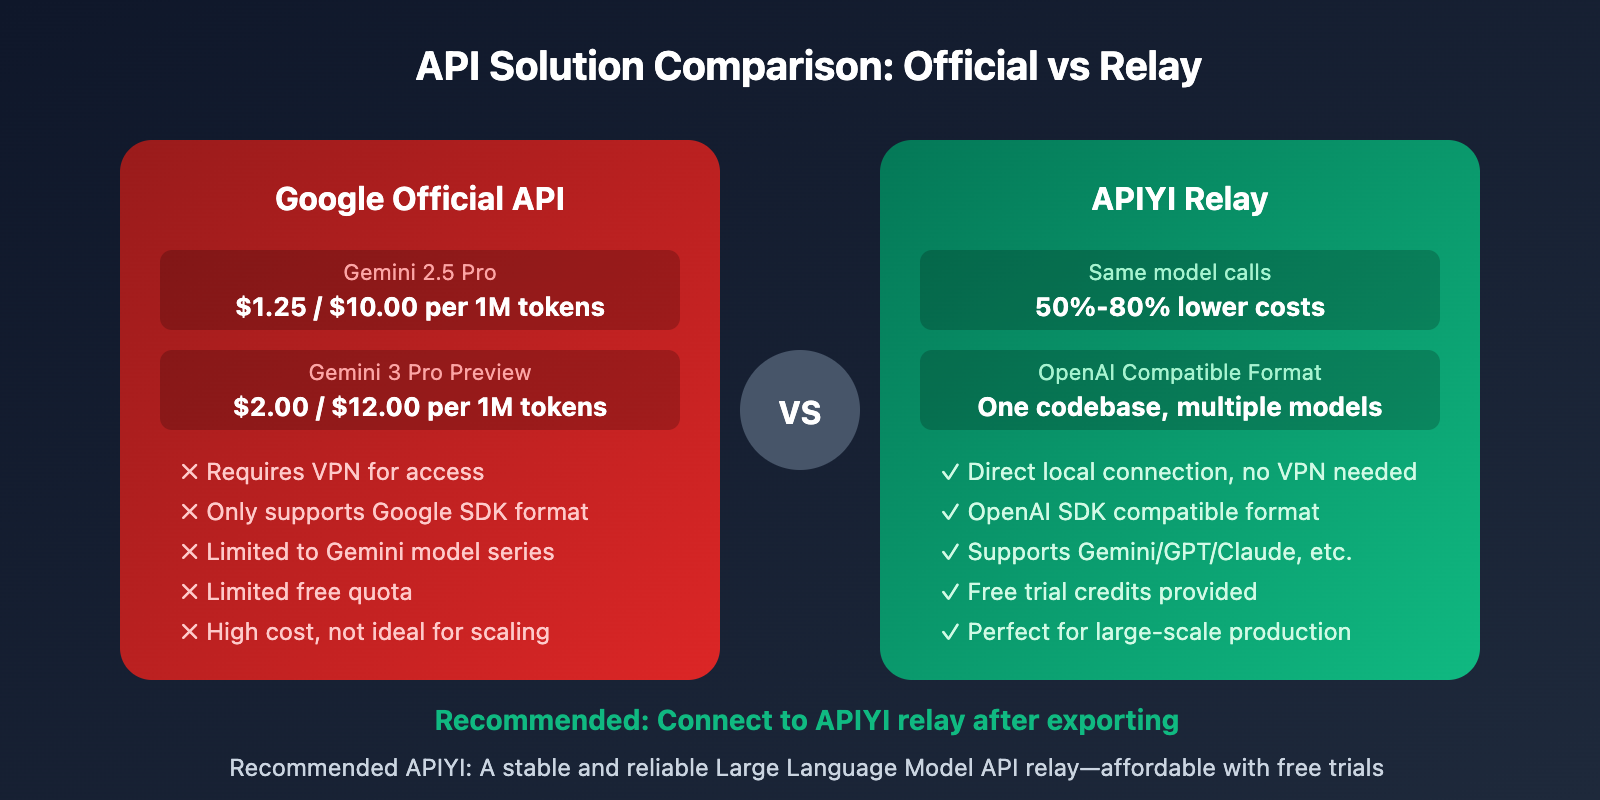
| Comparison Item | Google Official API | APIYI Relay | wentuo.ai |
|---|---|---|---|
| Pricing | Standard | Discounted | Discounted |
| Interface Format | Google SDK | OpenAI Compatible | OpenAI Compatible |
| Model Support | Gemini only | Unified multi-model | Unified multi-model |
| Free Quota | Limited | Trial available | Trial available |
| Stability | Requires VPN | Direct connection | Direct connection |
Why choose an API relay?
- Cost Advantage: For the same volume of calls, costs can drop by 50%-80%.
- Unified Interface: OpenAI format compatibility means you can switch models without rewriting your code.
- Stable Access: Direct local connections mean you don't need a VPN.
- Multi-Model Support: Use a single Key to call Gemini, GPT, Claude, and more.
Recommendation: Register at APIYI (apiyi.com) to get your API Key. The platform offers free trial credits and supports the entire Gemini model lineup.
AI Studio Deployment Step 4: Going Live
Once you've finished modifying the code, there are several deployment options available.
Option 1: Deploying to Vercel (Recommended)
# Install Vercel CLI
npm install -g vercel

# Log in and deploy
vercel login
vercel
Set the APIYI_KEY environment variable in the Vercel dashboard.
Option 2: Deploying to Cloud Run
AI Studio supports one-click deployment to Google Cloud Run:
- Click the "Deploy" button in the top right corner.
- Select your Google Cloud project.
- Configure environment variables.
- Confirm the deployment.
Note: Cloud Run deployments still use the AI Studio API Key by default. If you want to use a proxy API, we recommend exporting the code, modifying it, and then deploying it manually.
Option 3: Deploying to Your Own Server
# Build the production version
npm run build

# Run using a tool like PM2
pm2 start npm --name "ai-app" -- start
AI Studio Deployment FAQs
Q1: What should I do if the exported code throws an error when running locally?
Common causes and solutions:
- Dependencies not installed: Run
npm installto install all necessary packages. - Incorrect Node version: We recommend using Node.js 18 or higher.
- Missing environment variables: Double-check that your
.envfile is correctly configured.
Q2: Model calls are failing after modifying the API?
Check the following:
- Is the API Key correct?
- Does the baseURL include the
/v1suffix? - Is the model name in the proxy's supported list?
- Check the call logs in the APIYI (apiyi.com) console to troubleshoot.
Q3: How do I keep my development in sync with AI Studio?
Suggested workflow:
- Prototype and iterate quickly within AI Studio.
- Export the code once the features are stable.
- Modify API configurations locally.
- Continue further development in your local IDE.
Q4: Are proxy APIs stable?
Choosing a reliable proxy is crucial. Platforms like APIYI (apiyi.com) provide:
- High-availability service architecture.
- Multi-node load balancing.
- Real-time monitoring and alerts.
- Responsive technical support.
AI Studio Deployment: Complete Process Summary
| Step | Action | Tools |
|---|---|---|
| 1. Create Application | Build mode natural language development | AI Studio |
| 2. Export Code | ZIP download or GitHub push | AI Studio |
| 3. Local Development | Open project, modify API config | Cursor / VS Code |
| 4. Connect to Proxy | Replace baseURL and API Key | APIYI and other platforms |
| 5. Testing & Verification | Run locally, verify functionality | npm run dev |
| 6. Deployment | Vercel / Cloud Run / Self-hosted | Platform CLIs |
Summary
Key takeaways for deploying applications with Google AI Studio:
- Build Mode: Use natural language to quickly create React/Angular applications.
- Code Export: Use ZIP downloads or GitHub pushes to move your project to local development.
- API Replacement: Modify the baseURL and Key to connect via a proxy service.
- Cost Optimization: Slash your costs by 50%-80% using proxies like APIYI.
AI Studio is a powerful online development platform. By combining its code export features with an API proxy, you've got the perfect setup for rapid prototyping and low-cost deployment.
We recommend using APIYI (apiyi.com) for Gemini API access. The platform offers free test credits, OpenAI-compatible interfaces, and unified calling for multiple models.
📚 References
-
Google AI Studio Build Mode Documentation: Official guide to using Build Mode
- Link:
ai.google.dev/gemini-api/docs/aistudio-build-mode - Description: Detailed introduction to Build Mode features and code export
- Link:
-
Gemini API Pricing Page: Official API pricing information
- Link:
ai.google.dev/gemini-api/docs/pricing - Description: Latest pricing and free tiers for each model
- Link:
-
AI Studio Deployment to Cloud Run Tutorial: Official Google Codelab
- Link:
codelabs.developers.google.com/deploy-from-aistudio-to-run - Description: Complete workflow for one-click deployment to Google Cloud
- Link:
-
Guide to Running AI Studio Projects Locally: Community tutorial
- Link:
medium.com/lets-code-future/how-to-run-your-google-ai-studio-project-locally - Description: Detailed steps for local development after exporting code
- Link:
Author: Technical Team
Technical Exchange: Feel free to join the discussion in the comments! For more resources, visit the APIYI (apiyi.com) technical community.