
Author’s note: From the prompt and the depth-compensation formula to frame-by-frame export with Playwright + ffmpeg, this walks through how to build a 2.5D parallax animation studio with Claude Code that exports without dropping frames.
A lot of people try an AI coding assistant for animation for the first time and hit the same wall: the preview looks smooth in the browser, but the moment they export a video, it stutters, skips frames, and the duration doesn’t match. The problem is usually architectural. Export wasn’t treated as part of the design from the start. This article centers on one idea, a pure function renderAt(t) plus frame-by-frame seek and screenshot, and explains how to use Claude Code to build a 2.5D parallax animation studio in a single session and export a stable MP4.
This isn’t yet another “let AI write you an animation” demo. We’ll break down how the depth-compensation formula is derived, one very typical offset bug, and the fundamental difference between real-time playback and frame-by-frame export.
Core value: By the end, you’ll have a reusable prompt structure, a reproducible export pipeline, and a verification checklist you can carry over to other programmatic video projects.
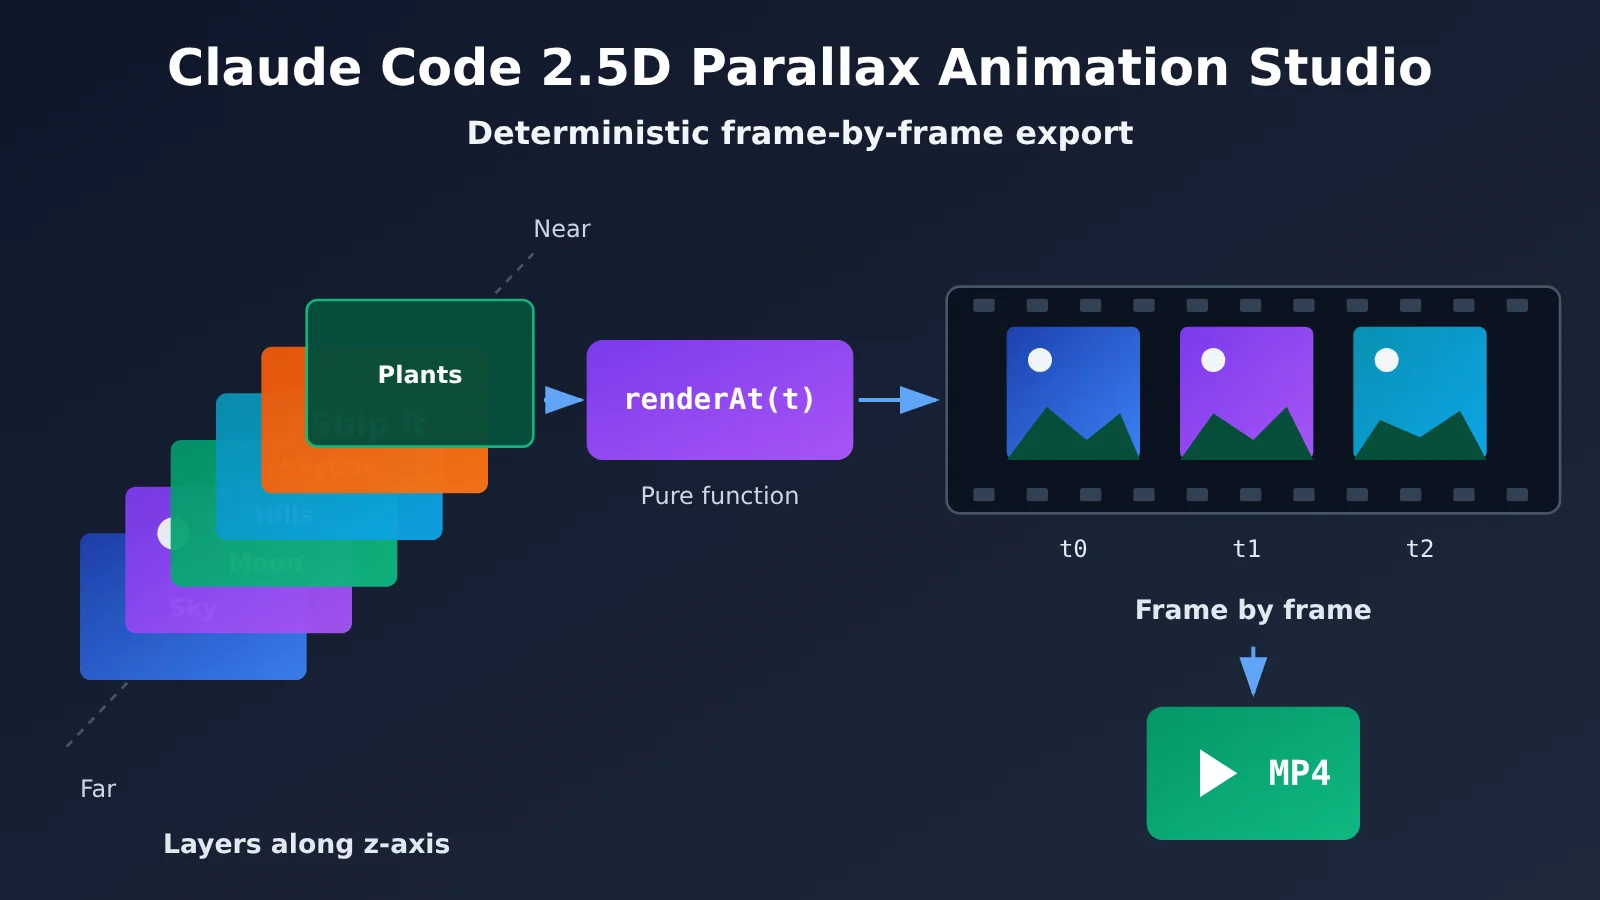
Core Takeaways from the Claude Code 2.5D Parallax Animation Studio
The practice described in the source material comes from an article published on 2026-11-09. The author used Claude Code with Opus 5.5 to build a single-file HTML studio in one session, plus a Playwright export script of about 25 lines. On the author’s laptop, a 6-second 720p video (180 frames) took about 20 seconds to export. The author didn’t share the hardware specs, so treat that timing as a rough order of magnitude only.
| Key Point | Description | Value |
|---|---|---|
| Scene Graph | Each layer has a z depth, size, position, and HTML content | Creates a sense of depth without any 3D models |
| Timeline | Keyframes for the camera and layers, with an easing curve for each segment | Camera moves are editable and reusable |
| Deterministic renderer | renderAt(t) produces exactly one frame for any given time t |
Export results don’t depend on how fast or slow the machine is |
| Depth-compensated scaling | Size and offset are both multiplied by 1 - z/perspective |
At rest, what you see is what you wrote; in motion, parallax comes for free |
| Frame-by-frame export pipeline | Playwright seeks to i/fps, takes a screenshot, and hands the frames to ffmpeg for encoding |
Identical output on every machine, with no dropped frames |
How 2.5D Parallax Animation Works
The 2.5D approach places flat 2D assets at different depths in 3D space, then sends a virtual camera through them. Layers closer to the camera move faster and those farther away move slower. The human eye reads that speed difference as depth, which is what we call parallax. There’s no modeling, no lighting, and no 3D engine involved. The browser’s CSS perspective and preserve-3d are enough.
What separates a “studio” from a “one-off animation” is whether all three components are present: a scene graph, a timeline, and a deterministic renderer. Plenty of tutorials skip the third one, yet it’s what decides whether your exported MP4 stutters. So when you write the very first line of your prompt, make it a hard requirement.
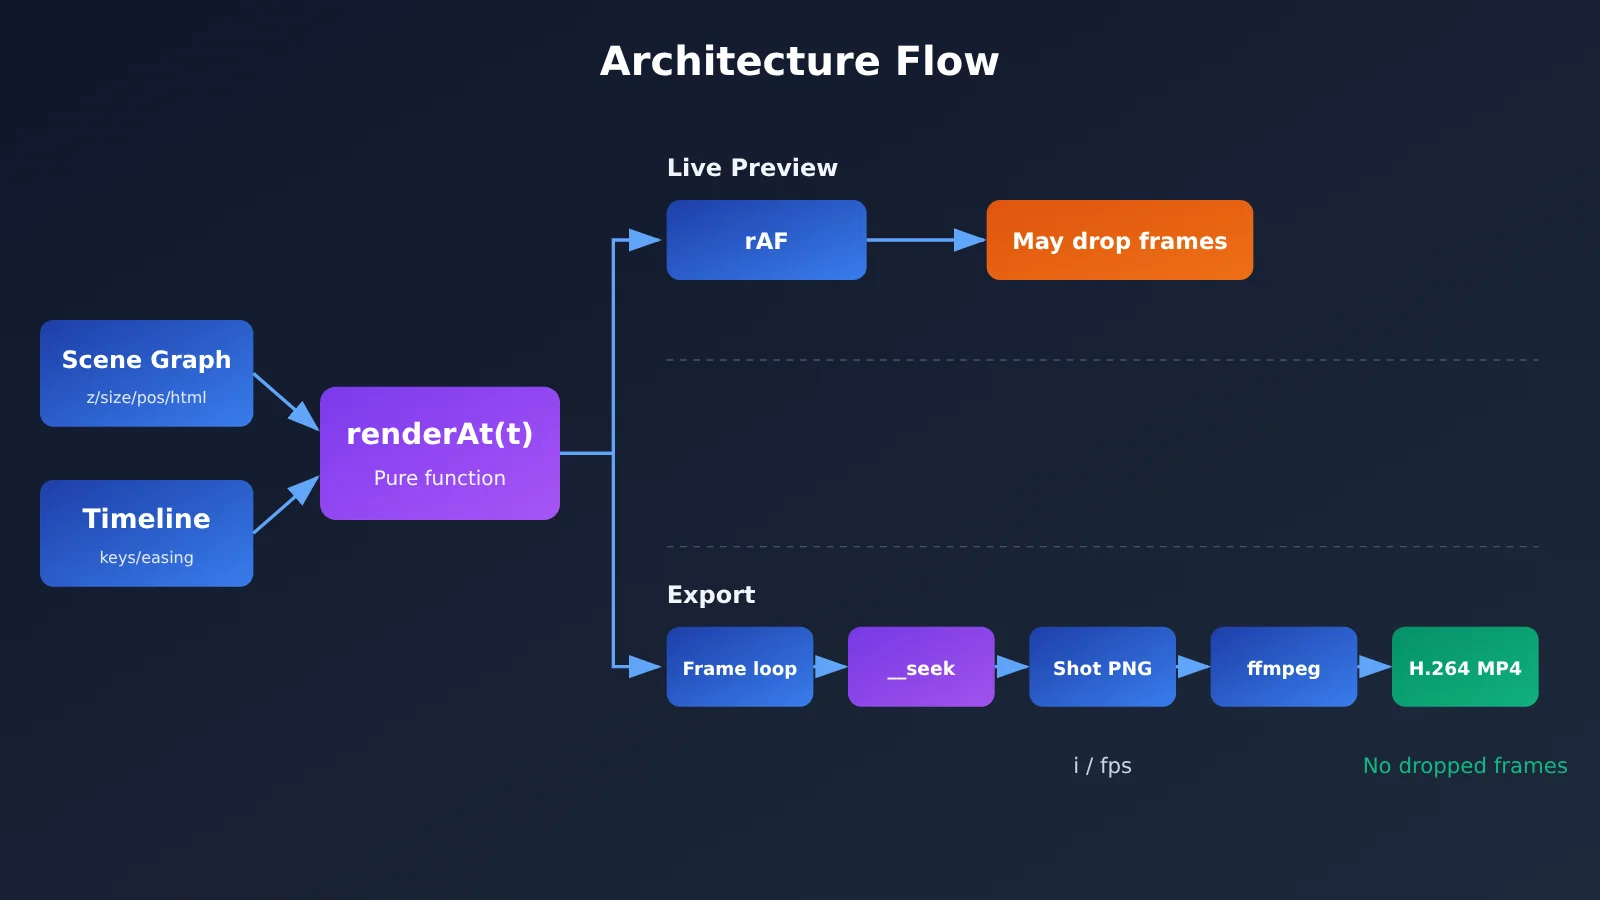
Environment and Model Setup for the Claude Code 2.5D Studio
The reference material recommends using Opus 5.5 for the first build. Anthropic’s official model overview positions it as a model for “long-running agentic coding and knowledge work,” with a 1M-token context window and a maximum output of 128K. Official pricing is $4 / $20 per million input / output tokens. Check the official page for current pricing.
We recommend pinning a specific model ID at launch, so an alias switch partway through the project doesn’t change the model’s behavior:
claude --model claude-opus-5-5 --effort high
Opus 5.5 uses medium effort by default. During the first build, the agent has to get the projection math, the keyframe engine, and the export pipeline right in one pass, so we recommend setting it to high. After that, for small changes like tweaking keyframe values or colors, you can drop back to medium to save tokens.
| Phase | Recommended effort | Typical tasks | Why |
|---|---|---|---|
| First build | high | Projection math, keyframe engine, export scripts | Several subsystems need to line up in one pass |
| Iterative tuning | medium | Adjusting keyframes, changing color schemes, adding layers | Small scope of change, and the logic is already stable |
| “Describe shot” endpoint | low (to start) | Returns JSON keyframes with a fixed schema | Short task with a fixed output structure |
The reference material doesn’t give any comparison data on how well other models would handle an equivalent build, or how much the cost would differ. If you want to switch models, we suggest running the same prompt on each one, then comparing them item by item using the still-frame verification method described later.
A Prompt Structure for Building a 2.5D Studio with Claude Code
One specific prompt beats five vague ones. The build spec in the reference material is a single long prompt, and here’s the version that keeps its original meaning:
Build a 2.5D motion studio as one file, studio.html, with no dependencies.
- Scene: 6 layers (sky, moon, hills, city skyline, a title card "Ship it.",
  foreground foliage), each at its own z depth, using CSS perspective and preserve-3d.
- Camera: keyframes for x, y, z (dolly) and yaw (orbit around the card).
- Per-layer tracks: opacity, scale, y. Easings: linear, easeInOutCubic,
  easeInOutSine, easeOutBack.
- A timeline bar with keyframe markers, a playhead, click to scrub, space to play or pause.
- renderAt(t) must be pure in t. Expose window.__seek(t) that resolves after
  the frame paints, and a ?capture mode that hides the UI.
Then write export.mjs: Playwright opens ?capture, seeks every frame at 30 fps,
screenshots it and pipes PNGs to ffmpeg as H.264.
You can break this prompt into four layers: the scene, the camera, tracks and easings, and the interactive UI, followed by the export contract. The last two lines are what really make the difference. They require renderAt(t) to be a pure function of t, they require a __seek that only returns once the frame has been painted, and they require a ?capture mode that hides the UI. That turns export into an architectural constraint, so the agent designs its code around it from the start.
If you’re adapting this for your own project, use the structure as a template. Spell out “what to draw” up front, then use the last two or three lines to pin down “how frames get captured deterministically.”
Breaking Down the 2.5D Core Code Claude Code Generated
The whole studio is about 150 lines, and the key parts are the three sections below.
Keyframe Sampling and Easing
Each track is an array of keyframes sorted by time. sample() first finds the two keyframes on either side of t, uses the earlier keyframe’s easing function to compute the progress, and then interpolates every numeric field:
function sample(keys, t) {
  if (t <= keys[0].t) return keys[0];
  for (let i = 0; i < keys.length - 1; i++) {
    const a = keys[i], b = keys[i + 1];
    if (t <= b.t) {
      const p = (easings[a.ease] || easings.linear)((t - a.t) / (b.t - a.t));
      const out = {};
      for (const k in b)
        if (typeof b[k] === 'number' && k !== 't') out[k] = a[k] + (b[k] - a[k]) * p;
      return out;
    }
  }
  return keys[keys.length - 1];
}
This function doesn’t read the current time, doesn’t depend on the previous frame’s state, and doesn’t use random numbers. The same t always produces the same set of values, and that’s where the determinism of renderAt(t) comes from.
Depth Compensation: The Core Formula for 2.5D Parallax
The idea here is that the camera stays put while the whole world moves in the opposite direction. Besides shifting along the z-axis, each layer also gets multiplied by a compensating scale:
const PERSPECTIVE = 1200; // Must match the perspective of #viewport
world.style.transform =
  `translate3d(${-cam.x}px, ${-cam.y}px, ${cam.z}px) rotateY(${-cam.yaw}deg)`;
const comp = 1 - L.z / PERSPECTIVE;
el.style.transform = `translate(-50%,-50%) ` +
  `translate3d(${x * comp}px, ${y * comp}px, ${L.z}px) scale(${comp * s})`;
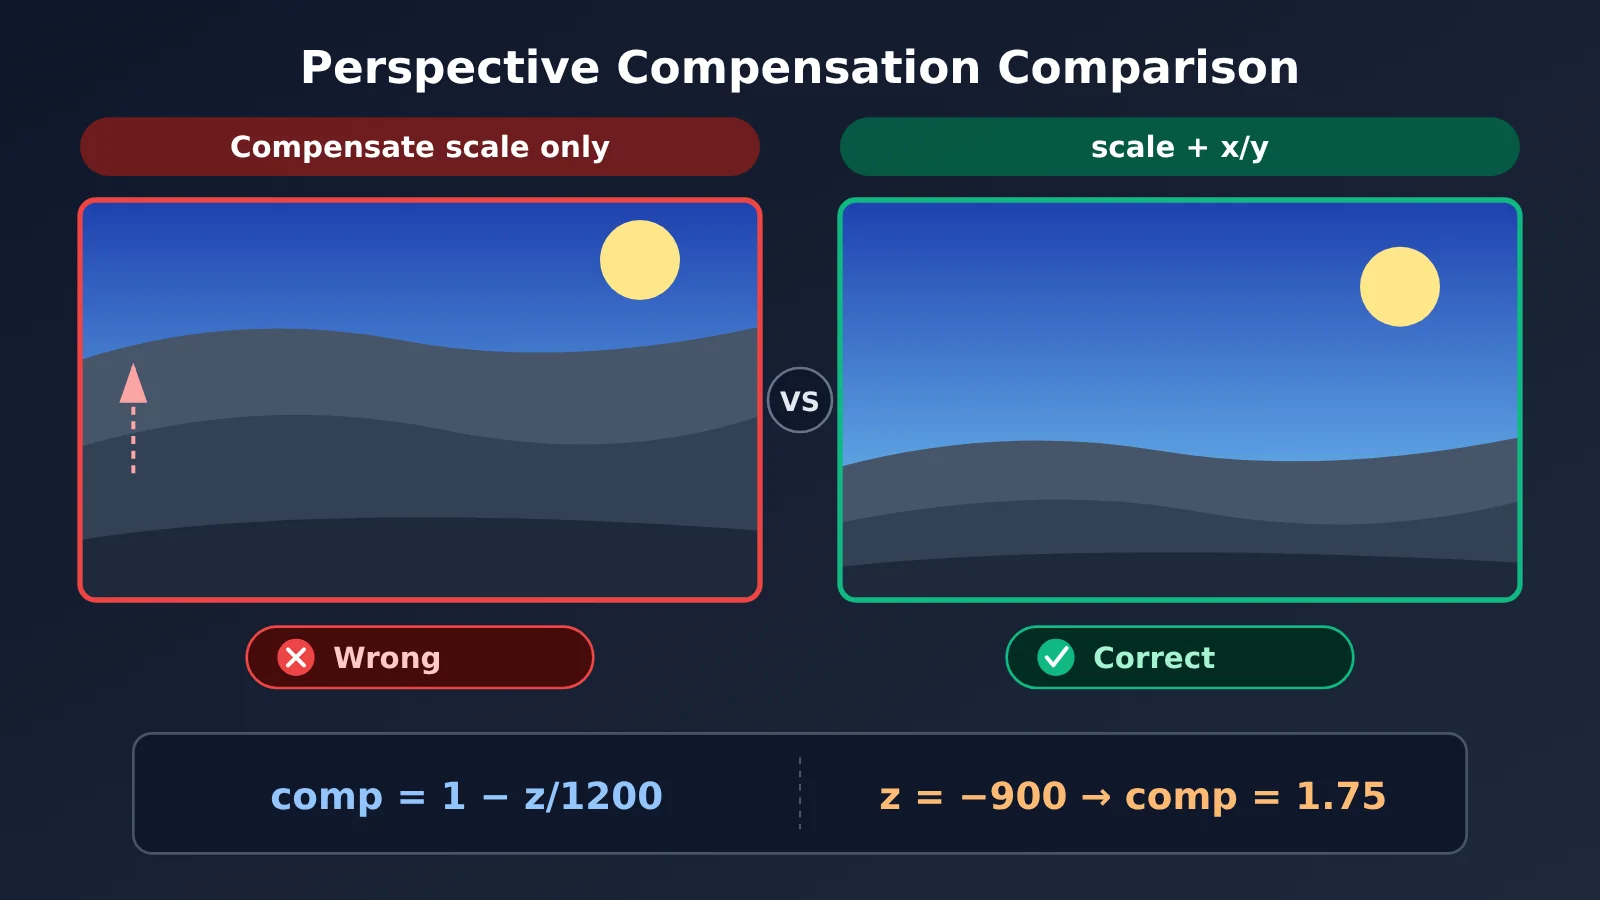
Here’s the derivation. With a CSS perspective distance of p, a point at depth z (a negative z means it’s farther from the viewer) gets scaled by p / (p - z) when projected onto the screen. Take p = 1200 and z = -900, and you get 1200 / 2100 ≈ 0.571, so the layer shrinks to about 57% of its original size.
To cancel that shrinkage, multiply by its reciprocal: (p - z) / p = 1 - z/p = 1 + 900/1200 = 1.75. That’s exactly what comp is in the code. Since 0.571 × 1.75 = 1, every layer shows up at the size and position you set whenever the camera is at rest.
So where does the parallax come from? When the camera moves, the whole world shifts by the same dx, but each layer’s on-screen displacement still gets multiplied by its own p/(p - z). Distant layers have a smaller factor, so they move less; nearby layers have a larger factor, so they move more. The compensation only fixes the composition at rest and doesn’t affect the speed differences during motion, and that’s exactly what makes the 2.5D effect work.
| Layer z | Projected scale p/(p−z) | Compensation factor comp | Relative speed during camera pan |
|---|---|---|---|
| 0 (title card plane) | 1.000 | 1.000 | Baseline |
| -300 | 0.800 | 1.250 | Slower |
| -900 | 0.571 | 1.750 | Noticeably slower |
| -1800 | 0.400 | 2.500 | Nearly static background |
(The values in the table are calculated with p = 1200. The -300 and -1800 rows are example derivations.)
A bug worth remembering: compensating size but not offset
The first version of the code only applied scale(comp) to each layer and didn’t multiply the x/y offsets by comp. As a result, the perspective compressed the offsets of the distant hills, the whole composition shifted out of place, and the hills climbed higher and higher until they covered about two thirds of the sky. The fix is simple: multiply x and y by comp too, because perspective scales position and size by the same factor.
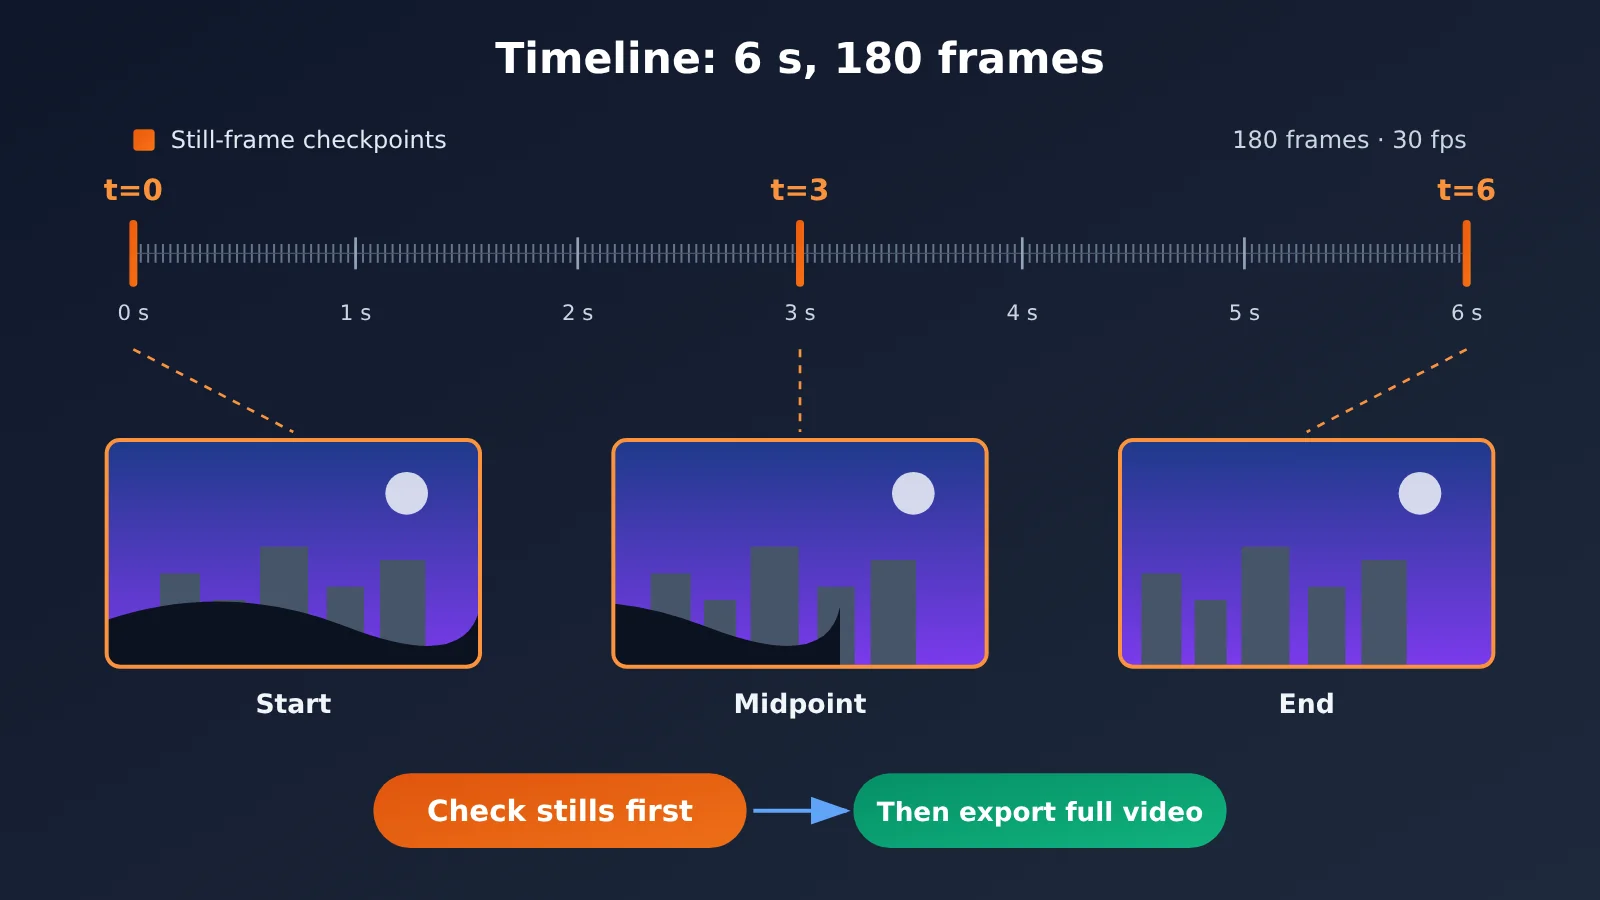
What’s more interesting is how the bug was found. The author spotted it from a single rendered frame, not from reading the code. So before you trust any camera move, have your agent render three still frames: start, midpoint, and end.
Deterministic Frame-by-Frame Export of 2.5D Parallax Animation to MP4
The Core Difference Between Real-Time Playback and Frame-by-Frame Export
Real-time preview uses requestAnimationFrame, which drops frames whenever the machine gets busy. That’s fine for previewing, but it’s a dealbreaker for export. If you screen-record instead, you capture whatever happens to be on screen at that moment in real time, so a single slow frame turns into a duplicated or missing frame.
| Dimension | Real-time playback (rAF / screen recording) | Frame-by-frame seek export |
|---|---|---|
| Time source | System clock | Frame index i / fps |
| When the machine is busy | Dropped and duplicated frames | Just slower; the output is unchanged |
| Cross-machine consistency | Inconsistent | Identical output on every machine |
| Frame count | Unpredictable | Exactly duration × fps |
| Best for | Editing preview, scrubbing the timeline | Final render, automated CI video output |
Minimal Export Script
The exporter’s timing is driven by frame index. For each frame, it seeks first, waits for the picture to finish painting, takes a screenshot, and then writes the PNG to ffmpeg’s standard input:
import { chromium } from 'playwright';
import { spawn } from 'node:child_process';
import { pathToFileURL } from 'node:url';

const out = process.argv[2] || 'out.mp4';
const browser = await chromium.launch();
const page = await browser.newPage({ viewport: { width: 1280, height: 720 } });
await page.goto(pathToFileURL('studio.html').href + '?capture');

const { duration, fps } = await page.evaluate(() => window.__scene);
const ffmpeg = spawn('ffmpeg', ['-y', '-f', 'image2pipe', '-framerate', String(fps),
  '-i', '-', '-c:v', 'libx264', '-pix_fmt', 'yuv420p', '-crf', '18', out],
  { stdio: ['pipe', 'ignore', 'inherit'] });

const frames = Math.round(duration * fps);
for (let i = 0; i < frames; i++) {
  await page.evaluate(t => window.__seek(t), i / fps);
  ffmpeg.stdin.write(await page.screenshot({ type: 'png' }));
}
ffmpeg.stdin.end();
await new Promise(r => ffmpeg.on('close', r));
await browser.close();
A few details are worth noting. window.__seek(t) only resolves after two animation frames, so the screenshot is guaranteed to capture the new transform. image2pipe lets ffmpeg read a PNG sequence from stdin. yuv420p makes sure the output file plays properly in browsers. If Playwright doesn’t have a browser installed yet, run npx playwright install chromium once first.
View the reference implementation of __seek and still-frame verification (illustrative code)
// Inside studio.html: deterministic seek, returns after two frames have been painted
window.__seek = (t) => new Promise(resolve => {
  renderAt(t);                       // Pure function: depends only on t
  requestAnimationFrame(() =>
    requestAnimationFrame(resolve)); // Make sure styles are committed and painted
});
// stills.mjs: render three stills (start / midpoint / end), check the images before trusting the shot
import { chromium } from 'playwright';
import { pathToFileURL } from 'node:url';

const browser = await chromium.launch();
const page = await browser.newPage({ viewport: { width: 1280, height: 720 } });
await page.goto(pathToFileURL('studio.html').href + '?capture');
const { duration } = await page.evaluate(() => window.__scene);

for (const [name, t] of [['start', 0], ['mid', duration / 2], ['end', duration - 1e-3]]) {
  await page.evaluate(t => window.__seek(t), t);
  await page.screenshot({ path: `still-${name}.png` });
}
await browser.close();
The two snippets above are illustrative implementations based on the ideas in the reference material. What the agent actually generates in your project is what counts.
The author’s test results: 180 frames, 1280×720, 30 fps, 6.0 seconds long, with an output MP4 of about 420 KB and a total run time of around 20 seconds. In the footage, the city towers shift less than the dark foreground hills, and the foreground hills eventually move completely out of frame. That’s exactly the parallax effect.
Adding a “Describe Shot” Feature to the 2.5D Studio
Next, let’s let screenwriters type a one-line shot description and have the model return keyframe JSON. The reference material calls the Anthropic Messages API directly:
curl https://api.anthropic.com/v1/messages \
  -H "x-api-key: $ANTHROPIC_API_KEY" \
  -H "anthropic-version: 2026-10-21" \
  -H "content-type: application/json" \
  -d '{
    "model": "claude-opus-5-5",
    "max_tokens": 4096,
    "output_config": { "effort": "low" },
    "system": "Return only JSON: {\"camera\": [{\"t\",\"x\",\"y\",\"z\",\"yaw\",\"ease\"}], \"tracks\": {}}. Times in seconds, 0 to 6.",
    "messages": [{ "role": "user", "content": "Slow push-in, slight orbit right, title fades up in the first second." }]
  }'
There are two easy-to-miss gotchas here. First, effort goes in output_config.effort. Second, Opus 5.5 always uses adaptive thinking, so passing thinking: {"type": "disabled"} returns a 400. Thinking tokens also count toward max_tokens. If you set max_tokens too low, the JSON gets cut off partway through the array and stop_reason comes back as "max_tokens".
A truncated response, or one with extra text mixed in, will make sample() fail at render time, so it’s worth pairing this call with a contract test. The reference material uses the Apidog CLI to have the same Claude Code session create and run the test. It asserts a 200 status code, a stop_reason that isn’t "max_tokens", response text that parses as JSON, and a camera array whose t values increase from 0 to 6. You can get the same result with another API testing tool or your own assertion script. Re-run the test whenever you change the system prompt or effort, since both can change what comes back.
FAQ
Q1: What’s the difference between 2.5D parallax animation and true 3D animation?
2.5D places flat 2D assets at different depths, then films them with a moving camera. The speed difference between layers creates the sense of depth. You don’t need 3D models, lighting, or a 3D engine, and plain browser CSS is enough. The tradeoff is that the camera can’t swing around behind a layer at a steep angle.
Q2: Why seek and screenshot frame by frame instead of just screen recording?
A screen recording follows real time, so any slow frame turns into a dropped or duplicated frame. If you seek to `i / fps` and then take a screenshot, each frame’s content depends only on its frame index. That means the output is identical on any machine.
Q3: How is the compensation factor 1.75 calculated?
With a perspective distance of 1200 and a depth of -900, the projected scale is 1200/2100 ≈ 0.571. The compensation is its reciprocal: `1 – z/p = 1 + 900/1200 = 1.75`. Multiply the two and you get 1, so when the camera is at rest, each layer returns to its design size and position.
Q4: Why do you recommend Opus 5.5 with high effort for the first build?
The first build has to get the projection math, the keyframe engine, and the export pipeline all right in a single session. In the reference material, one prompt plus one round of fixes produced a working studio. For small follow-up edits, medium effort or lower is enough. There’s no public comparison data for other models yet, so you’ll need to test them yourself.
Q5: Can I use the studio without an API key?
Yes. The studio itself and the MP4 export both run locally, so no key is needed. Only the “Describe shot” feature calls the Messages API, and that requires your own Anthropic API key. The tokens used when building with Claude Code are billed according to the billing plan of the account you’re using.
Q6: What are the known limitations of this approach?
The speed of capturing PNG screenshots frame by frame depends on resolution and page complexity. The 20-second figure in the reference material is a single result from one laptop. CSS 3D rendering of large yaw angles and semi-transparent stacked layers may differ between browser versions. Model IDs, API version headers, and effort parameters are all time-sensitive, so check the official documentation before you use them.
Q7: How do I apply “deterministic rendering + still-frame verification” to other programmatic video projects?
You can go through this checklist item by item:
– The render function takes only `t`. It doesn’t read the system clock, doesn’t depend on the previous frame’s state, and doesn’t use random numbers without a fixed seed.
– Provide a seek interface that returns only after drawing has finished.
– Provide a capture mode that hides the UI, plus a fixed viewport size.
– Make the number of exported frames exactly `round(duration × fps)`.
– After changing a shot, first render three still frames (start, middle, and end). Confirm they look right before exporting the full video.
– Add contract tests for model-generated JSON keyframes: they must be parseable, timestamps must be monotonically increasing, and the output must not be truncated.
Claude Code 2.5D Parallax Animation: Key Takeaways
- Export is part of the design: Lock in a pure
renderAt(t)function and a seek contract in the last few lines of your prompt - Depth compensation formula:
comp = 1 − z/perspective. Apply it to both size and x/y offset - Where parallax comes from: Compensation only corrects the static composition. Once things move, each layer still appears to travel at a different speed based on its depth
- Check still frames before trusting the camera: Three images (start, midpoint, end) can reveal bugs you’d never spot by reading the code
- Drive time by frame index: Playwright seeks and screenshots each frame, then ffmpeg encodes them to H.264 via image2pipe
- Adjust effort by stage: Use high for the first build, medium for fine-tuning, and start at low for structured JSON interfaces
- Add contract tests for model output: They protect you from max_tokens truncation breaking keyframe parsing
Summary
Building a 2.5D parallax animation studio with Claude Code comes down to three things:
- Architecture: A scene graph, a timeline, and a deterministic renderer. The third one decides the quality of the final video.
- Math: The perspective compensation factor
1 - z/papplies to both size and offset. The composition looks right at rest, and parallax comes for free once things move. - Pipeline: Seek frame by frame at
i/fps, take screenshots, and hand them to ffmpeg for encoding. The output doesn’t depend on how fast your machine is.
I’d suggest following the prompt structure in this article to get a 6-second sample working end to end. Then make a habit of checking three still frames before you tweak any camera move. After that, you can add more layers, hook up a “describe the shot” interface, or carry the same deterministic approach over to other programmatic video tools like Remotion.
📚 References
- How to Build a 2.5D Motion Studio With Opus 5.5: The source of the workflow in this article
- Link:
apidog.com/blog/build-2-5d-motion-studio-opus-5-5 -
Notes: Includes the full prompts, studio code, export script, and an example of the “describe shot” endpoint
-
Anthropic Model and Effort Documentation: Model positioning, context, pricing, and the effort parameter
- Link:
docs.anthropic.com -
Notes: Use it to verify the claude-opus-5-5 model ID, the API version header, and how to use output_config
-
ffmpeg Formats Documentation: Input format details such as image2pipe
- Link:
ffmpeg.org/ffmpeg-formats.html -
Notes: Helps you understand reading a PNG sequence from stdin and the H.264 encoding parameters
-
Playwright Documentation: Browser automation and the screenshot API
- Link:
playwright.dev - Notes: Covers page.evaluate, page.screenshot, and the browser install command