
Author’s note: This article walks through installing and authorizing agent-desktop, running the snapshot/click loop, and connecting it over MCP. It also shows how to configure the model and Base URL for the “brain in the loop.”
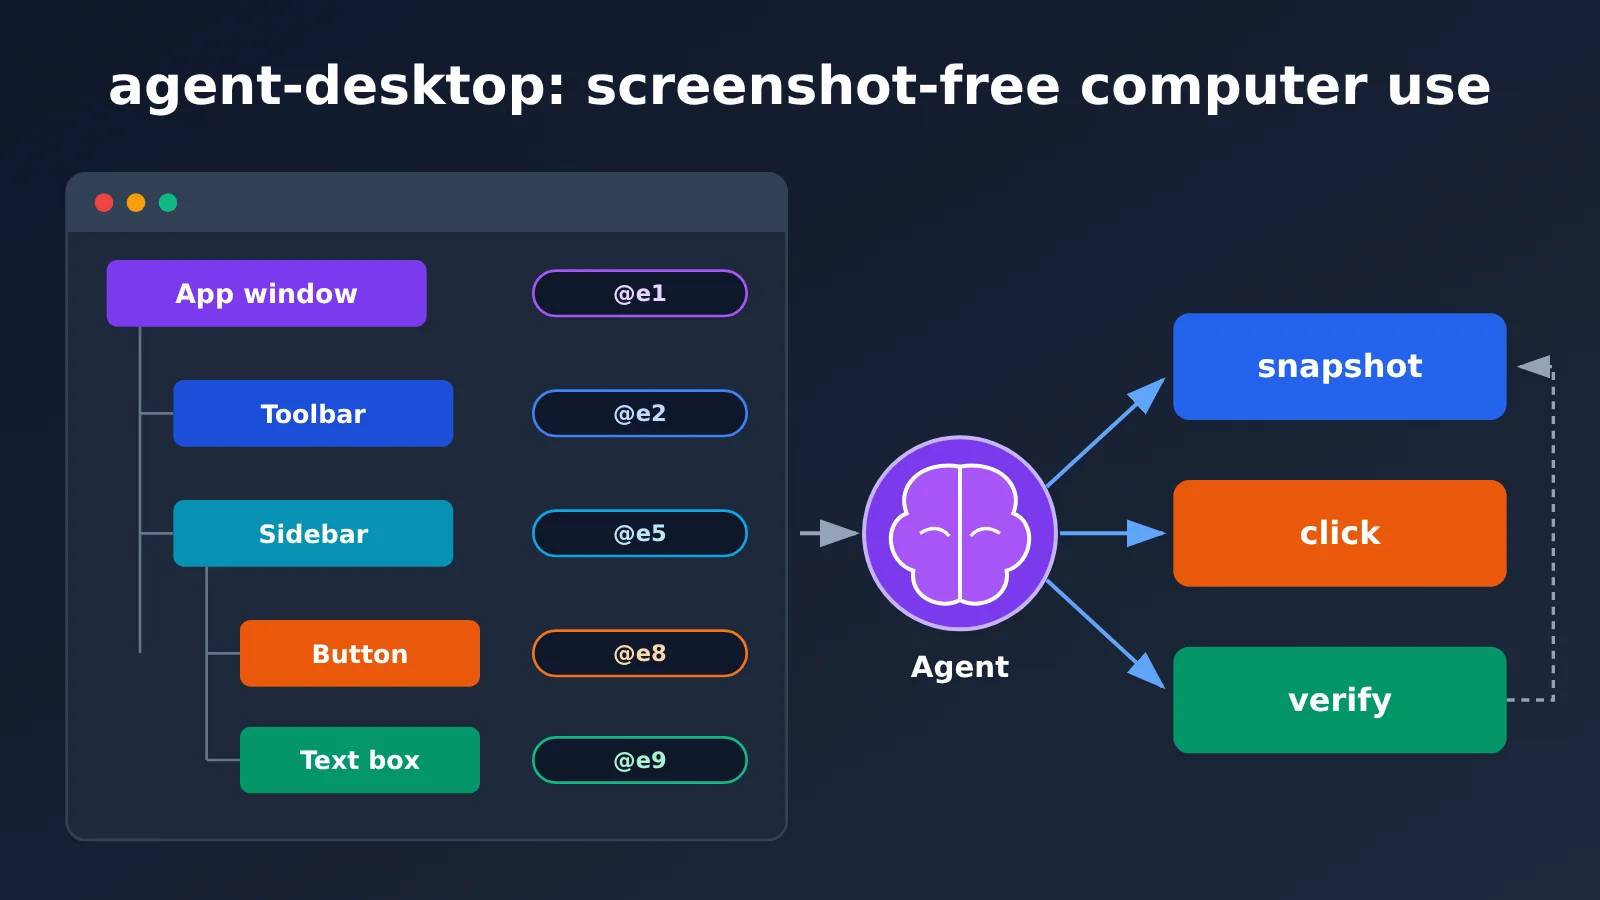
Getting a coding agent or a homegrown agent to click around Finder, fill in system settings, or drive a native client used to mean screenshots, vision models, and pixel coordinates—a long chain with plenty of room to misclick. Vercel Labs’ open-source agent-desktop takes a different path: it reads the OS accessibility tree, turns the desktop UI into JSON with refs, and lets the agent click and type by ref. That’s what it means by “screenshot-free computer use.”
This isn’t another desktop robot with AI baked in. Before we start, let’s get three things straight:
- agent-desktop doesn’t include a model: There’s no LLM embedded in the binary, no GUI, and no interactive prompt. Each command prints a JSON envelope and exits.
- The loop lives in the caller: The observe-act-verify loop is the responsibility of the agent invoking it—Claude Code, OpenCode, or a script you write yourself.
- It doesn’t do web: Web automation belongs to its sibling project agent-browser; agent-desktop only handles native desktop apps.
Since the tool doesn’t ship with a model, the “brain” has to come from the calling agent, which requires an API key and token. You can point the calling agent’s Base URL at APIYI apiyi.com and use a single key to call models like claude-opus-5-5 and claude-sonnet-5-5.
What you’ll get out of this: By the end, you’ll have agent-desktop installed and authorized, you’ll have run the minimal snapshot → click → snapshot loop, and you’ll have connected it to your own agent over MCP—with the model-side Base URL and model name configured.
agent-desktop Key Highlights
Here’s a table that lays out where agent-desktop fits. The information below comes from the official README, FAQ, and docs site, observed on 2026-11-13.
| Point | Description | Value for developers |
|---|---|---|
| Data source | Reads the OS accessibility tree: AX API on macOS, UI Automation on Windows, AT-SPI on Linux | Doesn’t rely on screenshots or pixel matching; highly structured |
| Output format | Each command emits a JSON envelope and then exits; elements carry a ref | Easy for LLMs to parse, and easy for scripts to assert on |
| Default mode | Headless, goes through the accessibility API, doesn’t move the pointer or steal focus | Can operate in the background without interrupting the user |
| Model included? | No — the loop is the caller’s responsibility | Pick your own model; the caller controls cost and quality |
| Integration methods | CLI, MCP (stdio), skills, C library FFI | Plugs into Claude Code, OpenCode, and homegrown agents |
As of 2026-11-13, the GitHub repo vercel-labs/agent-desktop has around 22,900 stars, uses the Apache-2.0 license, and the npm package name is simply agent-desktop; it was still getting new commits that day. Commands total roughly 61 names with 57 runnable, grouped into Observe, Act on ref, Keyboard mouse, Apps windows, Notifications, Clipboard, Wait, Sessions, Sandboxes, System, and so on.
How agent-desktop Works: Accessibility Trees and refs
The core concepts in agent-desktop are snapshot and ref. When you run snapshot, it walks the target app’s accessibility tree and outputs elements — buttons, text fields, menu items, and so on — as JSON, assigning each element a ref. A full ref looks something like @s8f3k2p9:e8: the first part identifies this particular snapshot, and the second part is the element number.
A ref belongs only to the snapshot that produced it. If you pass a bare @e8, you’ll get INVALID_ARGS. After the UI changes, old refs may go stale and return STALE_REF or AMBIGUOUS_TARGET, at which point you need to take a fresh snapshot. This design forces the caller to re-observe after every action — which is exactly the “verify” step in observe-act-verify.
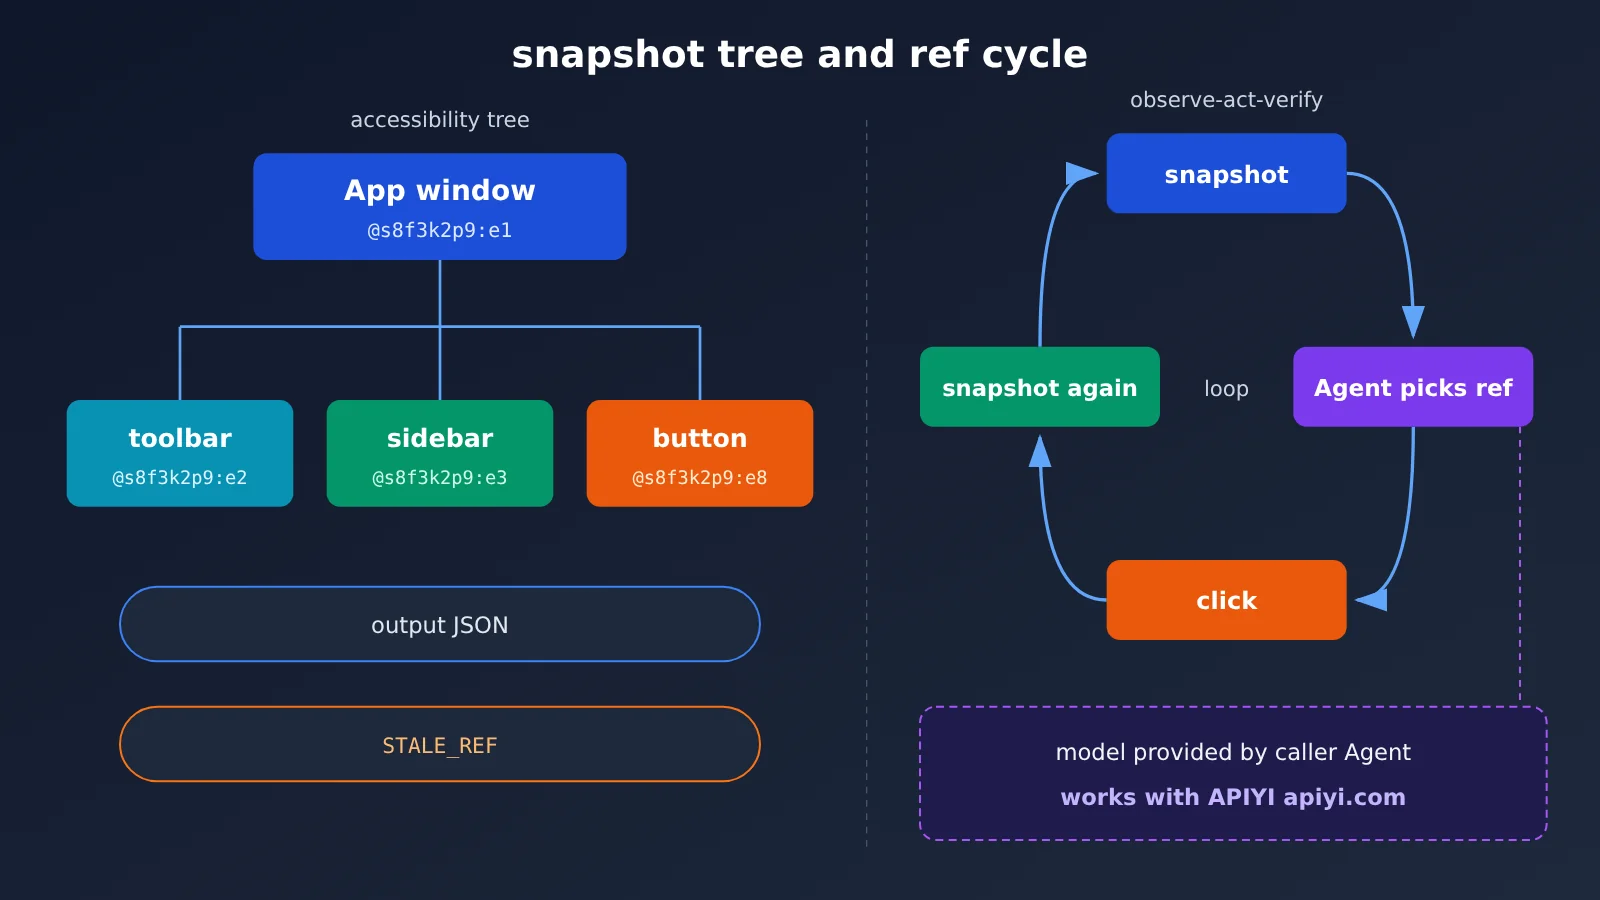
The “Agent picks a ref” step in the diagram above is where the model makes decisions. agent-desktop’s job is to hand over a structured view of the interface; reading the JSON and deciding which element to click is the calling model’s work.
How agent-desktop and agent-browser divide responsibilities
Both projects are part of Vercel Labs, and their docs are hosted together, but the division of responsibilities is clear:
| Aspect | agent-desktop | agent-browser |
|---|---|---|
| Purpose | Native desktop apps (Finder, System Settings, native clients) | Web pages and browser pages |
| Observation method | OS accessibility tree | Browser-side page structure |
| Chromium / Electron apps | Can be handed to agent-browser via a DevTools port | Good for taking over the web content inside these apps |
| Includes a model? | No | Also serves as a tool for an Agent to call |
| Typical commands | snapshot, click, clipboard-set |
Page-oriented navigation and interaction |
A practical split is this: native windows, the menu bar, the Dock, and notifications go to agent-desktop; when you hit web content in a webpage or an Electron app, switch to agent-browser via the DevTools port.
agent-desktop version milestones and where the facts come from
agent-desktop iterates quickly. Several key versions changed behavior, and some of those changes were breaking. The table below notes the source for each fact; “Unknown” means official materials don’t make it clear yet.
| Version / Date | Key changes | Source |
|---|---|---|
| 1.0.0 (2026-10-27) | Linux support officially enters 1.0 | Official changelog |
| 1.1.0 (2026-11-02) | Envelope upgraded to 2.6; added macOS Dock and menu-bar-extras support; breaking changes related to identity proof | Official changelog |
| 1.2.0 (2026-11-05) | Added MCP (agent-desktop mcp); type / set-value / clipboard-set now support --stdin |
Official changelog |
| 1.3.0 (2026-11-11) | Added agent-desktop sandbox and a macOS sandbox provider; menu/menubar snapshot no longer includes data.window (breaking) |
Official changelog |
| Windows / Linux sandboxing | Whether a corresponding provider will be offered | Unknown |
agent-desktop Quick Start
Here’s a walkthrough in the order of “install → authorize → minimal working loop → MCP integration.”
Step 1: Install agent-desktop
Platform requirements: macOS 13+; Windows 10 1809+ (x64 / ARM64); Linux is Ubuntu 24.04+ (x86_64 / aarch64), and either X11 or Wayland works. Pick any one of the installation methods below:
- npm (requires Node 18+; the package includes native binaries for each platform):
npm install -g agent-desktop - Homebrew (macOS / Linux, available in homebrew-core):
brew install agent-desktop - Native archive: download from GitHub Releases; the helper needs to be placed next to the executable.
Once installed, run agent-desktop status first to confirm that the binary and current platform environment are working properly.
Step 2: Granting permissions to agent-desktop
On macOS, you need to enable “Accessibility” permissions for your terminal or host process — otherwise agent-desktop can’t read the accessibility tree. The official CLI ships with a guided command for this:
agent-desktop permissions --guide: walks you through granting accessibility permissions in System Settings- Run
agent-desktop statusagain afterward to confirm everything is set up correctly
One thing to keep in mind: the permission applies to “the process that’s actually running agent-desktop.” If you’re invoking it indirectly through Claude Code, an IDE, or an MCP client, you may need to grant permissions to the host application instead.
Step 3: Get the minimal snapshot → click → snapshot loop working
Taking Finder as an example, three commands are enough to form a complete observe-act-verify cycle:
agent-desktop snapshot --app Finder -i: retrieves Finder’s accessibility tree. The-iflag focuses on interactive elements, and the output JSON contains refs like@s8f3k2p9:e8agent-desktop click @s8f3k2p9:e8: clicks the target element from the previous snapshot. You must write out the full refagent-desktop snapshot --app Finder -i: observe again and verify that the UI changed as expected
If step 2 throws STALE_REF or AMBIGUOUS_TARGET, that means the UI has changed — just go back to step 1 and take a fresh snapshot. For apps that require real pointer or keyboard events, you can add the global --headed flag to switch to physical input mode.
For interfaces with lots of elements, a full snapshot in one go gets long and wastes model tokens. You can fetch it in two layers instead:
agent-desktop snapshot --skeleton --app Finder: grab the skeleton first to get an overview of the regionsagent-desktop snapshot --app Finder --root @<ref from the skeleton>: then drill down into a specific subtree
This trick noticeably shortens the context you feed into the model. For the caller, a shorter context means lower costs when billed by token.
Step 4: Connect an Agent via MCP and skills
Starting with 1.2.0, agent-desktop has a built-in MCP service that runs over stdio and exposes tools such as desktop_snapshot and desktop_click. Different clients use slightly different config formats; here’s a quick overview:
- Start command:
agent-desktop mcp - Generic JSON config example:
{"mcpServers": {"agent-desktop": {"command": "agent-desktop", "args": ["mcp"]}}} - Claude Code example:
claude mcp add agent-desktop -- agent-desktop mcp
If your Agent supports skills, you can also load the official usage instructions directly so the model knows how to call them:
agent-desktop skills get desktop,agent-desktop skills get platform: print skill descriptionsnpx skills add https://github.com/vercel-labs/agent-desktop --skill agent-desktop: install via skills.sh
If you need same-process invocation, you can also use the C library libagent_desktop_ffi.
Optional: agent-desktop sandbox in 1.3.0
1.3.0 adds the agent-desktop sandbox subcommand and a macOS sandbox provider, so you can run automation inside a locally signed macOS virtual machine and isolate Agent operations from your real desktop. This isn’t required, and the minimal setup doesn’t depend on it. If you’re worried about the Agent accidentally touching real files, or you want to run lots of exploratory tasks, it’s worth considering first.
🚀 Quick start: Once MCP is configured, the calling Agent still needs a model it can use. The recommended approach is to create a token in the APIYI console at apiyi.com, then point the Agent’s Base URL there. One API key lets you switch between and compare models such as Claude, GPT, and Gemini.
Giving the agent-desktop loop a model “brain”
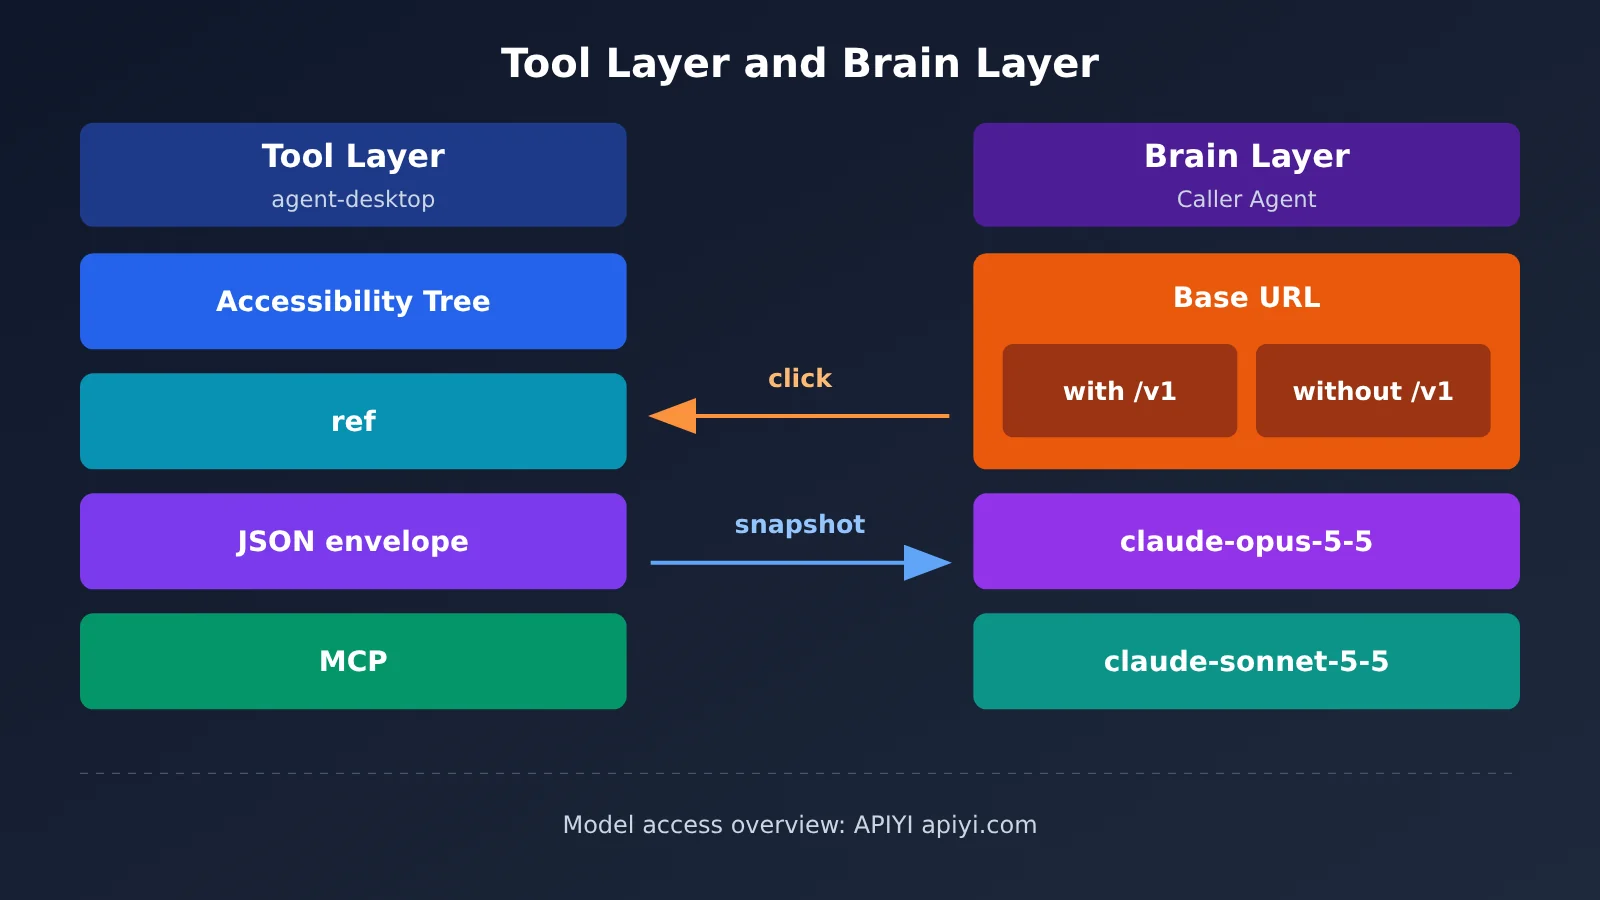
agent-desktop only handles the “eyes and hands.” The “brain” that decides which ref to click and whether the task is done lives in the caller. There are two key settings at this stage: the Base URL and the model ID.
Base URL: know whether to include /v1
The calling Agent usually uses one of two protocol styles, and each expects a different Base URL. Getting this wrong is the most common cause of 404s:
- OpenAI-compatible protocol (most homegrown scripts and OpenCode’s OpenAI-compatible provider):
https://api.apiyi.com/v1, with/v1 - Anthropic native protocol (Claude Code and other clients that call the messages endpoint directly):
https://api.apiyi.com, without/v1
For Claude Code, here’s an example using environment variables:
export ANTHROPIC_BASE_URL=https://api.apiyi.comexport ANTHROPIC_AUTH_TOKEN=你的令牌
When using the OpenAI SDK in your own Python or Node script, set base_url to https://api.apiyi.com/v1 and model to claude-opus-5-5. You can create a token at api.apiyi.com/token; for detailed configuration, see docs.apiyi.com/faq/base-url-config.md.
How to write the loop for a do-it-yourself Agent
If you don’t want to depend on an off-the-shelf Agent, writing your own loop isn’t hard. The core steps are:
- Run
agent-desktop snapshot --app 目标应用 -iand read the JSON envelope from stdout. - Send the task goal and snapshot JSON to the model, asking it to return only the next action and the full ref.
- Execute the command the model gives you, for example
agent-desktop click @sxxxx:eN. - Take another snapshot and hand the new result back to the model to decide whether the task is complete. If you get
STALE_REF, just observe again. - Set a maximum step count and human-confirmation checkpoints to avoid infinite loops or unauthorized actions.
Steps 2 and 4 both consume tokens. The --skeleton plus --root drill-down approach mentioned earlier directly affects cost here.
Choosing between claude-opus-5-5 and claude-sonnet-5-5
Both Claude models are now listed in APIYI’s model catalog and support both the chat and messages endpoints. The table below reflects pricing as of 2026-11-13, in USD per 1M tokens. Model and pricing details are subject to the platform’s model list.
| Model | Input | Output | Cache read | Best for agent-desktop scenarios | Available platform |
|---|---|---|---|---|---|
claude-opus-5-5 |
$4 | $20 | $0.2 | Multi-step tasks with complex interfaces that need stronger planning | APIYI apiyi.com |
claude-sonnet-5-5 |
$2 | $10 | $0.1 | Routine operations with clear steps and heavy repetition | APIYI apiyi.com |
A practical approach is to get the flow working with claude-opus-5-5 first, then—once the prompts and steps are settled—evaluate whether the stable parts can move to claude-sonnet-5-5. snapshot JSON contains a lot of repeated system prompts and tool descriptions, and cache reads are significantly cheaper than input tokens, so enabling prompt caching is a good fit for long loops. For the latest pricing, refer to docs.apiyi.com/models.
agent-desktop troubleshooting: a permissions issue or a model issue?
agent-desktop and the model sit on two independent paths. When something fails, figure out which side is responsible first—that’ll save you a lot of wasted effort:
| Symptom | Path | Possible cause | What to do |
|---|---|---|---|
| snapshot is empty or can’t read the app | Tool side | Accessibility permission hasn’t been granted, or the app doesn’t expose an accessibility tree | Run agent-desktop permissions --guide and check the host process permissions |
INVALID_ARGS |
Tool side | You passed only a bare ref, e.g. @e8 |
Use the full ref, e.g. @s8f3k2p9:e8 |
STALE_REF / AMBIGUOUS_TARGET |
Tool side | The UI has changed and the ref is no longer valid | Take a new snapshot |
| Model request returns 401 | Model side | The token is incorrect, expired, or the environment variable didn’t take effect | Go to api.apiyi.com/token to verify the token and re-export it |
| Model request returns 404 | Model side | The /v1 in the Base URL is wrong, or the model name is misspelled |
OpenAI-compatible endpoints include /v1; Anthropic native endpoints don’t. See the full model comparison table |
A quick way to tell: if the agent-desktop command can run standalone in the terminal and output JSON, the tool side is fine—any remaining errors are almost certainly on the model side. For 401/404 errors on the model side, check each item against the Base URL configuration guide in the APIYI documentation center at apiyi.com.
agent-desktop Permissions and Privacy Risks
This section is about the risks of desktop automation itself—not account-related risks—but it’s worth a careful read before you start using it.
The weight of Accessibility permissions. On macOS, enabling Accessibility means the authorized process can read and control the interfaces of other apps. Once you grant it to a terminal or an Agent host, any program running in that process may get the same capability. We recommend granting it only to the host that actually needs it, and you can turn it off in System Settings when you’re done.
Snapshots, the clipboard, and screenshots can all contain private data. The official docs explicitly warn that snapshots, clipboard contents, screenshots, notifications, and debug HTML may contain sensitive information from the desktop—things like chat messages, email subject lines, file names, and password manager interfaces. This data gets sent to the model by the caller, so don’t publicly upload debug logs, and don’t paste full snapshots directly into issues.
The optional helper connects to the internet. The native CLI itself doesn’t require a remote model service, but if you enable the optional JEV helper, it will send the target and screen description to the model provider you configured. Whether to enable it and who to send data to is up to you—make sure you know what you’re choosing.
You’re responsible for the consequences of actions. The Agent may click the wrong button, delete the wrong file, or send a message that shouldn’t have been sent. You can reduce risk by trying it in the 1.3.0 sandbox, limiting the scope of --app, and adding human confirmation for high-risk operations like deleting, sending, and paying. Also, apps whose accessibility tree can’t be read are invisible to agent-desktop. That’s a capability boundary—don’t count on it being able to operate every piece of software.
Connecting third-party Agents to an API gateway is a different kind of risk. When you connect third-party Agents like Claude Code or OpenCode to any API gateway, pay attention to token storage, usage limits, and whether sensitive content will be written to logs. Evaluate this separately from desktop automation risk. We recommend creating a separate token for the Agent and setting a quota, so you can revoke it independently if something goes wrong.
Frequently Asked Questions (FAQ)
Q1: What is agent-desktop?
agent-desktop is an open-source computer use CLI from Vercel Labs. It uses the OS accessibility tree to let AI agents see and operate desktop apps on macOS, Windows, and Linux — no screenshots or pixel matching required. It’s a tool, not an agent: it doesn’t bundle a model of its own.
Q2: How is agent-desktop different from screenshot-based computer use?
Screenshot-based approaches lean on a vision model to interpret pixels and then spit out coordinates — a long pipeline that’s also easily thrown off by resolution. agent-desktop emits structured JSON and refs directly; the model acts on those refs, and it runs headless by default, so it doesn’t hijack your pointer or focus. The trade-off: it can only see apps that expose accessibility information.
Q3: What version is agent-desktop on right now?
As of 2026-11-13, the latest visible release is 1.3.0 (2026-11-11), which adds sandbox. MCP has been available since 1.2.0 (2026-11-05), and Linux officially reached 1.0 with 1.0.0 (2026-10-27). Releases ship quickly, so treat GitHub Releases as the source of truth.
Q4: What is agent-desktop good for?
– **Native app testing**: automatically click through settings panels and verify UI state
– **Extending coding agents**: let Claude Code open a desktop app and check the result after it finishes writing code
– **Repetitive desktop chores**: tidy up Finder files, read notifications, read from and write to the clipboard
Hand web-related tasks off to agent-browser.
Q5: How does an agent calling agent-desktop get connected to a model quickly?
1. Sign up at APIYI apiyi.com and create an API key on the token page — new users get free trial credits
2. For OpenAI-compatible clients, set the Base URL to `https://api.apiyi.com/v1`; for native Anthropic clients, set it to `https://api.apiyi.com`
3. Pick a model such as `claude-opus-5-5` or `claude-sonnet-5-5`, then run the snapshot loop described in this article
Q6: MCP is configured but the agent returns 401 or 404 — is that agent-desktop’s fault?
Usually not. agent-desktop doesn’t talk to model services. A 401 is typically a token problem, and a 404 is usually a wrong `/v1` or a misspelled model name. First run `agent-desktop snapshot` on its own in a terminal to confirm the tool itself works, then troubleshoot the model side against APIYI apiyi.com’s Base URL configuration docs.
Q7: What are the known limitations of agent-desktop?
– Apps whose accessibility trees it can’t read are invisible to it
– Some releases carry breaking changes (e.g. 1.1.0, 1.3.0) — read the Changelog before upgrading
– The sandbox provider currently targets macOS; whether other platforms follow is unknown for now
– It doesn’t do web automation, so you’ll need agent-browser alongside it
agent-desktop Key Takeaways
- No model built in: agent-desktop only outputs a JSON envelope; the loop and decisions live in the caller
- Computer use without screenshots: it works off the AX, UI Automation, and AT-SPI accessibility trees, acting by ref
- refs must be complete: they look like
@s8f3k2p9:e8, and you’ll need a fresh snapshot after the UI changes - Works on three platforms: macOS 13+, Windows 10 1809+, Ubuntu 24.04+
- One-line MCP setup: since 1.2.0,
agent-desktop mcpruns over stdio - Hand web pages off to agent-browser: Electron apps can be passed over through the DevTools port
- Plugging in the brain: point the caller’s Base URL at APIYI apiyi.com and pick
claude-opus-5-5
Summary
The core points of agent-desktop:
- Clear positioning: it’s the “eyes and hands” of desktop apps — no model, no web pages
- Simple loop: install →
permissions --guide→ snapshot → click → snapshot again, with--skeletonto keep the context length in check - Flexible integration: CLI, MCP, skills, and FFI all work; the 1.3.0 sandbox is handy for isolated trial runs
- Keep risks in check: accessibility permissions and any private content captured in snapshots need to be managed to desktop-automation standards
Once the tool side is up and running, the remaining job is to give the loop a suitable brain. I recommend creating a token through APIYI apiyi.com, pointing the Base URL of Claude Code, OpenCode, or your own scripts at it, validating the flow with claude-opus-5-5 first, then deciding whether to switch to claude-sonnet-5-5 based on task complexity.
📚 References
- GitHub – agent-desktop: Official open-source repository with README, FAQ, and Changelog
- Link:
github.com/vercel-labs/agent-desktop -
Note: Version changes, command lists, and privacy notices are based on this repository
-
agent-desktop Official Documentation: Concepts and quick start
- Link:
agent-browser.dev/desktop,agent-browser.dev/desktop/quick-start -
Note: Installation, authorization, and minimal end-to-end examples
-
npm – agent-desktop: npm package page
- Link:
npmjs.com/package/agent-desktop -
Note: Check the current published version
-
Vercel – What is computer use: Introduction to the computer use concept
- Link:
vercel.com/i/what-is-computer-use -
Note: Understand the differences between accessibility tree and screenshot approaches
-
APIYI Documentation Center: Model catalog, Base URL configuration, Claude capability descriptions
- Link:
docs.apiyi.com/models.md,docs.apiyi.com/faq/base-url-config.md,docs.apiyi.com/api-capabilities/claude.md - Note: Models and pricing are subject to the platform model list
Author: APIYI Technical Team
Technical Contact: Feel free to contact us via the APIYI apiyi.com homepage. For more resources, visit the docs.apiyi.com documentation center.