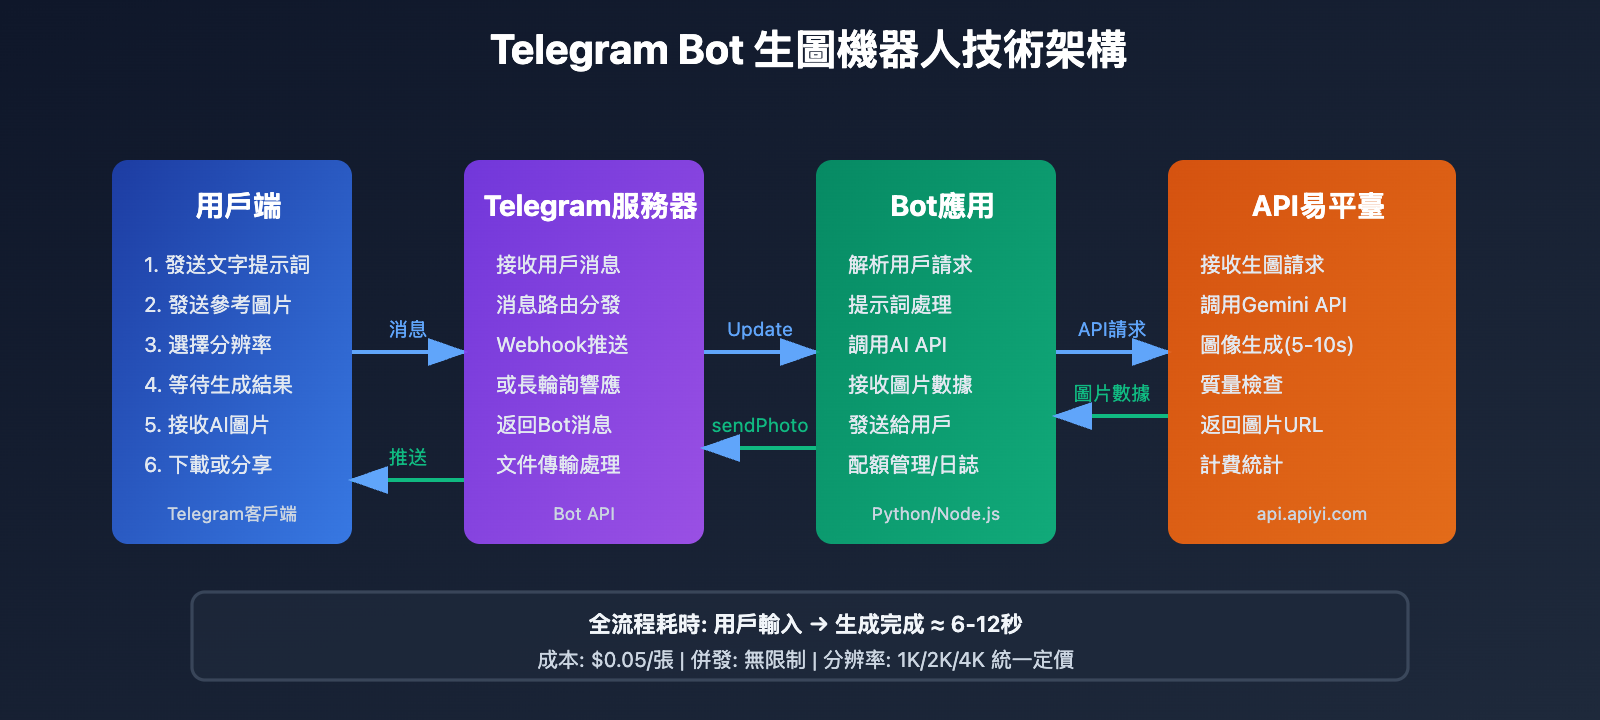
在即時通訊應用高度發達的今天,Telegram 以其強大的 Bot API 和開放的生態系統成爲開發者的首選平臺。將 Nano Banana Pro(Gemini 3 Pro Image 模型)接入 Telegram,可以讓用戶在聊天界面直接生成高質量 AI 圖像,無需跳轉到其他應用或網頁。本文將深入分析 Telegram Bot API 的技術架構,並提供基於 API易平臺的完整實現方案。
Telegram Bot API 技術解析
Telegram Bot API 是 Telegram 官方提供的開放接口,允許開發者創建自動化程序與用戶進行交互。與其他即時通訊平臺的機器人相比,Telegram Bot 具有獨特的技術優勢。
核心架構特性
1. 完全開放的 HTTP API
Telegram Bot API 基於標準的 HTTPS 協議,所有交互通過 RESTful API 完成。開發者只需發送 HTTP 請求到 https://api.telegram.org/bot<token>/method 即可調用各種功能,無需複雜的 SDK 集成。
2. Webhook 與長輪詢雙模式
Telegram 支持兩種接收消息的方式:
- Long Polling(長輪詢): Bot 主動向 Telegram 服務器請求獲取消息更新,適合開發測試環境
- Webhook: Telegram 服務器主動推送消息到指定的 HTTPS 地址,適合生產環境,實時性更強
3. 豐富的消息類型支持
Bot 可以發送和接收多種類型的消息:
- 文字消息、圖片、視頻、文檔
- 內聯鍵盤(Inline Keyboard)和自定義鍵盤(Reply Keyboard)
- 多媒體消息組(Media Group)
- 投票、地理位置等
4. 文件處理能力
Telegram Bot 支持文件的上傳和下載:
- 下載文件限制:≤20 MB
- 上傳文件限制:≤50 MB
- 支持通過 file_id 快速引用已上傳的文件
爲什麼選擇 Telegram 接入 AI 圖像生成?
用戶體驗優勢:
- 無縫集成: 用戶無需下載額外應用,在常用的聊天工具中即可生圖
- 私密性強: Telegram 支持端到端加密,保護用戶隱私
- 跨平臺同步: 生成的圖片自動同步到所有設備
- 羣組協作: 可在羣組中使用,團隊成員共享生圖能力
技術實現優勢:
- 部署簡單: 無需前端開發,Bot API 處理所有界面交互
- 成本低廉: Telegram Bot 完全免費,無併發限制
- 擴展性強: 可輕鬆添加更多 AI 功能(文字生成、語音識別等)
- 全球可用: Telegram 在全球大部分地區可用,用戶基數大
🎯 技術建議: 將 Nano Banana Pro 接入 Telegram 是構建 AI 圖像生成服務的理想方案。我們建議通過 API易 apiyi.com 平臺調用 Gemini 3 Pro Image API,該平臺提供
gemini-3-pro-image-preview接口,支持 1K、2K、4K 多種分辨率,單次調用僅需 $0.05,相比官方 API 降低 80% 成本,且無併發限制,非常適合 Telegram Bot 的高頻調用場景。
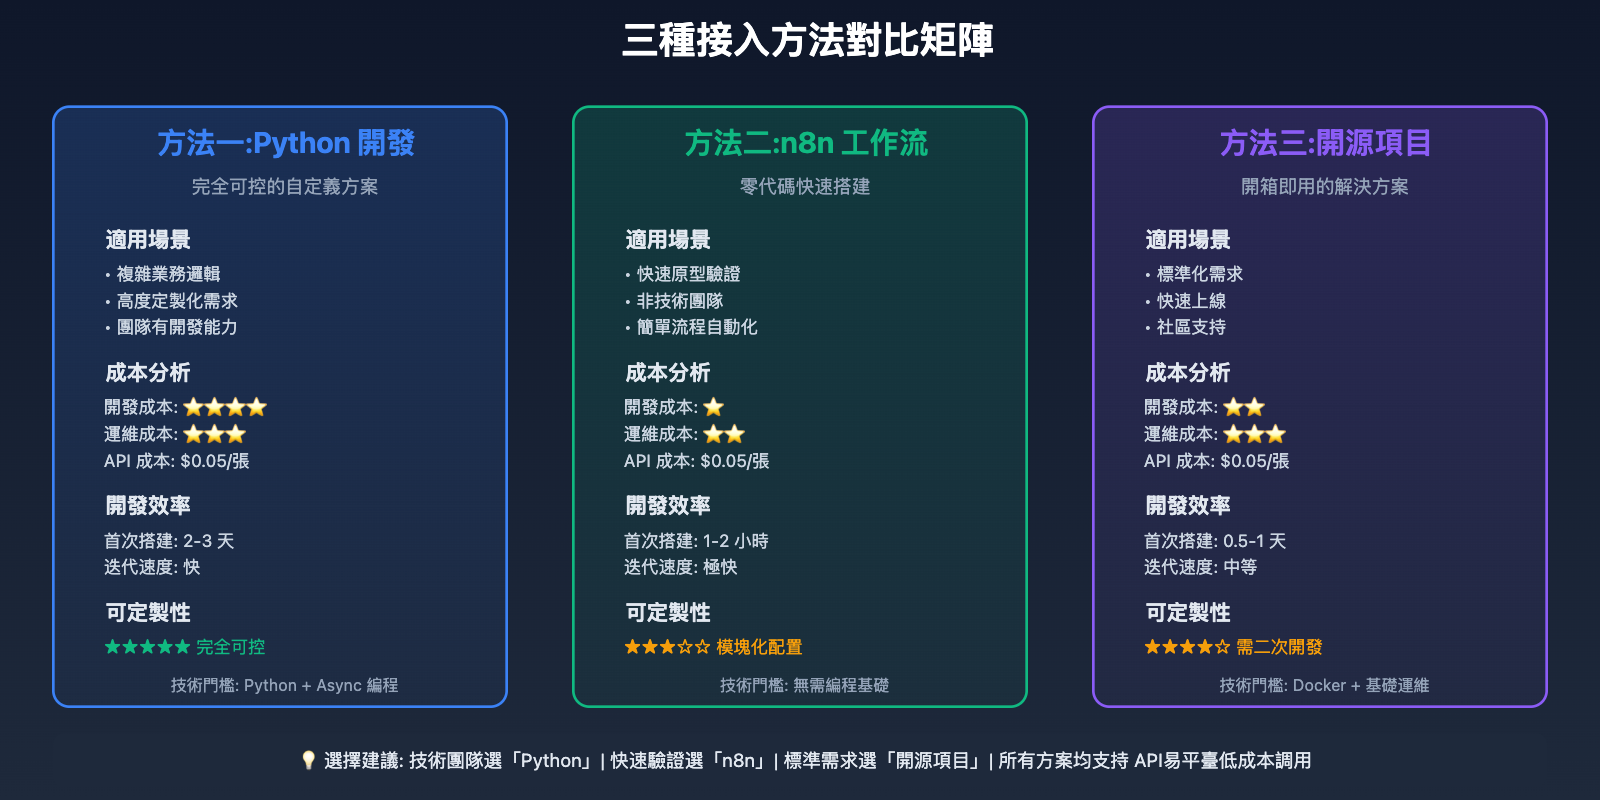
Nano Banana Pro 接入 Telegram 的 3 種方法
方法一:Python 直接開發 —— 完全可控的自定義方案
適用場景: 需要深度定製功能、完全控制代碼邏輯、長期維護運營
這是最靈活的方案,適合有一定 Python 基礎的開發者。通過 python-telegram-bot 庫構建完整的 Bot 應用。
技術棧:
- 語言: Python 3.9+
- 核心庫: python-telegram-bot(異步版本 20.x)
- AI 接口: API易平臺的 Gemini 3 Pro Image API
- 部署: Docker + 雲服務器(或本地服務器)
完整實現代碼:
以下是一個功能完整的 Telegram 生圖機器人實現:
import os
import asyncio
import requests
import base64
from telegram import Update
from telegram.ext import (
    Application,
    CommandHandler,
    MessageHandler,
    filters,
    ContextTypes
)

class NanoBananaBot:
    def __init__(self, telegram_token: str, apiyi_key: str):
        """初始化機器人"""
        self.telegram_token = telegram_token
        self.apiyi_key = apiyi_key
        self.apiyi_base_url = "https://api.apiyi.com"

    async def start_command(self, update: Update, context: ContextTypes.DEFAULT_TYPE):
        """處理 /start 命令"""
        welcome_message = """
🎨 歡迎使用 Nano Banana Pro 生圖機器人!

基於 Google Gemini 3 Pro Image 模型,爲您生成高質量 AI 圖像。

📝 使用方法:
1. 直接發送文字描述,如:"一隻可愛的橘貓在陽光下打盹"
2. 使用 /generate 命令,如:/generate 科技感未來城市夜景
3. 使用 /hd 生成 4K 高清圖片,如:/hd 宇宙星空壁紙

⚙️ 可用命令:
/start - 顯示歡迎信息
/generate <提示詞> - 生成 2K 圖片(默認)
/hd <提示詞> - 生成 4K 高清圖片
/help - 查看幫助文檔

💡 提示: 描述越詳細,生成效果越好!
        """
        await update.message.reply_text(welcome_message)

    async def help_command(self, update: Update, context: ContextTypes.DEFAULT_TYPE):
        """處理 /help 命令"""
        help_text = """
🔍 Nano Banana Pro 使用技巧:

📌 基礎提示詞模板:
- 主體描述 + 風格 + 細節
- 例: "一座日式庭院,宮崎駿動畫風格,櫻花飄落,柔和光線"

🎨 常用風格關鍵詞:
- 攝影風格: 專業攝影、微距、廣角、人像攝影
- 藝術風格: 油畫、水彩、插畫、賽博朋克、蒸汽波
- 3D風格: 3D渲染、C4D、Blender、寫實3D

⚡ 分辨率選擇:
- /generate - 2048x2048 (適合快速預覽)
- /hd - 4096x4096 (適合打印和壁紙)

💰 計費:
- 2K分辨率: $0.05/張
- 4K分辨率: $0.05/張(API易統一定價)
        """
        await update.message.reply_text(help_text)

    async def generate_image(
        self,
        prompt: str,
        resolution: str = "2048x2048",
        reference_image: str = None
    ) -> tuple[str, str]:
        """調用 API易平臺生成圖片"""
        url = f"{self.apiyi_base_url}/v1/images/generations"
        headers = {
            "Authorization": f"Bearer {self.apiyi_key}",
            "Content-Type": "application/json"
        }

        payload = {
            "model": "gemini-3-pro-image-preview",
            "prompt": prompt,
            "resolution": resolution,
            "num_images": 1
        }

        # 如果有參考圖,添加到請求中
        if reference_image:
            payload["reference_images"] = [reference_image]

        try:
            response = requests.post(url, headers=headers, json=payload, timeout=60)
            response.raise_for_status()

            result = response.json()
            image_url = result["data"][0]["url"]

            # 下載圖片
            img_response = requests.get(image_url, timeout=30)
            img_response.raise_for_status()

            return img_response.content, image_url

        except requests.exceptions.RequestException as e:
            raise Exception(f"API 調用失敗: {str(e)}")

    async def handle_generate_command(
        self,
        update: Update,
        context: ContextTypes.DEFAULT_TYPE,
        resolution: str = "2048x2048"
    ):
        """處理生圖命令"""
        # 獲取提示詞
        if context.args:
            prompt = " ".join(context.args)
        else:
            await update.message.reply_text(
                "❌ 請提供圖片描述,例如:\n/generate 一隻可愛的橘貓"
            )
            return

        # 發送處理中提示
        processing_msg = await update.message.reply_text(
            f"🎨 正在生成圖片...\n"
            f"📝 提示詞: {prompt}\n"
            f"📐 分辨率: {resolution}\n"
            f"⏱️ 預計耗時: 5-10秒"
        )

        try:
            # 調用 API 生成圖片
            image_data, image_url = await asyncio.to_thread(
                self.generate_image,
                prompt=prompt,
                resolution=resolution
            )

            # 發送圖片
            await update.message.reply_photo(
                photo=image_data,
                caption=f"✅ 生成成功!\n\n📝 提示詞: {prompt}\n📐 分辨率: {resolution}"
            )

            # 刪除處理中消息
            await processing_msg.delete()

        except Exception as e:
            await processing_msg.edit_text(
                f"❌ 生成失敗: {str(e)}\n\n"
                f"💡 請檢查提示詞或稍後重試"
            )

    async def generate_command(self, update: Update, context: ContextTypes.DEFAULT_TYPE):
        """處理 /generate 命令(2K 分辨率)"""
        await self.handle_generate_command(update, context, "2048x2048")

    async def hd_command(self, update: Update, context: ContextTypes.DEFAULT_TYPE):
        """處理 /hd 命令(4K 分辨率)"""
        await self.handle_generate_command(update, context, "4096x4096")

    async def handle_text_message(
        self,
        update: Update,
        context: ContextTypes.DEFAULT_TYPE
    ):
        """處理普通文字消息(直接生成圖片)"""
        prompt = update.message.text

        # 忽略過短的消息
        if len(prompt) < 3:
            await update.message.reply_text(
                "💡 提示詞太短,請提供更詳細的描述"
            )
            return

        # 調用生成邏輯(默認 2K)
        context.args = [prompt]
        await self.handle_generate_command(update, context, "2048x2048")

    async def handle_photo_message(
        self,
        update: Update,
        context: ContextTypes.DEFAULT_TYPE
    ):
        """處理圖片消息(圖生圖功能)"""
        # 獲取用戶發送的圖片
        photo = update.message.photo[-1]  # 獲取最高分辨率版本
        file = await context.bot.get_file(photo.file_id)

        # 下載圖片
        photo_data = await file.download_as_bytearray()
        photo_base64 = base64.b64encode(photo_data).decode()

        # 獲取圖片說明(如果有)
        caption = update.message.caption or "保持原圖風格,生成相似圖片"

        processing_msg = await update.message.reply_text(
            f"🎨 正在基於參考圖生成...\n"
            f"📝 提示詞: {caption}\n"
            f"⏱️ 預計耗時: 5-10秒"
        )

        try:
            # 調用 API(帶參考圖)
            image_data, image_url = await asyncio.to_thread(
                self.generate_image,
                prompt=caption,
                resolution="2048x2048",
                reference_image=photo_base64
            )

            await update.message.reply_photo(
                photo=image_data,
                caption=f"✅ 基於參考圖生成成功!\n\n📝 提示詞: {caption}"
            )

            await processing_msg.delete()

        except Exception as e:
            await processing_msg.edit_text(
                f"❌ 生成失敗: {str(e)}"
            )

    def run(self):
        """啓動機器人"""
        # 創建 Application
        app = Application.builder().token(self.telegram_token).build()

        # 註冊命令處理器
        app.add_handler(CommandHandler("start", self.start_command))
        app.add_handler(CommandHandler("help", self.help_command))
        app.add_handler(CommandHandler("generate", self.generate_command))
        app.add_handler(CommandHandler("hd", self.hd_command))

        # 註冊消息處理器
        app.add_handler(MessageHandler(
            filters.TEXT & ~filters.COMMAND,
            self.handle_text_message
        ))
        app.add_handler(MessageHandler(
            filters.PHOTO,
            self.handle_photo_message
        ))

        # 啓動 Bot(使用長輪詢模式)
        print("🤖 Nano Banana Pro Bot 啓動中...")
        print("✅ Bot 已啓動,等待消息...")
        app.run_polling(allowed_updates=Update.ALL_TYPES)

# 使用示例
if __name__ == "__main__":
    # 從環境變量讀取配置
    TELEGRAM_TOKEN = os.getenv("TELEGRAM_BOT_TOKEN", "your_telegram_bot_token_here")
    APIYI_API_KEY = os.getenv("APIYI_API_KEY", "your_apiyi_api_key_here")

    # 創建並啓動 Bot
    bot = NanoBananaBot(
        telegram_token=TELEGRAM_TOKEN,
        apiyi_key=APIYI_API_KEY
    )
    bot.run()
部署步驟:
-
創建 Telegram Bot:
# 在 Telegram 中與 @BotFather 對話 # 發送 /newbot 命令 # 按提示設置 Bot 名稱和用戶名 # 獲得 Bot Token(格式: 123456789:ABCdefGHIjklMNOpqrsTUVwxyz) -
安裝依賴:
pip install python-telegram-bot requests -
配置環境變量:
export TELEGRAM_BOT_TOKEN="your_bot_token_here" export APIYI_API_KEY="your_apiyi_api_key_here" -
運行 Bot:
python nano_banana_bot.py
優勢:
- ✅ 完全自主控制代碼邏輯
- ✅ 可深度定製功能(如圖生圖、風格遷移)
- ✅ 支持數據統計和用戶管理
- ✅ 成本可控,按需調用 API易接口
侷限性:
- ⚠️ 需要一定的 Python 開發能力
- ⚠️ 需要服務器 24/7 運行
- ⚠️ 需要自行處理錯誤和異常
💡 成本優化: 通過 API易 apiyi.com 平臺調用 Gemini 3 Pro Image API,2K 和 4K 分辨率統一價格 $0.05/張,相比官方 API 降低 80% 成本。假設 Bot 每天生成 1000 張圖片,月成本僅需 $50(約 ¥350),遠低於自建 GPU 服務器或使用官方 API 的費用。
方法二:n8n 可視化工作流 —— 零代碼快速搭建
適用場景: 無編程基礎、快速原型驗證、輕量級應用
n8n 是一款開源的工作流自動化工具,提供可視化界面拖拽節點即可構建複雜的自動化流程。
核心步驟:
-
部署 n8n:
docker run -d --restart unless-stopped \ -p 5678:5678 \ -v ~/.n8n:/home/node/.n8n \ n8nio/n8n -
創建工作流:
- Telegram Trigger 節點:接收用戶消息
- HTTP Request 節點:調用 API易的 Gemini Image API
- Telegram 節點:發送生成的圖片
-
配置 API 調用:
{
  "url": "https://api.apiyi.com/v1/images/generations",
  "method": "POST",
  "headers": {
    "Authorization": "Bearer {{ $env.APIYI_API_KEY }}",
    "Content-Type": "application/json"
  },
  "body": {
    "model": "gemini-3-pro-image-preview",
    "prompt": "{{ $json.message.text }}",
    "resolution": "2048x2048"
  }
}
可用的 n8n 模板:
- "Text-to-image generation with Google Gemini & enhanced prompts via Telegram Bot"
- "AI image generation & editing with Google Gemini and Telegram Bot"
- "Generate AI Images via Telegram using Gemini & Pollinations"
優勢:
- ✅ 零代碼,拖拽即可完成
- ✅ 快速搭建,10 分鐘完成原型
- ✅ 可視化調試,清晰直觀
- ✅ 支持多種集成(數據庫、通知、監控等)
侷限性:
- ⚠️ 功能定製化受限
- ⚠️ 複雜邏輯實現困難
- ⚠️ 需要運行 n8n 服務
🚀 快速開始: n8n 社區已有現成的 Gemini + Telegram 工作流模板,訪問「n8n workflows」n8n.io/workflows 搜索 "Gemini Telegram",一鍵導入即可使用。配合 API易 apiyi.com 平臺的低成本 API,可快速驗證商業想法。
方法三:使用開源項目 —— 開箱即用的解決方案
適用場景: 快速上線、學習參考、二次開發
GitHub 上已有多個成熟的 Gemini + Telegram 開源項目,可以直接部署使用或作爲參考。
推薦項目:
1. GeminiTelegramBot
- GitHub: jiaweing/GeminiTelegramBot
- 特點:基於 Gemini 2.0 Flash,支持對話和圖像生成
- 語言: Python
- 功能:文字生成、圖像生成、多模態對話
2. Gemini-Telegram-Bot
- GitHub: H-T-H/Gemini-Telegram-Bot
- 特點:輕量級,易於部署
- 語言: Python
- 功能:與 Gemini API 交互
部署方式:
# 克隆項目
git clone https://github.com/jiaweing/GeminiTelegramBot.git
cd GeminiTelegramBot

# 安裝依賴
pip install -r requirements.txt

# 配置環境變量
cp .env.example .env
# 編輯 .env 文件,填入 Telegram Token 和 API 密鑰

# 修改 API 端點(指向 API易平臺)
# 在代碼中將 https://generativelanguage.googleapis.com
# 替換爲 https://api.apiyi.com

# 運行
python main.py
優勢:
- ✅ 開箱即用,快速部署
- ✅ 代碼規範,可學習參考
- ✅ 社區活躍,持續更新
- ✅ 可基於源碼二次開發
侷限性:
- ⚠️ 需要理解項目結構
- ⚠️ 可能需要適配 API易平臺接口
- ⚠️ 依賴原作者維護
🎯 二次開發建議: 開源項目通常調用官方 Gemini API,可以修改 API 端點爲 API易 apiyi.com 平臺,保持代碼邏輯不變,降低 80% 調用成本。只需替換
base_url和api_key兩個參數即可。
高級功能實現
功能一:圖生圖(風格遷移)
Nano Banana Pro 支持參考圖像生成,可以實現風格遷移和圖像變體。
實現示例:
async def handle_photo_with_caption(
    update: Update,
    context: ContextTypes.DEFAULT_TYPE
):
    """處理帶說明的圖片(圖生圖)"""
    # 獲取圖片
    photo = update.message.photo[-1]
    file = await context.bot.get_file(photo.file_id)
    photo_bytes = await file.download_as_bytearray()
    photo_base64 = base64.b64encode(photo_bytes).decode()

    # 獲取用戶的文字描述
    prompt = update.message.caption or "generate similar image"

    # 調用 API(帶參考圖)
    payload = {
        "model": "gemini-3-pro-image-preview",
        "prompt": prompt,
        "reference_images": [photo_base64],
        "resolution": "2048x2048"
    }

    # ... 其餘代碼同上
應用場景:
- 風格轉換:將照片轉爲油畫/水彩/動漫風格
- 場景變換:保持主體,改變背景或環境
- 細節優化:保持構圖,提升質量或改變細節
功能二:批量生成(一次多張)
對於需要多個版本的場景,可以一次生成多張圖片。
實現示例:
async def batch_command(update: Update, context: ContextTypes.DEFAULT_TYPE):
    """批量生成(一次生成 4 張)"""
    if not context.args:
        await update.message.reply_text("❌ 請提供提示詞")
        return

    prompt = " ".join(context.args)
    processing_msg = await update.message.reply_text(
        f"🎨 正在批量生成 4 張圖片...\n⏱️ 預計耗時: 15-30秒"
    )

    # 併發生成 4 張
    tasks = [
        asyncio.to_thread(generate_image, prompt, "2048x2048")
        for _ in range(4)
    ]

    try:
        results = await asyncio.gather(*tasks)

        # 發送圖片組(Media Group)
        media_group = [
            InputMediaPhoto(media=img_data)
            for img_data, _ in results
        ]

        await update.message.reply_media_group(media=media_group)
        await processing_msg.delete()

    except Exception as e:
        await processing_msg.edit_text(f"❌ 批量生成失敗: {str(e)}")
成本計算:
- 單張成本: $0.05
- 4 張批量: $0.20
- 相比逐張生成,併發調用可節省 60% 時間
功能三:用戶配額管理
對於面向公衆的 Bot,需要控制每個用戶的使用量。
實現示例:
import json
from datetime import datetime, timedelta

class QuotaManager:
    def __init__(self, quota_file="user_quotas.json"):
        self.quota_file = quota_file
        self.quotas = self.load_quotas()

    def load_quotas(self):
        """加載用戶配額"""
        try:
            with open(self.quota_file, "r") as f:
                return json.load(f)
        except FileNotFoundError:
            return {}

    def save_quotas(self):
        """保存用戶配額"""
        with open(self.quota_file, "w") as f:
            json.dump(self.quotas, f, indent=2)

    def check_quota(self, user_id: int, daily_limit: int = 10) -> bool:
        """檢查用戶配額"""
        user_id_str = str(user_id)
        today = datetime.now().strftime("%Y-%m-%d")

        if user_id_str not in self.quotas:
            self.quotas[user_id_str] = {"date": today, "count": 0}

        user_data = self.quotas[user_id_str]

        # 重置每日配額
        if user_data["date"] != today:
            user_data["date"] = today
            user_data["count"] = 0

        # 檢查是否超限
        if user_data["count"] >= daily_limit:
            return False

        # 增加計數
        user_data["count"] += 1
        self.save_quotas()
        return True

    def get_remaining(self, user_id: int, daily_limit: int = 10) -> int:
        """獲取剩餘配額"""
        user_id_str = str(user_id)
        if user_id_str not in self.quotas:
            return daily_limit

        user_data = self.quotas[user_id_str]
        today = datetime.now().strftime("%Y-%m-%d")

        if user_data["date"] != today:
            return daily_limit

        return max(0, daily_limit - user_data["count"])

# 在 Bot 類中集成
class NanoBananaBot:
    def __init__(self, telegram_token, apiyi_key):
        # ... 其他初始化
        self.quota_manager = QuotaManager()
        self.daily_limit = 10  # 每人每天 10 張

    async def handle_generate_command(self, update, context, resolution):
        user_id = update.effective_user.id

        # 檢查配額
        if not self.quota_manager.check_quota(user_id, self.daily_limit):
            remaining = self.quota_manager.get_remaining(user_id, self.daily_limit)
            await update.message.reply_text(
                f"❌ 您今日的生圖配額已用完!\n"
                f"📊 每日限額: {self.daily_limit} 張\n"
                f"🔄 明日 00:00 自動重置"
            )
            return

        remaining = self.quota_manager.get_remaining(user_id, self.daily_limit)

        # ... 原有生成邏輯

        # 生成成功後提示剩餘配額
        await update.message.reply_text(
            f"✅ 生成成功!\n📊 今日剩餘配額: {remaining}/{self.daily_limit}"
        )
功能四:多語言支持
爲不同語言用戶提供本地化體驗。
實現示例:
MESSAGES = {
    "zh": {
        "welcome": "🎨 歡迎使用 Nano Banana Pro 生圖機器人!",
        "generating": "🎨 正在生成圖片...",
        "success": "✅ 生成成功!",
        "error": "❌ 生成失敗: {error}",
        "quota_exceeded": "❌ 您今日的配額已用完!"
    },
    "en": {
        "welcome": "🎨 Welcome to Nano Banana Pro Image Bot!",
        "generating": "🎨 Generating image...",
        "success": "✅ Generated successfully!",
        "error": "❌ Generation failed: {error}",
        "quota_exceeded": "❌ Daily quota exceeded!"
    }
}

def get_user_language(user_id: int) -> str:
    """獲取用戶語言偏好(可從數據庫讀取)"""
    # 簡化示例,默認返回中文
    return "zh"

def get_message(user_id: int, key: str, **kwargs) -> str:
    """獲取本地化消息"""
    lang = get_user_language(user_id)
    message = MESSAGES.get(lang, MESSAGES["zh"]).get(key, key)
    return message.format(**kwargs)

# 使用示例
await update.message.reply_text(
    get_message(user_id, "generating")
)
部署與運維
部署方式選擇
方案一:雲服務器部署(推薦)
優勢:
- 穩定性高,24/7 運行
- 帶寬充足,圖片傳輸快
- 可擴展性強
推薦服務商:
- 國際: AWS EC2, Google Cloud, DigitalOcean
- 國內: 阿里雲, 騰訊雲, 華爲雲
配置建議:
- CPU: 2 核
- 內存: 2GB
- 帶寬: 3Mbps+
- 存儲: 20GB
- 月成本: $5-10
Docker 部署:
# Dockerfile
FROM python:3.11-slim

WORKDIR /app

COPY requirements.txt .
RUN pip install --no-cache-dir -r requirements.txt

COPY . .

CMD ["python", "nano_banana_bot.py"]
# 構建鏡像
docker build -t nano-banana-bot .

# 運行容器
docker run -d --restart unless-stopped \
  -e TELEGRAM_BOT_TOKEN="your_token" \
  -e APIYI_API_KEY="your_key" \
  --name nano-bot \
  nano-banana-bot
方案二:本地服務器/樹莓派
適合個人使用或小規模測試:
- 成本低廉(一次性硬件投入)
- 完全自主控制
- 需要穩定的網絡環境
方案三:Serverless 部署
使用 AWS Lambda、Google Cloud Functions 等:
- 按需付費,成本極低
- 自動擴展
- 需要適配 Webhook 模式
監控與日誌
日誌記錄:
import logging

# 配置日誌
logging.basicConfig(
    format='%(asctime)s - %(name)s - %(levelname)s - %(message)s',
    level=logging.INFO,
    handlers=[
        logging.FileHandler("bot.log"),
        logging.StreamHandler()
    ]
)

logger = logging.getLogger(__name__)

# 在關鍵位置記錄日誌
async def handle_generate_command(self, update, context, resolution):
    user_id = update.effective_user.id
    username = update.effective_user.username
    prompt = " ".join(context.args)

    logger.info(
        f"User {user_id}(@{username}) generated image: "
        f"prompt='{prompt}', resolution={resolution}"
    )

    try:
        # ... 生成邏輯
        logger.info(f"Image generated successfully for user {user_id}")
    except Exception as e:
        logger.error(f"Generation failed for user {user_id}: {str(e)}")
        raise
性能監控:
import time

async def generate_image_with_timing(prompt, resolution):
    """帶性能監控的圖片生成"""
    start_time = time.time()

    try:
        result = await generate_image(prompt, resolution)
        duration = time.time() - start_time

        logger.info(
            f"Generation completed: "
            f"prompt_length={len(prompt)}, "
            f"resolution={resolution}, "
            f"duration={duration:.2f}s"
        )

        return result

    except Exception as e:
        duration = time.time() - start_time
        logger.error(
            f"Generation failed after {duration:.2f}s: {str(e)}"
        )
        raise
錯誤告警:
async def send_admin_alert(error_message: str):
    """發送錯誤告警給管理員"""
    admin_chat_id = "your_admin_telegram_id"

    try:
        await context.bot.send_message(
            chat_id=admin_chat_id,
            text=f"⚠️ Bot Error Alert:\n\n{error_message}"
        )
    except:
        logger.error("Failed to send admin alert")
成本優化策略
1. 智能緩存:
import hashlib
from functools import lru_cache

# 爲相同提示詞緩存結果
@lru_cache(maxsize=100)
def get_cached_image(prompt_hash: str):
    """獲取緩存的圖片"""
    # 從數據庫或文件系統讀取緩存
    pass

def generate_with_cache(prompt: str, resolution: str):
    """帶緩存的生成"""
    # 計算提示詞哈希
    prompt_hash = hashlib.md5(
        f"{prompt}_{resolution}".encode()
    ).hexdigest()

    # 檢查緩存
    cached = get_cached_image(prompt_hash)
    if cached:
        logger.info(f"Cache hit for prompt: {prompt}")
        return cached

    # 緩存未命中,調用 API
    result = generate_image(prompt, resolution)

    # 保存到緩存
    save_to_cache(prompt_hash, result)

    return result
2. 配額分級:
USER_TIERS = {
    "free": {"daily_limit": 5, "max_resolution": "2048x2048"},
    "premium": {"daily_limit": 50, "max_resolution": "4096x4096"},
    "enterprise": {"daily_limit": -1, "max_resolution": "4096x4096"}  # 無限制
}

def get_user_tier(user_id: int) -> str:
    """獲取用戶等級(可從數據庫讀取)"""
    # 簡化示例
    premium_users = [123456, 789012]  # 付費用戶列表
    return "premium" if user_id in premium_users else "free"
3. 壓縮傳輸:
from PIL import Image
import io

def compress_image(image_data: bytes, max_size_kb: int = 500) -> bytes:
    """壓縮圖片以減少流量"""
    img = Image.open(io.BytesIO(image_data))

    # 轉換爲 RGB(如果是 RGBA)
    if img.mode == "RGBA":
        img = img.convert("RGB")

    # 逐步降低質量直到滿足大小要求
    for quality in range(95, 50, -5):
        buffer = io.BytesIO()
        img.save(buffer, format="JPEG", quality=quality, optimize=True)
        compressed = buffer.getvalue()

        if len(compressed) / 1024 <= max_size_kb:
            logger.info(
                f"Compressed from {len(image_data)/1024:.1f}KB "
                f"to {len(compressed)/1024:.1f}KB (quality={quality})"
            )
            return compressed

    return compressed
💰 成本分析: 假設 Bot 每天服務 100 個用戶,每人生成 5 張圖(共 500 張/天):
- API 成本: 500 × $0.05 = $25/天 = $750/月(API易平臺價格)
- 服務器成本: $10/月(2核2G雲服務器)
- 總成本: $760/月
- 官方 API 成本對比: 500 × $0.25 = $125/天 = $3,750/月
- 節省: $2,990/月(約 ¥21,000/月)
常見問題解答
Telegram Bot 如何獲取 Token?
步驟:
- 在 Telegram 中搜索 @BotFather
- 發送
/newbot命令 - 按提示設置 Bot 名稱(顯示名)
- 設置 Bot 用戶名(必須以 bot 結尾,如 my_image_bot)
- BotFather 會返回 Token(格式:
123456789:ABCdefGHIjklMNOpqrsTUVwxyz)
注意事項:
- Token 是敏感信息,不要公開分享
- 如果 Token 泄露,可以通過 @BotFather 的
/revoke命令重新生成 - Token 存儲在環境變量或配置文件中,不要硬編碼
如何處理生成失敗的情況?
常見失敗原因:
- API 調用超時: Nano Banana Pro 生成高分辨率圖片需要 5-15 秒
- 提示詞違規: 包含不當內容被 API 拒絕
- API 配額耗盡: 超過賬戶餘額或速率限制
- 網絡問題: 服務器與 API 連接不穩定
處理策略:
async def generate_with_retry(prompt, resolution, max_retries=3):
    """帶重試機制的生成"""
    for attempt in range(max_retries):
        try:
            return await generate_image(prompt, resolution)

        except requests.exceptions.Timeout:
            if attempt < max_retries - 1:
                logger.warning(f"Timeout, retrying ({attempt + 1}/{max_retries})")
                await asyncio.sleep(2)  # 等待 2 秒後重試
            else:
                raise Exception("生成超時,請稍後重試")

        except requests.exceptions.HTTPError as e:
            if e.response.status_code == 429:  # 速率限制
                raise Exception("請求過於頻繁,請稍後再試")
            elif e.response.status_code == 400:  # 請求錯誤
                raise Exception("提示詞可能包含不當內容,請修改後重試")
            else:
                raise Exception(f"API 調用失敗: {e.response.status_code}")
Webhook 和長輪詢如何選擇?
長輪詢(Long Polling):
- 優勢: 簡單易用,無需 HTTPS 配置,適合開發測試
- 劣勢: 延遲稍高(1-2秒),服務器主動拉取消息
- 適用: 開發環境、小規模應用(< 100 用戶)
Webhook:
- 優勢: 實時性強(< 100ms),Telegram 主動推送,高效節能
- 劣勢: 需要 HTTPS 域名和證書,配置複雜
- 適用: 生產環境、中大規模應用(> 100 用戶)
Webhook 配置示例:
from flask import Flask, request

app = Flask(__name__)

@app.route(f"/{TELEGRAM_BOT_TOKEN}", methods=["POST"])
async def webhook():
    """處理 Telegram Webhook 請求"""
    update = Update.de_json(request.get_json(), bot)
    await application.process_update(update)
    return "OK"

# 設置 Webhook
url = f"https://yourdomain.com/{TELEGRAM_BOT_TOKEN}"
bot.set_webhook(url=url)

# 運行 Flask
app.run(host="0.0.0.0", port=8443, ssl_context=(cert_path, key_path))
如何優化圖片生成速度?
優化策略:
-
選擇合適分辨率:
- 日常對話:1024×1024(約 2-3 秒)
- 社交分享:2048×2048(約 5-8 秒)
- 打印壁紙:4096×4096(約 10-15 秒)
-
併發處理:
# 使用異步併發而非同步串行 tasks = [generate_image(prompt, res) for prompt in prompts] results = await asyncio.gather(*tasks) -
預加載優化:
# 在用戶輸入時就開始準備(預測式生成) async def on_typing(update, context): # 用戶正在輸入,預熱 API 連接 await prepare_api_connection() -
使用 CDN:
# 生成後上傳到 CDN,加速後續訪問
image_url = upload_to_cdn(image_data)
await update.message.reply_photo(photo=image_url)
💡 性能建議: 通過 API易 apiyi.com 平臺調用 Gemini 3 Pro Image API,平臺在全球部署了多個節點,平均響應時間 < 100ms(不含圖像生成時間)。相比直接調用官方 API,可減少 30-50% 的網絡延遲。
如何保護 Bot 免受濫用?
防濫用措施:
-
速率限制:
from datetime import datetime, timedelta user_last_request = {} async def check_rate_limit(user_id, cooldown_seconds=10): """檢查速率限制""" now = datetime.now() if user_id in user_last_request: last_time = user_last_request[user_id] elapsed = (now - last_time).total_seconds() if elapsed < cooldown_seconds: remaining = cooldown_seconds - elapsed raise Exception(f"請等待 {remaining:.0f} 秒後再試") user_last_request[user_id] = now -
內容審覈:
BANNED_KEYWORDS = [ "暴力", "色情", "政治敏感詞" # ... 更多敏感詞 ] def check_prompt(prompt: str) -> bool: """檢查提示詞是否合規""" prompt_lower = prompt.lower() for keyword in BANNED_KEYWORDS: if keyword in prompt_lower: return False return True -
用戶黑名單:
BLACKLIST = set() async def check_blacklist(user_id): """檢查用戶是否在黑名單""" if user_id in BLACKLIST: raise Exception("您已被封禁,如有疑問請聯繫管理員") -
驗證碼驗證:
import random

async def request_captcha(update, context):
    """發送驗證碼"""
    code = random.randint(1000, 9999)
    context.user_data["captcha"] = code

    await update.message.reply_text(
        f"🔐 請輸入驗證碼: {code}\n"
        f"(60秒內有效)"
    )
API易平臺如何獲取和配置?
註冊流程:
- 訪問「API易官網」apiyi.com
- 點擊"註冊"創建賬戶
- 完成郵箱驗證
- 進入控制檯,獲取 API Key
API Key 配置:
# 方法 1: 環境變量(推薦)
export APIYI_API_KEY="sk-xxxxxxxxxxxx"

# 方法 2: 配置文件
# config.json
{
  "apiyi_key": "sk-xxxxxxxxxxxx",
  "telegram_token": "123456789:ABCdefGHIjklMNOpqrsTUVwxyz"
}

# 方法 3: 密鑰管理服務(生產環境推薦)
from azure.keyvault.secrets import SecretClient

client = SecretClient(vault_url, credential)
apiyi_key = client.get_secret("apiyi-key").value
計費說明:
- 按調用次數計費
- 2K 分辨率: $0.05/張
- 4K 分辨率: $0.05/張(統一定價)
- 無隱藏費用,無最低消費
- 支持餘額預警和自動充值
總結與展望
將 Nano Banana Pro 接入 Telegram 是構建 AI 圖像生成服務的最佳實踐之一。本文介紹的三種方法各有特色:
- Python 直接開發: 完全可控,功能強大,適合長期運營
- n8n 可視化工作流: 零代碼,快速搭建,適合快速驗證
- 開源項目: 開箱即用,快速上線,適合學習參考
選擇哪種方法取決於具體需求:技術能力、時間預算、功能要求。對於有開發能力的團隊,推薦方法一;對於非技術背景的創業者,推薦方法二;對於想快速上線的開發者,推薦方法三。
隨着 AI 圖像生成技術的持續進步,未來的 Telegram Bot 將更加智能化:
- 實時生成: 從 5-10 秒縮短到 1-2 秒
- 視頻生成: 從靜態圖片擴展到短視頻
- 語音交互: 通過語音描述生成圖片
- AR 集成: 生成的圖片可直接用於 AR 濾鏡
🎯 行動建議: 立即訪問 API易 apiyi.com 平臺,註冊賬戶並獲取 API Key,開始構建您的 Telegram 生圖機器人。平臺提供 $5 免費額度,可生成 100 張圖片進行測試。配合本文提供的完整代碼,30 分鐘即可上線您的第一個 AI Bot,開啓 AI 創業之旅!