用 AI 编辑图片时,很多开发者最关心的问题是:能不能只改图片的某个局部,而不影响其他部分? 这就是 inpainting(局部修复/局部改图)技术要解决的核心问题。
好消息是,Nano Banana 系列模型 确实支持 inpainting 局部改图,而且提供了比传统方案更强大的 mask-free(无蒙版)编辑能力。本文将详解 3 种通过 API 实现局部改图的方案,帮你快速选择最适合的技术路线。
核心价值: 读完本文,你将掌握 Nano Banana inpainting API 的 3 种调用方式,能够在自己的项目中实现专业级的 AI 局部改图功能。
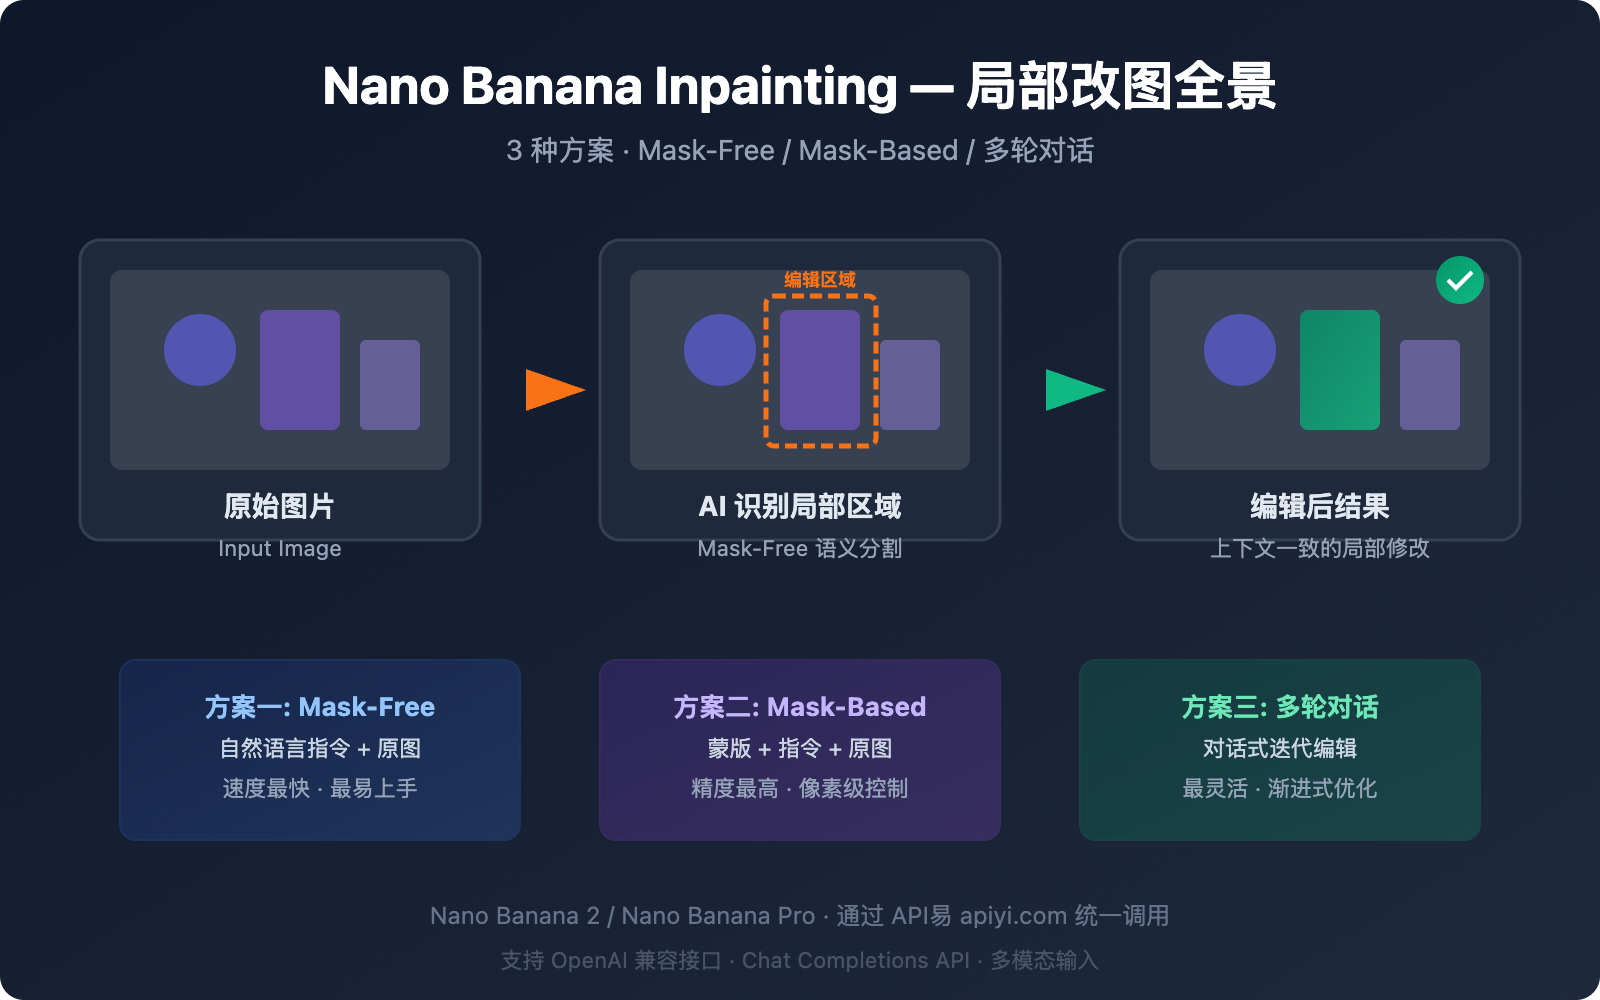
Nano Banana Inpainting 能力全景:3 种局部改图方案
很多开发者有一个常见误解:认为 Nano Banana 只能生成图片,不支持 inpainting。实际上,Nano Banana 不仅支持 inpainting,还提供了多种实现路径。
| 方案 | 模型 | 原理 | 精度 | 速度 | 适用场景 |
|---|---|---|---|---|---|
| 方案一: Mask-Free 自然语言编辑 | Nano Banana 2 | 文本指令 + 原图 | ⭐⭐⭐⭐ | ⭐⭐⭐⭐⭐ | 快速编辑、背景替换 |
| 方案二: Mask-Based 精确修改 | Nano Banana Pro Edit | 蒙版 + 文本指令 + 原图 | ⭐⭐⭐⭐⭐ | ⭐⭐⭐ | 精确区域控制 |
| 方案三: 多轮对话迭代编辑 | Nano Banana 2 | 多轮对话 + 上下文 | ⭐⭐⭐⭐ | ⭐⭐⭐ | 复杂编辑、逐步优化 |
Nano Banana Inpainting 与传统方案的关键区别
传统的 inpainting 工具(如 Stable Diffusion Inpainting)需要开发者手动绘制黑白蒙版(mask),指定需要修改的区域。而 Nano Banana 的核心突破在于:
- 语义理解驱动: 模型能理解"把背景换成海滩"这类自然语言指令,自动识别背景区域
- 上下文感知: 修改局部时自动匹配周围环境的光照、透视和色彩
- 无需蒙版: 大部分编辑场景不需要手动制作 mask,降低了开发门槛
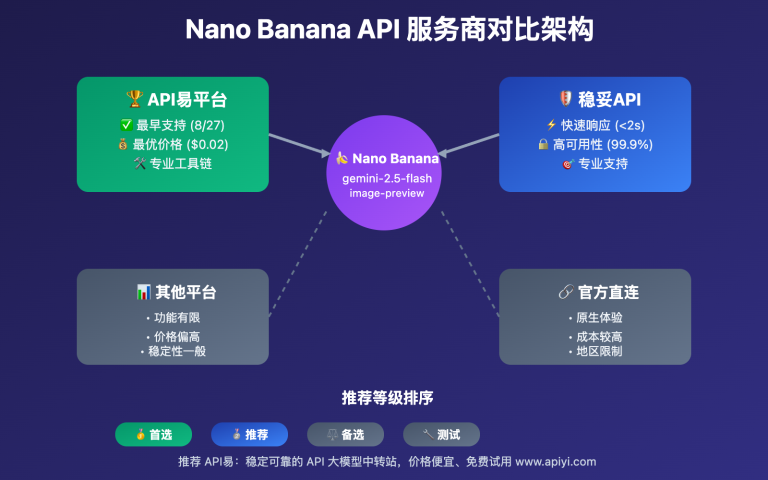
🎯 技术建议: Nano Banana 的 inpainting 能力通过标准的 OpenAI 兼容接口提供。我们建议通过 API易 apiyi.com 平台调用,可以统一管理 Nano Banana 2 和 Nano Banana Pro 两个模型的调用,便于在不同方案之间切换测试。
方案一:Mask-Free 自然语言 Inpainting(推荐入门)
这是 Nano Banana inpainting 最强大的特性之一——不需要蒙版,只用文字描述就能实现局部修改。
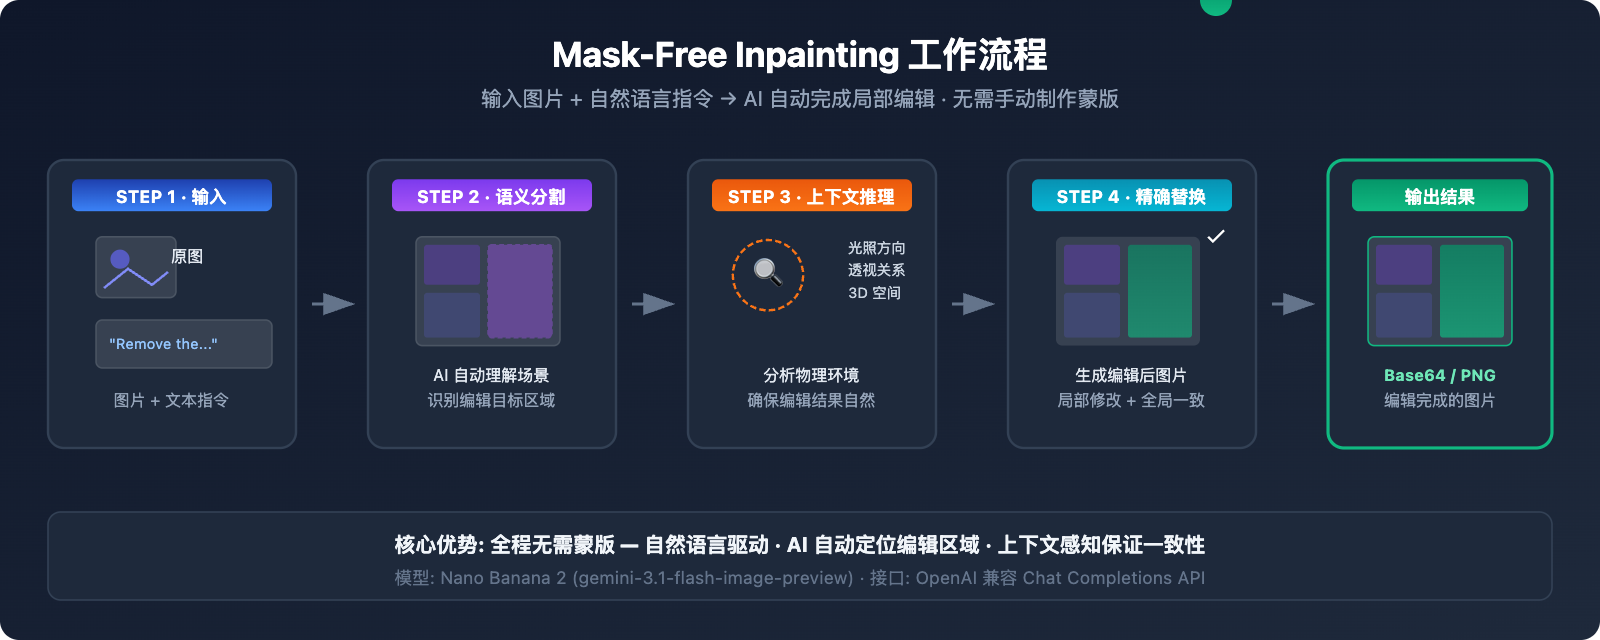
Nano Banana Mask-Free Inpainting 核心原理
Nano Banana 2(基于 Gemini 3.1 Flash Image)内置了语义分割能力,模型会:
- 解析编辑指令 — 理解你想修改图片的哪个部分
- 自动识别区域 — 通过语义理解定位需要修改的像素区域
- 上下文推理 — 分析光照方向、透视关系、3D 空间关系
- 精确替换 — 在保持周围环境一致的前提下修改目标区域
Mask-Free Inpainting 极简代码示例
import openai
import base64

client = openai.OpenAI(
    api_key="YOUR_API_KEY",
    base_url="https://api.apiyi.com/v1"  # API易 统一接口
)

response = client.chat.completions.create(
    model="gemini-2.5-flash-image-preview",
    messages=[{
        "role": "user",
        "content": [
            {"type": "text", "text": "Remove the person from this photo and fill the area with the surrounding background naturally"},
            {"type": "image_url", "image_url": {"url": "https://example.com/your-photo.jpg"}}
        ]
    }]
)

# 提取编辑后的图片
content = response.choices[0].message.content
print("编辑完成,提取图片数据...")
Nano Banana Inpainting 常用编辑指令模板
| 编辑类型 | 英文指令模板 | 中文说明 |
|---|---|---|
| 移除对象 | Remove the [object] from the image and fill naturally |
移除指定对象并自然填充 |
| 替换背景 | Replace the background with [new scene] |
替换背景场景 |
| 添加元素 | Add a [object] to the [position] of the image |
在指定位置添加元素 |
| 修改属性 | Change the [object]'s color from [A] to [B] |
修改对象颜色 |
| 模糊背景 | Blur the background while keeping the foreground sharp |
背景虚化 |
| 修复瑕疵 | Remove the stain/scratch from the [area] |
移除污渍或划痕 |
| 姿势调整 | Change the person's pose to [description] |
调整人物姿势 |
| 风格转换 | Convert the [area] to watercolor painting style |
局部风格转换 |
查看 Mask-Free Inpainting 完整代码(含图片保存和错误处理)
#!/usr/bin/env python3
"""
Nano Banana Mask-Free Inpainting 完整示例
通过自然语言指令实现局部图片编辑
"""

import openai
import base64
import re
from datetime import datetime

# 配置
API_KEY = "YOUR_API_KEY"
BASE_URL = "https://api.apiyi.com/v1"

client = openai.OpenAI(api_key=API_KEY, base_url=BASE_URL)

def inpaint_image(image_url: str, edit_instruction: str, output_path: str = None):
    """
    使用 Mask-Free Inpainting 编辑图片

    Args:
        image_url: 原图 URL 或 base64 data URI
        edit_instruction: 英文编辑指令
        output_path: 输出文件路径(可选)
    Returns:
        bool: 是否成功
    """
    print(f"📝 编辑指令: {edit_instruction}")
    print(f"🖼️  原图: {image_url[:80]}...")

    try:
        response = client.chat.completions.create(
            model="gemini-2.5-flash-image-preview",
            messages=[{
                "role": "user",
                "content": [
                    {"type": "text", "text": f"Generate an image: {edit_instruction}"},
                    {"type": "image_url", "image_url": {"url": image_url}}
                ]
            }]
        )

        content = response.choices[0].message.content

        # 提取 base64 图片数据
        patterns = [
            r'data:image/[^;]+;base64,([A-Za-z0-9+/=]+)',
            r'([A-Za-z0-9+/=]{1000,})'
        ]

        base64_data = None
        for pattern in patterns:
            match = re.search(pattern, content)
            if match:
                base64_data = match.group(1)
                break

        if not base64_data:
            print(f"⚠️ 未找到图片数据,模型回复: {content[:200]}")
            return False

        # 保存图片
        if not output_path:
            timestamp = datetime.now().strftime("%Y%m%d_%H%M%S")
            output_path = f"inpainted_{timestamp}.png"

        image_bytes = base64.b64decode(base64_data)
        with open(output_path, 'wb') as f:
            f.write(image_bytes)

        print(f"✅ 编辑完成! 保存到: {output_path} ({len(image_bytes):,} 字节)")
        return True

    except Exception as e:
        print(f"❌ 编辑失败: {e}")
        return False


# 使用示例
if __name__ == "__main__":
    # 示例 1: 移除对象
    inpaint_image(
        image_url="https://example.com/photo-with-person.jpg",
        edit_instruction="Remove the person on the right side and fill with natural background",
        output_path="result_remove_person.png"
    )

    # 示例 2: 替换背景
    inpaint_image(
        image_url="https://example.com/portrait.jpg",
        edit_instruction="Replace the background with a sunset beach scene, keep the person unchanged",
        output_path="result_new_background.png"
    )

    # 示例 3: 修改局部属性
    inpaint_image(
        image_url="https://example.com/room.jpg",
        edit_instruction="Change the wall color to light blue, keep furniture unchanged",
        output_path="result_wall_color.png"
    )
方案二:Mask-Based 精确 Inpainting(高级用法)
当你需要像素级精确控制修改区域时,可以使用 Nano Banana Pro Edit 的蒙版模式。
Mask-Based Inpainting 工作原理
这种模式需要你提供一张黑白蒙版图片(mask),白色区域表示需要修改的部分,黑色区域表示保持不变。
| 参数 | 说明 | 要求 |
|---|---|---|
| 原图 | 需要编辑的图片 | PNG/JPEG,建议不超过 4096×4096 |
| 蒙版图 | 标记编辑区域的黑白图 | 与原图同尺寸,白色=编辑区域 |
| 编辑指令 | 描述如何填充白色区域 | 英文指令效果最佳 |
Mask-Based Inpainting 代码示例
import openai

client = openai.OpenAI(
    api_key="YOUR_API_KEY",
    base_url="https://api.apiyi.com/v1"
)

# 多图输入: 原图 + 蒙版 + 文本指令
response = client.chat.completions.create(
    model="gemini-2.5-flash-image-preview",
    messages=[{
        "role": "user",
        "content": [
            {
                "type": "text",
                "text": "Generate an image: The first image is the original photo. The second image is a mask where white areas indicate regions to edit. Replace the masked area with a beautiful garden scene."
            },
            {"type": "image_url", "image_url": {"url": "https://example.com/original.jpg"}},
            {"type": "image_url", "image_url": {"url": "https://example.com/mask.png"}}
        ]
    }]
)
何时选择 Mask-Based Inpainting
- 需要精确控制编辑边界(如只修改衬衫不影响皮肤)
- 编辑区域形状不规则,自然语言难以准确描述
- 需要批量处理相同区域的多张图片
- 对边缘过渡要求极高的专业场景
💡 实用提示: 制作蒙版最简单的方式是在 Photoshop 或 GIMP 中用画笔涂白需要修改的区域,然后导出为 PNG。如果嫌手动制作蒙版麻烦,方案一的 Mask-Free 模式在大多数场景下已经足够好用。
方案三:多轮对话 Inpainting(迭代优化)
Nano Banana 2 支持在一次会话中进行多轮编辑,每一轮都可以基于上一轮的结果继续修改。这种方式特别适合需要精细调整的场景。
多轮 Inpainting 对话流程
第1轮: "把背景换成办公室" → 得到编辑后图片A
第2轮: 图片A + "把桌上的杯子换成笔记本电脑" → 得到编辑后图片B
第3轮: 图片B + "调亮整体光线,增加窗户透光效果" → 得到最终图片C
多轮 Inpainting 代码实现
import openai

client = openai.OpenAI(
    api_key="YOUR_API_KEY",
    base_url="https://api.apiyi.com/v1"
)

# 构建多轮对话
messages = [
    # 第1轮: 初始编辑
    {
        "role": "user",
        "content": [
            {"type": "text", "text": "Replace the background with a modern office scene"},
            {"type": "image_url", "image_url": {"url": "https://example.com/photo.jpg"}}
        ]
    }
]

# 第1轮请求
response_1 = client.chat.completions.create(
    model="gemini-2.5-flash-image-preview",
    messages=messages
)

# 将第1轮结果加入上下文
messages.append({"role": "assistant", "content": response_1.choices[0].message.content})

# 第2轮: 基于前一轮继续编辑
messages.append({
    "role": "user",
    "content": [{"type": "text", "text": "Now add a laptop on the desk and make the lighting warmer"}]
})

response_2 = client.chat.completions.create(
    model="gemini-2.5-flash-image-preview",
    messages=messages
)
Nano Banana Inpainting 不同模型版本对比
选择哪个 Nano Banana 模型取决于你的 inpainting 需求:
| 对比维度 | Nano Banana 2 | Nano Banana Pro | 说明 |
|---|---|---|---|
| 模型 ID | gemini-3.1-flash-image-preview |
gemini-3.0-pro-image |
– |
| Mask-Free 编辑 | ✅ 支持 | ✅ 支持 | 两者都支持自然语言编辑 |
| 编辑精度 | ⭐⭐⭐⭐ | ⭐⭐⭐⭐⭐ | Pro 的语义理解更精细 |
| 生成速度 | 3-8 秒 | 10-20 秒 | Flash 架构快 3-5 倍 |
| 最大分辨率 | 4K (4096px) | 2K (2048px) | Banana 2 分辨率更高 |
| 多轮编辑 | ✅ 支持 | ✅ 支持 | 两者都支持多轮对话 |
| API 价格 | ~$0.02/次 | ~$0.04/次 | Banana 2 成本减半 |
| 推荐场景 | 批量编辑、快速迭代 | 专业修图、高精度需求 | 可通过 API易 apiyi.com 平台同时调用 |
Nano Banana Inpainting 模型选择建议
- 日常编辑、批量处理: 选 Nano Banana 2 — 速度快、成本低、4K 分辨率
- 专业修图、商业素材: 选 Nano Banana Pro — 最精细的语义理解和色彩还原
- 不确定用哪个: 先用 Nano Banana 2 测试效果,不满意再切换 Pro
Nano Banana Inpainting 与 Gemini 网页版编辑的区别
很多用户在 Gemini 网页端(gemini.google.com)体验过图片编辑功能后会问:这个 API 也能做到吗?
答案是 可以,但有差异:
| 维度 | Gemini 网页版 | Nano Banana API |
|---|---|---|
| 交互方式 | 鼠标选区 + 文字描述 | 纯 API 调用(文字 + 图片) |
| 蒙版制作 | 网页端内置画笔工具 | 需自行准备蒙版图或使用 mask-free 模式 |
| 控制精度 | 视觉化选区,直观 | 代码级控制,可自动化 |
| 批量处理 | 不支持 | ✅ 支持批量调用 |
| 水印 | 有 SynthID 水印 | 有 SynthID 水印 |
| 集成能力 | 仅网页使用 | 可嵌入任何应用 |
| 价格 | 免费(有限额) | 按次计费 |
关键区别: Gemini 网页版的图片编辑体验更加交互式和可视化,用户可以直接用鼠标画选区。而 API 版本的核心优势在于自动化和规模化 — 你可以在代码中批量处理图片,嵌入到产品流程中。
🎯 技术建议: 如果你的需求是在自己的产品中集成 AI 图片编辑功能,API 是唯一选择。通过 API易 apiyi.com 平台可以获得更稳定的接口访问和技术支持。
Nano Banana Inpainting 最佳实践
编辑指令优化技巧
好的编辑指令能显著提升 inpainting 效果:
| 技巧 | 差的指令 ❌ | 好的指令 ✅ |
|---|---|---|
| 具体描述 | "改一下背景" | "Replace the background with a sunset beach, warm golden light" |
| 指定保留区域 | "换背景" | "Replace the background while keeping the person completely unchanged" |
| 说明光照 | "加个灯" | "Add soft warm lighting from the upper left, casting gentle shadows" |
| 描述材质 | "换地板" | "Replace the floor with light oak hardwood flooring with visible grain" |
| 限定范围 | "改颜色" | "Change only the car's body color to midnight blue, keep windows and tires unchanged" |
Nano Banana Inpainting 性能优化建议
- 输入图片预处理 — 建议 1024×1024 到 2048×2048 之间,过大会增加处理时间
- 英文指令优先 — 英文指令的理解准确度明显高于中文
- 单次聚焦一个修改 — 复杂编辑拆分为多轮,每轮只做一件事
- 添加 "Generate an image:" 前缀 — 明确告诉模型输出图片而非纯文本回复
常见问题
Q1: Nano Banana API 真的支持 inpainting 吗?不是只有网页版才有?
是的,Nano Banana API 完全支持 inpainting 局部改图。Nano Banana 2(gemini-3.1-flash-image-preview)和 Nano Banana Pro(gemini-3.0-pro-image)都支持通过 API 进行图片编辑。最强大的特性是 mask-free inpainting,你不需要制作蒙版,只需用自然语言描述编辑需求,模型就能自动识别并修改目标区域。通过 API易 apiyi.com 平台可以快速获取 API Key 开始测试。
Q2: Mask-Free 和 Mask-Based Inpainting 哪个效果更好?
取决于场景。对于背景替换、对象移除、颜色修改等常见需求,Mask-Free 模式已经足够精确,而且更方便。对于边界要求极严格的场景(比如只修改衬衫花纹不影响皮肤),Mask-Based 模式能提供更精确的控制。建议先用 Mask-Free 模式测试,不满意再使用蒙版。API易 apiyi.com 平台支持两种模式的调用,切换非常方便。
Q3: Nano Banana 的 inpainting 能达到 Photoshop 的效果吗?
在很多场景下已经非常接近甚至超越 Photoshop 的内容感知填充(Content-Aware Fill)。Nano Banana 的优势在于它理解场景语义——比如移除一个人后,它知道背后应该是什么样的建筑或风景,而不只是简单的纹理填充。但对于极其精细的商业修图,建议结合 Photoshop 做最终调整。
Q4: 为什么我的编辑指令有时不生效,模型生成了全新图片?
这是一个常见问题。确保你的指令明确表达是"编辑"而非"生成"。建议在指令前加 "Generate an image:" 前缀,并明确说明保留原图的哪些部分。例如:"Generate an image: Edit the original photo - replace only the sky with a starry night, keep everything else exactly the same"。如果问题持续,可以尝试添加 "Do not change the composition or layout" 来约束模型。
Q5: Nano Banana Inpainting 的 API 调用价格是多少?
Nano Banana 2 的图片编辑约 $0.02/次,Nano Banana Pro 约 $0.04/次。通过 API易 apiyi.com 平台调用可以享受更优惠的价格,实际成本约 ¥0.14/次(Nano Banana 2),适合批量图片编辑场景。
总结
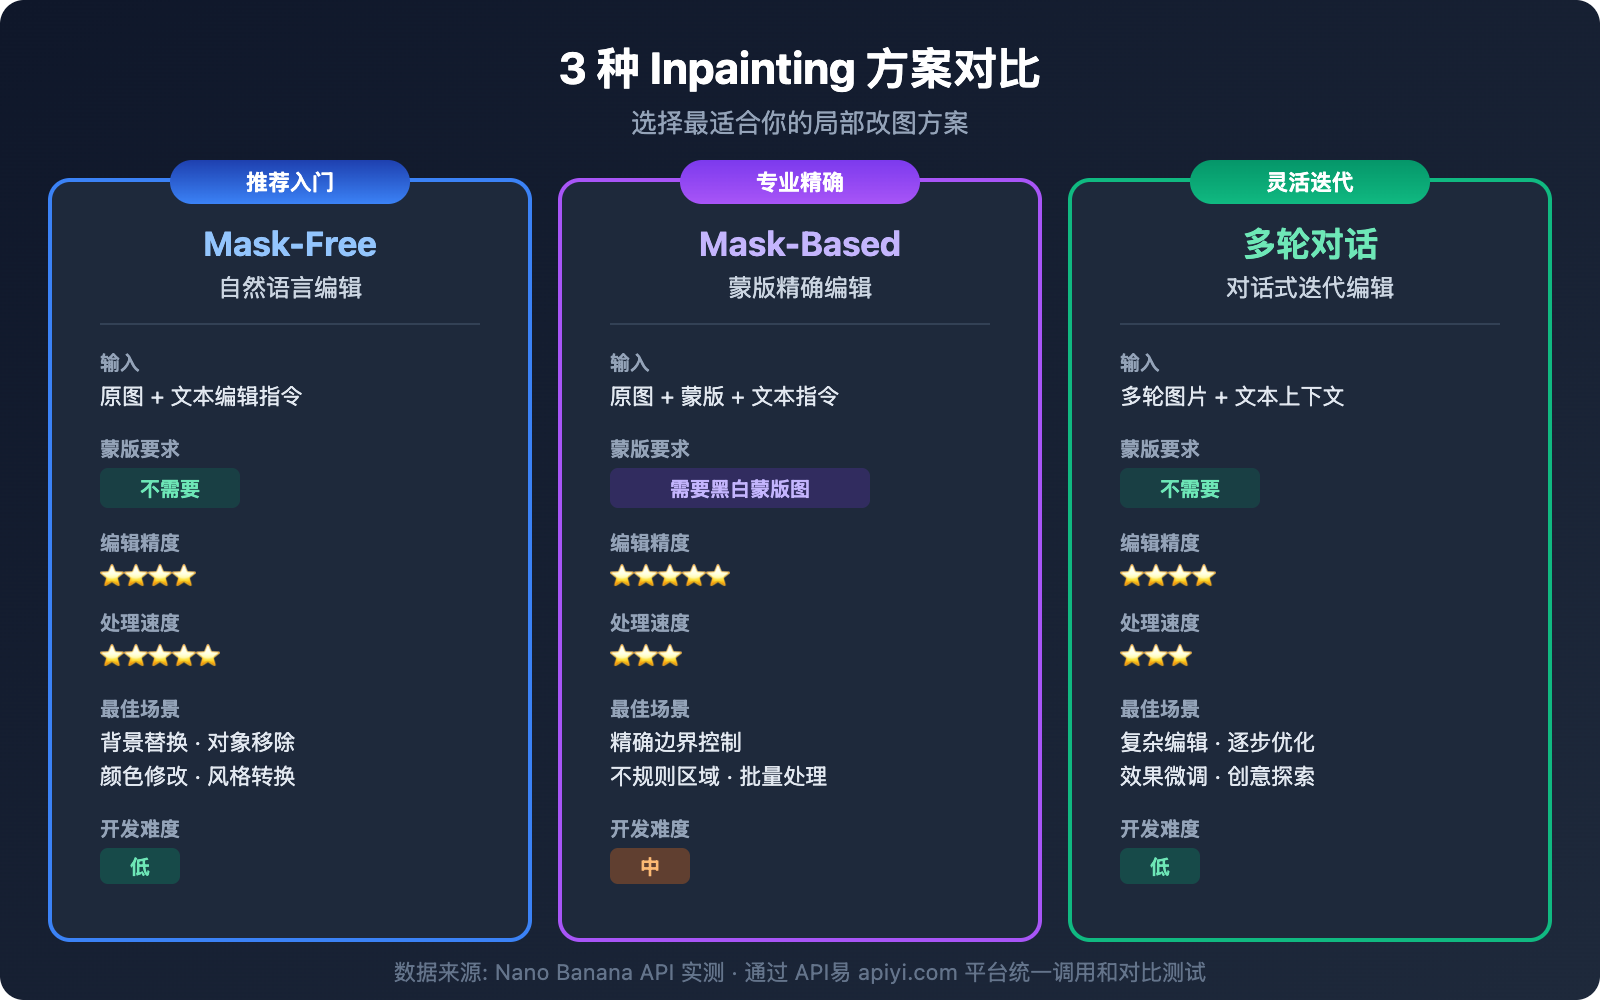
Nano Banana 的 inpainting 局部改图能力远比很多开发者想象的要强大。3 种方案各有适用场景:
- Mask-Free 自然语言编辑 — 最方便,适合大部分场景,推荐优先使用
- Mask-Based 精确修改 — 最精确,适合专业级像素控制
- 多轮对话迭代编辑 — 最灵活,适合复杂的渐进式修改
无论选择哪种方案,核心都是通过标准的 Chat Completions API 发送图片和编辑指令。推荐通过 API易 apiyi.com 平台快速开始测试,5 分钟即可跑通第一个 inpainting 示例。
参考资料
-
Google AI 官方文档 – Nano Banana Image Generation
- 链接:
ai.google.dev/gemini-api/docs/image-generation - 说明: Gemini 图像生成和编辑 API 完整文档
- 链接:
-
Google Developers Blog – Gemini 2.5 Flash Image
- 链接:
developers.googleblog.com/introducing-gemini-2-5-flash-image/ - 说明: Nano Banana 技术架构和能力详解
- 链接:
-
DataCamp – Gemini 2.5 Flash Image Complete Guide
- 链接:
datacamp.com/tutorial/gemini-2-5-flash-image-guide - 说明: 完整的代码示例和实践指南
- 链接:
📝 作者: APIYI Team | 技术交流和 API 接入请访问 apiyi.com