使用 Sora 2 API 进行图生视频 (Image-to-Video) 时,垫图尺寸不匹配是开发者最常遇到的报错之一。本文将详细解析 Inpaint image must match the requested width and height 错误的根本原因,并提供 5 种经过验证的解决方案。
核心价值: 读完本文,你将掌握 Sora 2 API 垫图尺寸校验规则,学会使用 Python Pillow 和 FFmpeg 预处理图片,彻底解决尺寸报错问题。
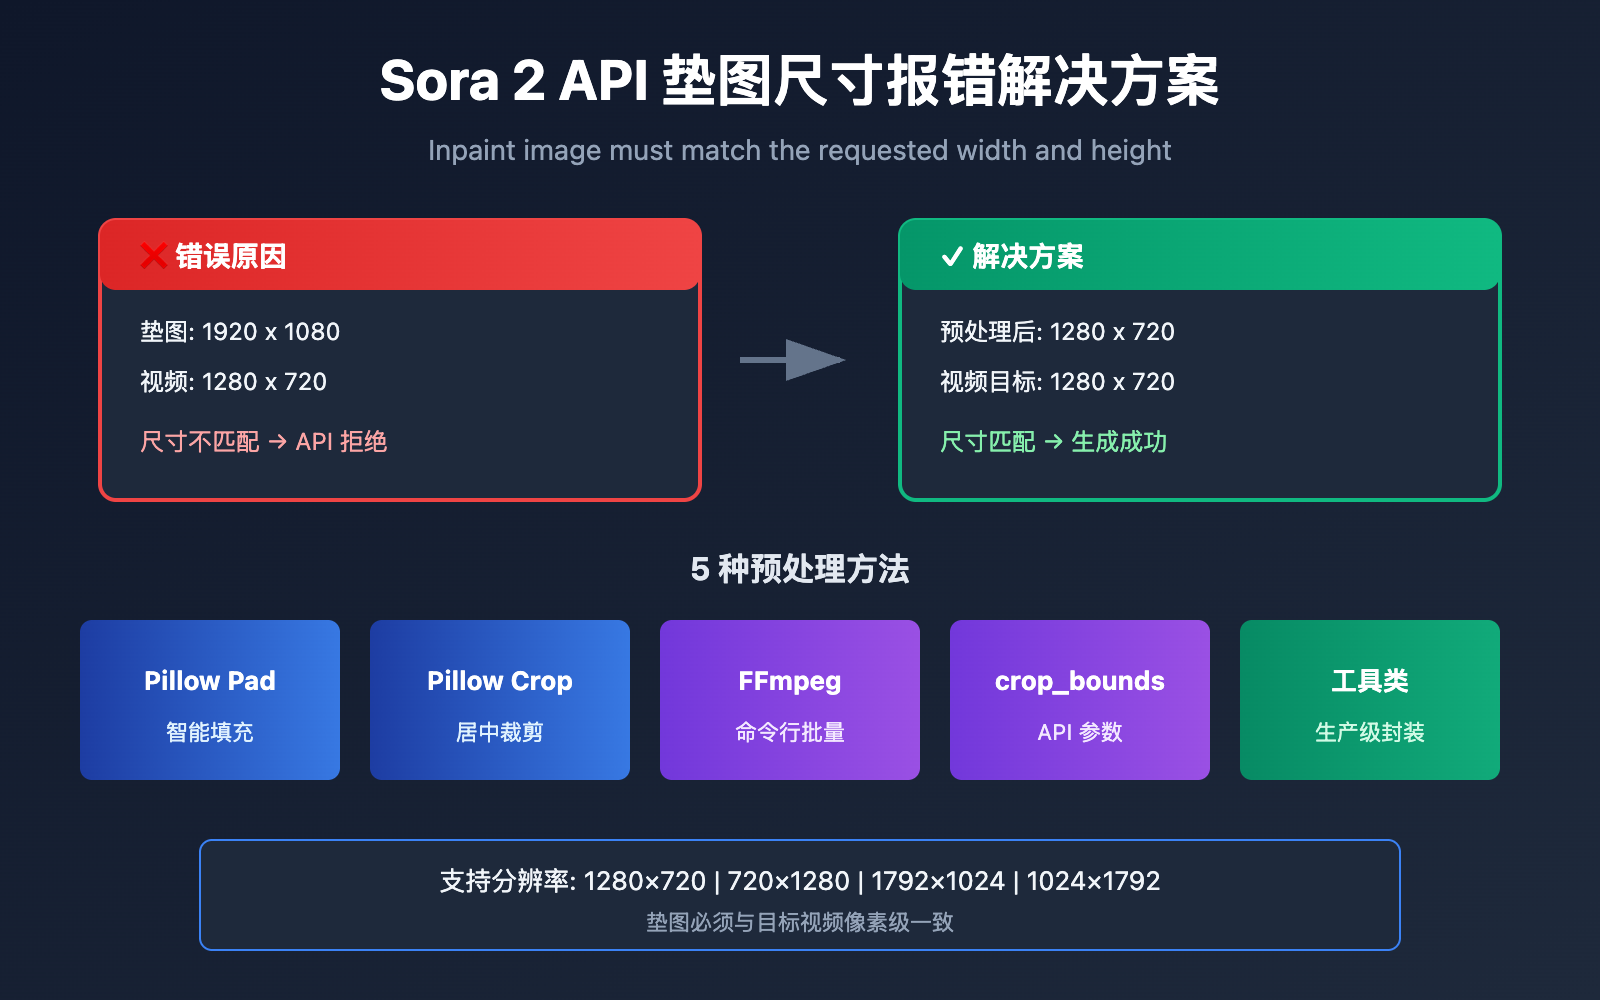
Sora 2 API 垫图尺寸报错原因分析
当你调用 Sora 2 API 的图生视频功能时,如果看到以下报错信息:
{
  "error": {
    "message": "Inpaint image must match the requested width and height",
    "type": "invalid_request_error",
    "param": null,
    "code": null
  }
}
这表示你上传的垫图 (input_reference) 尺寸与目标视频分辨率不匹配。
Sora 2 API 垫图尺寸强制匹配规则
Sora 2 API 对垫图有 严格的尺寸校验机制:
| 校验项 | 要求 | 说明 |
|---|---|---|
| 宽度匹配 | 垫图宽度 = 视频宽度 | 必须像素级一致 |
| 高度匹配 | 垫图高度 = 视频高度 | 必须像素级一致 |
| 格式支持 | JPEG、PNG、WebP | 三种格式均可 |
| 文件传输 | multipart/form-data | 必须以文件形式上传 |
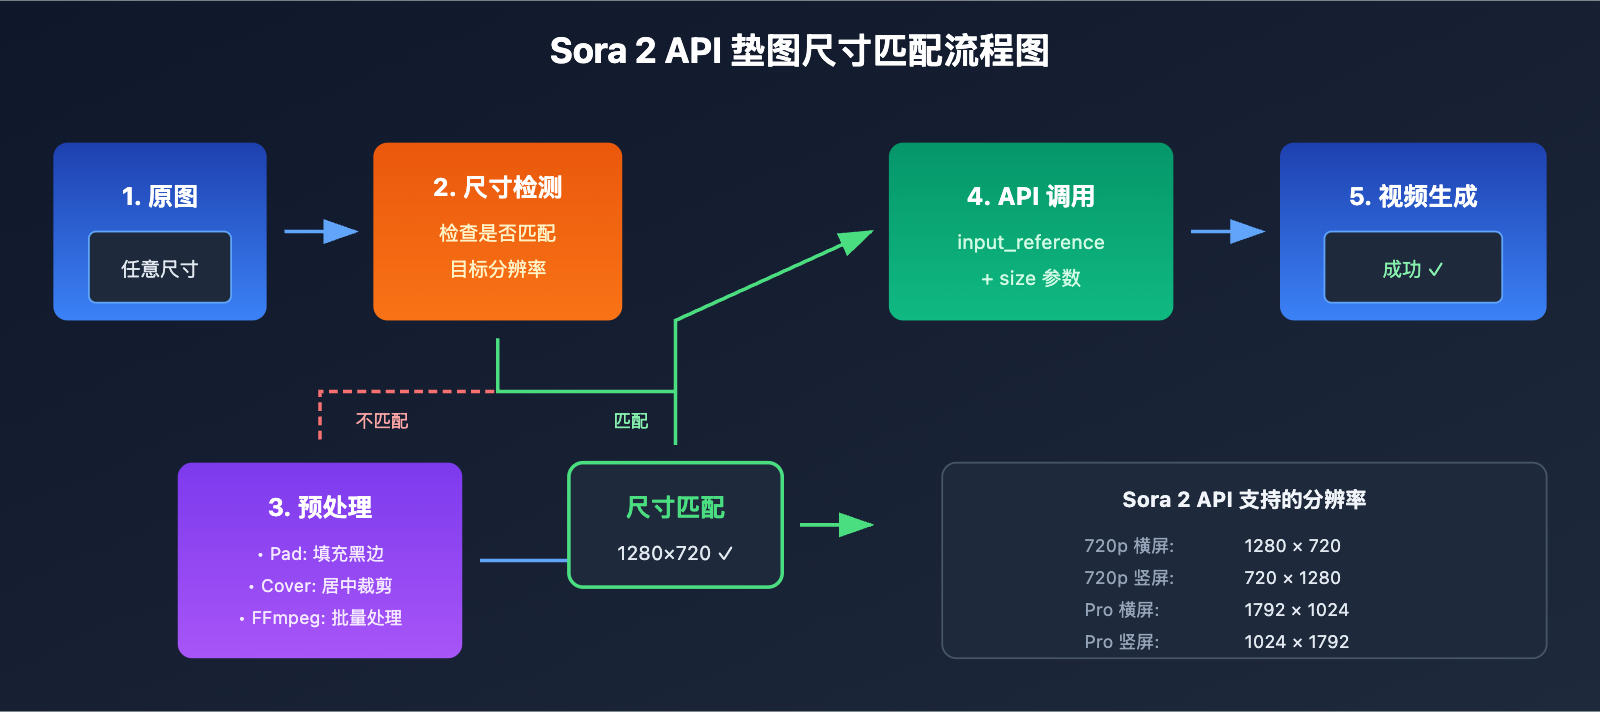
Sora 2 API 支持的视频分辨率
根据 OpenAI 官方文档,Sora 2 API 目前支持以下分辨率:
| 分辨率 | 宽度 x 高度 | 比例 | 适用场景 |
|---|---|---|---|
| 720p 横屏 | 1280 x 720 | 16:9 | YouTube、网页视频 |
| 720p 竖屏 | 720 x 1280 | 9:16 | 抖音、TikTok、Reels |
| 1080p 横屏 (Pro) | 1792 x 1024 | ~16:9 | 高清横屏视频 |
| 1080p 竖屏 (Pro) | 1024 x 1792 | ~9:16 | 高清竖屏视频 |
🎯 重要提示: 你的垫图必须与选择的目标分辨率 像素级完全一致,例如选择 1280×720 分辨率,垫图就必须是精确的 1280×720 像素,差 1 个像素都会报错。
Sora 2 API 垫图尺寸报错的 5 种解决方案
方案一:Python Pillow 智能裁剪填充
使用 Pillow 的 ImageOps.pad() 方法可以智能处理任意尺寸的图片,保持宽高比的同时填充到目标尺寸:
from PIL import Image, ImageOps
import openai

# Sora 2 API 支持的标准分辨率
SORA_RESOLUTIONS = {
    "landscape_720p": (1280, 720),
    "portrait_720p": (720, 1280),
    "landscape_1080p": (1792, 1024),
    "portrait_1080p": (1024, 1792),
}

def preprocess_image_for_sora(image_path, target_resolution="landscape_720p"):
    """预处理图片以匹配 Sora 2 API 尺寸要求"""
    target_size = SORA_RESOLUTIONS[target_resolution]

    # 打开原图
    img = Image.open(image_path)

    # 使用 pad 方法:保持宽高比,填充黑色背景
    processed = ImageOps.pad(img, target_size, color=(0, 0, 0))

    # 保存处理后的图片
    output_path = image_path.replace(".jpg", "_sora_ready.jpg")
    processed.save(output_path, "JPEG", quality=95)

    return output_path

# 使用示例
processed_image = preprocess_image_for_sora("my_image.jpg", "landscape_720p")

# 调用 Sora 2 API - 通过 API易 统一接口
client = openai.OpenAI(
    api_key="YOUR_API_KEY",
    base_url="https://api.apiyi.com/v1"  # 使用 API易 统一接口
)

with open(processed_image, "rb") as f:
    response = client.videos.create(
        model="sora-2",
        prompt="A serene landscape comes to life",
        size="1280x720",
        input_reference=f
    )
🚀 快速开始: 推荐使用 API易 apiyi.com 平台快速测试 Sora 2 API,该平台提供开箱即用的接口,无需复杂配置即可完成集成。
方案二:Python Pillow 居中裁剪(保留主体)
如果你希望保留图片主体内容,不想要黑边填充,可以使用居中裁剪:
from PIL import Image

def center_crop_for_sora(image_path, target_width, target_height):
    """居中裁剪图片以匹配 Sora 2 API 尺寸要求"""
    img = Image.open(image_path)
    orig_width, orig_height = img.size

    # 计算目标宽高比
    target_ratio = target_width / target_height
    orig_ratio = orig_width / orig_height

    if orig_ratio > target_ratio:
        # 原图更宽,按高度缩放后裁剪两边
        new_height = target_height
        new_width = int(orig_width * (target_height / orig_height))
    else:
        # 原图更高,按宽度缩放后裁剪上下
        new_width = target_width
        new_height = int(orig_height * (target_width / orig_width))

    # 先缩放
    img = img.resize((new_width, new_height), Image.LANCZOS)

    # 再居中裁剪
    left = (new_width - target_width) // 2
    top = (new_height - target_height) // 2
    right = left + target_width
    bottom = top + target_height

    cropped = img.crop((left, top, right, bottom))

    output_path = image_path.replace(".jpg", f"_{target_width}x{target_height}.jpg")
    cropped.save(output_path, "JPEG", quality=95)

    return output_path

# 为横屏 720p 视频准备垫图
processed = center_crop_for_sora("my_photo.jpg", 1280, 720)
方案三:FFmpeg 命令行批量处理
对于需要批量处理的场景,FFmpeg 是更高效的选择:
居中裁剪模式(Cover):
# 先缩放保持比例,再居中裁剪到目标尺寸
ffmpeg -i input.jpg -vf "scale=1280:720:force_original_aspect_ratio=increase,crop=1280:720" output_sora.jpg
填充模式(Letterbox):
# 保持原比例缩放,不足部分填充黑色
ffmpeg -i input.jpg -vf "scale=1280:720:force_original_aspect_ratio=decrease,pad=1280:720:(ow-iw)/2:(oh-ih)/2:black" output_sora.jpg
批量处理脚本:
#!/bin/bash
# 批量处理当前目录所有 jpg 图片为 Sora 2 API 720p 横屏格式

for file in *.jpg; do
    ffmpeg -i "$file" \
        -vf "scale=1280:720:force_original_aspect_ratio=increase,crop=1280:720" \
        -q:v 2 \
        "sora_ready_$file"
done
方案四:使用 crop_bounds 参数(API 内置裁剪)
Sora 2 API 提供了 crop_bounds 参数,可以在 API 层面指定裁剪区域:
import openai

client = openai.OpenAI(
    api_key="YOUR_API_KEY",
    base_url="https://api.apiyi.com/v1"  # 使用 API易 统一接口
)

# 使用 crop_bounds 指定裁剪区域(以比例形式)
with open("full_size_image.jpg", "rb") as f:
    response = client.videos.create(
        model="sora-2",
        prompt="动态视频效果",
        size="1280x720",
        input_reference=f,
        crop_bounds={
            "left_fraction": 0.1,    # 左边裁掉 10%
            "top_fraction": 0.1,     # 顶部裁掉 10%
            "right_fraction": 0.9,   # 右边保留到 90%
            "bottom_fraction": 0.9   # 底部保留到 90%
        },
        frame_index=0  # 图片作为第一帧
    )
⚠️ 注意: 使用
crop_bounds时,裁剪后的区域仍需与目标视频分辨率匹配,建议结合前置预处理使用。
方案五:完整的图片预处理工具类
以下是一个生产级的图片预处理工具类,包含多种处理模式:
from PIL import Image, ImageOps
from pathlib import Path
import io

class SoraImagePreprocessor:
    """Sora 2 API 垫图预处理工具"""

    RESOLUTIONS = {
        "1280x720": (1280, 720),
        "720x1280": (720, 1280),
        "1792x1024": (1792, 1024),
        "1024x1792": (1024, 1792),
    }

    def __init__(self, target_resolution="1280x720"):
        if target_resolution not in self.RESOLUTIONS:
            raise ValueError(f"不支持的分辨率: {target_resolution}")
        self.target_size = self.RESOLUTIONS[target_resolution]

    def pad(self, image_path, bg_color=(0, 0, 0)):
        """填充模式:保持原图比例,添加背景色填充"""
        img = Image.open(image_path)
        return ImageOps.pad(img, self.target_size, color=bg_color)

    def cover(self, image_path):
        """覆盖模式:保持原图比例,居中裁剪"""
        img = Image.open(image_path)
        return ImageOps.fit(img, self.target_size, Image.LANCZOS)

    def stretch(self, image_path):
        """拉伸模式:强制拉伸到目标尺寸(不推荐)"""
        img = Image.open(image_path)
        return img.resize(self.target_size, Image.LANCZOS)

    def to_bytes(self, img, format="JPEG", quality=95):
        """将 PIL Image 转换为字节流,用于 API 上传"""
        buffer = io.BytesIO()
        img.save(buffer, format=format, quality=quality)
        buffer.seek(0)
        return buffer

    def process_and_save(self, image_path, mode="cover", output_path=None):
        """处理并保存图片"""
        if mode == "pad":
            processed = self.pad(image_path)
        elif mode == "cover":
            processed = self.cover(image_path)
        elif mode == "stretch":
            processed = self.stretch(image_path)
        else:
            raise ValueError(f"不支持的模式: {mode}")

        if output_path is None:
            p = Path(image_path)
            output_path = p.parent / f"{p.stem}_sora_{self.target_size[0]}x{self.target_size[1]}{p.suffix}"

        processed.save(output_path, quality=95)
        return output_path

# 使用示例
preprocessor = SoraImagePreprocessor("1280x720")

# 方式1:处理并保存
output = preprocessor.process_and_save("my_image.jpg", mode="cover")
print(f"处理完成: {output}")

# 方式2:直接获取字节流用于 API 调用
img = preprocessor.cover("my_image.jpg")
image_bytes = preprocessor.to_bytes(img)
查看完整调用示例代码
import openai
from PIL import Image, ImageOps
import io

class SoraImagePreprocessor:
    """Sora 2 API 垫图预处理工具"""

    RESOLUTIONS = {
        "1280x720": (1280, 720),
        "720x1280": (720, 1280),
        "1792x1024": (1792, 1024),
        "1024x1792": (1024, 1792),
    }

    def __init__(self, target_resolution="1280x720"):
        if target_resolution not in self.RESOLUTIONS:
            raise ValueError(f"不支持的分辨率: {target_resolution}")
        self.target_size = self.RESOLUTIONS[target_resolution]

    def cover(self, image_path):
        """覆盖模式:保持原图比例,居中裁剪"""
        img = Image.open(image_path)
        return ImageOps.fit(img, self.target_size, Image.LANCZOS)

    def to_bytes(self, img, format="JPEG", quality=95):
        """将 PIL Image 转换为字节流"""
        buffer = io.BytesIO()
        img.save(buffer, format=format, quality=quality)
        buffer.seek(0)
        return buffer


def generate_video_with_image(image_path, prompt, resolution="1280x720"):
    """
    使用预处理后的图片生成 Sora 2 视频

    Args:
        image_path: 原始图片路径
        prompt: 视频描述提示词
        resolution: 目标分辨率

    Returns:
        视频生成任务 ID
    """
    # 1. 预处理图片
    preprocessor = SoraImagePreprocessor(resolution)
    processed_img = preprocessor.cover(image_path)
    image_bytes = preprocessor.to_bytes(processed_img)

    # 2. 初始化客户端 - 通过 API易 统一接口
    client = openai.OpenAI(
        api_key="YOUR_API_KEY",
        base_url="https://api.apiyi.com/v1"
    )

    # 3. 调用 Sora 2 API
    response = client.videos.create(
        model="sora-2",
        prompt=prompt,
        size=resolution,
        input_reference=image_bytes,
        duration=5  # 视频时长(秒)
    )

    return response


# 完整调用示例
if __name__ == "__main__":
    result = generate_video_with_image(
        image_path="landscape_photo.jpg",
        prompt="The scene comes alive with gentle wind moving through the trees",
        resolution="1280x720"
    )
    print(f"视频生成任务已提交: {result}")
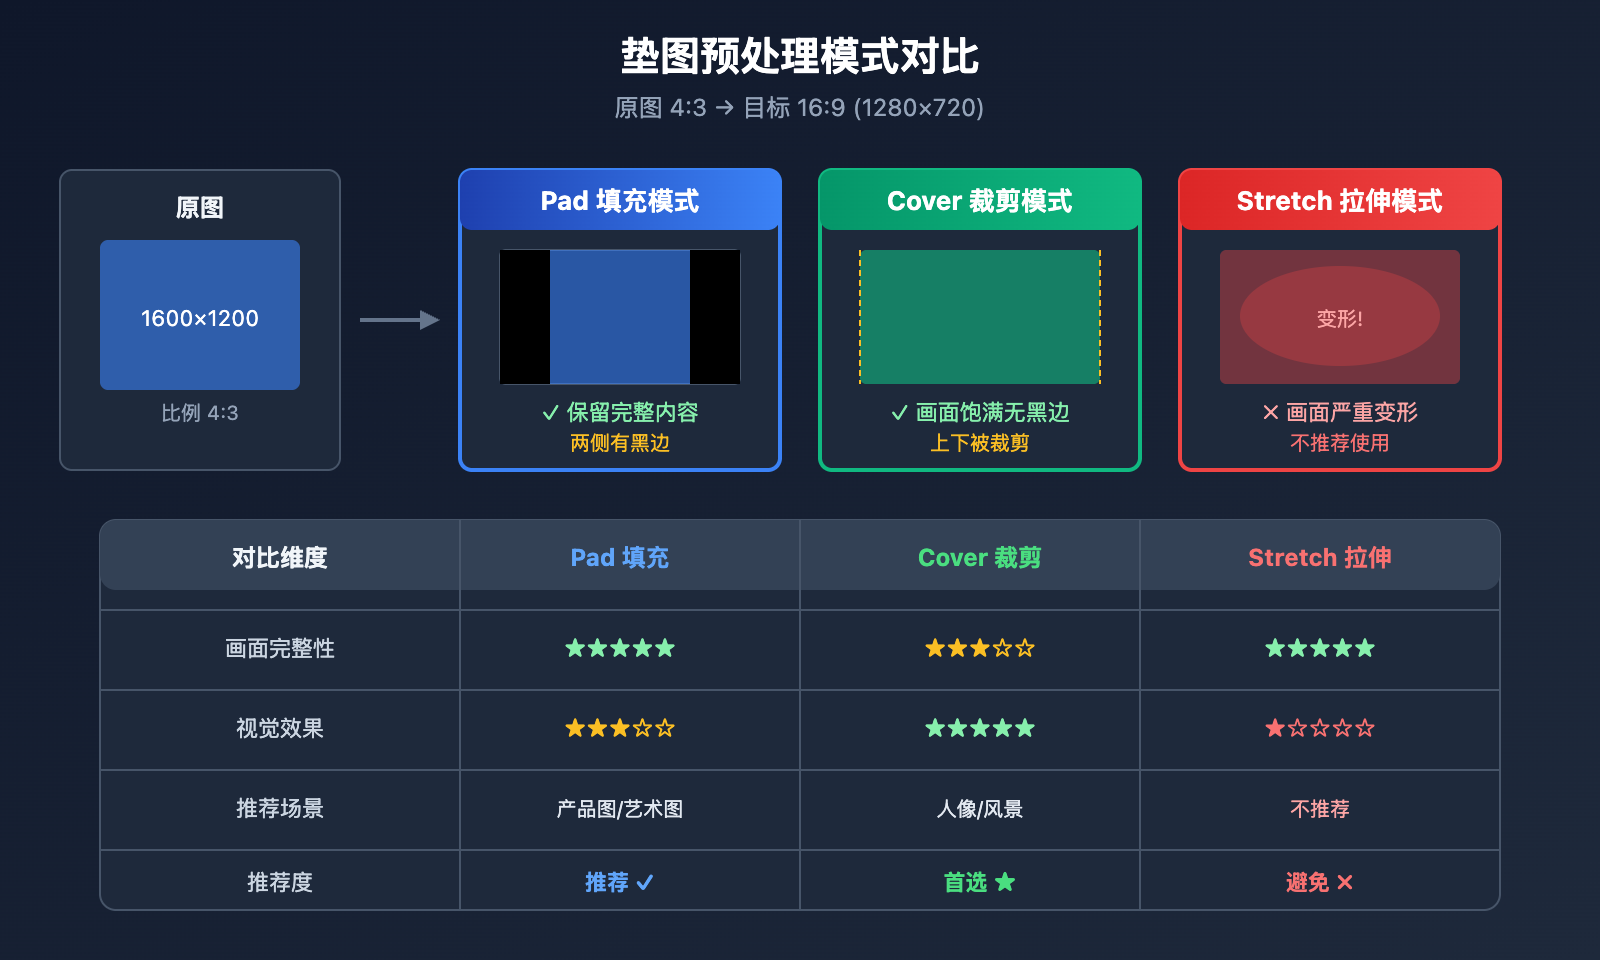
Sora 2 API 垫图预处理模式对比
选择合适的预处理模式对视频效果至关重要:
| 预处理模式 | 处理方式 | 优点 | 缺点 | 推荐场景 |
|---|---|---|---|---|
| Pad (填充) | 保持比例,添加黑边 | 保留完整画面 | 可能有黑边 | 内容完整性要求高 |
| Cover (裁剪) | 保持比例,居中裁剪 | 无黑边,画面饱满 | 可能裁掉边缘内容 | 主体居中的图片 |
| Stretch (拉伸) | 强制拉伸 | 简单直接 | 画面变形 | 不推荐使用 |
💡 选择建议: 选择哪种预处理模式主要取决于您的图片内容和最终效果需求。我们建议通过 API易 apiyi.com 平台进行实际测试,以便快速验证不同模式的效果差异。
不同场景的推荐模式
| 图片类型 | 推荐模式 | 说明 |
|---|---|---|
| 人像照片 | Cover | 保持人物主体居中完整 |
| 风景照片 | Pad 或 Cover | 根据构图选择 |
| 产品图片 | Pad | 确保产品完整显示 |
| 艺术图片 | Pad | 保留艺术完整性 |
| UI 截图 | Cover | 通常信息集中在中心 |
Sora 2 API 垫图常见问题
Q1: 为什么 Sora 2 API 对垫图尺寸要求这么严格?
Sora 2 使用垫图作为视频的首帧 (first frame),模型需要从这一帧开始生成后续动态内容。如果垫图尺寸与目标视频不匹配,模型无法正确初始化生成过程。这是 OpenAI 设计的技术限制,确保生成质量的一致性。
通过 API易 apiyi.com 平台调用时,建议在客户端完成图片预处理,这样可以获得最佳的生成效果。
Q2: 预处理时应该选择哪种图片格式?
Sora 2 API 支持 JPEG、PNG 和 WebP 三种格式:
- JPEG: 推荐用于照片类图片,文件小、上传快
- PNG: 适合需要透明背景或无损质量的场景
- WebP: 平衡质量和体积,但兼容性略差
建议使用 JPEG 格式,quality 参数设置为 90-95,既保证质量又控制文件大小。
Q3: 处理后的图片质量下降怎么办?
图片质量下降通常由以下原因导致:
- 过度压缩: 将 JPEG quality 提高到 95
- 放大过多: 尽量使用分辨率接近目标的原图
- 重采样算法: 使用
Image.LANCZOS而非Image.NEAREST
# 高质量处理设置
img = img.resize(target_size, Image.LANCZOS)  # 使用 Lanczos 算法
img.save(output_path, "JPEG", quality=95)     # 高质量保存
Q4: 如何批量处理大量图片?
对于批量处理场景,推荐使用 FFmpeg 或 Python 多线程:
from concurrent.futures import ThreadPoolExecutor
import os

def batch_process(image_dir, output_dir, resolution="1280x720"):
    preprocessor = SoraImagePreprocessor(resolution)

    def process_single(filename):
        input_path = os.path.join(image_dir, filename)
        output_path = os.path.join(output_dir, f"sora_{filename}")
        return preprocessor.process_and_save(input_path, "cover", output_path)

    image_files = [f for f in os.listdir(image_dir) if f.endswith(('.jpg', '.png'))]

    with ThreadPoolExecutor(max_workers=4) as executor:
        results = list(executor.map(process_single, image_files))

    return results
通过 API易 apiyi.com 平台可以获取批量处理的 API 配额,适合大规模视频生成项目。
Q5: 垫图中包含人脸会被拒绝吗?
是的,根据 OpenAI 政策,包含真实人脸的垫图目前会被 Sora 2 API 拒绝处理。如果你的业务需要人物视频,建议:
- 使用不含清晰人脸的图片
- 使用 AI 生成的虚拟人物图片
- 使用抽象或艺术化处理后的人物图片
Sora 2 API 垫图尺寸速查表
为方便快速查询,以下是完整的尺寸匹配速查表:
| 目标视频 | 垫图宽度 | 垫图高度 | API size 参数 | 适用平台 |
|---|---|---|---|---|
| 720p 横屏 | 1280 | 720 | "1280×720" | YouTube, 网页 |
| 720p 竖屏 | 720 | 1280 | "720×1280" | 抖音, TikTok |
| Pro 横屏 | 1792 | 1024 | "1792×1024" | 高清横屏 |
| Pro 竖屏 | 1024 | 1792 | "1024×1792" | 高清竖屏 |
📌 提示: 可用平台包括 API易 apiyi.com、OpenAI 官方 API 等,建议选择响应速度快、价格优惠的平台进行开发测试。
总结
Sora 2 API 垫图尺寸报错是开发者最常遇到的问题之一,核心解决思路是:
- 理解规则: 垫图必须与目标视频像素级尺寸一致
- 选择模式: 根据图片内容选择 Pad 或 Cover 模式
- 前置处理: 使用 Python Pillow 或 FFmpeg 预处理
- 验证尺寸: 处理后验证图片尺寸是否匹配
推荐通过 API易 apiyi.com 快速验证图片预处理效果和视频生成质量。
作者: APIYI Team | 更多 AI 开发技巧请访问 apiyi.com
参考资料:
- OpenAI Sora API 文档: 图生视频接口说明
- 链接:
platform.openai.com/docs/guides/video-generation
- 链接:
- Pillow 官方文档: ImageOps 图像处理模块
- 链接:
pillow.readthedocs.io/en/stable/reference/ImageOps.html
- 链接:
- FFmpeg 官方文档: 视频和图片处理滤镜
- 链接:
ffmpeg.org/ffmpeg-filters.html
- 链接: