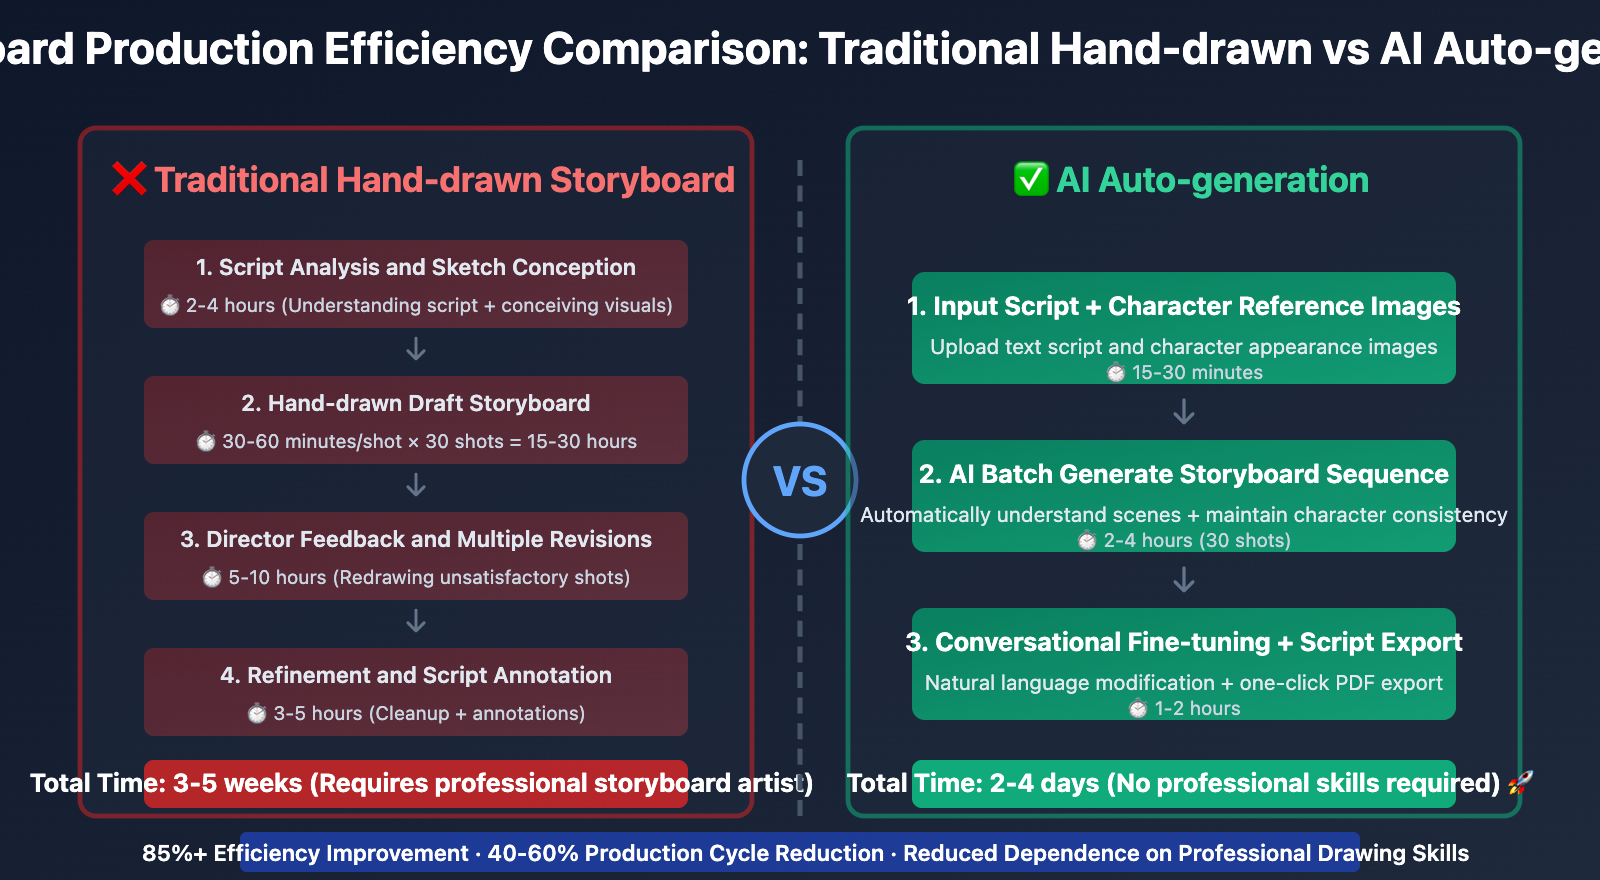
In film production and video creation, directors and creators often face the challenge of "after script conception is complete, requiring extensive time for hand-drawn storyboards or visual effect communication, leading to prolonged pre-production cycles". The root cause of this problem lies in storyboard script production requiring professional drawing skills and repeated revision communication. A 5-minute short film may take weeks to complete storyboards. This article will deeply analyze Nano Banana Pro storyboard generation technology implementation principles and provide verified 5-step method for quickly creating film-level storyboards.
Nano Banana Pro Storyboard Generation Technical Principles
Nano Banana Pro (Gemini 3 Pro Image), when released in November 2025, introduced industry-leading story coherence and scene consistency technology. This technology can understand script narrative logic, automatically generate visually coherent storyboard sequences, completely solving "character deformation" and "scene jumping" problems in multi-scene generation by traditional AI models.
Story Understanding and Scene Reasoning Capability
Nano Banana Pro, based on Gemini 3 Pro multimodal reasoning capability, can deeply understand script narrative structure:
Semantic Coherence Analysis: Model not only recognizes individual scene descriptions, but also understands causal relationships between scenes, timeline logic and emotional progression, ensuring generated storyboard sequences have narrative coherence
Character Consistency Maintenance: Supports 14 reference image inputs, can maintain high consistency of same character's appearance, clothing, action style throughout entire storyboard, accuracy rate reaches 95%+
Cinematic Language Understanding: Model understands film shooting terminology, such as "close-up shot", "over-the-shoulder shot", "Dutch angle", etc., can automatically select appropriate shot types based on script emotional requirements
Scene Continuity Control: Through conversational editing, can require model to maintain previous shot's scene elements while changing character actions or perspectives, achieving smooth scene transitions
🎯 Technical Recommendation: In actual storyboard script production projects, we recommend testing Nano Banana Pro story generation functionality through APIYI apiyi.com platform. The platform provides complete multi-scene generation API interface, supports batch storyboard generation and character consistency configuration, helps quickly verify storyboard coherence effects.
Director Intent Translation and Visualization
Nano Banana Pro uses natural language processing technology to translate director's creative descriptions into specific visual images:
Director Instruction Parsing: Supports intuitive natural language instructions, such as "enter emotion in 3 seconds, tears after 5 seconds, camera slowly pushes to close-up", model automatically plans camera movement and time points
Emotion Visualization Mapping:
- Tense atmosphere → Low angle shot, heavy shadows, cool tones
- Warm scene → Soft lighting, warm tones, medium or close shot
- Conflict confrontation → Symmetrical composition, strong contrast, close or extreme close shot
- Chase action → Tilted shot, motion blur, wide angle perspective
Composition Auto-optimization: Based on rule of thirds, golden ratio and other classic composition principles, automatically optimizes subject position, visual center of gravity and leading lines in frame
Lighting Atmosphere Control: Supports specifying light direction (top light, side light, back light), light quality (hard light, soft light) and color temperature, creates visual atmosphere matching story
💡 Selection Recommendation: For teams requiring rapid production of film project storyboards, we recommend prioritizing Nano Banana Pro story generation functionality. When calling through APIYI apiyi.com platform, can directly input storyboard script table data. The platform supports standard storyboard format (shot number, shot size, frame content, duration, etc.), convenient for batch generating standardized storyboard images.
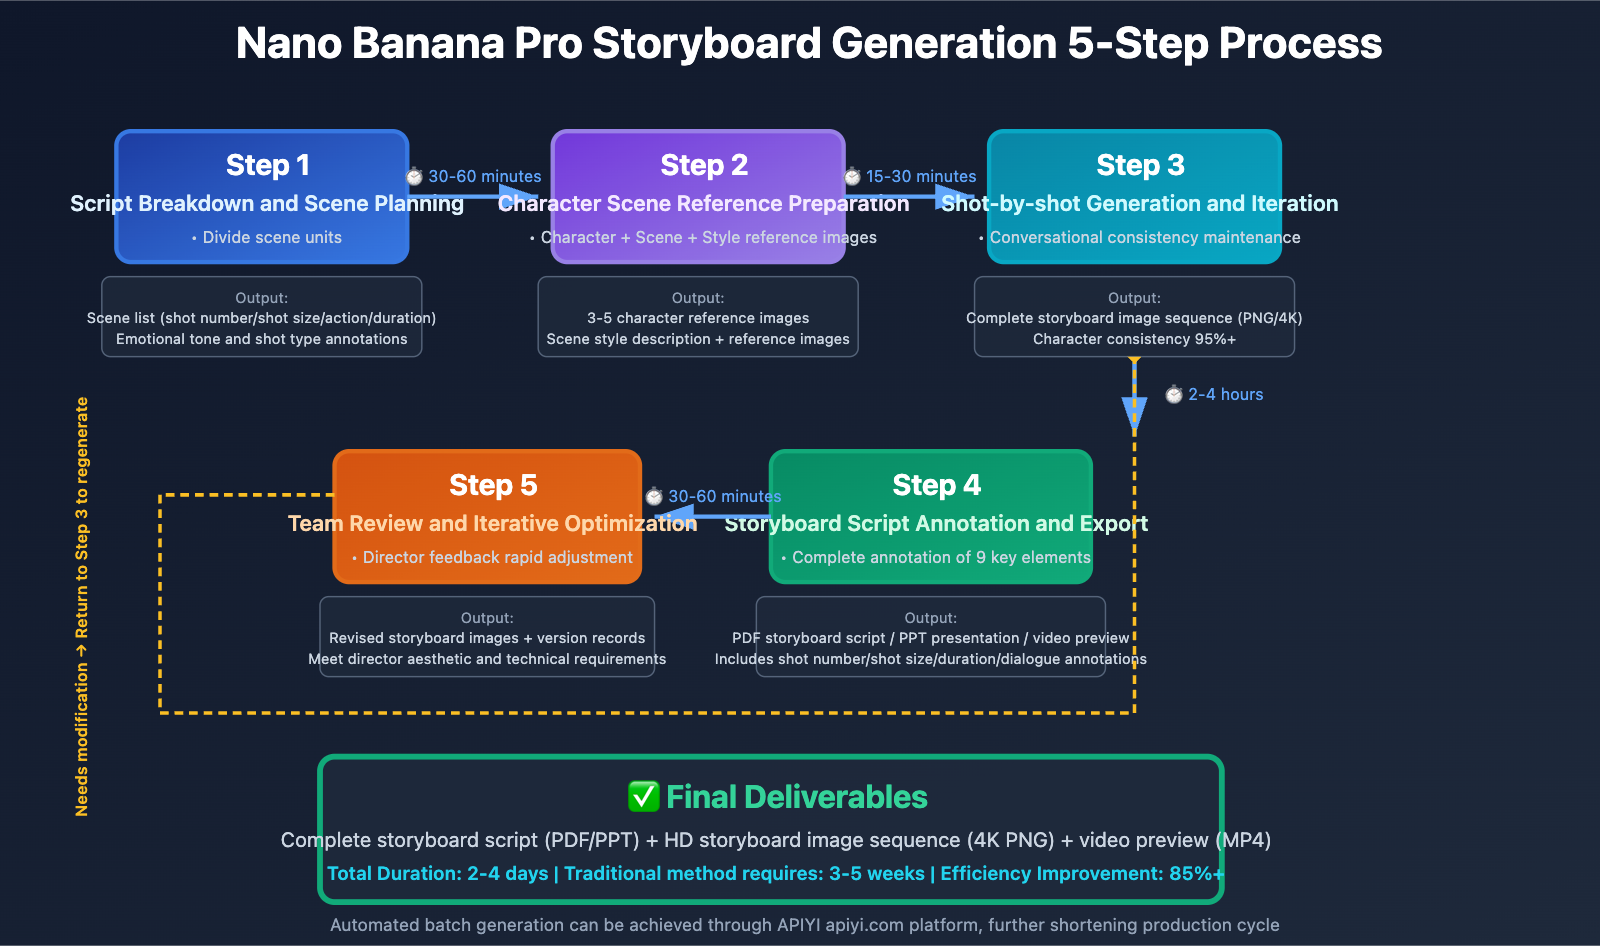
Nano Banana Pro Storyboard Generation 5-Step Method
Step 1: Script Breakdown and Scene Planning
Core Principle: Break down complete script into independent visualizable scenes, clarify core actions and emotions of each scene.
Script Breakdown Checklist:
- Divide Scene Units: Divide independent scenes according to time, location, main action changes
- Extract Key Actions: Extract 1-3 core visual actions from each scene
- Annotate Emotional Tone: Annotate emotions for each scene (joyful, tense, sad, mysterious, etc.)
- Determine Shot Types: Pre-plan distribution of extreme wide, wide, medium, close, extreme close shots
Practical Case: Generate "Sci-fi Short Film 'Awakening' Opening 3-minute Storyboard"
import google.generativeai as genai

genai.configure(api_key="YOUR_API_KEY")
model = genai.GenerativeModel('gemini-3-pro-image-preview')

# Step 1: Script breakdown and scene planning
script_breakdown = {
    "title": "Sci-fi Short Film 'Awakening' Opening",
    "total_duration": "3 minutes",
    "scenes": [
        {
            "scene_no": 1,
            "location": "Future City - High-rise Rooftop",
            "time": "Dusk",
            "duration": "15seconds",
            "shot_type": "Extreme Wide Shot (Extreme Wide Shot)",
            "action": "Camera slowly pushes from city panorama to protagonist's back on rooftop",
            "emotion": "Lonely, contemplative",
            "lighting": "Backlit silhouette, city neon lights just lit"
        },
        {
            "scene_no": 2,
            "location": "Rooftop",
            "time": "Dusk",
            "duration": "8seconds",
            "shot_type": "Medium Shot (Medium Shot)",
            "action": "Protagonist turns around, reveals tired but determined eyes",
            "emotion": "Determination",
            "lighting": "Side light outlines silhouette, face half-lit half-shadowed"
        },
        {
            "scene_no": 3,
            "location": "Rooftop",
            "time": "Dusk",
            "duration": "5seconds",
            "shot_type": "Close-up (Close-up)",
            "action": "Protagonist's palm opens, blue holographic projection appears in palm",
            "emotion": "Surprise, awakening",
            "lighting": "Blue holographic light illuminates face"
        },
        {
            "scene_no": 4,
            "location": "Rooftop",
            "time": "Dusk",
            "duration": "12seconds",
            "shot_type": "Over-the-shoulder Shot (Over-the-shoulder)",
            "action": "View holographic projection expanding from behind protagonist's shoulder, showing city map and red alerts",
            "emotion": "Tense, sense of mission",
            "lighting": "Holographic projection light + city neon reflection"
        }
    ]
}

print("Step 1 Complete: Script broken down into 4 scenes")
for scene in script_breakdown["scenes"]:
    print(f"Scene {scene['scene_no']}: {scene['shot_type']} | {scene['action']}")
Scene Planning Tips:
- Use extreme wide shots at opening and ending to establish spatial sense
- Use more close-ups at emotional climax to capture details
- Use shot-reverse-shot or over-the-shoulder shots for dialogue scenes
- Use moving shots for action scenes to enhance dynamism
🚀 Quick Start: It is recommended to use APIYI apiyi.com platform's script parsing functionality. The platform supports uploading PDF/Word format script files, AI automatically identifies scene divisions and generates preliminary storyboard suggestions, no need to manually write scene data structures, can complete script breakdown stage in 5 minutes.
Step 2: Character and Scene Reference Material Preparation
Core Principle: Provide clear character appearance and scene style references, ensure visual consistency throughout entire storyboard.
Reference Material Types:
Character Reference Images (Character Reference):
- Front, side, back views of main characters
- Different emotional expression references
- Typical action poses
- Clothing detail close-ups
Location Reference Images (Location Reference):
- Real location photos or concept images of main shooting scenes
- Different angles and time periods of scenes
- Key props and environmental elements
Style Reference Images (Style Reference):
- Color tone and lighting style references (film screenshots, photography works)
- Composition and cinematic language references
- Overall visual atmosphere references
Practical Code:
# Step 2: Prepare character and scene references
import PIL.Image

# Character reference images (protagonist - future warrior image)
character_ref_images = [
    PIL.Image.open("protagonist_front.jpg"),    # Front full body
    PIL.Image.open("protagonist_face.jpg"),     # Facial close-up
    PIL.Image.open("protagonist_uniform.jpg")   # Uniform details
]

# Location reference images (future city style)
location_ref_images = [
    PIL.Image.open("future_city_rooftop.jpg"),  # Rooftop scene
    PIL.Image.open("hologram_interface.jpg"),   # Holographic interface style
    PIL.Image.open("neon_cityscape.jpg")        # Neon city nightscape
]

# Style reference (cyberpunk + film-level lighting)
style_references = """
Visual Style Reference:
- Blade Runner 2049 cinematography (orange and teal color grading)
- Cyberpunk atmosphere with neon lights and rain-soaked surfaces
- Cinematic shallow depth of field
- Volumetric lighting and god rays
- Anamorphic lens flares
"""

# Encode reference images as base64 or pass directly to API
print("Step 2 Complete: Prepared 3 character reference images + 3 location reference images + style description")
Reference Material Preparation Tips:
- Control character reference image count at 3-5 images, too many will confuse model
- Ensure reference images are high-definition with clear lighting
- Style references can directly cite famous films or photographer works
- Use consistent artistic style, avoid mixing conflicts
💰 Cost Optimization: For budget-sensitive independent creators, can consider calling Nano Banana Pro API through APIYI apiyi.com platform. The platform provides reference image library functionality, includes common character types (sci-fi warrior, fantasy mage, modern workplace, etc.) and scene types (city, nature, indoor, etc.) presets, can quickly apply without preparing materials yourself, saves pre-production preparation time.
Step 3: Shot-by-shot Generation and Conversational Iteration
Core Principle: Generate storyboards shot by shot in script order, use conversational editing to maintain scene and character coherence.
Storyboard Generation Process:
# Step 3: Shot-by-shot generation
storyboard_shots = []

# Generate first shot (establish reference baseline)
scene_1 = script_breakdown["scenes"][0]
prompt_1 = f"""
Create a cinematic storyboard frame for a sci-fi short film:

SCENE: {scene_1['location']} - {scene_1['time']}
SHOT TYPE: {scene_1['shot_type']}
ACTION: {scene_1['action']}
EMOTION: {scene_1['emotion']}
LIGHTING: {scene_1['lighting']}

CHARACTER REFERENCE:
Use the provided character reference images to depict the protagonist.
Maintain consistent appearance: short black hair, tactical future uniform with blue accents, Asian male in early 30s.

VISUAL STYLE:
{style_references}

COMPOSITION:
- Wide cinematic aspect ratio (2.39:1)
- Protagonist silhouette against dramatic sunset sky
- Futuristic city skyline with glowing neon lights in background
- Rule of thirds: protagonist positioned at right third of frame
- Atmospheric depth with layers of buildings fading into haze

TECHNICAL DETAILS:
- Photorealistic rendering
- Shallow depth of field (f/2.8)
- Warm orange sunset gradating to cool blue city lights
- Volumetric atmospheric haze
- Resolution: 4K for storyboard printing
"""

response_1 = model.generate_images(
    prompt=prompt_1,
    reference_images=character_ref_images + location_ref_images,
    resolution="4K",
    thinking_mode=True,  # Enable reasoning mode to optimize shot design
    guidance_scale=8.0   # High guidance strength ensures compliance with description
)

shot_1_image = response_1.images[0]
shot_1_image.save("storyboard_shot_01.png")
storyboard_shots.append(shot_1_image)

print(f"✓ Shot 1 generation complete: {scene_1['shot_type']}")

# Generate second shot (continue based on first shot)
scene_2 = script_breakdown["scenes"][1]

# Use conversational continuation to maintain scene and character consistency
chat_session = model.start_chat(history=[
    {"role": "user", "parts": [prompt_1] + character_ref_images + location_ref_images},
    {"role": "model", "parts": [shot_1_image]}
])

prompt_2 = f"""
Great! Now continue the storyboard sequence:

NEXT SHOT:
- Shot Type: {scene_2['shot_type']}
- Action: {scene_2['action']}
- Emotion: {scene_2['emotion']}
- Lighting: {scene_2['lighting']}

CONTINUITY REQUIREMENTS:
- Keep the EXACT SAME character (same face, same uniform, same hairstyle)
- Same rooftop location and time of day
- Camera has moved closer to the character (from wide to medium shot)
- Character has turned 180 degrees to face camera
- Facial expression: tired but determined, slight frown

MAINTAIN:
- Same visual style and color grading
- Same lighting conditions (sunset backlighting)
- Same atmospheric quality
"""

response_2 = chat_session.send_message(prompt_2)
shot_2_image = response_2.images[0]
shot_2_image.save("storyboard_shot_02.png")
storyboard_shots.append(shot_2_image)

print(f"✓ Shot 2 generation complete: {scene_2['shot_type']}")

# Continue generating shots 3, 4...
# (Same code pattern, maintain coherence through chat_session)
Conversational Iteration Tips:
- Use
chat_sessionmode to let model remember previously generated shots - Clearly state "SAME character", "SAME location" to ensure consistency
- Describe changes between shots (angle, distance, action) rather than repeating all details
- If character appearance starts drifting, can re-reference
reference_images
Common Issue Handling:
# If generated shot unsatisfactory, use follow-up instructions for fine-tuning
follow_up_prompt = """
That's close, but please make these adjustments:
- Make the character's facial expression more intense (furrowed brow, clenched jaw)
- Shift the camera angle slightly lower (looking up at character)
- Increase the rim lighting on the character's silhouette
- Add more volumetric god rays in the background

Keep everything else exactly the same.
"""

response_revised = chat_session.send_message(follow_up_prompt)
shot_2_revised = response_revised.images[0]
shot_2_revised.save("storyboard_shot_02_revised.png")
🎯 Quality Assurance Recommendation: APIYI apiyi.com platform provides storyboard coherence detection functionality, can automatically analyze character consistency and scene coherence between multiple generated shots, and provide optimization suggestions. Enterprise users can configure automated verification processes, ensure entire storyboard 100% complies with director requirements and visual standards.
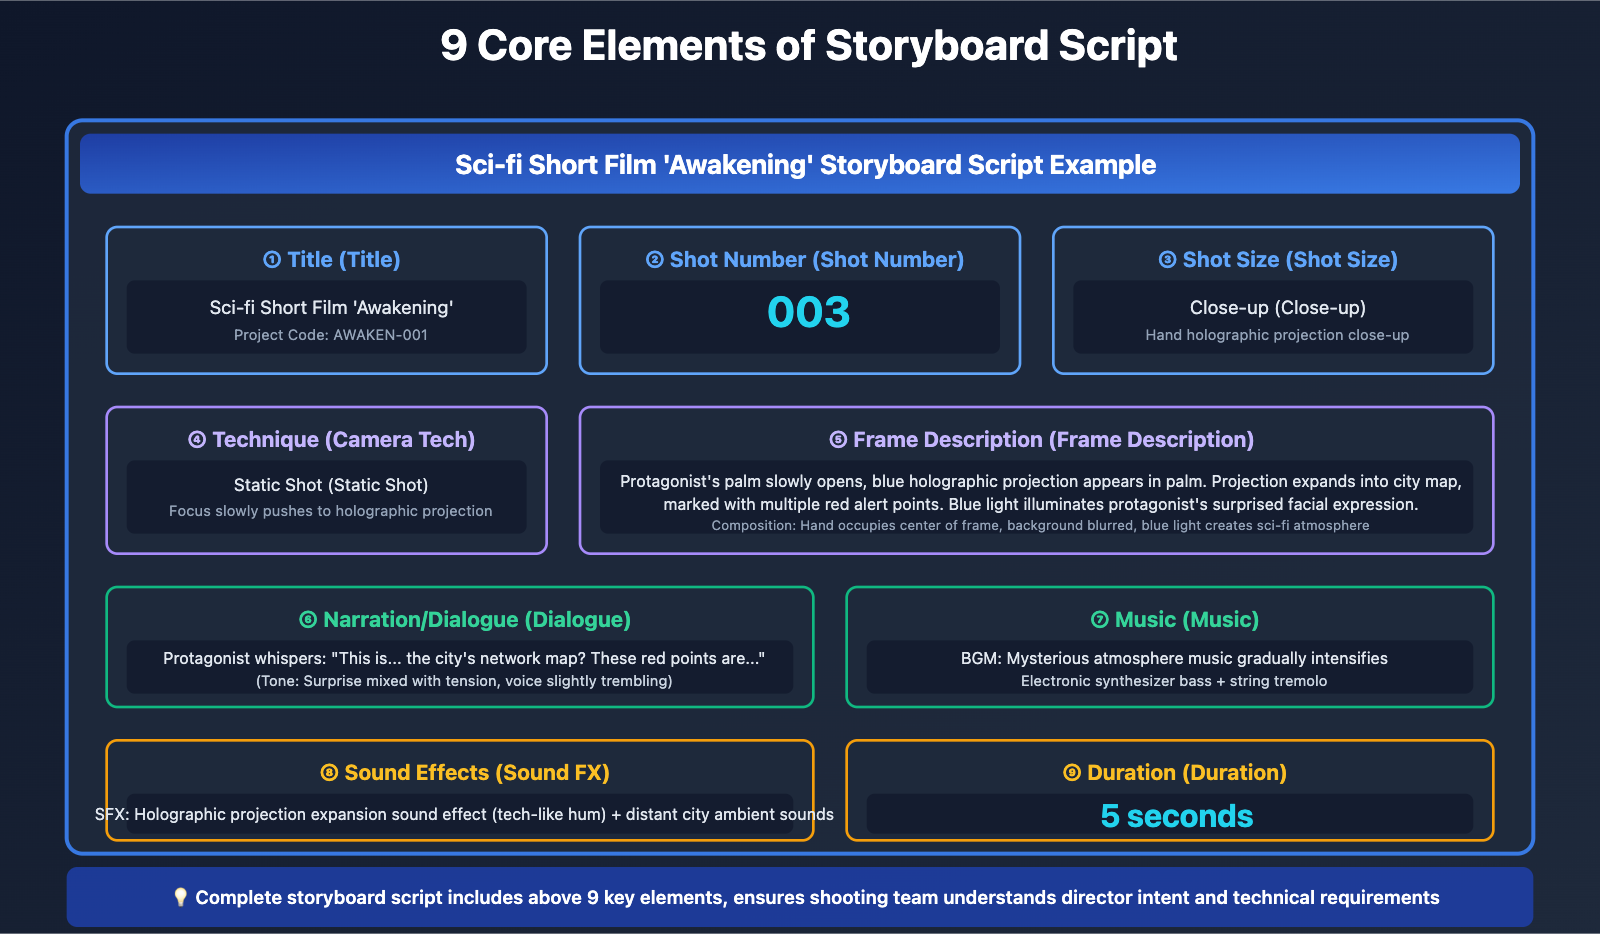
Step 4: Storyboard Script Annotation and Export
Core Principle: Add professional script annotations to generated storyboard images, form complete executable shooting documents.
Storyboard Script Annotation Elements:
Traditional film storyboard scripts contain 9 core elements:
- Title (Title): Project name
- Shot Number (Shot Number): Sequential numbering (001, 002, 003…)
- Shot Size (Shot Size): Extreme wide/wide/medium/close/extreme close
- Technique (Camera Technique): Push/pull/pan/track/follow/rise/fall/whip/static
- Frame Description (Frame Description): Detailed description of frame composition
- Narration (Narration): Voiceover or dialogue text
- Music (Music): Background music cues
- Sound Effects (Sound Effects): Sound effect cues
- Duration (Duration): Seconds per shot
Automated Annotation Code:
# Step 4: Generate complete storyboard script document
from datetime import datetime

def generate_storyboard_script(script_breakdown, storyboard_shots):
    """
    Generate storyboard script document with annotations
    """
    script_output = f"""
================================================================================
                    Storyboard Script STORYBOARD SCRIPT
================================================================================
Title: {script_breakdown['title']}
Total Duration: {script_breakdown['total_duration']}
Creation Date: {datetime.now().strftime('%Y-%m-%d')}
================================================================================

"""

    cumulative_time = 0

    for idx, scene in enumerate(script_breakdown['scenes']):
        shot_no = f"{idx+1:03d}"  # 001, 002, 003...
        cumulative_time += int(scene['duration'].replace('seconds', ''))

        script_output += f"""
┌─────────────────────────────────────────────────────────────────────────┐
│ Shot Number: {shot_no}        Shot Size: {scene['shot_type']:<30} │
├─────────────────────────────────────────────────────────────────────────┤
│ Scene: {scene['location']} - {scene['time']:<38} │
│ Duration: {scene['duration']:<10}  Cumulative Duration: {cumulative_time} seconds{' '*(30-len(str(cumulative_time)))}│
├─────────────────────────────────────────────────────────────────────────┤
│ Camera Technique:                                                               │
│ {scene.get('camera_movement', 'Static Shot (Static Shot)'):<69} │
├─────────────────────────────────────────────────────────────────────────┤
│ Frame Description:                                                               │
│ {scene['action']:<69} │
│                                                                         │
│ Emotional Atmosphere: {scene['emotion']:<59} │
│ Lighting Setup: {scene['lighting']:<59} │
├─────────────────────────────────────────────────────────────────────────┤
│ Dialogue/Narration:                                                              │
│ {scene.get('dialogue', '(No dialogue)'):<69} │
├─────────────────────────────────────────────────────────────────────────┤
│ Music: {scene.get('music', 'BGM: Atmosphere music continues'):<65} │
│ Sound Effects: {scene.get('sfx', 'SFX: City ambient sounds'):<65} │
├─────────────────────────────────────────────────────────────────────────┤
│ Director Notes:                                                               │
│ {scene.get('notes', 'Note: Maintain character clothing and scene lighting consistency'):<69} │
└─────────────────────────────────────────────────────────────────────────┘

[Storyboard Image: storyboard_shot_{shot_no}.png]

"""

    return script_output

# Generate script document
full_script = generate_storyboard_script(script_breakdown, storyboard_shots)

# Save as text file
with open("storyboard_script_awakening.txt", "w", encoding="utf-8") as f:
    f.write(full_script)

print("Step 4 Complete: Storyboard script document generated")
print(full_script)
Export Format Options:
# Export as PDF format (recommended for printing and distribution)
from reportlab.lib.pagesizes import A4
from reportlab.pdfgen import canvas
from reportlab.lib.utils import ImageReader

def export_storyboard_pdf(script_breakdown, storyboard_shots, output_path):
    """
    Export storyboard images and script as PDF
    """
    c = canvas.Canvas(output_path, pagesize=A4)
    width, height = A4

    # Cover Page
    c.setFont("Helvetica-Bold", 24)
    c.drawString(100, height - 100, script_breakdown['title'])
    c.setFont("Helvetica", 12)
    c.drawString(100, height - 130, f"Storyboard Script | Storyboard Script")
    c.drawString(100, height - 150, f"Total Duration: {script_breakdown['total_duration']}")
    c.showPage()

    # Add storyboards page by page
    for idx, (scene, shot_image) in enumerate(zip(script_breakdown['scenes'], storyboard_shots)):
        # Storyboard image (occupies upper half of page)
        img_reader = ImageReader(shot_image)
        c.drawImage(img_reader, 50, height - 350, width=500, height=280)

        # Script information (occupies lower half of page)
        y_pos = height - 400
        c.setFont("Helvetica-Bold", 14)
        c.drawString(50, y_pos, f"Shot Number: {idx+1:03d} | {scene['shot_type']}")

        y_pos -= 25
        c.setFont("Helvetica", 10)
        c.drawString(50, y_pos, f"Scene: {scene['location']} - {scene['time']}")

        y_pos -= 20
        c.drawString(50, y_pos, f"Duration: {scene['duration']}")

        y_pos -= 25
        c.setFont("Helvetica-Bold", 11)
        c.drawString(50, y_pos, "Frame Description:")
        y_pos -= 15
        c.setFont("Helvetica", 10)
        # Text line wrapping
        action_lines = scene['action'].split(',')
        for line in action_lines:
            c.drawString(70, y_pos, line.strip())
            y_pos -= 15

        c.showPage()

    c.save()
    print(f"✓ PDF export complete: {output_path}")

# Execute export
export_storyboard_pdf(script_breakdown, storyboard_shots, "awakening_storyboard.pdf")
Other Export Formats:
- PowerPoint/Keynote: For proposal presentations and team discussions
- Video Preview: Stitch storyboard images into video preview by duration (using FFmpeg)
- Online Collaboration Tools: Export to Frame.io, ShotGrid and other professional tools
🎯 Export Recommendation: APIYI apiyi.com platform provides one-click export functionality, supports output as PDF storyboard script, PPT presentation, video preview and other formats. Enterprise users can directly integrate with project management systems (such as Monday.com, Notion), achieve online collaboration and version management of storyboard scripts.
Step 5: Team Review and Iterative Optimization
Core Principle: Storyboard scripts need review by director, cinematographer, art director, iterate quickly based on feedback.
Review Dimensions:
Narrative Coherence Review:
- Does shot sequence clearly convey story progression?
- Are key plot points fully visualized?
- Are scene transitions natural and smooth?
Visual Consistency Review:
- Is character appearance consistent across all shots?
- Do scene environments match timeline and spatial logic?
- Are color tones and lighting coherent?
Cinematic Language Review:
- Is shot size distribution reasonable (avoid all medium or close shots)?
- Do camera movements serve narrative (rather than showing off)?
- Does composition follow visual guidance principles?
Technical Feasibility Review:
- Can shot design be actually shot within budget?
- Are special effect requirements clearly annotated?
- Are shooting difficulty and time arrangement reasonable?
Rapid Iteration Method:
# Step 5: Iterate and optimize based on feedback

# Example: Director requests modification of shot 3's perspective and emotion
feedback = """
Director Feedback - Shot 003:
- Current perspective too flat, needs increased dramatic tension
- Recommend changing to low angle upward shot, reflect character's awakening power
- Holographic projection blue light should be more intense, illuminate entire face
- Character expression should transition from surprise to determination, eyes more sharp
"""

# Regenerate shot 003
scene_3_revised = script_breakdown['scenes'][2]
prompt_3_revised = f"""
Based on director feedback, revise Shot 003:

CHANGES REQUIRED:
- Camera angle: LOW ANGLE looking up at protagonist (enhance power sense)
- Lighting: INTENSE blue hologram light illuminating entire face (more dramatic)
- Expression: Transition from surprise to DETERMINATION, sharp focused eyes (emotional progression)
- Composition: Protagonist centered, filling more of frame (enhance visual impact)

MAINTAIN FROM PREVIOUS SHOT:
- Same character appearance (exact face, uniform, hairstyle)
- Same rooftop location
- Hologram projection in palm
- Overall visual style and color grading

Shot Type: Close-up
Emotion: Awakening power, determination
Action: {scene_3_revised['action']} (with revised dramatic intensity)
"""

# Continue generation based on previous conversation history
response_3_revised = chat_session.send_message(prompt_3_revised)
shot_3_revised_image = response_3_revised.images[0]
shot_3_revised_image.save("storyboard_shot_03_v2.png")

# Compare versions
print("✓ Shot 003 regenerated based on director feedback")
print("  - Version 1: storyboard_shot_03.png")
print("  - Version 2 (Revised): storyboard_shot_03_v2.png")
Version Management Best Practices:
- Save each iteration as new version (v1, v2, v3…), do not overwrite original
- Annotate modification reason in filename (such as
_low_angle,_intense_lighting) - Record generation parameters and prompts for each version, convenient for backtracking
- Use Git or professional version control tools to manage storyboard files
Batch Modification Tips:
# If need to adjust entire storyboard's color tone style
global_style_adjustment = """
Apply the following style adjustment to ALL future shots:
- Change color grading from orange-teal to blue-purple (more sci-fi cold)
- Increase contrast by 20% (more cinematic)
- Add subtle film grain texture (film texture)
- Maintain all character and scene details unchanged
"""

# Regenerate entire storyboard through new conversation session
# (Code structure similar to Step 3, omitted here)
💡 Collaboration Efficiency Recommendation: Through APIYI apiyi.com platform's team collaboration functionality, can invite director, cinematographer and other members to review storyboards online, directly annotate modification suggestions on platform. Platform automatically records iteration history, supports version comparison and one-click rollback, greatly improves cross-department collaboration efficiency.
Nano Banana Pro Storyboard Generation Best Practices
Shot Types and Shot Size Selection
Application Scenarios of 5 Classic Shot Sizes:
Extreme Wide Shot (Extreme Wide Shot / Establishing Shot)
- Purpose: Establish scene spatial sense, display environment panorama
- Timing: First shot of new scene, during scene transitions
- Example: "Overlooking entire future city, protagonist's building in city center"
Wide Shot (Wide Shot / Full Shot)
- Purpose: Display character full body and surrounding environment, reflect character-environment relationship
- Timing: Action scenes, character entrance or exit
- Example: "Protagonist stands at rooftop edge, full body in frame, city nightscape behind"
Medium Shot (Medium Shot)
- Purpose: Display character upper body, balance environment and character details
- Timing: Dialogue scenes, daily actions
- Example: "Waist-up framing, protagonist turns to face camera, shows determined expression"
Close-up (Close-up)
- Purpose: Focus on character facial expression, convey emotion
- Timing: Emotional climax, key decision moments
- Example: "Close-up protagonist's eyes, blue holographic light reflected in pupils"
Extreme Close-up (Extreme Close-up)
- Purpose: Display extreme detail elements, create tension
- Timing: Suspense buildup, key prop display
- Example: "Extreme close-up protagonist's palm, holographic projection slowly expands in palm"
Shot Size Distribution Recommendations:
- 5-minute short film recommended shot size distribution: Extreme wide 10% + Wide 20% + Medium 40% + Close 20% + Extreme close 10%
- Avoid 3+ consecutive same shot sizes, maintain visual rhythm variation
- Use more medium shots in emotionally stable sections, increase close and extreme close proportion in climax sections
Camera Movement and Narrative Rhythm
7 Common Camera Movement Techniques:
camera_movements = {
    "Push Shot (Push In / Dolly In)": {
        "Effect": "Gradually focus, guide audience attention, create tension",
        "Application": "Emotional progression, critical moment approaching",
        "prompt keywords": "camera slowly pushing in, gradually closer"
    },
    "Pull Shot (Pull Out / Dolly Out)": {
        "Effect": "Reveal larger environment, create surprise or reversal",
        "Application": "Display character's predicament, reveal hidden information",
        "prompt keywords": "camera pulling back, revealing wider environment"
    },
    "Pan Shot (Pan)": {
        "Effect": "Horizontally display space, connect different elements",
        "Application": "Display scene panorama, character gaze follows",
        "prompt keywords": "camera panning horizontally from left to right"
    },
    "Tracking Shot (Tracking / Follow Shot)": {
        "Effect": "Follow character movement, enhance immersion",
        "Application": "Action scenes, when character moves",
        "prompt keywords": "camera tracking character movement, following alongside"
    },
    "Crane Shot (Crane / Pedestal)": {
        "Effect": "Vertical movement, display scene layers or change perspective power",
        "Application": "Scene opening or ending, character state transition",
        "prompt keywords": "camera craning up/down, vertical movement"
    },
    "Whip Pan Shot (Whip Pan)": {
        "Effect": "Rapid transition, create dynamism or time jump feeling",
        "Application": "Rapid scene switching, shock moments",
        "prompt keywords": "rapid whip pan blur transition"
    },
    "Static Shot (Static Shot)": {
        "Effect": "Stable observation, emphasize frame content itself",
        "Application": "Dialogue scenes, static composition artistic frames",
        "prompt keywords": "static locked-off camera, no movement"
    }
}

# Apply camera movement in prompts
prompt_with_camera_movement = """
Shot 005: Medium Shot with Camera Movement

Action: Protagonist walks toward the edge of the rooftop
Camera Movement: TRACKING SHOT - Camera follows protagonist from behind,
                 moving smoothly alongside as they approach the ledge.
                 Camera height: shoulder level
                 Movement speed: slow, steady walk
                 Frame: protagonist occupies right third of frame throughout

This creates immersive feeling as if viewer is following the character's journey.
"""
Camera Movement and Emotional Rhythm Correspondence Table:
| Narrative Rhythm | Recommended Camera Movement | Speed | Effect |
|---|---|---|---|
| Gentle Buildup | Slow push, horizontal pan | Slow | Establish atmosphere |
| Tense Progression | Accelerated push | Medium→Fast | Create pressure |
| Climax Burst | Rapid whip pan, tracking | Fast | Dynamic impact |
| Suspense Reveal | Slow pull | Slow | Extend anticipation |
| Emotional Settling | Static, crane up | Static/Slow | Leave space for thought |
💰 Efficiency Improvement Recommendation: For film teams requiring large-scale storyboard production, can consider calling Nano Banana Pro batch generation API through APIYI apiyi.com platform. The platform supports importing Excel format storyboard script tables, automatically batch generates all shots, compared to manual generation one by one can save 80% time cost, suitable for series, advertisements and other scaled production scenarios.
Character Consistency Maintenance Techniques
Reference Image Optimization Strategy:
# Best practice: Prepare "character card" for main characters
character_card = {
    "name": "Alex Chen (Protagonist)",
    "description": """
    - Gender: Male
    - Age: Early 30s
    - Ethnicity: Asian (Chinese)
    - Build: Athletic, lean muscular
    - Height: 180cm
    - Hair: Short black hair, slightly messy, modern urban style
    - Eyes: Dark brown, sharp and focused gaze
    - Facial features: Strong jawline, slight stubble, small scar above left eyebrow
    - Costume: Dark blue tactical uniform with glowing blue circuit patterns,
               high-tech fabric with slight sheen, fitted design
    - Accessories: Smart wristband on left wrist (always visible)
    """,
    "reference_images": [
        "alex_front_neutral.jpg",
        "alex_profile_determined.jpg",
        "alex_uniform_detail.jpg"
    ],
    "consistency_keywords": "same face, same uniform, same hairstyle, same scar above left eyebrow"
}

# Reference character card in each key shot prompt
def generate_prompt_with_character(scene_description, character_card):
    prompt = f"""
    {scene_description}

    CHARACTER CONSISTENCY (CRITICAL):
    Name: {character_card['name']}
    {character_card['description']}

    VERIFICATION CHECKLIST:
    □ {character_card['consistency_keywords']}
    □ Maintain exact facial features from reference images
    □ Keep costume and accessories identical

    If any detail differs from reference, regenerate.
    """
    return prompt
Multi-character Scene Handling:
# When scene has 2+ characters
multi_character_prompt = """
Shot 010: Two-Character Dialogue Scene

MAIN CHARACTER (Alex - from reference set A):
- Positioned on left side of frame
- Medium close-up
- [Complete Alex feature description]

SECONDARY CHARACTER (Maya - from reference set B):
- Positioned on right side of frame
- Over-the-shoulder partial view from behind
- Female, long black hair, white medical coat
- Only back/side profile visible in this shot

IMPORTANT:
- Keep Alex's appearance EXACTLY as in all previous shots
- Maya is a NEW character, use reference set B images
- Clear spatial separation between two characters
- Maintain consistent lighting on both characters
"""
Common Consistency Issues and Solutions:
| Issue | Cause | Solution |
|---|---|---|
| Character face gradually changes | Model forgets initial features after multiple rounds of dialogue | Re-reference reference images every 5-8 shots |
| Clothing details lost | Prompt does not clearly emphasize clothing | Detail clothing features in consistency_keywords |
| Background scene drift | Scene description not specific enough | Use specific landmarks or geometric features to describe scene |
| Lighting conditions inconsistent | Time continuity not stated | Clearly annotate "same time of day, continuous lighting" |
🎯 Consistency Assurance: APIYI apiyi.com platform provides character consistency detection functionality, uses facial recognition algorithms to automatically compare same character across multiple generated shots, calculates similarity scores. If consistency below 85%, system automatically prompts regeneration, ensures unified character appearance across entire storyboard.
Nano Banana Pro Storyboard Generation Common Questions and Answers
How to Handle Complex Multi-character Group Scenes?
Nano Banana Pro supports up to 5-6 characters in a single shot, but note composition and description strategies:
Recommended Approach:
- Split group scenes into multiple shots: establish space with wide shot first → individual character close-ups → return to wide shot
- Clearly describe each character's position (foreground/middle ground/background, left/center/right)
- Use reference images for main characters, text description only for secondary characters
- Avoid all characters being close-ups or extreme close-ups, utilize depth of field layers
Prompt Example:
complex_scene_prompt = """
Shot 015: Multi-Character Conference Room Scene

COMPOSITION - Three-Layer Depth:
FOREGROUND (Left): Alex (main character, from reference) - close-up side profile
MIDDLE GROUND (Center): Conference table with 3 seated figures (silhouettes, out of focus)
BACKGROUND (Right): Maya (secondary character, from reference) - standing, medium shot

FOCUS: Rack focus technique - Alex sharp in foreground, background soft bokeh

SPATIAL RELATIONSHIPS:
- Alex occupies 40% of frame on left edge
- Table and seated figures create central visual weight
- Maya positioned at golden ratio point on right

LIGHTING: Three-point lighting setup, main light from right illuminating Maya
"""
How to Control Generated Storyboard Frame Aspect Ratio?
Nano Banana Pro supports multiple aspect ratios, adapts to different media platforms:
Common Frame Aspect Ratios:
- 16:9 (1920×1080): Standard video, TV, YouTube
- 2.39:1 (Cinemascope): Film-level widescreen, most cinematic
- 1:1 (1080×1080): Instagram, social media square video
- 9:16 (1080×1920): TikTok, Kuaishou vertical short video
- 4:3 (Traditional TV): Retro style, artistic projects
Specify Ratio in API:
response = model.generate_images(
    prompt=prompt,
    aspect_ratio="2.39:1",  # Film widescreen
    resolution="4K"
)

# Or use specific pixel dimensions
response = model.generate_images(
    prompt=prompt,
    width=2048,
    height=858,  # 2K resolution for 2.39:1
    resolution="2K"
)
How to Ensure Accurate Storyboard Duration Estimation?
Duration estimation in storyboard scripts is crucial for budget and scheduling, can use following methods:
Duration Estimation Formula:
def estimate_shot_duration(shot_type, action_complexity, dialogue_length):
    """
    Estimate reasonable duration of single shot
    """
    base_duration = {
        "Close-up (Close-up)": 3,      # Close-ups usually shorter, 3-5 seconds
        "Medium Close (Medium Close)": 4,
        "Medium Shot (Medium Shot)": 5,    # Medium shots average 5-7 seconds
        "Wide Shot (Wide Shot)": 6,
        "Extreme Wide (Extreme Wide)": 8    # Extreme wide shots need longer time to establish spatial sense
    }

    duration = base_duration.get(shot_type, 5)

    # Adjust based on action complexity
    if action_complexity == "simple":  # Static or simple actions
        duration *= 1.0
    elif action_complexity == "moderate":  # Moderate actions
        duration *= 1.3
    elif action_complexity == "complex":  # Complex actions or camera movement
        duration *= 1.8

    # If has dialogue, increase duration based on word count
    if dialogue_length > 0:
        # Each Chinese character approximately 0.3 seconds (normal speaking speed)
        duration += dialogue_length * 0.3

    return round(duration, 1)

# Usage example
shot_duration = estimate_shot_duration(
    shot_type="Medium Shot (Medium Shot)",
    action_complexity="moderate",  # Character turning action
    dialogue_length=15  # "I can no longer escape, it's time to face the truth" (15 characters)
)
print(f"Estimated Duration: {shot_duration} seconds")  # Output approximately 11.5 seconds
Dynamic Preview Verification:
# Stitch storyboard images into video preview, verify actual viewing duration
import subprocess

def create_video_preview(storyboard_shots, durations, output_path):
    """
    Use FFmpeg to stitch storyboard images into video preview
    """
    # Specify duration for each storyboard image
    concat_file = "concat_list.txt"
    with open(concat_file, "w") as f:
        for idx, (shot, duration) in enumerate(zip(storyboard_shots, durations)):
            shot_path = f"storyboard_shot_{idx+1:03d}.png"
            shot.save(shot_path)
            f.write(f"file '{shot_path}'\n")
            f.write(f"duration {duration}\n")

    # FFmpeg stitching command
    cmd = [
        "ffmpeg",
        "-f", "concat",
        "-safe", "0",
        "-i", concat_file,
        "-vf", "scale=1920:1080",
        "-r", "24",  # 24fps
        "-pix_fmt", "yuv420p",
        output_path
    ]

    subprocess.run(cmd, check=True)
    print(f"✓ Video preview generated: {output_path}")

# Generate preview
durations = [15, 8, 5, 12]  # Duration of each shot (seconds)
create_video_preview(storyboard_shots, durations, "storyboard_preview.mp4")
💡 Duration Optimization Recommendation: Through APIYI apiyi.com platform's video preview functionality, can one-click convert storyboard image sequence to video preview with duration, supports adding temporary sound effects and BGM, convenient for director and clients to intuitively feel actual rhythm. Platform also provides industry standard duration recommendations, automatically optimizes duration allocation based on big data analysis of thousands of films.
Nano Banana Pro vs Traditional Hand-drawn Storyboard vs Other AI Tools Comparison?
| Feature | Nano Banana Pro | Traditional Hand-drawn Storyboard | Midjourney/DALL-E | PixVerse/Runway |
|---|---|---|---|---|
| Generation Speed | ✅ 5-10 sec/shot | ❌ 30-60 min/shot | ⚠️ 10-30 sec/shot | ⚠️ 30-120 sec/shot |
| Character Consistency | ✅ 95%+ (Reference) | ✅ 100% (Hand-drawn Control) | ❌ 60-70% | ⚠️ 80-85% |
| Conversational Iteration | ✅ Supported | ❌ Requires Redrawing | ⚠️ Partially Supported | ⚠️ Limited Support |
| Cinematic Language Understanding | ✅ Professional Terminology Support | ✅ Full Control | ⚠️ Basic Understanding | ⚠️ Basic Understanding |
| Resolution | ✅ 4K | ✅ Adjustable | ⚠️ Limited (1024-2048) | ⚠️ 1080p-2K |
| Batch Generation | ✅ API Support | ❌ Not Applicable | ⚠️ Limited | ❌ Not Supported |
| Learning Curve | ✅ Low (Text Description) | ❌ High (Requires Drawing Skills) | ⚠️ Medium | ⚠️ Medium |
| Cost | Medium (API Calls) | High (Labor Hourly Rate) | Low-Medium (Subscription) | Medium-High (Video Generation Expensive) |
| Narrative Coherence | ✅ Reasoning Mode Optimization | ✅ Full Control | ❌ Weak | ⚠️ Improving |
Best Choice Recommendations:
- Rapid Prototyping/Concept Validation: Nano Banana Pro (Automation + Professionalism)
- Final Execution Storyboard: Hand-drawn Storyboard (Precise Control) or Nano Banana Pro + Manual Refinement
- Artistic Style Exploration: Midjourney (Rich Styles)
- Direct Video Generation: PixVerse/Runway (but character consistency still needs improvement)
Combined Workflow:
- Use Nano Banana Pro to quickly generate initial storyboard (complete 30 shots in 2-4 hours)
- Director reviews and annotates shots needing adjustment
- Use Nano Banana Pro to refine key shots, or hire storyboard artist for hand-drawn refinement
- Keep AI-generated versions for secondary shots
- Final output mixed storyboard script (AI 70% + Hand-drawn 30%)
Summary and Outlook
Nano Banana Pro's storyboard generation capability brings unprecedented efficiency improvements to film production, advertising creativity and video creators. Through the storyboard generation 5-step method introduced in this article, creators can achieve:
- Efficiency Improvement: Reduce from weeks of hand-drawn production to 2-4 hours of automatic generation, pre-production cycle shortened 40-60%
- Consistency Assurance: 95%+ character appearance consistency and scene coherence
- Professional Expression: Supports film-level cinematic language and narrative logic, output quality reaches professional storyboard artist level
- Rapid Iteration: Conversational editing allows unlimited modifications, responding to director feedback takes only minutes
As Gemini 3 Pro series models continue to optimize, we expect storyboard generation functionality will be further enhanced:
- Support longer storyboard sequences (currently recommend 30-50 shots, future can expand to 100+ shots)
- Provide 3D preview and virtual camera functionality (preview shot angles before generation)
- Real-time collaborative editing (multiple people simultaneously annotate and modify storyboard scripts)
- Direct integration with video generation tools (storyboard → dynamic preview video one-click generation)
For film creators and video teams, now is the best time to adopt AI-assisted storyboard production. Recommend starting testing with small projects (advertisements, short films), gradually build your own storyboard template library and workflow, fully leverage Nano Banana Pro's unique advantages in automation and professionalism.
🚀 Start Now: Recommend quickly experiencing Nano Banana Pro storyboard generation functionality through APIYI apiyi.com platform. The platform provides free trial credits, supports online script input and storyboard preview, can start experimenting without writing code. Film teams can apply for customized storyboard templates and batch generation solutions, accelerate film project transformation from script to visual storyboard.